NCD Sensors Email Notifications Using Node-RED

Introduction

With a multitude of communication methods available, each offering its unique advantages, it’s crucial to evaluate the scenarios where email is most effectively utilized for IoT integration. Emails excel at delivering updates or notifications that do not demand an immediate response, making them particularly suitable for IoT situations where swift reactions are not required. Additionally, emails offer a clear and reliable record of communication, which is vital for satisfying compliance requirements and meeting audit standards in regulated IoT industries. They also accommodate longer messages and file attachments, making them ideal for distributing comprehensive reports, logs, or documents in IoT applications. Furthermore, emails facilitate the delivery of notifications to multiple recipients simultaneously, ensuring that IoT messages reach users efficiently across various locations.

In this article, we will cover how to send email notifications and alerts for NCD sensors using Node-RED. We will set limits so that when the value of a variable exceeds or falls below these limits, an email notification or alarm will be triggered to indicate that something is wrong with the monitored field element.

In this basic example, we will set limits, but you should note that this basic example can be modified to meet your specific application. 

For instance, you can include a complete report on the behavior of a variable as a file attachment within the same email. Additionally, you can send the same email notification or alert to multiple recipients. For example, if the vibration value of a specific motor or the temperature of a food warehouse exceeds predefined limits, you can develop a logic to send notifications to the maintenance, quality, and production teams. Stay tuned, in our next articles or explore some of our actual articles:

Requirements

Overview

The next image visually depicts the system architecture outlined in this article. NCD Industrial IoT sensors gather data from field elements such as AC current, vibration, temperature, pressure, or level, then wirelessly transmit it via Digi-Mesh to the Enterprise IIoT Gateway or Industrial IoT Wireless Modem. Node-RED processes this data, establishing predefined limits or ranges. When values exceed these thresholds, the system sends basic email notifications to one or more recipients.

Email notification nodered overview

Setting Gmail Account

1. Begin by specifying both the sender and recipient email addresses. For simplicity, you can use the same address for both.

This example uses a Gmail service. If you prefer a different email service, consult the relevant documentation.

2. To enable email notifications, you’ll need to create an app password. First, activate two-factor authentication (2FA) in your Gmail account. Then, navigate to your Google Account settings to generate the app password.

Gmail Managae Accout

3. In search box type “app passwords” and select the “App passwords -security” option in results:

Gmail App passwords

4. You will see the following window, where you can create your “app passwords”:

Gmail create a new app specific password

5. You can give it a name or ID to your “App password” in order to identify what application will use this credentials, in this article we use the ID/name “node-red-email-notification”:

Gmail App Passwords

6. Name your app password and click “Create.” Google will generate a unique password. Carefully save this password for future use.

7. Click “Done,” and your newly created app password will appear under “Your app passwords.”

Gmail App password created

You now have the necessary email credentials to configure Node-RED for sending email alerts. Access Node-RED and install the required library to proceed.

Setting Node-RED

The Enterprise IIoT Gateway and Enterprise IIoT Gateway Lite come pre-installed with Node-RED, ready for use. Access the Node-RED interface by following the provided documentation.

If you are using the Industrial IoT Wireless to USB Modem or the Industrial IoT Wireless to Ethernet Modem, you should install Node-RED in your local PC, you can follow the next documentation:

1. To install the necessary email library, access the Node-RED menu and select the “Manage palette” option.

Nodered Menu and Manage Palette

2. Then, click the “Install” tab in the next window.

email nodered install tab

3. In the search bar, type “node-red-node-email” and click “Install.”

nodered install node-red-node-email

4. This will initiate the installation process. Confirm the library installation when prompted.

5. Once the installation completes, a message indicating the email library’s addition to the nodes palette will appear at the top center of the window.

6. To close the user settings window, click the “Close” button.

nodered email library close user settings tab

7. Confirm the email library installation by navigating to the “social” group in the nodes palette. You should find the newly installed nodes there.

nodered email notification node palette

Configuring Email Node

1. Drag and drop the email node onto the workspace and click on it.

nodered email notification tooltip

2. Double-click the “email” node to open its properties.

nodered email node properties
Understanding Email Node Properties

Name: you can assign an identifier/name to this node in order to identify it inside your workspace, this is useful when you have many of these same nodes in your work space.

To: The default message recipient can be configured in this property, simply type the address of the recipient.

Server: This property specifies the outgoing mail server address provided by your email service provider. It often follows the format smtp.example.com. Understanding the communication protocols associated with these server settings is essential.

  • SMTP (Simple Mail Transfer Protocol): Responsible for sending outgoing email messages from the sender’s email client or application to the recipient’s email server.
  • POP3 (Post Office Protocol version 3): Downloads messages to the client, typically deleting from the server.
  • IMAP (Internet Message Access Protocol): Access and manage email directly on the server, syncing across devices.

Port: This property specifies the port number used to connect to the mail server.

Ports for outgoing emails:

  • 465: This is the SMTP port for SSL-encrypted connections.
  • 587: This is the SMTP port for TLS encrypted connections (STARTTLS).
  • 25: This is the default SMTP port, but ISPs often block it for security reasons.

Ports for incoming emails, the default ports are:

  • 993: IMAP port for SSL-encrypted connections.
  • 143: IMAP port for plain TCP connections.
  • 995: POP3 port for SSL-encrypted connections.
  • 110: POP3 port for plain TCP connections.

Use Secure Connection: Enabling this option secures your email connection by encrypting it using Transport Layer Security (TLS). Strongly consider activating this feature to safeguard your email communications.

For ports 587 or 25, if the mail server supports the STARTTLS extension (which upgrades a plain text connection to an encrypted one), you should leave this option disabled.

Auth Type: This property specifies the authentication method required by your email service provider.

  • Basic: This method requires a username and password to authenticate with the mail server.
  • XOAuth: This method requires a username and access token, typically used for OAuth authentication.
  • None: Use this option if your mail server does not require authentication. However, this is rare and generally not recommended for outgoing mail servers.

Userid: This property contains the email address that Node-RED must access to send email notifications or alarms (the email sender).

Password:  This property contains the “App Password” generated in Gmail, which complements the required credentials (username and password) from Node-RED to access your email account.

TLS Option: Enabling this option verifies the email server’s SSL/TLS certificate, ensuring secure communication.

Gmail Configuration Details

Finally to integrate your Gmail account with Node-RED, you’ll need specific Gmail configuration details.

  • To: Your Gmal Address recipient.
  • Server: For outgoing emails smtp.gmail.com 
  • Port: Either 465 (SSL) or 587 (TLS).
  • Userid: Your Gmail address, e.g., example@gmail.com. (The sender’s email address)
  • Password: (The app-specific password generated earlier). To access your Google account with apps or devices, you’ll need to enable and generate an app password. Ensure each Node-RED application uses a unique app password.

3. Enter the email address of the recipient you want to send the email notification to in the ‘to’ input field.

4. Enter the server address as smtp.gmail.com into the server input field.

5. Enter port 465 to use SSL-encrypted connections and 587 for TLS-encrypted connections. You can use either of them.

6. Enable Use secure connection.

7. Select the auth type as “basic“.

8. Type the email account you are using as the sender.

9. Copy and paste the “App Password” generated in Gmail Account in the first part of this article. (This password will be shown in password mode in order to secure it).

10. Enable “Check server certificate is valid” box.

Finally you might have something like this:

(Optional) Set Environment Variables for Secure Email Configuration

For enhanced security, consider storing destination email, sender email, and password as environment variables within Node-RED’s settings.js file. This approach safeguards sensitive information, preventing accidental exposure to anyone accessing the Node-RED editor. We will provide instructions for both Enterprise IIoT Gateway (Linux-based) and Industrial IoT Wireless to USB/Ethernet Modem (Windows PC) users.

Enterprise IIoT Gateway

1. To access the Enterprise IIoT Gateway via SSH, follow this guide:

To SSH access from Windows PC Open a new Command Prompt window and use the following command:

ssh <userName>@<ipAddress> or <hostName>

2. Once connected to the Enterprise IIoT Gateway via SSH, use the following command to access the “settings.js” file:

sudo nano .node-red/settings.js

3. You’ll need to set the environment variables at the beginning of the file as shown in the following image:

Nodered Settings file env variables

To set environment variables in this file the syntax is the following:

process.env.<environmentVariableName>=”<value>”;

4. To exit the text editor, press Ctrl+X, then confirm by typing “Y” and pressing Enter to save your changes.

Environment variables email notification nodered
Environment variables nodered email notification

5. You need to restart Node-RED. To restart Node-RED, use the following command:

				
					pm2 restart all
				
			
For Industrial IoT Wireless to USB/Ethernet Modem with Windows PC.

1. You need to access the “.node-red” folder located at: C:\Users\<yourUsername>\.node-red

Nodered email notification environmental variable

2. You’ll find a file called “settings.js” within that folder. Right-click on it and select “Edit.”

Nodered email notification environmental variable

3. Upon opening the file, you’ll see a configuration section where you’ll add environment variables for your email credentials.

Nodered email notification environmental variable

4. You’ll need to set the environment variables at the beginning of the file as shown in the following image:

Nodered email notification environmental variable

5. To save changes, select “File” and then “Save” from the menu.

Nodered email notification environmental variable

Return to the email node and configure the “to,” “user ID,” and “password” fields using the corresponding environment variables.

You have to use the format: ${<nameOfEnvironmentVariable}

Nodered Email notification with environment variables

Finally click on the “Done” button.

nodered Email notification password

Testing communication

Before configuring variable ranges and integrating email notifications for your NCD sensors, consider testing the email functionality first. Use an Inject node to manually trigger a simulated alarm and confirm successful email delivery using your configured credentials.

1. Drag and drop an Inject node onto your workspace.

Nodered email notification testing flow

2. Double-click the Inject node to open its properties and set the “msg.topic” property to “NCD Email Notification”.

Nodered Email notification inject node

The “msg.payload” property will contain the email content. For this test, use the current timestamp as the message content.

The “msg.topic” property will be the subject of your email message. For this test, use “NCD Email Notification,” but you can customize this later.

Click “Done,” then connect the output of the Inject node to the input of the email node.

Nodered Email notification flow connection

3. To save and apply your changes, click the “Deploy” button.

nodered Deploy button

4. Click the button on the left side of the Inject node to activate it.

Nodered Email notification test flow

5. After activating the Inject node, you should see a “sending” status displayed on the NCD Email node.

Nodered Email notification test flow

6. You should see that a new email has been received in your Gmail account, something like this:

Gmail Email notification test

Set Limits

Let’s define variable ranges to trigger email notifications based on value thresholds. We’ll use the versatile “Switch” node to set these conditions, acting as an “If-Then” statement.

Switch node

To use the “Switch” node, drag and drop it from the function node group onto your workspace.

Nodered Switch node

Double-click the “Switch” node to access its properties.

The Switch node evaluates incoming messages against defined rules. When a match is found, the message is forwarded to the corresponding output.

Here we explain properties we use in this example:

The Switch node’s “Property” field determines the message property used for evaluation. This property’s value is compared against defined rules to direct the message flow.

Value rules: You can select specific rules to filter messages based on their properties. Some rules require a reference value for comparison. For instance, if you set the rule to “==”, the Switch node will check if the incoming message’s payload value matches the specified value, in order to compare if the value of the “msg.payload” property is equal to a defined value. Let me show you an example if you define this:

Nodered Switch node properties

When a new message arrives, the Switch node evaluates the “msg.payload” property. If this value equals “10”, the message flows to output 1. Otherwise, the message doesn’t proceed to any output.

You can add new evaluation rules by clicking the “add” button to create additional outputs. (This action dynamically creates a new output within the node).

Nodered Switch node

If you define an “otherwise” rule, the Switch node evaluates the “msg.payload” property. If the value matches “10,” the message flows to output 1; otherwise, it flows to output 2.

Nodered Switch node example

In this gif you can see this concept as visual way:

Nodered Switch node demo

With a basic understanding of the Switch node, you can create custom rules to trigger email alarms. This example uses the Industrial IoT Wireless AC Current Monitor Sensor, but the concept applies to other NCD sensors.

Integrate NCD Sensors

We’ll begin by configuring the basic NCD setup, incorporating a “Wireless Gateway” node to connect with Wireless DigiMesh modules via serial or Ethernet ports (depending on your NCD device). This enables the system to receive incoming data from NCD sensors.

  • The Enterprise IIoT Gateway.
  • The Industrial IoT Wireless to USB Modem
  • The Industrial IoT Wireless to Ethernet Modem

When your configured Wireless Gateway node is ready, incoming NCD messages will appear in the Debug window. As shows in the following image:

Nodered NCD WirelessGateway node

As previously mentioned, we used an Industrial IoT Wireless AC Current Monitor Sensor for this example, but any other NCD Enterprise sensor can be substituted.

Filter by MAC Address

If you plan to deploy multiple NCD sensors, filtering messages by Device MAC Address becomes essential. This prevents confusion as all messages pass through the Wireless Gateway Node.

To filter messages by device MAC address, add a Switch node to your workspace.

In the Debug tab, you’ll see all incoming sensor data. Expand each message to view properties like nodeId, firmware version, battery percent, and the crucial “addr” property, which contains the device’s MAC address.

Inside the message in the debug tab, you’ll see the NCD sensor property names in purple, and their corresponding values in blue (numbers) and red (text).

Go back to the ‘addr’ property. Hover over it and click the ‘copy path’ button to copy the path to this property, as illustrated in the image below:

Nodered switch node to filter by mac address

Each NCD IIoT sensor within Node-RED sends, among other things, its MAC address. You can utilize this property (or any other) to develop your logic within a Node-RED application. In this case, we will use this property in conjunction with a ‘Switch’ node to filter messages.

Once you’ve copied the property path from the debug window, which displays the complete sensor message, paste this path into the “Property” field within the Switch node, as shown in the image.

Nodered Switch node as filter mac address

The next step now is to establish the rules. You will need to define against which value the message value set in the “property” property will be compared. For this, what we want is to only obtain the messages that come from the NCD IIoT Current sensor, so we must copy the value of its MAC address and paste it into the property as shown in the following images:

Nodered switch node filter by mac address
Nodered Copy value Mac Address

A complete visual example within Node-RED of this process is shown in the following GIF image, where it is shown how to stop the visualization in the debug tab of the incoming messages using the debug node, in order to later visualize, know, and use the identifiers of the complete data emitted by the NCD sensors to use them within our logic.

Copy path and value from debug tab

Once you’ve finished this, you can assign a name or identifier to the “switch” node to identify it within your Node-RED flow. To save the changes made, click the “Done” button:

Switch node done

Now, as you know, within our enterprise IIoT Sensors line, we offer sensors that provide functions to measure different types of variables such as: temperature, vibration, electric current, voltage, pressure, among many others. And in some cases, we even offer sensors with 1, 2 or even three measurement channels/probes.

Therefore, you must take into account and specifically define which channel or type of variable you want to be evaluated to trigger an email notification. Being a very versatile tool, Node-RED also allows you to evaluate if two or more variables exceed the limit you set, so an email notification can also be sent.

For this example, we are using a single-channel sensor. We are going to focus on evaluating the value of this channel so that it can function as a trigger for the email notification in case it exceeds the established limit.

As we have mentioned, we will use a “Switch” node and the “msg.payload.sensor_data.amps” property.

You should add a new switch node and connect the output of the “Switch Device” node to the input of this new node. Then double-click on the node to access its properties:

You should copy the desired path from the ‘debug’ window. In this case, it is: ‘msg.payload.sensor_data.amps

Then, paste the path into the “Property” property. Remember, this is the property that the Switch node will evaluate as soon as a new message arrives.

The next step is to define the rules. In this case, we will set limits, so we will use the “>” operator, which will indicate that if the value of the property “msg.payload.sensor_data.amps” is greater than a value (which we will set later in the text input box), then the message will flow through output 1 of the Switch node.

Nodered Switch node rules

As mentioned before, for some rules, it’s necessary to complement with a set value. In this case, it must be a numeric value. Therefore, on the left side of the text input box, there’s a dropdown that allows you to select the data type. In this case, we will use “number”.

Nodered Switch node type of rule

Now, for this example, we’re going to set the reference limit value to 40.

It will depend on your application, but you may want to execute another block of logic in case the value of the variable you are evaluating is within the correct operating range, that is, in this specific example, when the variable is less than 40. To do this, you can use the same switch node. First, click on the “Add an item” button:”

Nodered Add Item Switch node

This will add a new field within the rules box, as well as a new output terminal in the switch node. Here, we will be able to establish a new rule, in this case, we will use the “otherwise” option:

Therefore, the final logic will be: if the value contained in the property “msg.payload.sensor_data.amps” is greater than “40”, then the message will go through output 1 of the switch node, but if the value contained in the property is less than “40” (otherwise), then the message will flow through output 2 of the switch node. Add a name for the node in this case we used “Current Limit”. To save the changes, you should press the “Done” button:

You can see that the flow is as follows:

Nodered Email notification Flow

Now that we have the basic logic for our project, we need to add the “email” node and connect output 1 of the “Current Limit” node (which will activate when the value of the property “msg.payload.sensor_data.amps” is greater than 40) to the input of the “email” node.

Next, depending on your application, but as an example, we will connect a “Debug” node to output 2 of the “Current Limit” Switch node. In this case, just to verify that messages flow to this output when the value of the property “msg.payload.sensor_data.amps” is not greater than 40:

Nodered Email notification flow

Since we are focusing on the property “msg.payload.sensor_data.amps” which contains the current value, and for now we are not interested in focusing on the complete sensor message (nodeid, firmware version, battery, sensor type.. etc). We are going to configure the newly added debug node so that it only shows us this value in the debug tab and not the complete message as it has been doing. To do this, we must tell it which property we want to display, so we access again and copy the path of interest within the debug tab:

Nodered Copy path Current sensor

Then, access the properties of the debug node and paste this property into the “Output” field (it is also possible to enter the property directly by text, if you already know the name of the property you are interested in).

Nodered Debug node set Output property

To save the changes, click on the “Done” button:

Nodered Done button Debug node

Now we are going to configure the “debug 2” node to visualize the value of the property “msg.payload.sensor_data.amps” but only within the node itself and not be displayed in the debug tab. 

This modification is so that only the messages received by the “debug 3” node are displayed in the debug tab, remembering that this node will only be activated when the current value is not greater than 40.

The first step is to disable the “debug 2” node by pressing the button next to the node on the right. This disables sending messages to the debug tab:

Nodered Disable Debug node

Now you should access the properties of the debug 2 node by double-clicking on the node:

Nodered Access debug properties flow

We will focus on the property “msg.payload.sensor_data.amps” and, like the “debug 3” node, we will set the “Output” property:

Nodered Add output property Debug node flow
Nodered setting Output property debug node

Now, before pressing the “Done” button, enable the “node status” option. This option allows you to visualize incoming messages to this node within the workspace, right below the node (we will see this later).

Nodered Enable Node status in Debug node
Nodered Done button Debug node

The next step to save and apply the changes made to our flow, click on the “Deploy” button:

You can clear the messages present in the “debug” window by pressing the “Clear messages” button within the “debug” tab, as shown in the following image:

Nodered NCD Email notification flow undefined message

As soon as the NCD current sensor sends new data, you will be able to observe something like the following:

Nodered NCD Email notification Debug tab

Just below the Debug 2 node, you will be able to see all the current values emitted by the sensor. And within the debug tab, you will be able to see only the messages coming from the “debug 3” node that are not greater than 40.

Nodered NCD Email notification flow Debug nodes

Now, when the NCD current sensor sends a value greater than 40 Amps, we can observe in the debug node “debug 2” that the message flows through the “Device” switch node to filter by MAC. Then, the message flows through the “Current Limit” switch node where it is evaluated and, being a value greater than 40 Amps, the message then flows through output 1 of the “Current Limit” switch node. Finally, this message activates the “NCD Email” node, causing an email to be sent with the established credentials. You can observe the status “Sending” just below the “NCD Email” node.

Nodered Email notifications Sending status

If you check the email account, you could see something like this:

If you open the email, you should see something like this:

Understanding the Email Information

We are going to explain each part of the email received from Node-RED.

Email Subject: In this case, we can see that the email subject is defined as “sensor_data”. Why is that? Because the “email” node uses the content of the “msg.topic” property as the value to set the email subject. Therefore, when the NCD sensors send data to Node-RED, the “msg.topic” property is set to “sensor_data”. But the good news is that we can modify this property at the input of the “Email” node to our liking.

Email Content: We can see that the email content is a series of data, where we can perceive; the nodeId, Firmware version, battery percent, among others. It will depend on your application, but probably we are only interested in knowing the current value within the email content.

To condition the incoming message for the “Email” node, we will use a very useful node called “Change”:

Nodered Change node

This node allows us to set, change, delete, or move properties of a message.

You will need to insert a Change node into your workspace and connect it between output 1 of the “Current limit” switch node and the input of the “NCD Email” node:

Nodered NCD Email notification flow

The process to insert a node between an existing connection or to remove the connection and reconnect it to a node is shown in the following images:

Nodered Change node to workspace
Nodered

Within this change node, we are going to set/condition the message that will serve as the input for the “NCD Email” node. To do this, we will reset the properties “msg.topic” for the message subject and “msg.payload” for the message content.

We access the properties of the change node, and you can assign it a name. Then, within the rules box, we will set the property “msg.topic” with the text “NCD Sensor Alert – Exceeded Threshold”. Since we also want to reset the property “msg.payload”, we will add a new item by clicking the “Add Item” button, as shown in the following image:

Nodered Change node add new item

For the “msg.payload” property, we will use a special data type called “JSONata”. This will allow us to add and concatenate some text and the current value within the same message. In the text type, you should select the option “J: expression:

Now, inside the text field we will add the following:

“The NCD IIoT Current sensor has detected a value of:  (“&(payload.sensor_data.amps)&”) Amps. Device MAC: (“&payload.addr&”)”

This allows us to customize a text and concatenate it with the current values (which are located within the property “msg.payload.sensor_data.amps” and the device’s MAC address, which is located within the property “msg.payload.addr”.

Now, to save and apply the changes to our flow, we need to press the “Deploy” button:

NCD Nodered Email notification Deploy Flow

We will be able to see that if there is an increase in the current that exceeds the 40-amp limit, then an email notification will be sent. However, now we can see a more appropriate message.

NCD Nodered Email notification flow

Go to your Gmail account and you can see a new message. Now, the subject of the message is displayed as “NCD Sensor Alert – Exceeded Threshold“, which is the value we set in the “msg.topic”

NCD Gmail Email notification

Now, if we access the content of the message, you can see a more appropriate message where we only observe the values that interest us (in this example), which is the current value at the time of the alarm and the MAC address of the device that sent this signal.

NCD Gmail Email notification

As a reference you can copy the following flow:

				
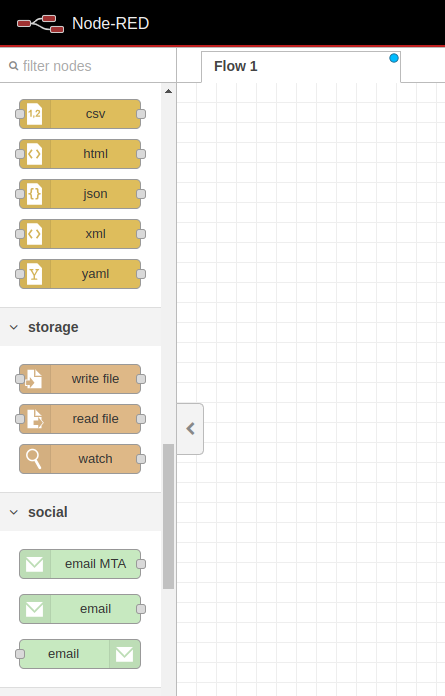
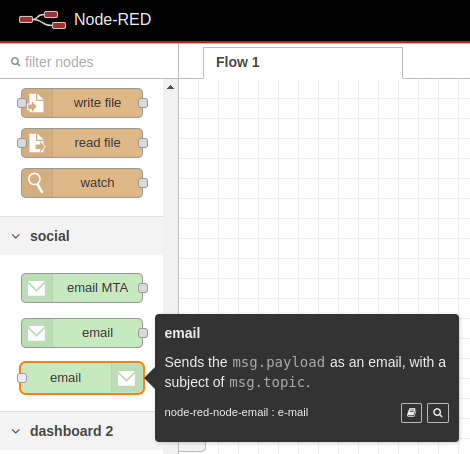
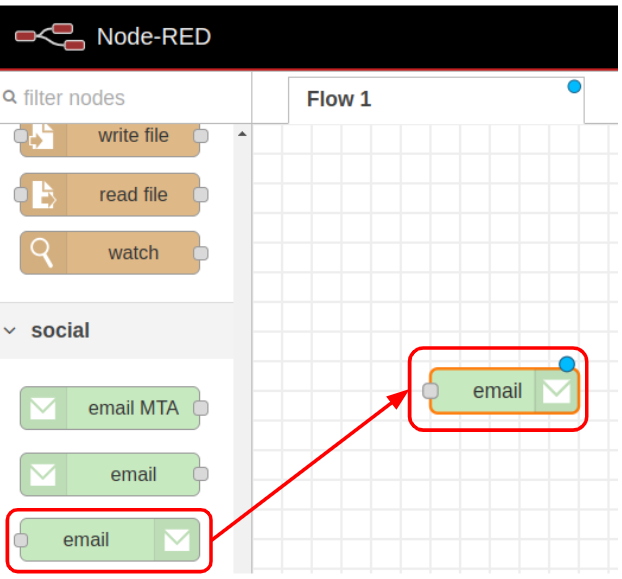
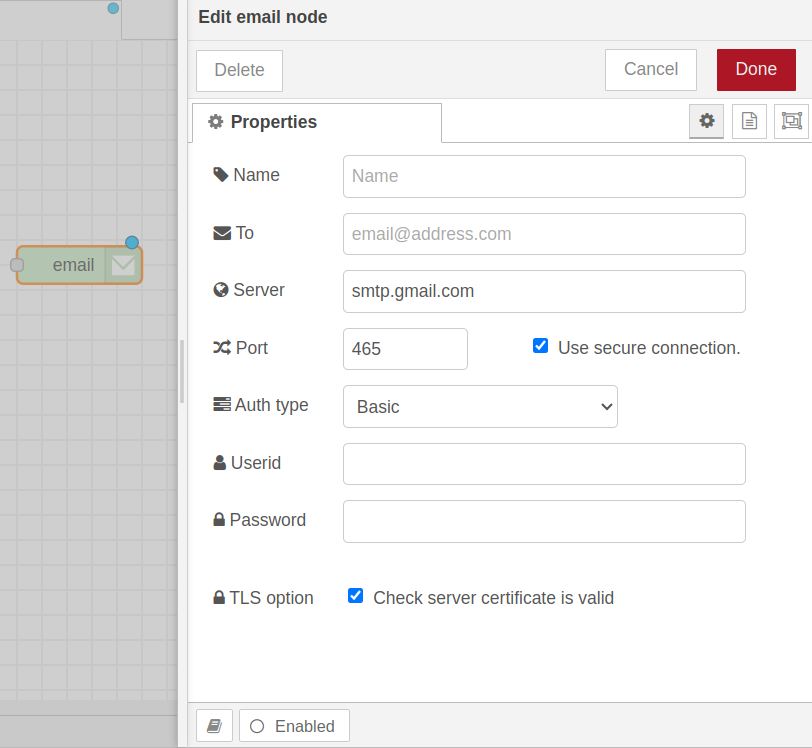
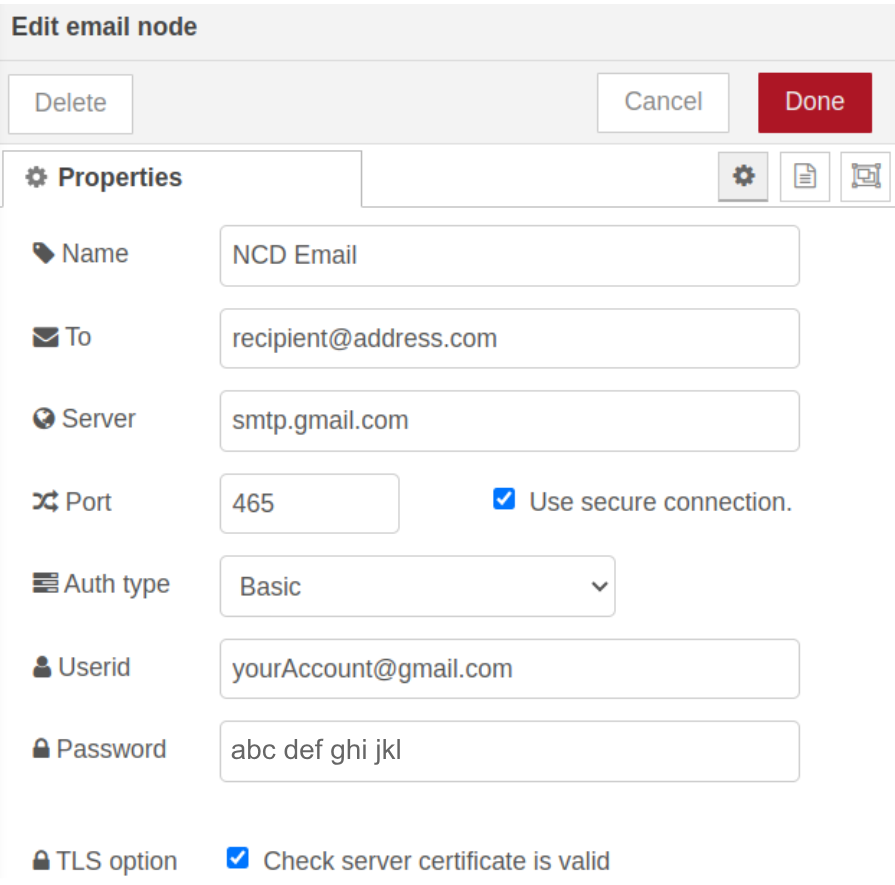
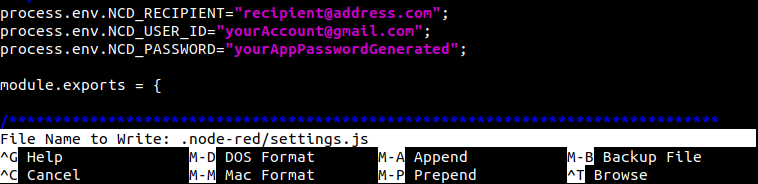
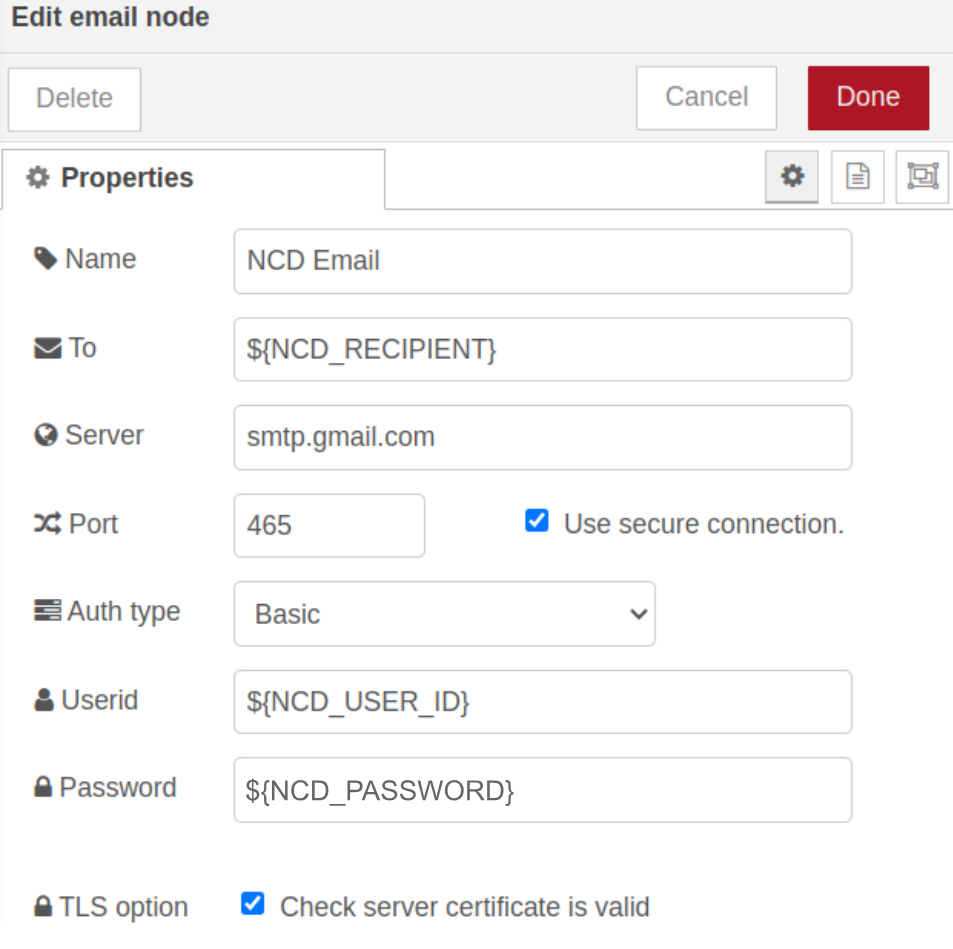
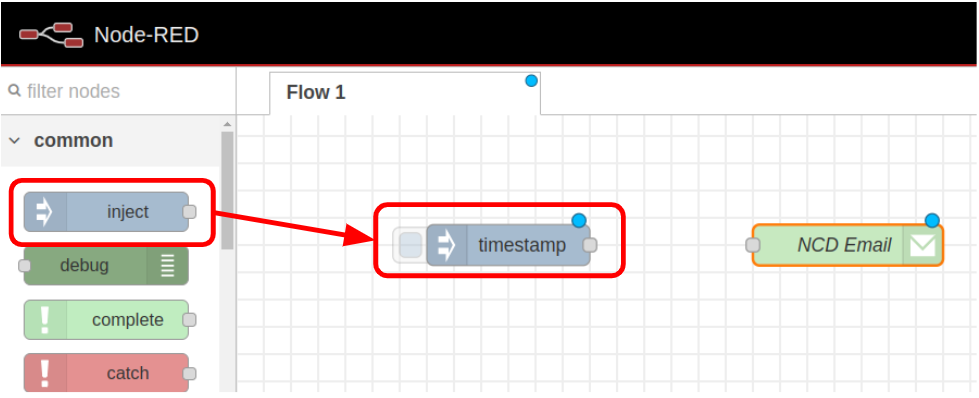
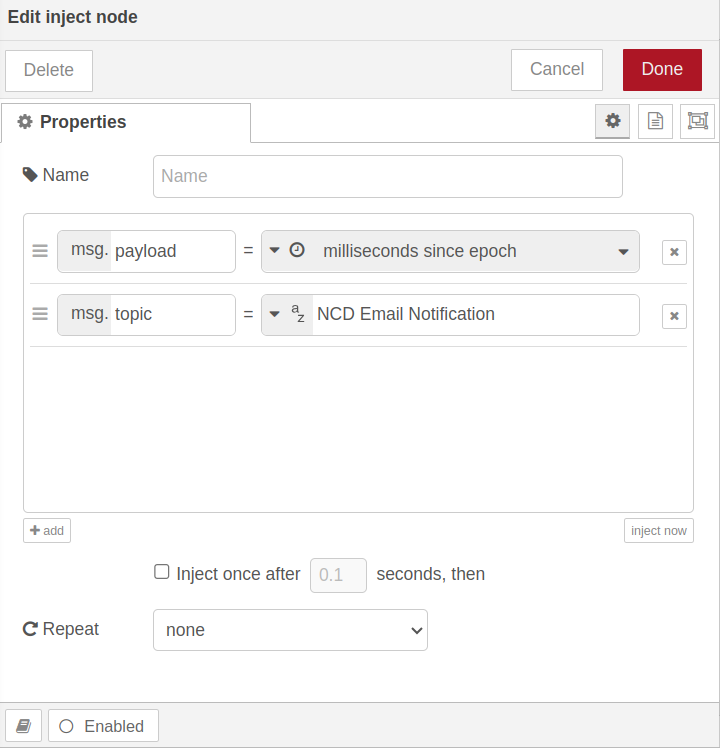
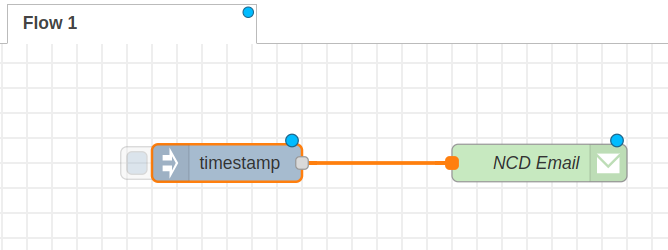
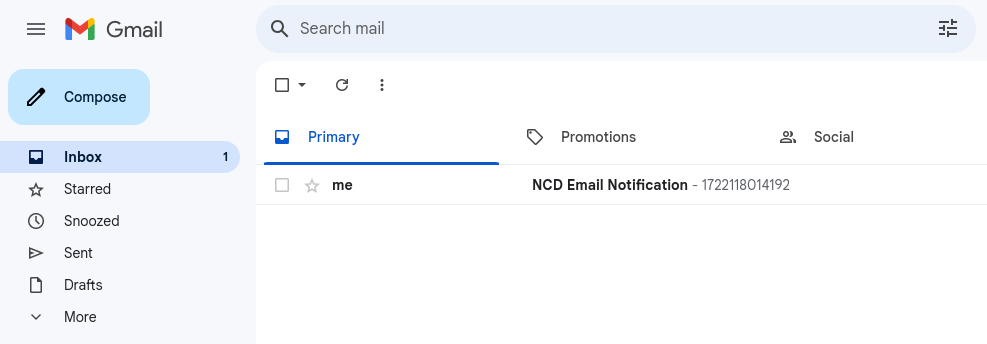
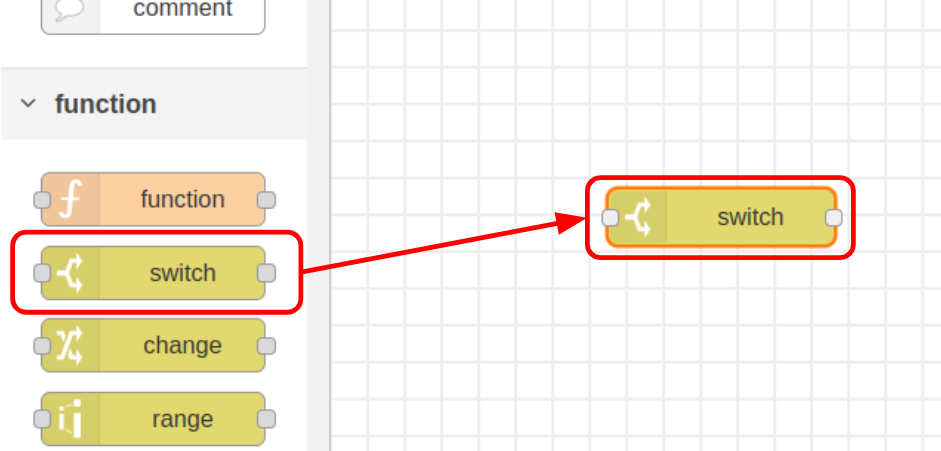
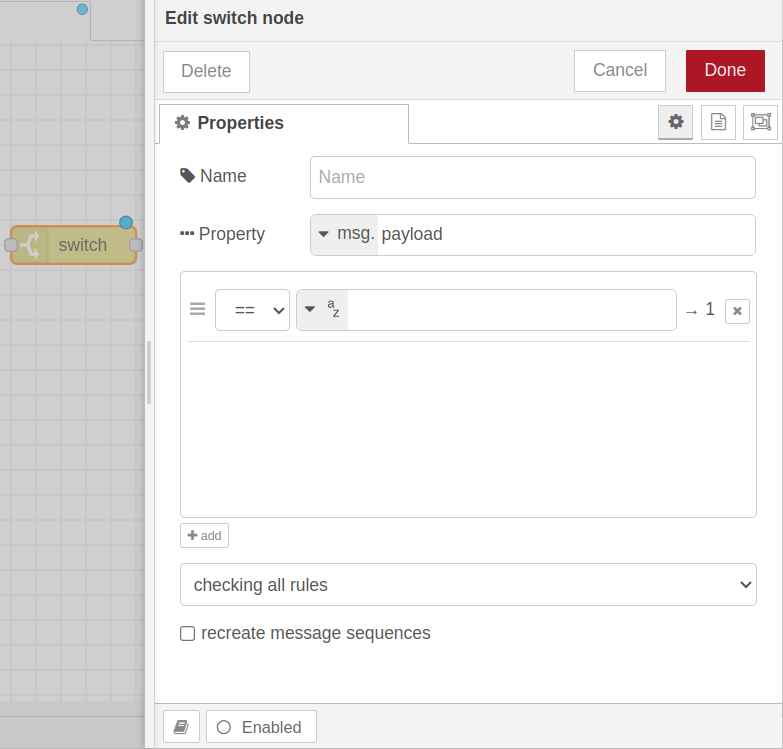
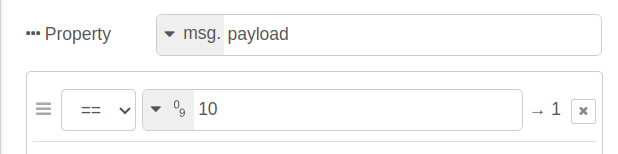
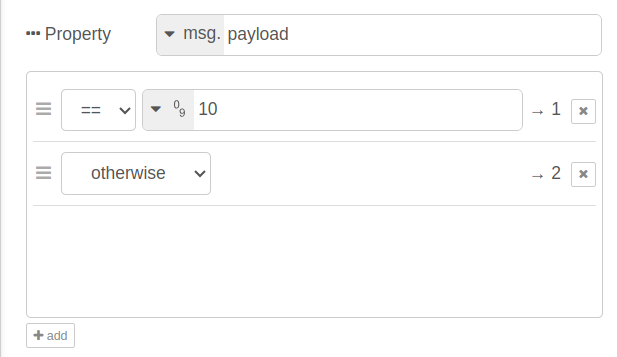
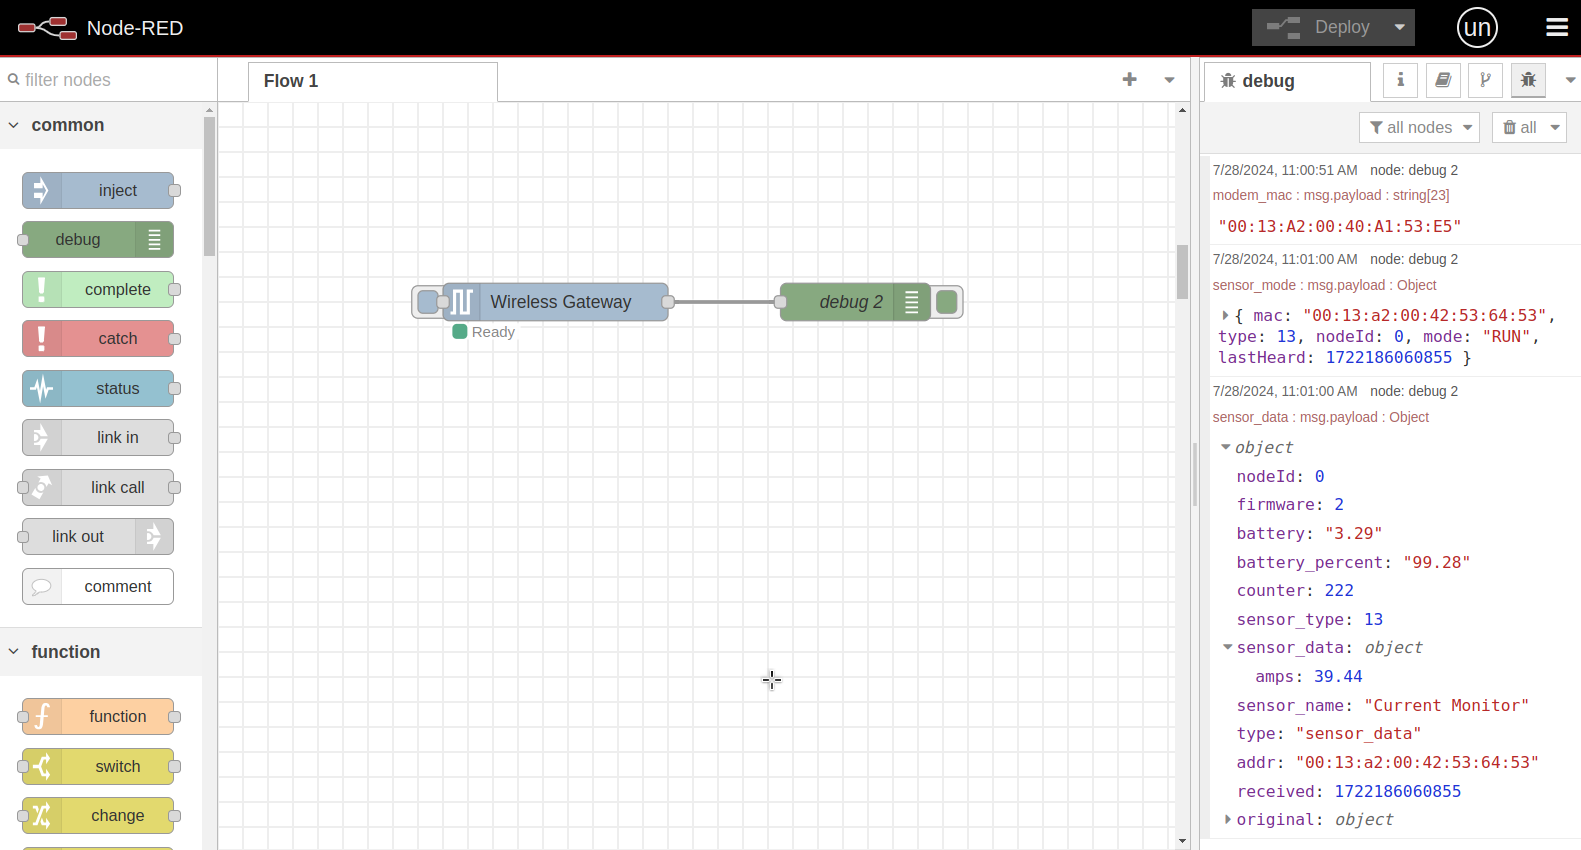
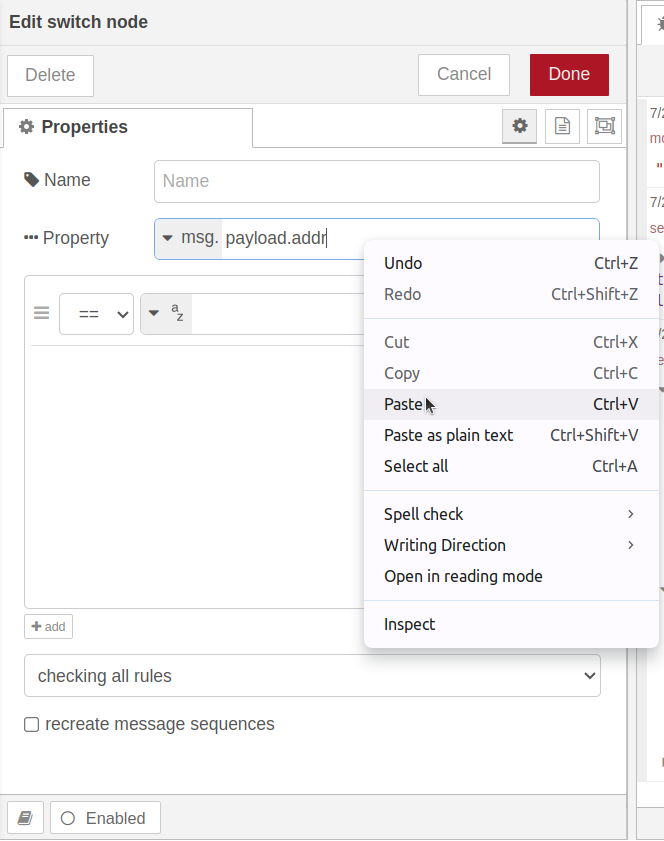
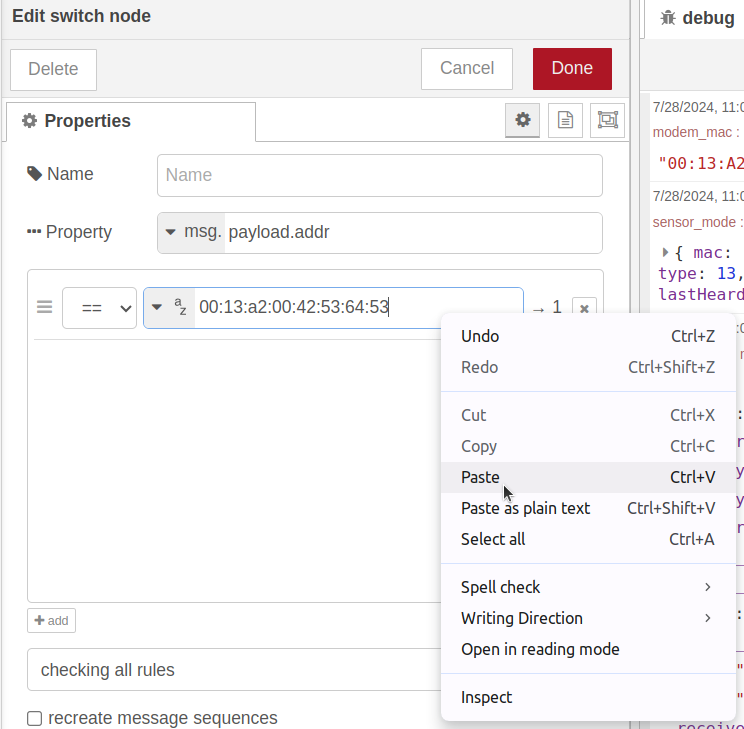
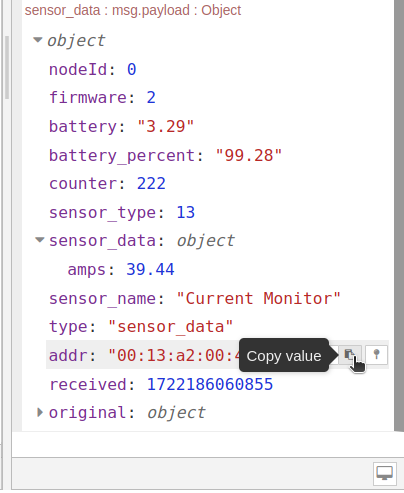
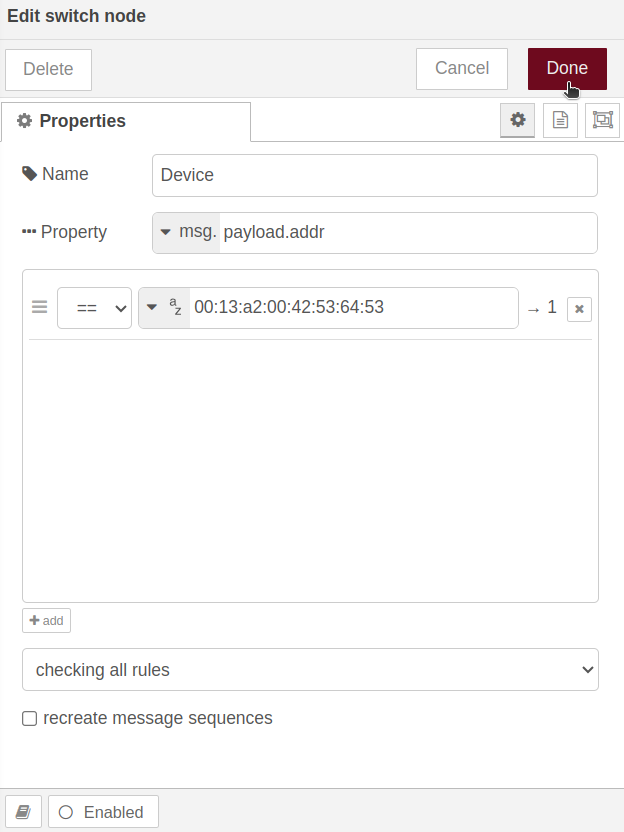
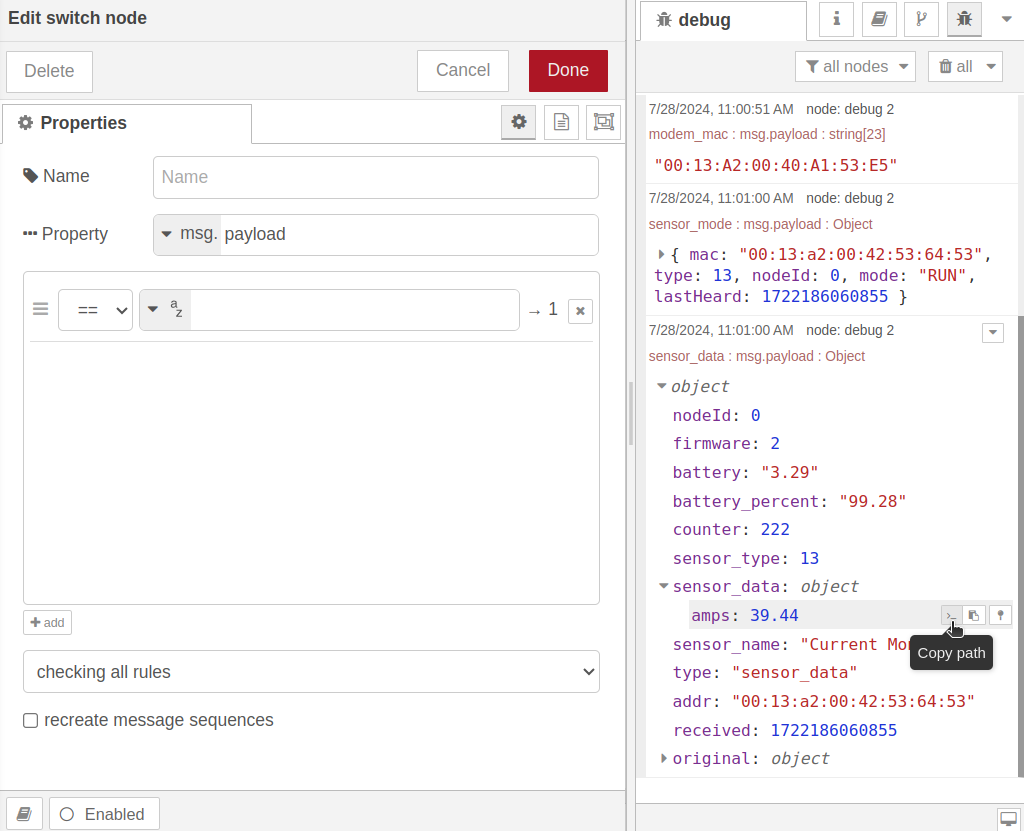
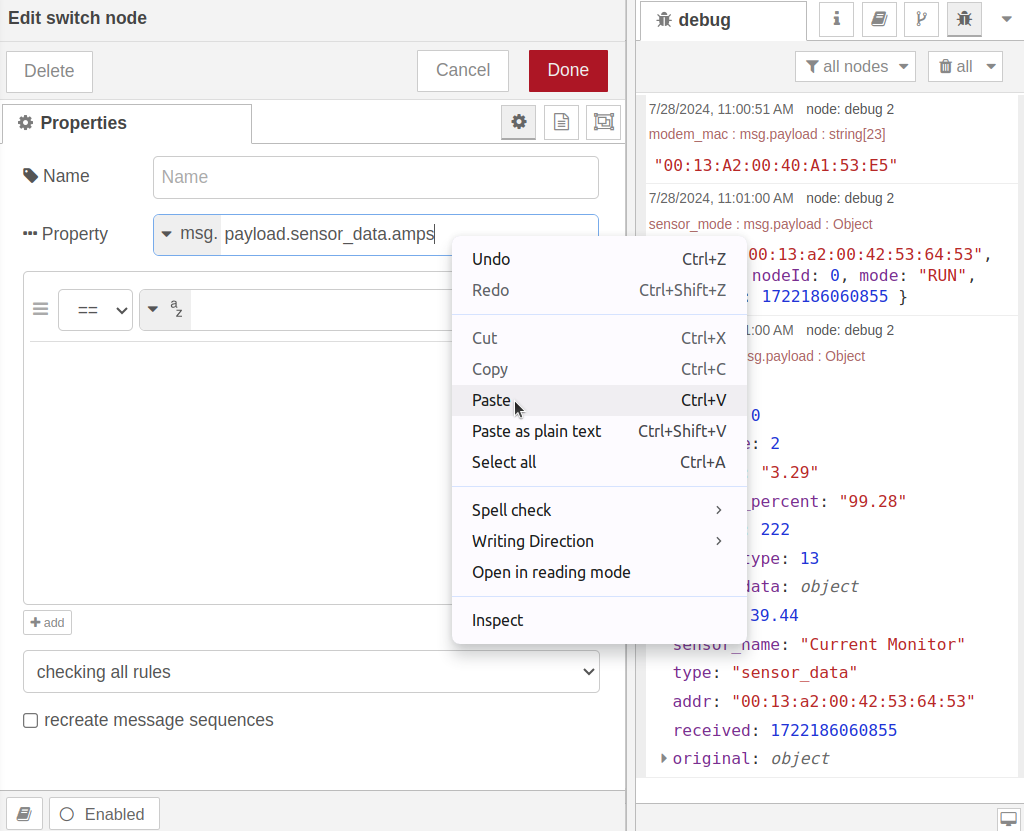
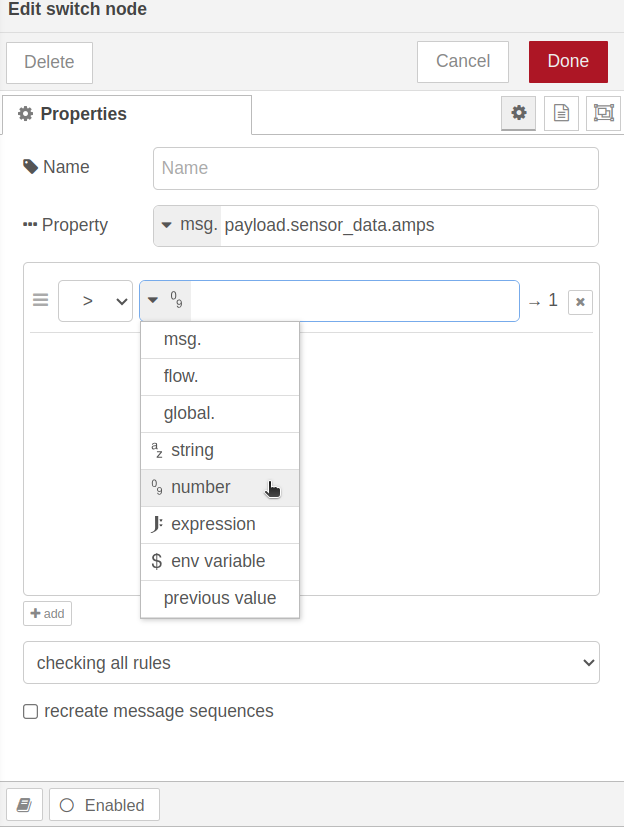
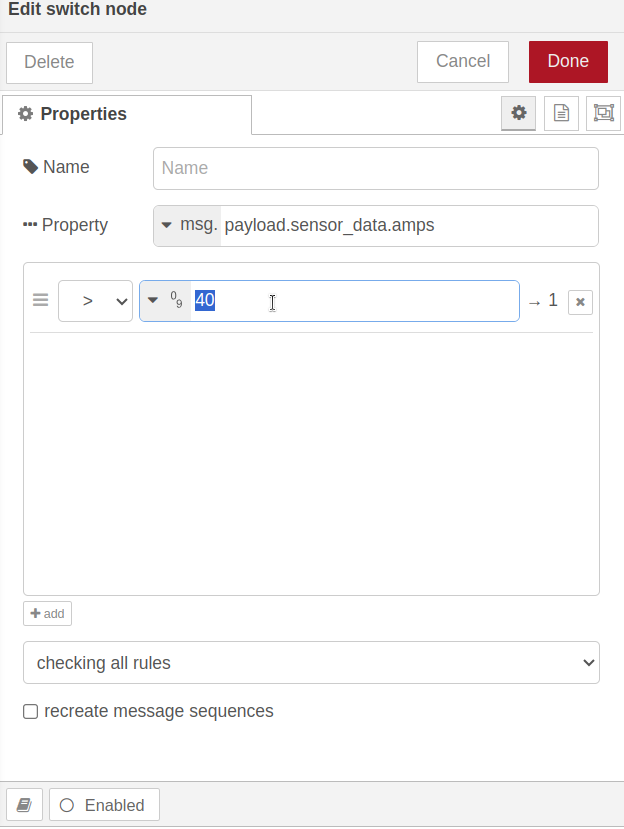
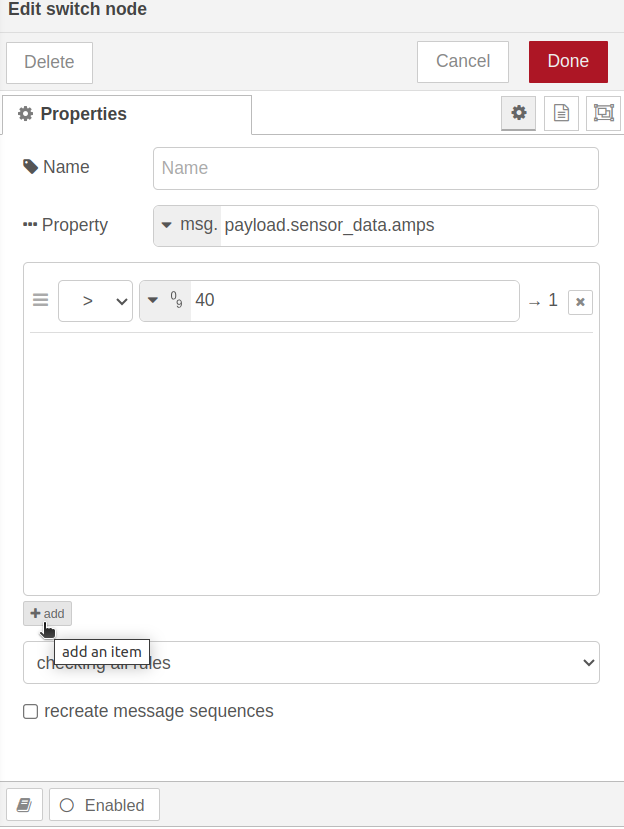
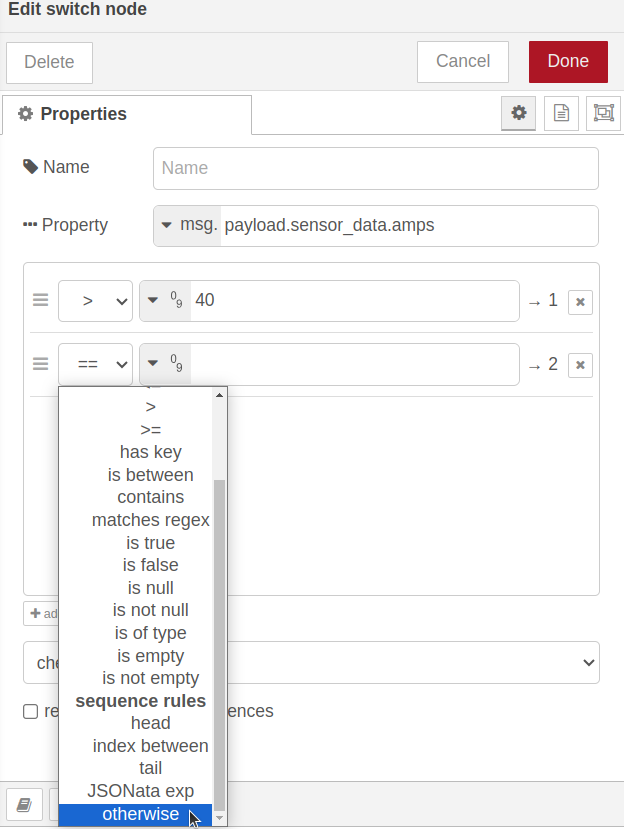
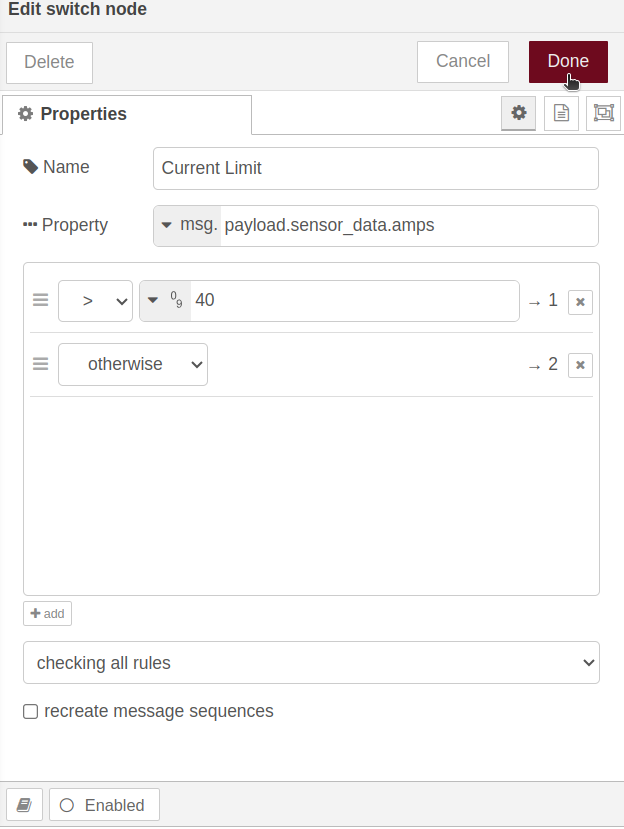
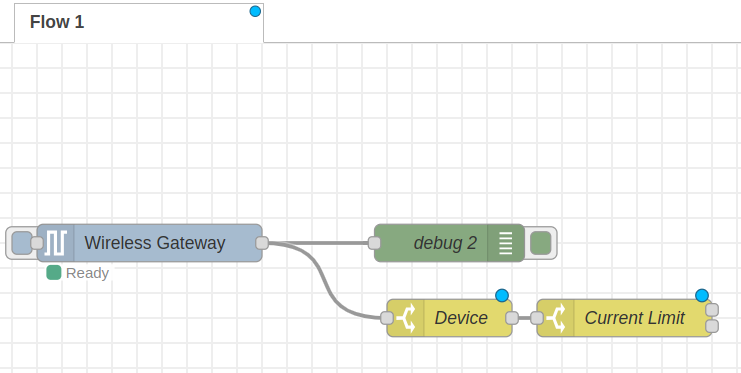
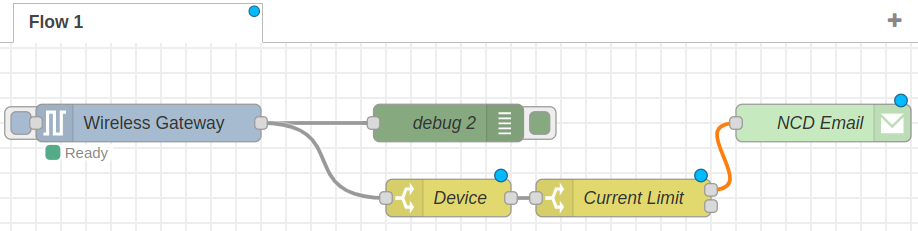
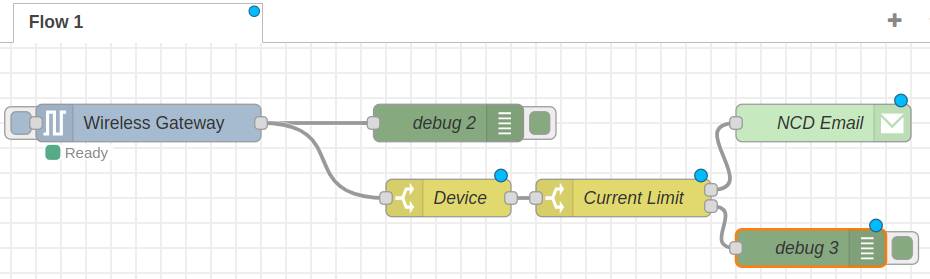
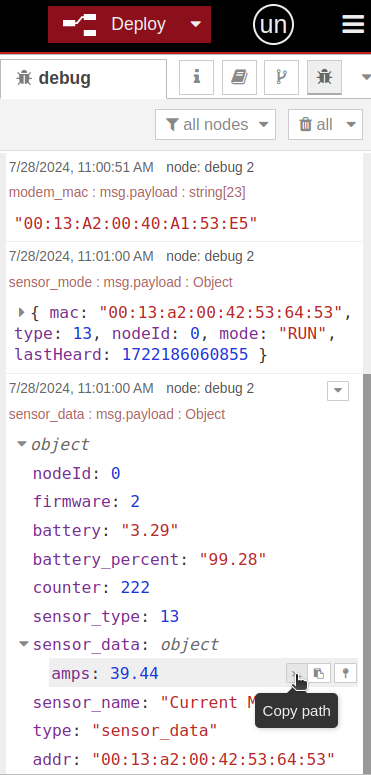
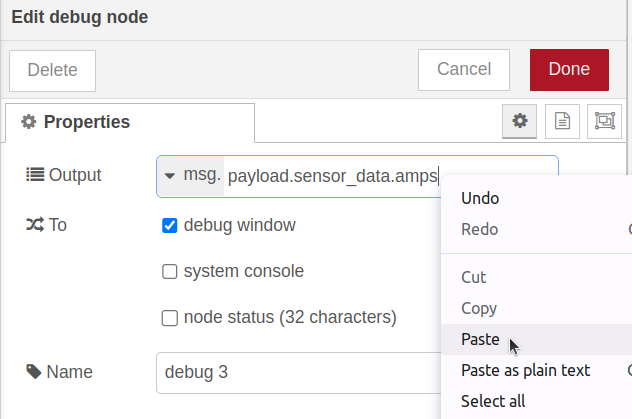
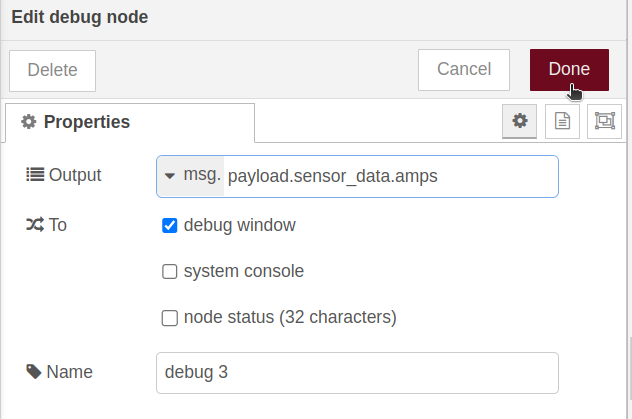
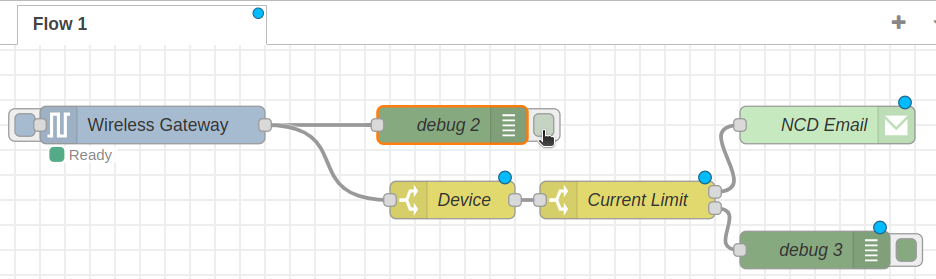
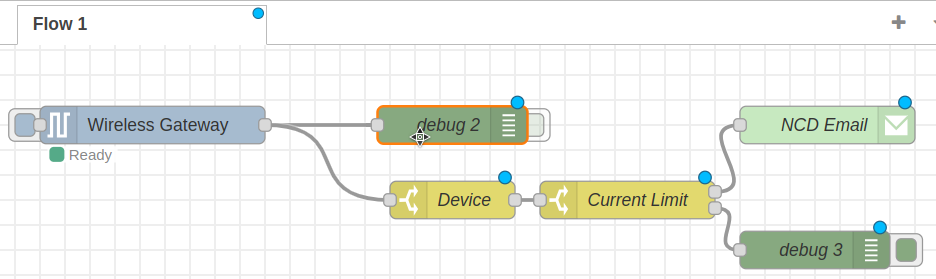
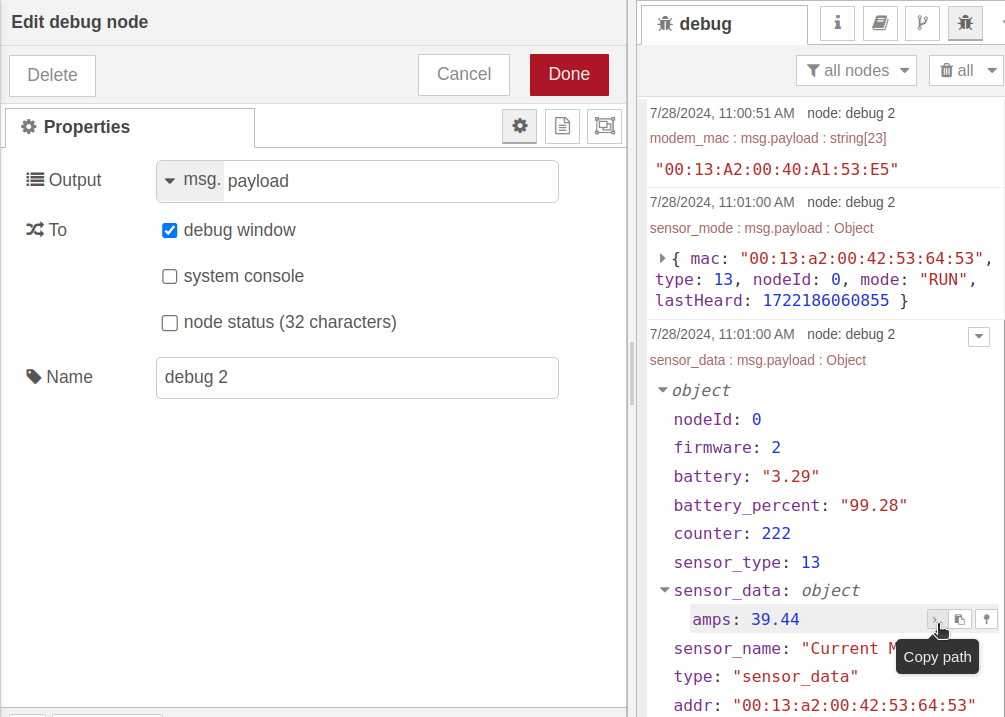
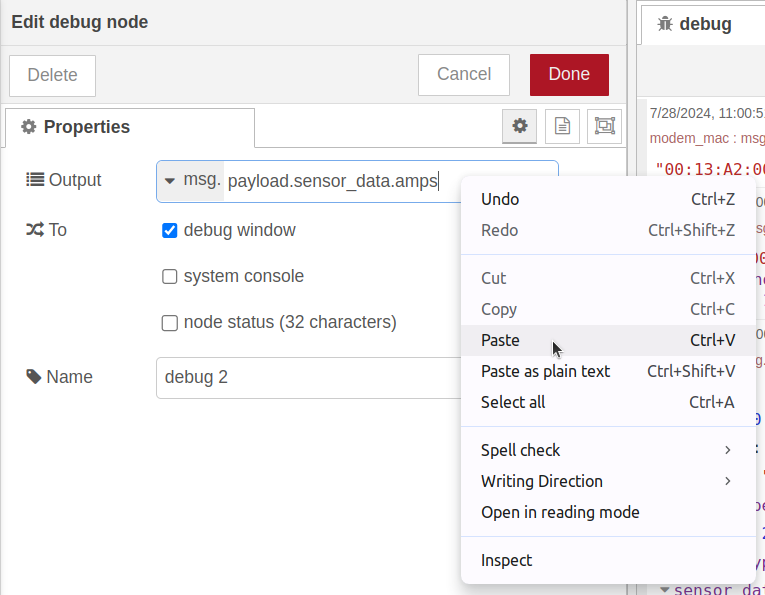
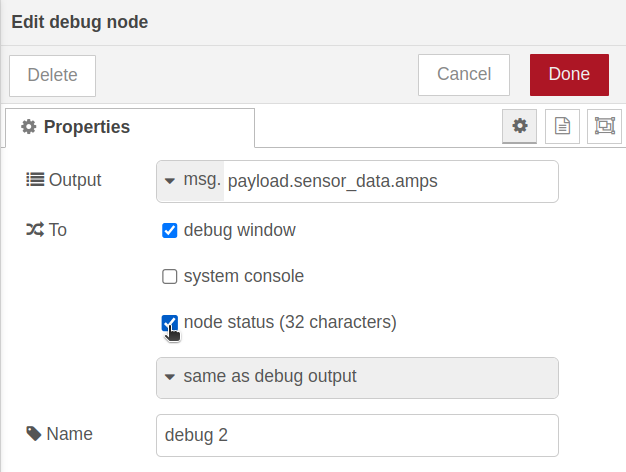
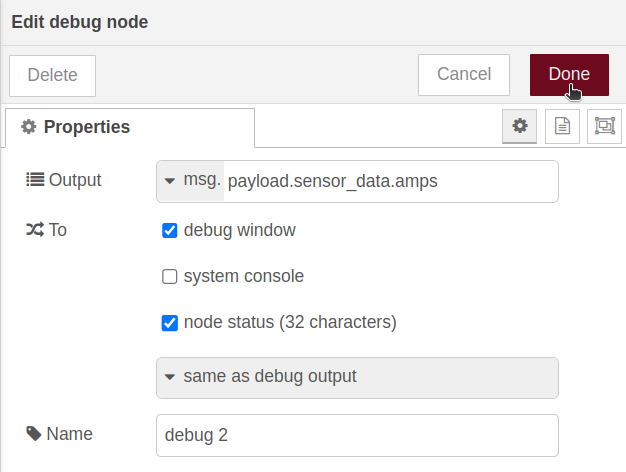
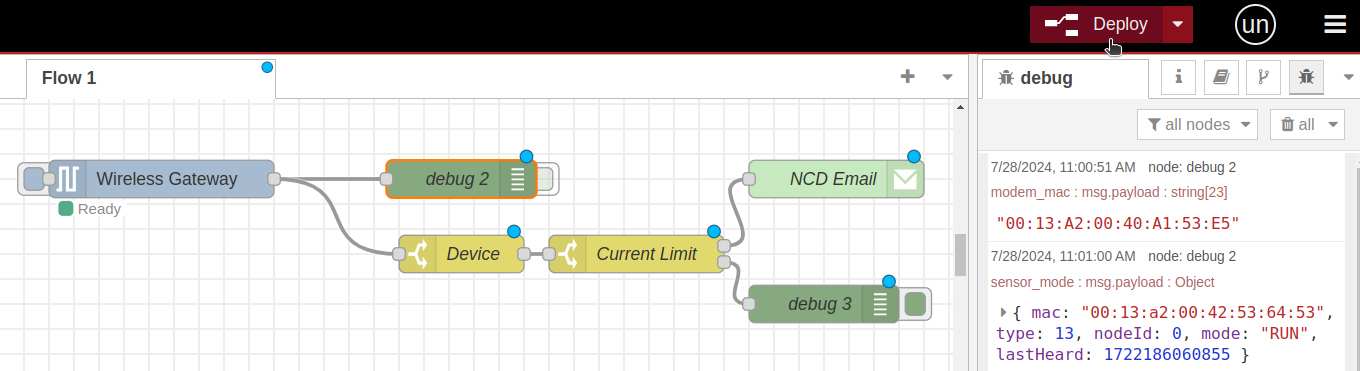
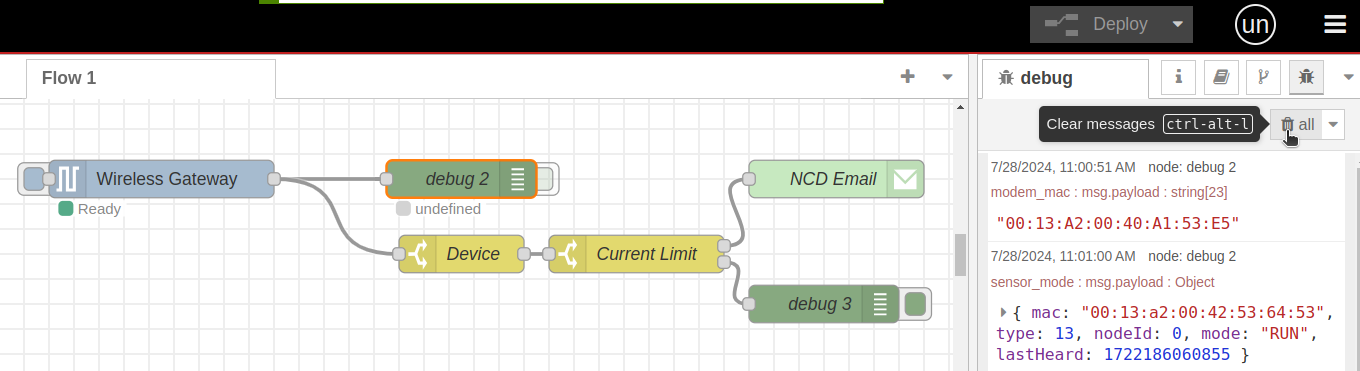
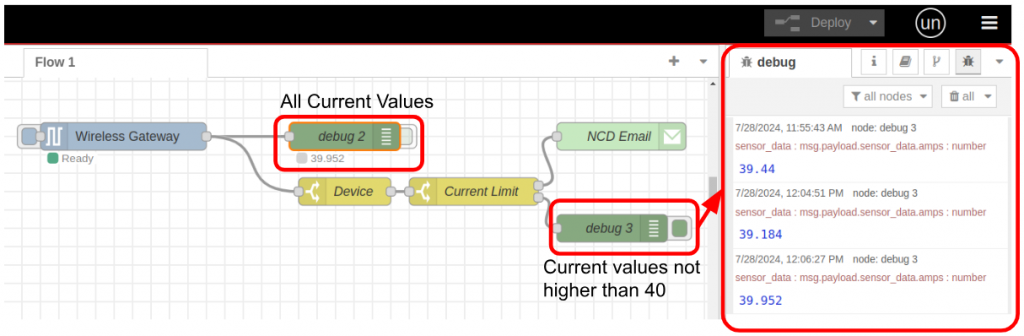
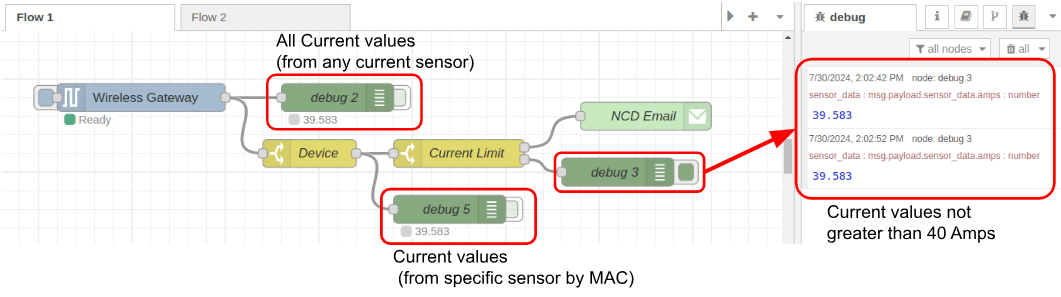
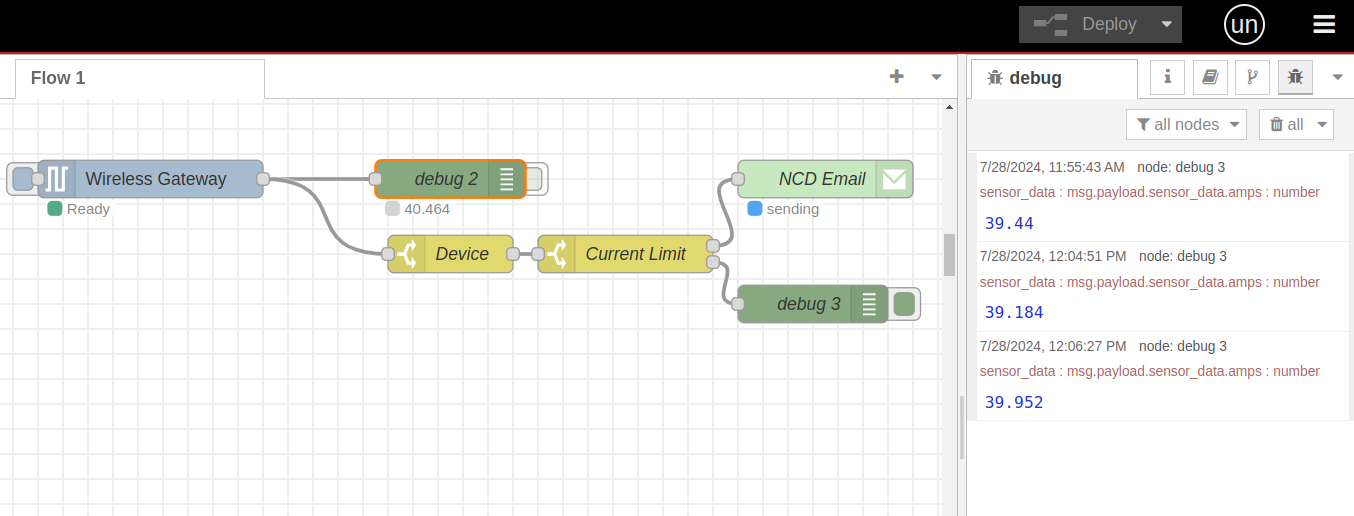
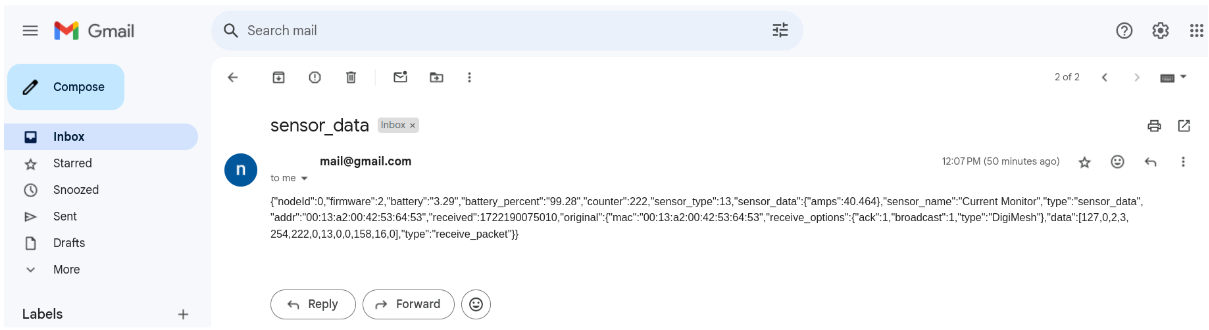
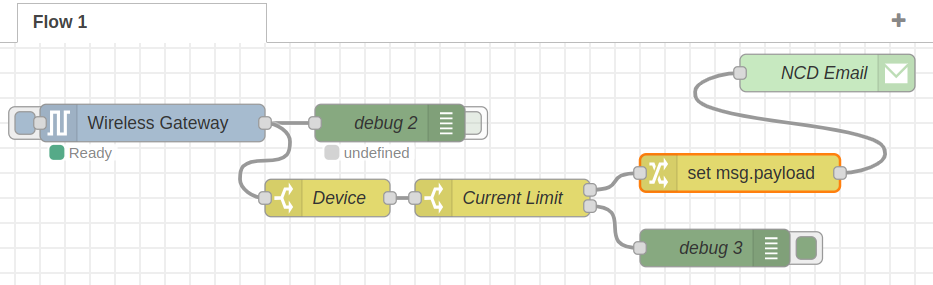
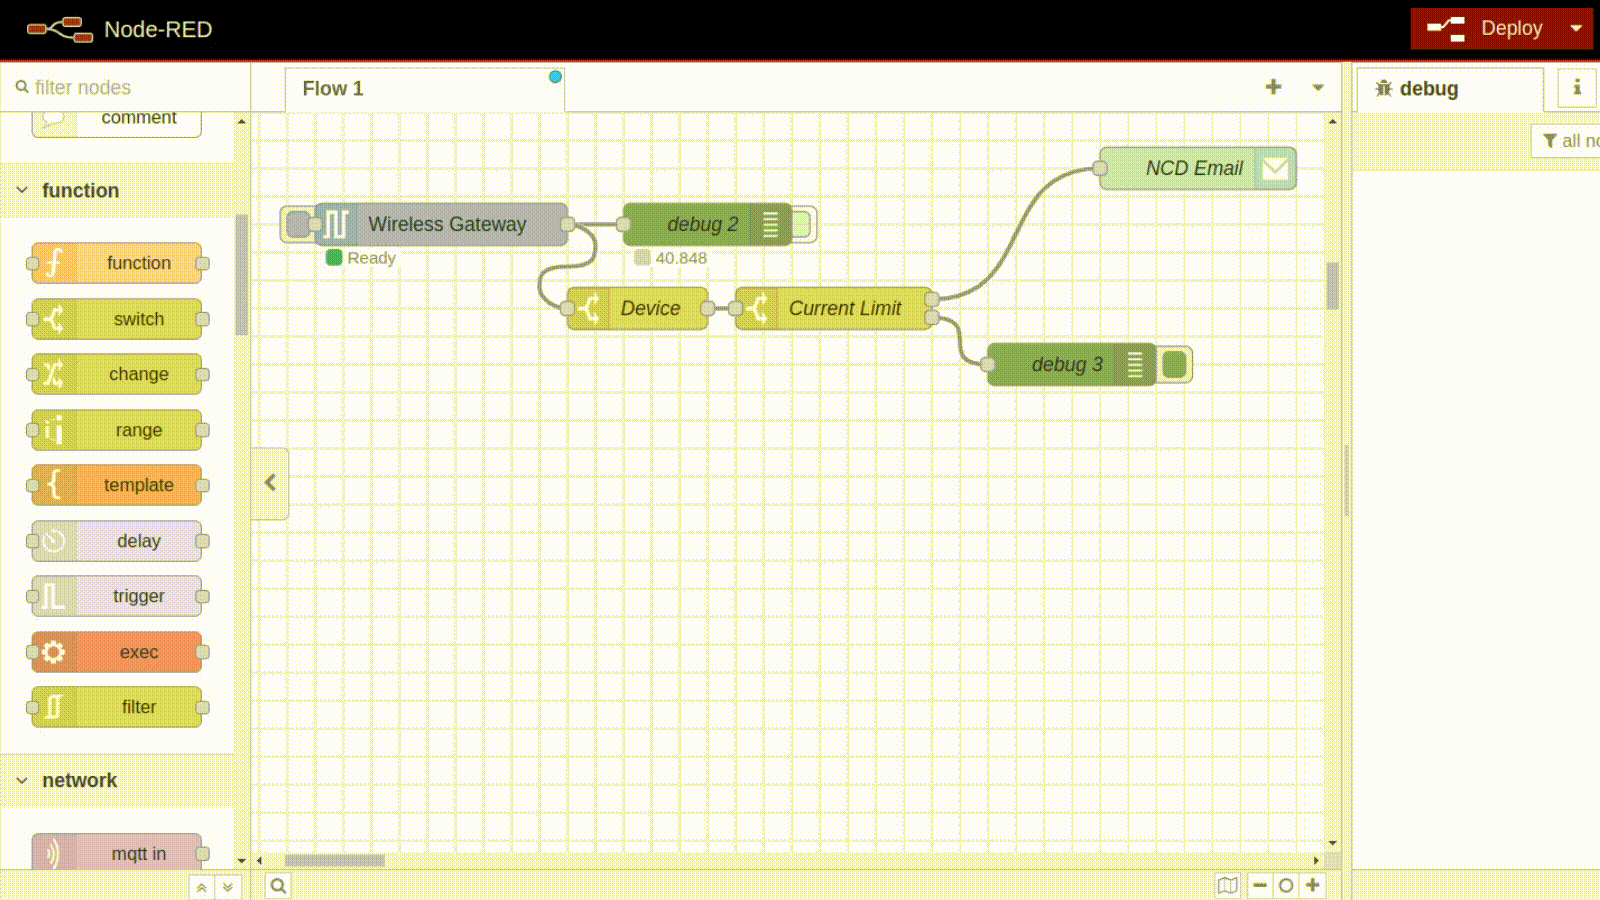
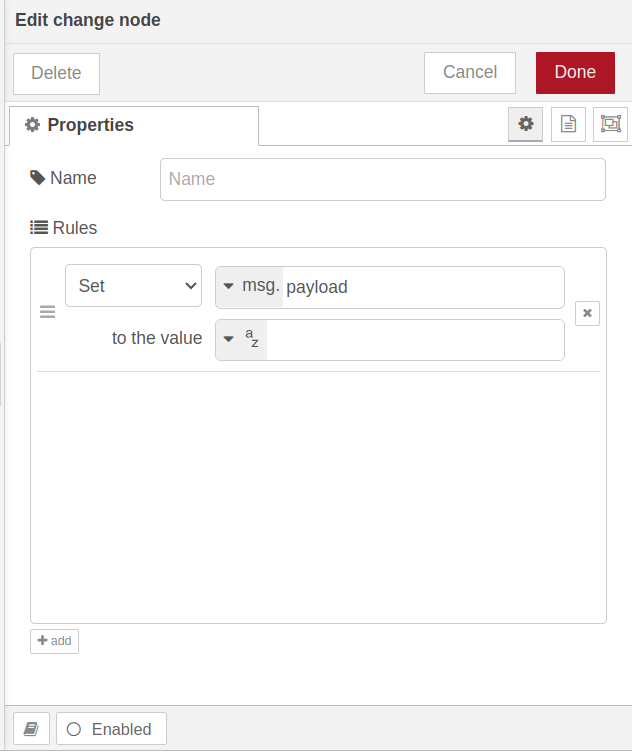
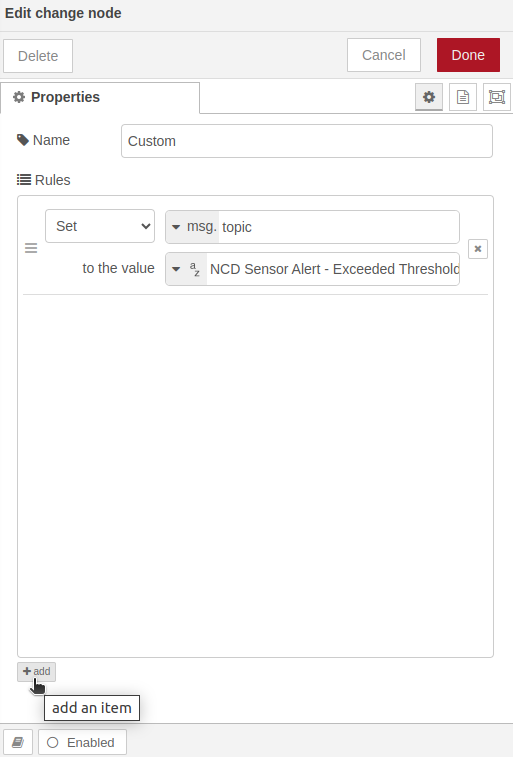
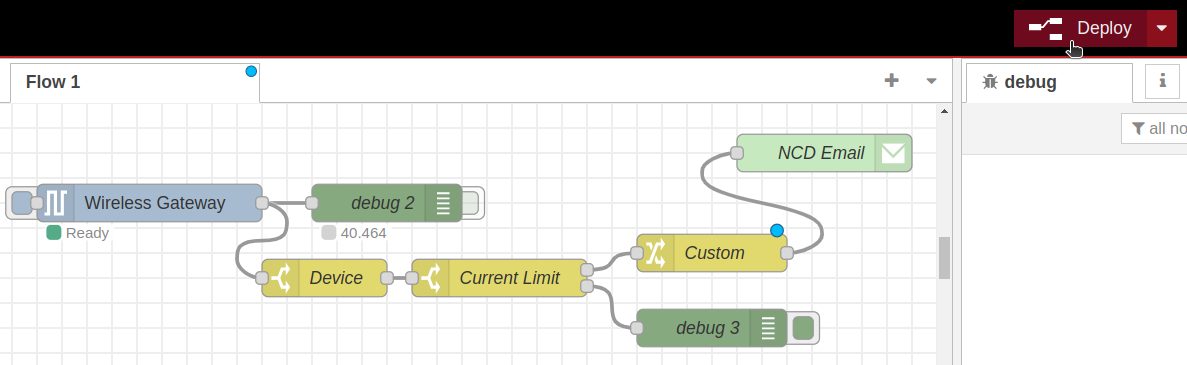
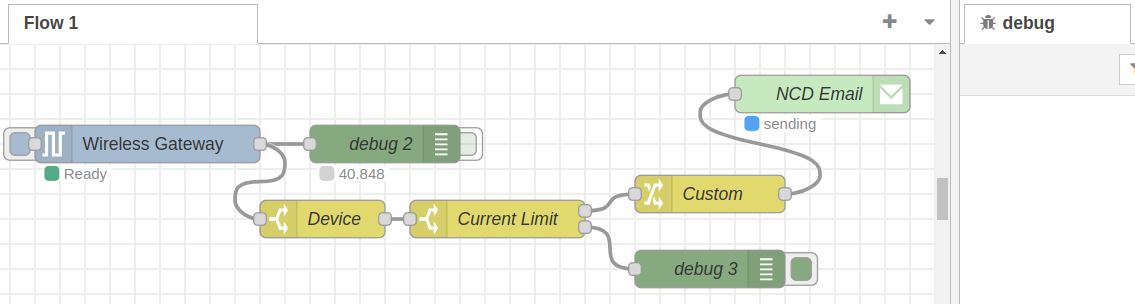
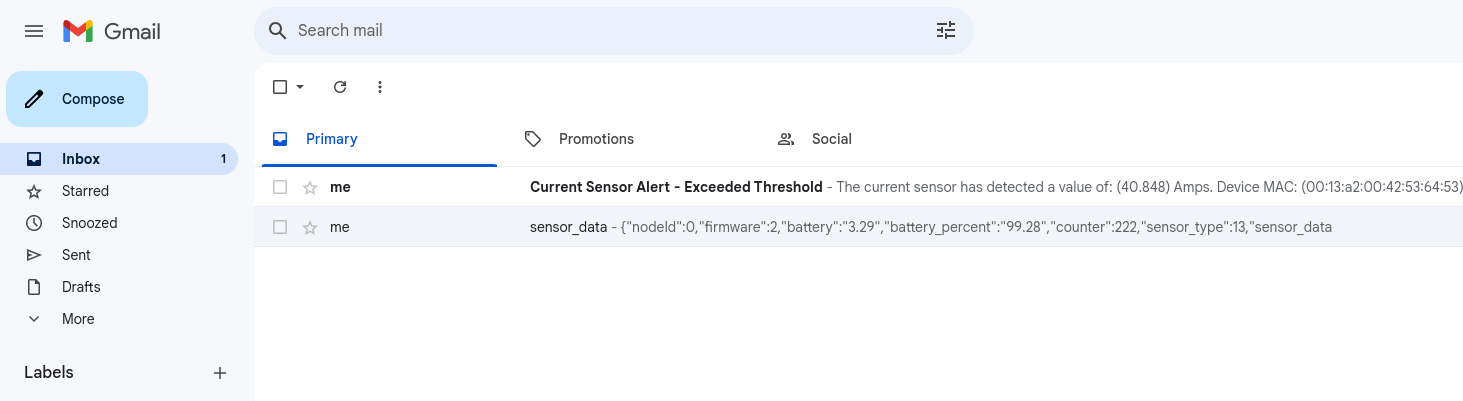
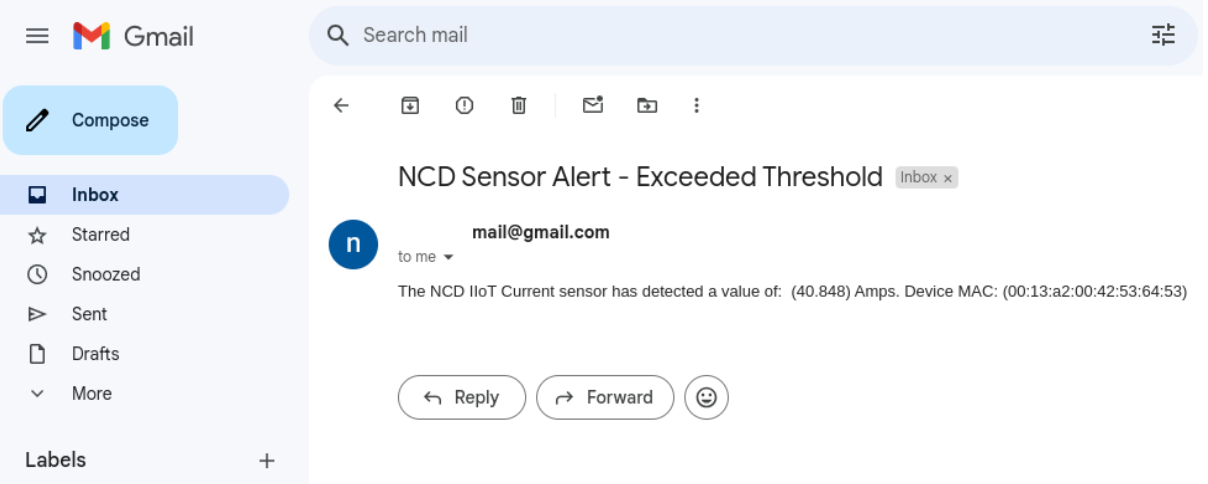
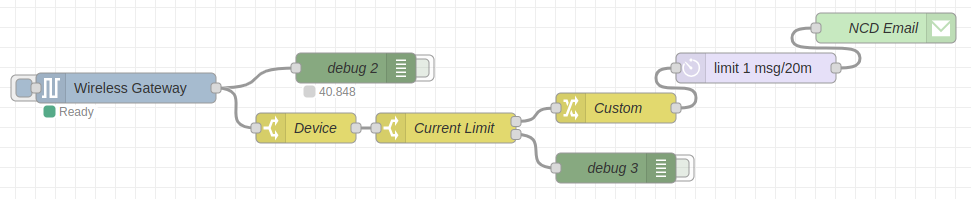
					[{"id":"cc7d0c37e58a8d1d","type":"e-mail","z":"263e304177cfb150","server":"smtp.gmail.com","port":"465","authtype":"BASIC","saslformat":true,"token":"oauth2Response.access_token","secure":true,"tls":true,"name":"${NCD_RECIPIENT}","dname":"NCD Email","x":810,"y":1560,"wires":[]},{"id":"f04fa612f30f05d7","type":"ncd-gateway-node","z":"263e304177cfb150","name":"","connection":"","unknown_devices":0,"outputs":1,"x":270,"y":1600,"wires":[["d1d70c68eabc27d5","230f1c24dd723765"]]},{"id":"d1d70c68eabc27d5","type":"debug","z":"263e304177cfb150","name":"debug 2","active":false,"tosidebar":true,"console":false,"tostatus":true,"complete":"payload.sensor_data.amps","targetType":"msg","statusVal":"payload.sensor_data.amps","statusType":"auto","x":460,"y":1600,"wires":[]},{"id":"230f1c24dd723765","type":"switch","z":"263e304177cfb150","name":"Device","property":"payload.addr","propertyType":"msg","rules":[{"t":"eq","v":"00:00:00:00:00:00:00:00","vt":"str"}],"checkall":"true","repair":false,"outputs":1,"x":410,"y":1660,"wires":[["370220d3e38d01d2"]]},{"id":"370220d3e38d01d2","type":"switch","z":"263e304177cfb150","name":"Current Limit","property":"payload.sensor_data.amps","propertyType":"msg","rules":[{"t":"gt","v":"","vt":"num"},{"t":"else"}],"checkall":"true","repair":false,"outputs":2,"x":550,"y":1660,"wires":[["e99f81a679023eba"],["a20b9bbdb13e35ca"]]},{"id":"a20b9bbdb13e35ca","type":"debug","z":"263e304177cfb150","name":"debug 3","active":true,"tosidebar":true,"console":false,"tostatus":false,"complete":"payload.sensor_data.amps","targetType":"msg","statusVal":"","statusType":"auto","x":720,"y":1700,"wires":[]},{"id":"e99f81a679023eba","type":"change","z":"263e304177cfb150","name":"Custom","rules":[{"t":"set","p":"topic","pt":"msg","to":"NCD Sensor Alert - Exceeded Threshold","tot":"str"},{"t":"set","p":"payload","pt":"msg","to":"\"The NCD IIoT Current sensor has detected a value of:  (\"&amp;(payload.sensor_data.amps)&amp;\") Amps. Device MAC: (\"&amp;payload.addr&amp;\")\"","tot":"jsonata"}],"action":"","property":"","from":"","to":"","reg":false,"x":660,"y":1600,"wires":[["cc7d0c37e58a8d1d"]]}]


Recommended Guidelines

Anti-spam strategies are a crucial aspect of email servers designed to block unwanted or malicious emails, thereby protecting users from deceptive practices. These strategies encompass content filtering, sender validation, IP filtering, and reputation assessment.

Content filtering entails examining email content for specific keywords, phrases, or patterns commonly linked to spam messages. Sender validation confirms the authenticity of sender email addresses or domains, often employing protocols like the Sender Policy Framework (SPF) to verify that the sender’s IP address is permitted to dispatch emails on behalf of their domain. IP filtering restricts or screens messages from known spam origins based on their IP addresses, while reputation assessment allocates a numerical value to senders based on their email sending history and behavior, affecting the probability of emails being classified as spam.

Sometimes, genuine emails might be incorrectly labeled as spam because of these anti-spam strategies. To avoid such occurrences with our outgoing messages or notifications, it’s essential to adopt best practices to reduce the risk of being categorized as spam.

Control Email Frequency: Limit the number of email notifications sent in a short span, as excessive messaging can activate spam filters. Instead, maintain a steady sending schedule and deliver valuable content to recipients.

We can add some nodes to help us control the frequency of email alerts within specific time ranges, for example, you can use the “delay” node:

Nodered Delay node

With this configuration, when a new incoming message arrives at the node, the node will only send this message to the output. If new incoming messages arrive within 20 minutes, these messages will be ignored and will not flow through the output. After 20 minutes have passed, the next new incoming message to the node will flow through the output, and the cycle will repeat.

This node can be connected to the output of the “Custom” Change node, as shown in the following image:

Nodered NCD Email notification final flow

In summary, this node helps you control the frequency of message sending at a set time interval (in this example, 20 minutes, but it can be set to a different value). It serves to prevent the system from sending multiple alerts if the current value (used in this example) is above 40 amps for an extended period. Instead, it will only send an alert the first time the increase is detected, and then suppress subsequent alerts within the specified time frame, thereby preventing message overload.

Clear and Direct Communication: Ensure notification messages are straightforward, brief, and focused on action. Convey the intent of the notification and any required subsequent actions that recipients need to follow.

Avoid spam trigger phrases: Refrain from using terms frequently linked to spam in your email content, such as “free,” “limited time offer,” or “urgent.”

among others.

Summary

In this article, we explored the use of email nodes as a tool for sending alerts or alarms that react to an increase in the value of a variable. However, as you can see, it is a versatile tool that you can adapt or customize depending on your application. You can add more elements to your logic within Node-RED. It is also possible to receive messages from an email to Node-RED. We will likely explore this feature in future posts.

Share this on:

Facebook
X
LinkedIn
Email

You might also like: