In this guide, we will demonstrate how to perform the firmware update process on an NCD Sensor using the NCD Library and Node-RED with OTA (Over-the-Air) functionality.
This method allows you to update the firmware without requiring physical access to the sensor(s). It is particularly useful for scenarios where you need to update the firmware of one or multiple devices.
The process is straightforward:
Import an example flow into your Node-RED workspace.
Configure the necessary parameters.
Access the FIRMWARE.ncd file—either locally or directly from the repository.
Enter the MAC Address(es) of the target device(s).
Wait for the firmware upload process to complete.
Overview
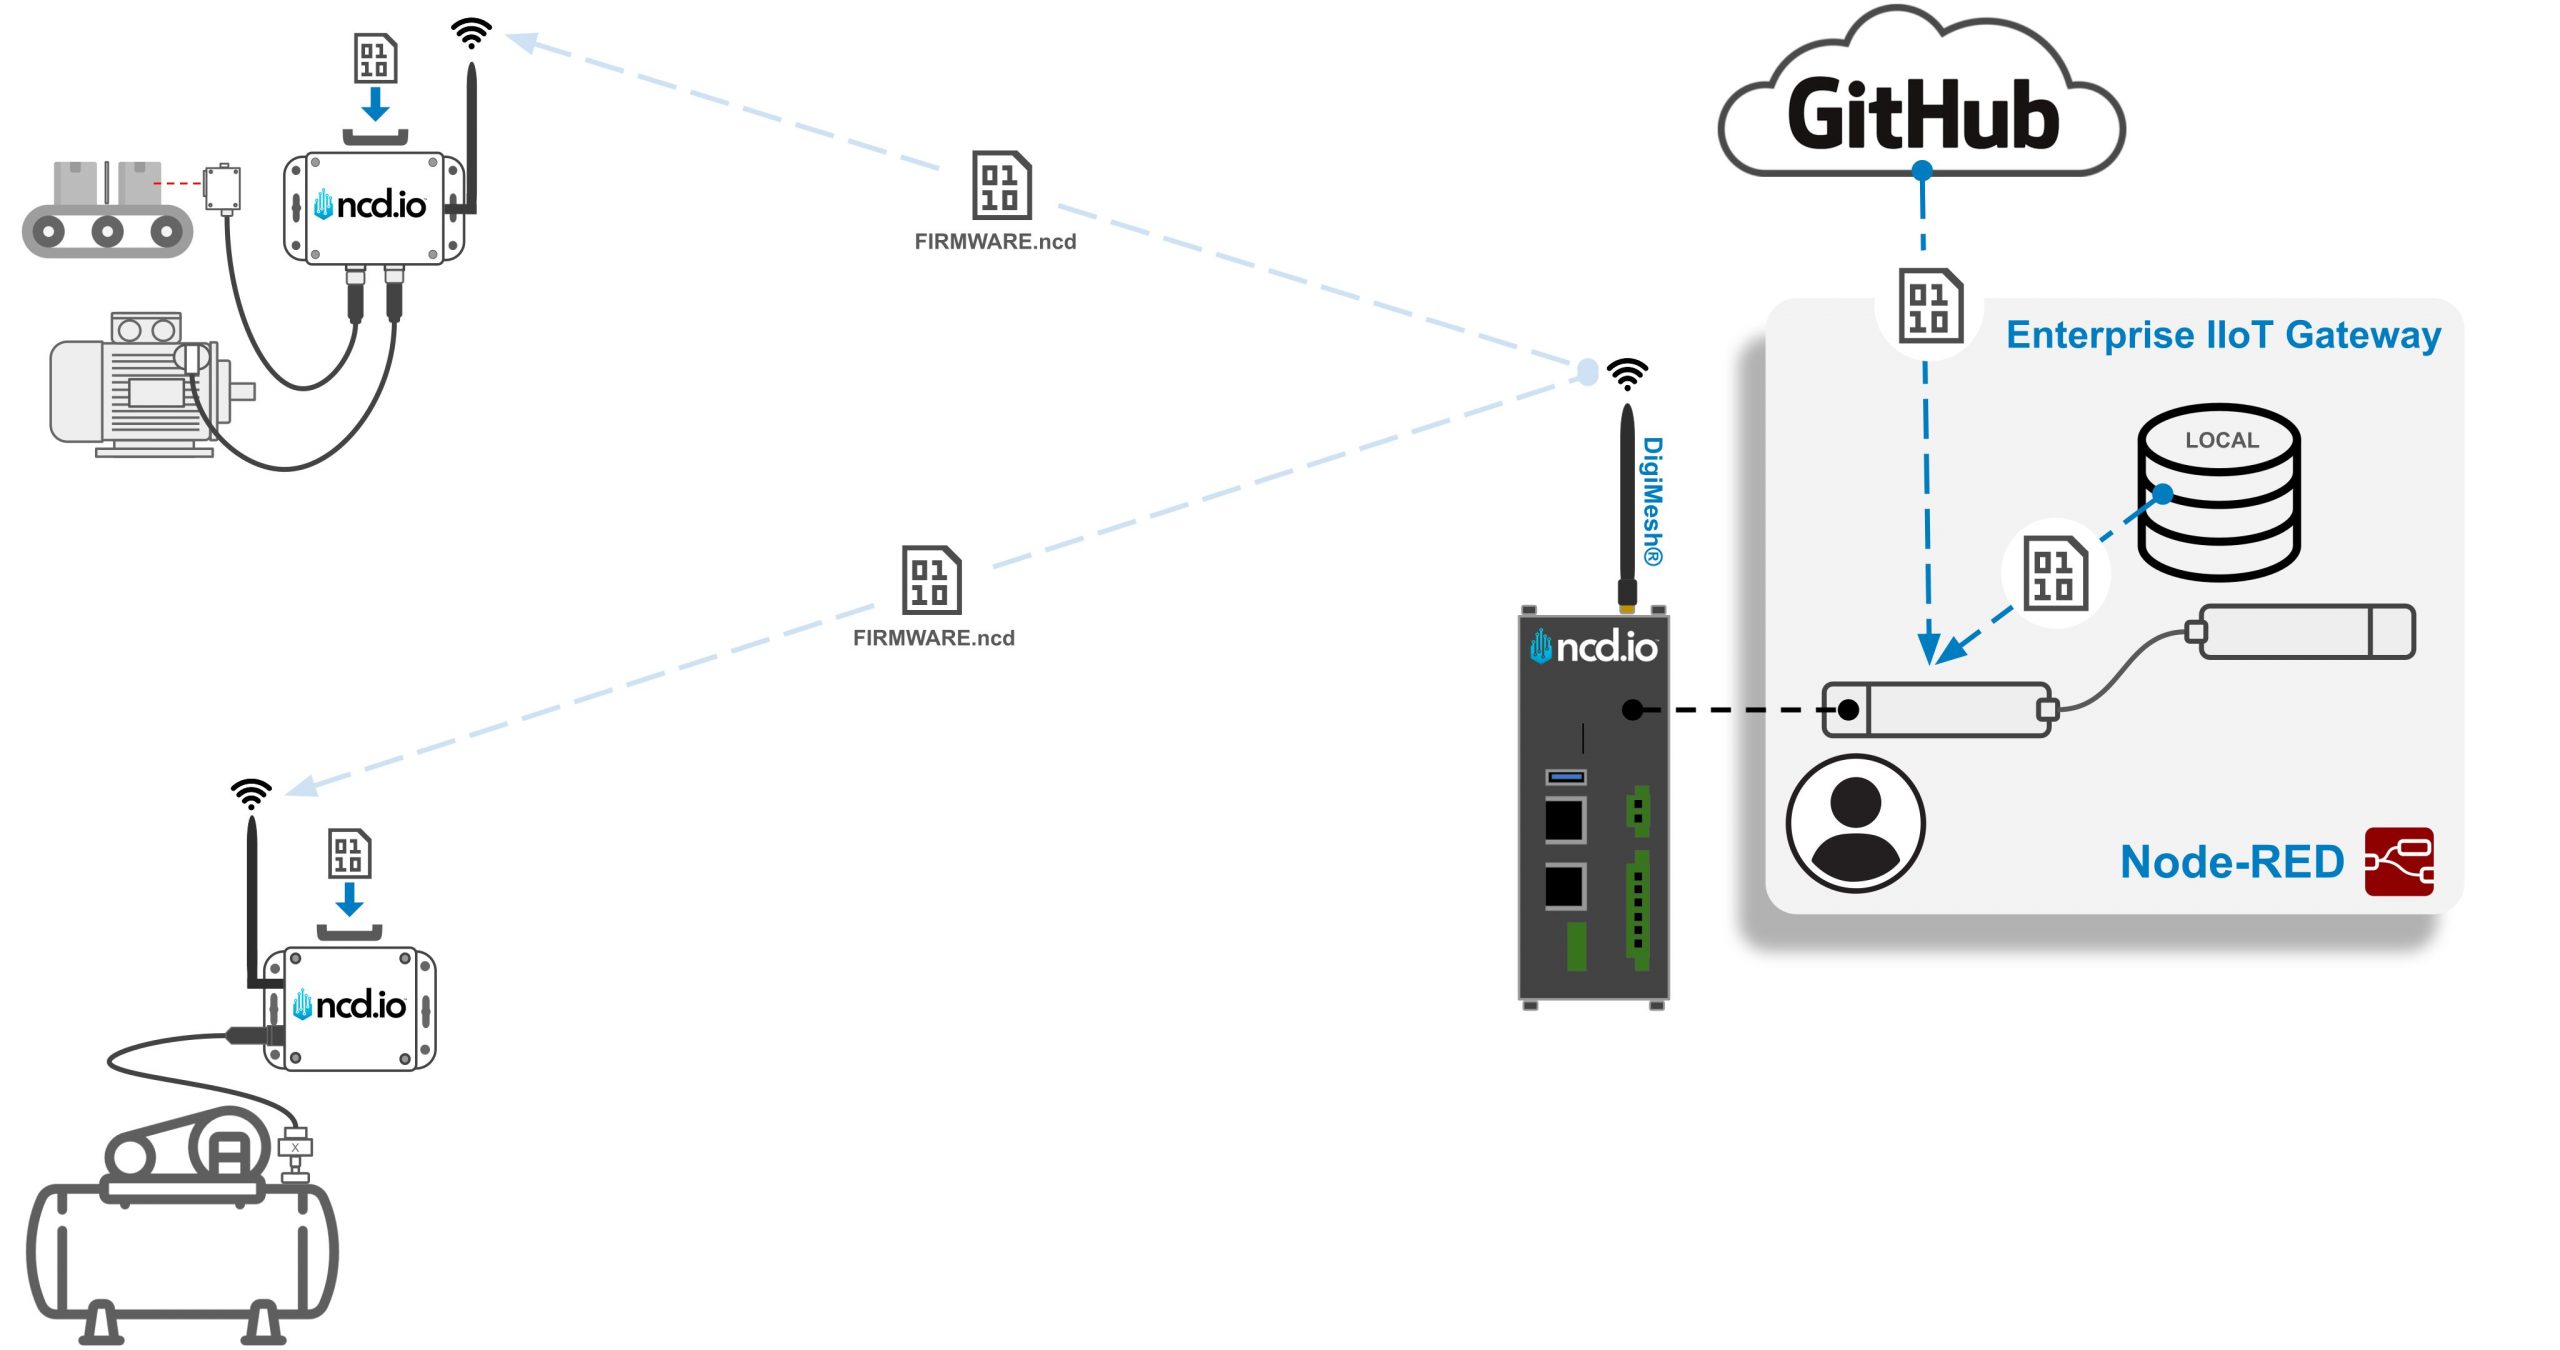
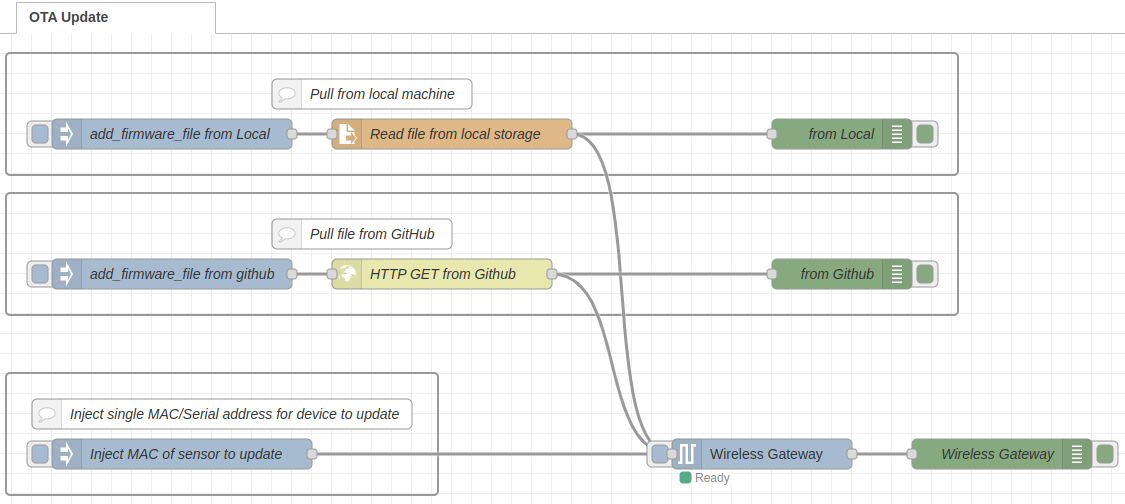
The following is a graphical representation of the firmware update process. In this flow within Node-RED, a ‘FIRMWARE.ncd’ file is accessed from either a local or a remote location. Once the file is located and downloaded, the MAC address(es) of the target field device(s) is specified. This address(es) is then passed into the Wireless Gateway node, which, after a validation process, waits for a FLY message from the corresponding sensor. Upon receiving the FLY message, the firmware update starts automatically.
NoteThis firmware upload procedure supports one device at a time.
Requirements
To carry out this procedure, you likely already have an NCD Sensor(s) that you wish to update the firmware. To perform the firmware update, an Enterprise IIoT Gateway or an Industrial Wireless Modem in either the Ethernet or USB version is required. It is also highly probable that you already possess one of these devices.
If you do not have one of these devices, you can find them listed below:
If you are still unsure whether your application requires a Gateway or a Modem, you can find a comprehensive guide on the differences between these two devices below:
To carry out this procedure, it is essential to have an instance of Node-RED installed and running, as well as our Enterprise NCD library. Our Enterprise IIoT Gateway and Enterprise IIoT Gateway Lite come with a pre-installed, ready-to-use instance of Node-RED, along with the library and a basic flow available. If you are using an Industrial Wireless Modem, you will need to manually install Node-RED on a PC to which the modem is connected. Here is a guide on how to install Node-RED and the NCD Enterprise library on a Windows PC:
Node-RED is a visual programming tool that provides a browser-based editor for creating applications by connecting predefined functions (nodes). Despite its technical nature, Node-RED offers a user-friendly interface. As an open-source project under the OpenJS Foundation, it is free to use with no subscription fees. You can install and run Node-RED locally on your PC, or, in the case of our Enterprise IIoT Gateway, it comes pre-installed and operates as a service. Node-RED, in conjunction with our Enterprise NCD library, forms a powerful tool for acquiring, managing, configuring, and uploading firmware through an intuitive interface. This combination offers a streamlined approach to optimizing the setup, configuration, and management of NCD sensor data.
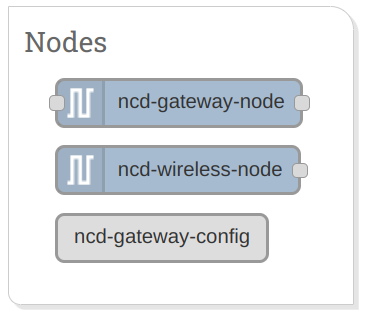
NCD Enterprise Library
This library facilitates communication with and configuration of the NCD Wireless Sensor Line. It can be employed in conjunction with Node-RED to communicate and manage a Wireless Sensor Network using the Node-RED flow-based development tool on any platform. Additionally, as demonstrated, the library acts as an interface for uploading Firmware Updates to NCD Sensors. As mentioned earlier, this library is pre-installed on the Enterprise IIoT Gateway and is ready for immediate deployment.
Accessing to Node-RED
To set up and connect the NCD sensor with the Enterprise IIoT Gateway and access the Node-RED interface, please refer to the following article:
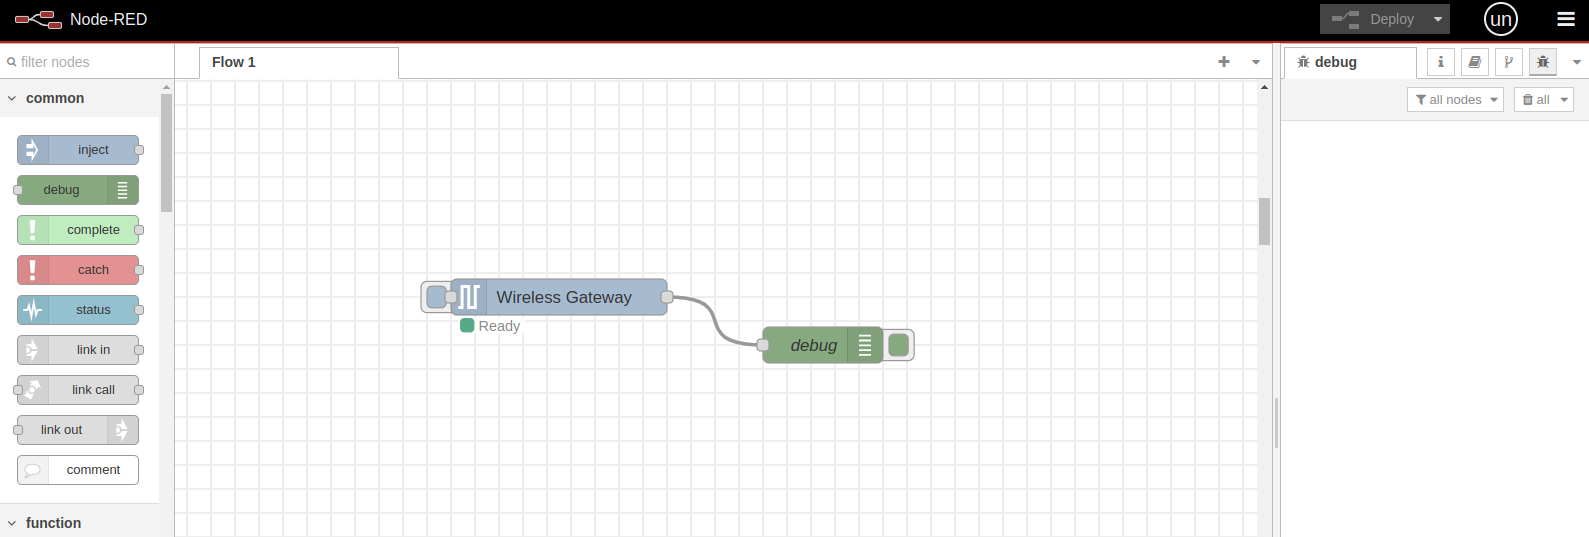
When you access Node-RED in the Enterprise IIoT Gateway, the first thing you will see is a basic flow containing two nodes: the “Wireless Gateway” node and the “Debug” node.
Click to expand
This is a preconfigured flow, meaning it is ready to receive data from the NCD sensors. When a new NCD sensor connects to the wireless network and sends data, the “Wireless Gateway” node automatically receives and processes the message. It then sends the message through its output terminal, and the message flows through the connection cable to the “Debug” node. This node receives the message and displays it in JSON format inside the “Debug” window on the right side of the Node-RED editor.
Pre-Update Check: Disabling Auto Config
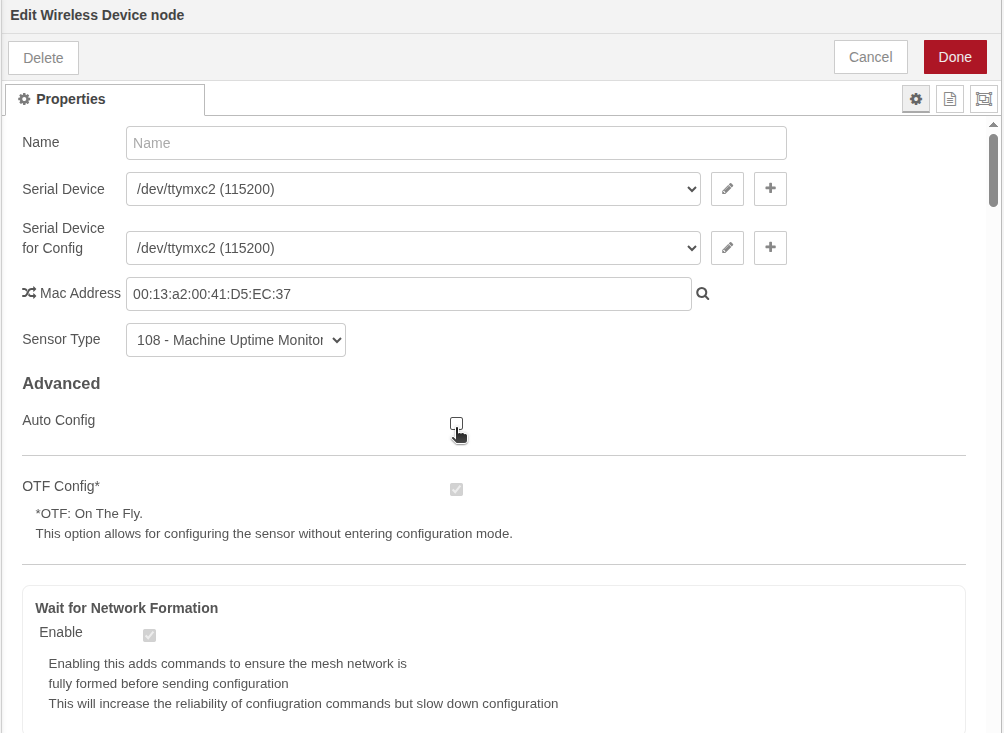
IMPORTANT: Before you begin the firmware update, or anytime you perform an update, it is critically important to disable the Auto Config feature if you have a Wireless Device node associated with the NCD sensor(s) you are updating.
Why is this important?
Both the sensor configuration (via “On The Fly” -OTF) and the firmware update process are triggered by the same type message (FLY message). If both processes occur simultaneously, the configuration attempt will clash with the firmware update attempt, which will likely cause the firmware update to fail.
How to Disable Auto Config
Double-click on the Wireless Device node to access its properties.
Uncheck the Auto Config box.
Click the Done button.
Click Deploy (in the top right of the Node-RED window) to save and apply the changes.
Click to Expand
NoteAnother safe option is to disable all your other active flows entirely during the firmware update process. To do this, simply double-click on the flow tab you wish to disable and click the Disable option. Once the firmware update is complete, you can re-enable the flow.
Firmware Update Flow
The next step is to import the flow responsible for the firmware upload. We provide two example flows for performing firmware updates:
OTA Firmware Update Single
This flow enables you to perform an over-the-air firmware update for a single NCD sensor at a time. It is particularly useful if you need to update the firmware of an individual sensor or apply different firmware updates to sensors of various types. In such cases, you will need to load the appropriate firmware for each sensor type separately. To access to the JSON file click on follow:
This flow allows you to perform an over-the-air firmware update on multiple NCD sensors of the same type simultaneously. It lets you specify the MAC addresses of all sensors of the same type that require the firmware update, streamlining the process for bulk updates. To access to the JSON file click on follow:
NoteThe firmware update process is sequential. This means the upload will begin with the first sensor that sends a FLY message. Once the firmware update for that sensor is complete, the library will wait for a FLY message from the next sensor to initiate the upload, and the process will continue in this manner.
Once you have access to the corresponding GitHub repository, you will need to copy the raw JSON code. To do this, click the ‘Copy RAW’ button, as shown in this screenshot.
Click to expand
Importing Flow
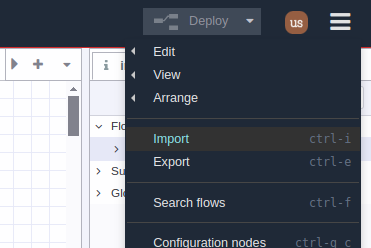
1. Navigate to the main menu of Node-RED and select the ‘Import‘ option, as shown in the following image:
Click to expand
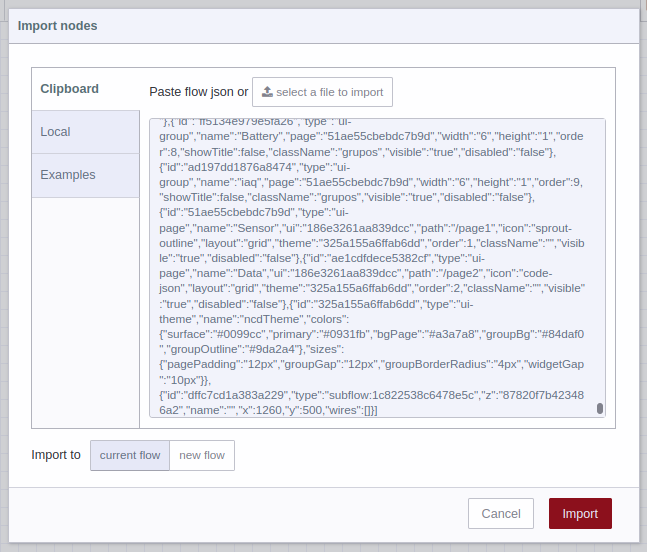
2. This action will open a window with a text input field. You should pastethe flow you copied in the previous step into this text box, as shown in the following image:
Click to expand
3. Once you have pasted the flow into the text box, click the ‘IMPORT‘ button to complete the flow import process:
Click to expand
4. You will see that the flow has been imported successfully. The next step is to locate the flow within your workspace:
Click to expand
This Flow is designed to work with the ‘Serial Device’ properties for the Enterprise IIoT Gateway by default. By accessing the properties of the ‘Wireless Gateway’ node, you will observe that the ‘Serial Device’ property is configured with the port ‘/dev/ttymxc2 (115200)‘.
Enterprise IIoT Gateway
If you are using an Enterprise IIoT Gateway to perform firmware update, you will not need to modify this property.
Click to expand
Wireless USB Modem
For a USB modem on Windows, it might be something like ‘COM4’. An example is shown in the following image:
Click to expand
Note!It is likely that you already have a port configured in your application, such as with the Enterprise IIoT Gateway. In this case, you only need to select the appropriate 'Serial Device' from the dropdown; it is not necessary to create another configuration node.
NCD Firmware File
You need to have the “FIRMWARE.ncd” file corresponding to the version and SKU model of your NCD sensor device. This procedure allows you to upload the firmware either from a local file or by pointing to a GitHub repository in the cloud to access the “.ncd” file directly from the flow in Node-RED. Below is the GitHub repository where you can find the available “FIRMWARE.ncd” files:
The next step is to specify the local or remote (GitHub) path of the ‘FIRMWARE.ncd’ file that you want to upload to the NCD sensor. This flow allows you to choose between these two options.
Option 1: Pull Firmware from GitHub (Recommended)
This option is to access the ‘FIRMWARE.ncd‘ file directly from the Node-RED flow via the GitHub repository. This requires internet access from the Enterprise IIoT Gateway or from the PC if using an Industrial Wireless Modem. This approach involves specifying the URL to which the flow should point in order to locate the ‘FIRMWARE.ncd‘ file. You can obtain this URL by navigating to the GitHub repository, locating the ‘FIRMWARE.ncd‘ file specific to your NCD Sensor.
1. You should right-click on the ‘Raw’ button and select the ‘Copy Link‘ or ‘Copy Link Address‘ option. Once this is done, you will have the remote path for the ‘FIRMWARE.ncd’ file, which you will need to specify into ‘HTTP GET from Github‘ node.
Click to expand
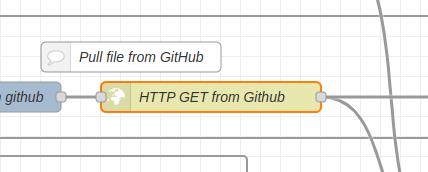
2. Then go to Node-RED and double-click on the ‘HTTP GET from Github’ node, in order to open its properties.
3. Once you open the properties, locate the ‘URL’ field. This is where you should paste or enter the GitHub URL corresponding to the FIRMWARE.ncd file.
Click to expand
4. You can copy and paste the URL directly. You should see something like this:
Click to expand
NoteThe following is an example of a RAW URL from a GitHub repository. You can use it as a reference.
Important!Recommended for offline use exclusively.
1. Using the Enterprise IIoT Gateway
Let’s dive into the second method for updating your firmware: downloading the file locally and then pushing it from your computer to the Gateway. This is a fantastic option, especially if your Gateway doesn’t have internet access or is behind strict firewall restrictions.
For example, in a scenario where, for security reasons, the Enterprise IIoT Gateway can’t reach out to your PC to read or store files, we’ll need to securely push the firmware file from your computer to the Gateway using the following commands.
The process involves downloading the correct firmware file to your local PC, then securely transferring it to the Gateway using the SSH protocol. You might need to enable SSH on your Enterprise IIoT Gateway first if you haven’t already. Here’s an article that shows you how:
Step 1: First, access the repository using the link we provided from your PC. Then, navigate through the folders to locate the firmware file specific to your device.
Click to expand
Step 2: Once you’ve found the right firmware file, click on it (as shown in the image you have for reference).
Click to expand
Step 3: To start downloading the file locally from the GitHub repository, simply click on the ‘Download raw file’ button (as shown in your reference image).
Click to expand
Step 4: You’ll then be able to see the downloaded file. Make sure to note its download path. This is the location or directory where the file is stored on your operating system, and it might look something like:
C:\Users\Username\Downloads\PRxx-xx_Vx.ncd
Click to expand
Step 5: Once you’ve confirmed the firmware file is in your local PC’s /Downloads directory, open Windows PowerShell. Then, type the following commands:
cd /Downloads
NoteThis command allow us to change the working directory, then click on enter key
NoteHostname: ncd-[last_4_of_mac].local where [last_4_of_mac] is the last 4 characters in the mac address printed on the side of the gateway without the colon i.e. ncd-c398.local
Then click on enter key, this command might ask you for the ssh gateway password, by default is:
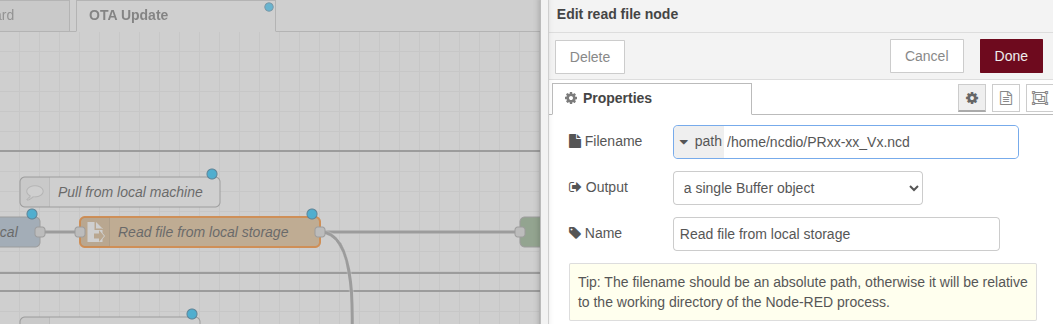
Step 6: Finally, go to Node-RED on the Gateway and access the ‘Read file from local storage’ node and, in the ‘filename’ property, enter this path:
/home/ncdio/PRxx-xx_Vx.ncd
Click to expand
2. Using a Modem Connected to PC
1. To do this, you should access the repository using the link provided, and then navigate through the folders to locate the firmware specific to your device.
Click to expand
2. Once you have located the appropriate file, you should click on it as shown in the following image:
Click to expand
3. In order to begin downloading the file locally from the GitHub repository, you should click on the ‘Download raw file’ button, as shown in the following image:
Click to expand
4. You will be able to view the downloaded file; you should locate the download path. This will be necessary later to specify to the Node-RED flow where to find the ‘FIRMWARE.ncd‘ file. The path corresponds to the location or directory where the file is stored on your operating system, and may look something like:
‘C:\Users\Username\Downloads\V4_PR55-88.ncd.’
Click to expand
5. Then return to Node-RED workspace, and double-click on the ‘Read file from local storage’ node, in order to access its properties:
Click to expand
6. You should enter the path where the firmware file is stored locally into the Filename property.
Click to expand
Set the MAC Address
Once this is done, the next step is to identify the MAC address of the device to which you wish to upload the firmware. You can obtain this address from the ‘sensor_data‘ message of the sensor.
You can either wait for a sensor_data message from the sensor or force a transmission by pressing the RST button on the sensor. Once the sensor_data message appears, expand it to view the ‘addr’ property. You can copy this property by clicking the ‘Copy value‘ button.
Click to expand
Update Single
Then, access the properties of the ‘Inject MAC of sensor to update’ node by double-clicking on it. Within the properties, paste or enter the MAC address of the target NCD sensor, which is the device that will receive the firmware upload:
Click to expand
Update Multiple
Next, access the properties of the ‘Addresses’ node by double-clicking on it. In the Address properties section, paste or enter the MAC address of each target NCD sensor, which are the devices that will receive the firmware update (you can enter from 1 up to 10 MAC addresses).
NoteThis node includes a MAC address validator that ensures the entered addresses are correctly formatted and free of duplicates. The validation results are displayed in the status node
Ready: The entered MAC address(es) are correct.
Empty: No MAC addresses have been entered.
Invalid length addr: Indicates that the entered MAC address has an invalid length and specifies the position of the error.
Invalid format addr: Indicates that the entered MAC address has an invalid format and specifies the position of the error.
Duplicate Address found: Indicates that two or more MAC addresses are duplicated and specifies the last 4 bytes of the duplicate address.
Click to expand
Once this is done, click the ‘DEPLOY‘ button to save and apply the changes made to the flow:
Click to expand
Enable Flow
To begin the firmware upload procedure with the parameters previously set, the first step is to activate the corresponding ‘Inject’ node.
1.(Apply for Option 1 – GitHub) In this case, you should activate the ‘Inject: add_firmware_file from github’ node. Similarly, upon performing this action, you will see two messages in the debug tab: one containing a buffer of the ‘FIRMWARE.ncd’ file and another from the Wireless Gateway node, indicating the status of the file and confirming that it is ready to be sent to the sensor.
Click to expand
1.(Apply for Option 2 – Local) The procedure is very similar if you wish to access the ‘FIRMWARE.ncd’ file from the local path.
Click to expand
2. The first message is a status update, indicating whether the flow successfully accessed the ‘FIRMWARE.ncd’ file.
For Option 1 – GitHub
Click to expand
For Option 2 – Local
Click to expand
3. The second message comes from the Wireless Gateway node and indicates whether the ‘FIRMWARE.ncd’ file provided was read correctly.
Click to expand
4. The final step is to activate the ‘Inject MAC of sensor to update’ node, as shown in the following image:
Click to expand
Click to expand
5. Now, the flow will wait for the target NCD sensor to send a FLY message. Once this message is received, the Wireless Gateway node will begin the firmware upload process to the target sensor. An example of the FLY message in the debug tab is shown in the following image:
Click to expand
NoteThis message (FLY) is automatically sent from the NCD Sensor approximately every hour. It is also possible to 'Force' a transmission of the 'FLY' command by pressing the RESET button inside the sensor.
6. As soon as the firmware upload process begins, you will automatically see incoming ‘sensor_manifest’ message and after that ACK messages in the debug window, indicating that the upload is in progress. An example of the sensor_manifest message is shown:
Click to expand
Click to expand
NotePlease be patient; this process may take a few minutes. Do not disconnect the sensor.
7. Upon completion of the firmware upload process, you will see a message labeled ‘update_stats’:
Click to expand
8. Finally, after the sensor restarts with the newly loaded firmware, you should see a message indicating the updated firmware version. In this case, it should show a change from an initial version 3 to version 4:
Click to expand
Click to expand
Video Demo
Note!If the Firmware update process does not complete successfully on the first attempt, you have a couple of options: Try a few more times manually or leave the flow running. The NCD Library is designed to automatically attempt to update the firmware every time the sensor transmits a new FLY message. Therefore, after a few tries, the process might complete automatically.
Summary
This article outlined the step-by-step process and necessary requirements for performing a firmware upload or update to an NCD sensor using Node-RED and our dedicated NCD library.