In an Earlier post, Getting Started with Microsoft Azure® and Wireless Temperature Humidity Sensor we have learned about:
- Create an Azure IoT hub and register a gateway device
- Set up ESP32 board
- IoT long-range Wireless Temperature and Humidity sensor
- Make connections between the Wireless temperature sensor and ESP32
- Flash ESP 32 and collect Sensor data from Wireless Temperature and Humidity sensor
- Analyze and visualize the sensor data in charts and graphs using Power BI
Now let’s get started with other core features of Microsoft Azure. If you haven’t followed the earlier post I would request you to go through it first. In this post, we will learn about:
- IoT Long-range Wireless Temperature and Humidity Sensors
- Send sensor raw bytes to the Microsoft Azure portal.
- Start with Azure Stream Analytics job and monitor raw bytes stream.
- Azure Functions.
- Set up azure function as stream analytics output.
- Get real temperature and humidity sensor data from raw data using Azure Functions.
- Stream data to Power Bi using Azure function.
IoT Long Range Wireless Temperature Humidity Sensor
These are Industrial Grade Long Range Temperature and Humidity Sensors with a sensor resolution of ±1.7%RH ±0.6° C. Powered by just 2 AA batteries (included) with an operational lifetime of 500,000 wireless transmissions, you can expect to achieve up to 10 years of battery life depending on environmental conditions and the transmission interval can be chosen by you. Optionally, this sensor may be externally powered. These sensors have 2 Mile Range with On-Board Antenna. The range can be boasted up to 28 miles using mesh networking architecture.

Azure Functions
Azure functions is another important feature provided by azure portal. Using Azure functions, we can write a piece of code or function in cloud. In this project we are parsing the JSON containing raw sensor data and getting the real temperature and Humidity values from it using Azure function.
Some of the features of Azure functions are:
- We can write functions using our choice like C#, F#, Javascript and other supported languages as well.
- We can execute functions with HTTP request using HTTP Trigger.
- We can schedule the function using TriggerTimer.
- Functions support NuGet and NPM, so you can use your favorite libraries.
- Function can be set as the output for stream analytics job.
Setting Up Azure function
Follow these steps to set up azure function and to create your first Azure function with HTTP trigger
- Step 1 : Creating Function App Resource
- Click on create a resource in the navigation panel
- Click on Compute and search for Function App on the right

- Step 2: Create your first Function App
- Give a name to Function App
- Use the existing resource group by clicking on Use existing. otherwise, you can create a new resource group as well.
- Select Storage, Create a new one or select existing.
- Click on Create to create new Function App.

- Step 3: Change settings of Function App
- Go to the navigation panel and select Function Apps.
- We can see different functions apps listed here, Select your desired function App

- Change the runtime version. We have to select runtime version 1.0 to run Azure function properly
- Click on Azure Function App listed on left
- Select Platform features tab
- Now click on Function app settings
- In Function app settings tab change the Runtime Version to ~1, it is set to default ~2

- Change SSL settings, This setting is required to setup Azure function as output, more on this will be discussed in the next topic.
- In the platform features tab, you will see SSL under Networking tag. Click on SSL
- Under Protocol Settings, change the Minimum TLS Version to 1.0 (required for adding azure function as output of Stream Analytics Job)

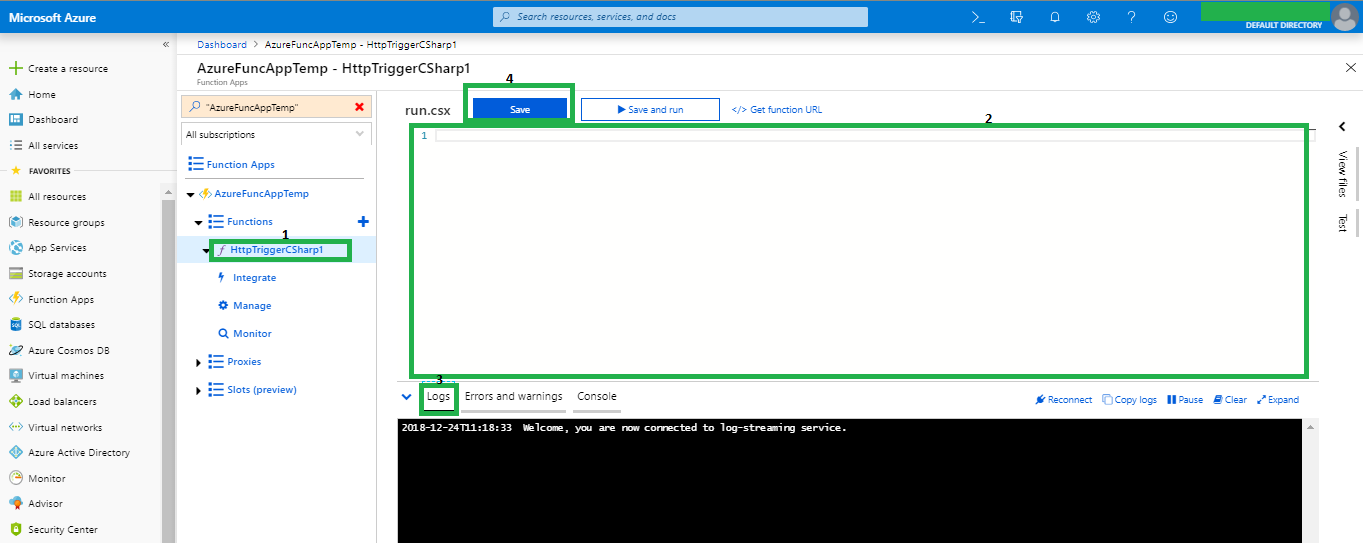
- Step4: Create a new function by clicking Functions.
- Choose a scenario. Here we are creating an HTTP trigger function, so select Webhook-API
- Choose the language of your choice
- Click on Create this function to create a new function.
- Now click on the newly created function under Functions drop-down list.
- You can write a new program, check the logs for it etc. In short, it is an IDE on cloud.

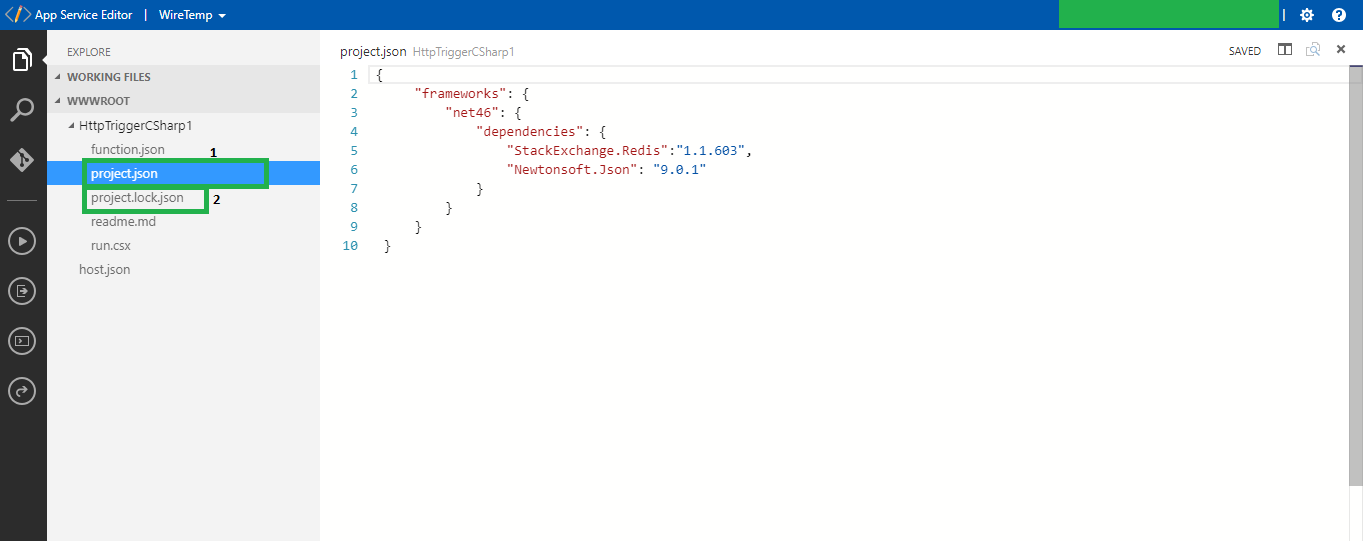
- Azure Function supports NuGet and NPM packages. So, we can use desired libraries like Newtonsoft JSON and many more.
- To add these dependencies, we need to upload a JSON script.
- Go to Platform Features and select App Service Editor under Development tools column
{
      "frameworks": {
          "net46": {
              "dependencies": {
                  "Newtonsoft.Json": "9.0.1"
              }
          }
      }
  }

- Copy the content above and create a JSON file on any Text Editor.
- In the navigation panel on the left side, Right click on the function name and select upload file
- Upload the JSON that you have just created.

Azure function as output of Stream Analytics job
We can also add Azure Function as the output of Stream Analytics job. We are receiving the raw bytes from the sensor and need to calculate the real temperature and humidity data. For that purpose we have created an Azure Function where we are feeding the raw bytes and converting those bytes in to meaningful data. Like in the post Getting Started with Microsoft Azure® and Wireless Temperature Humidity Sensor. We started Stream Analytics Job to monitor the sensor data stream and sent it to power Bi using Power Bi as the output of Stream Analytics Job. This time we have taken Azure Function as an output for Stream Analytics job. To set up Azure function as output for Stream Analytic job, Use the following steps.
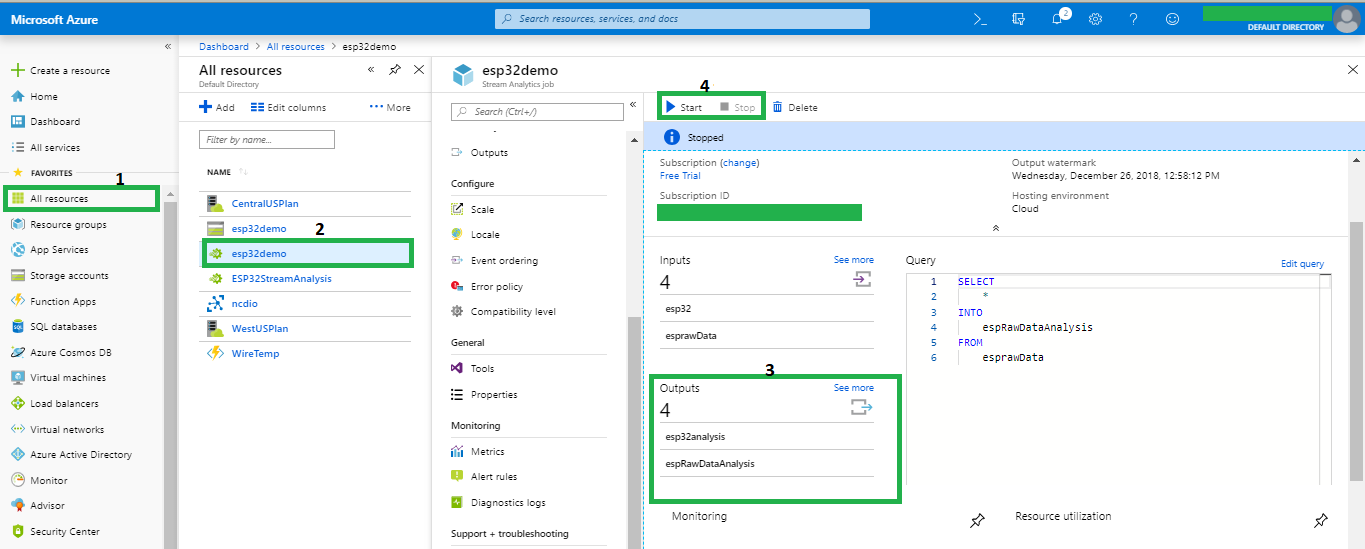
- In the navigation panel, Click on All Resources.
- Select Stream Analytics Job.
- Before editing anything in Stream Analytics Job, We have to stop the stream if it is running
- Click on Output tag to proceed further

- In Outputs page click on +Add
- Now select Azure Function from drop down list to add Azure Function as Output.

- Give Name to output
- Select Function App and Function.
- Click Save.


- You can see your output listed among all other outputs.

- Now we need to edit query. Select Query from navigation panel.
- Edit the query and add azure function to INTO query.
- Start the Stream.
Intro to Power BI
We are using Power BI to visualize the data. It provides interactive ways to analyze data. This data can be interpreted in the form of Line charts, Bar graphs, Pie charts etc. Start by creating an account in Power Bi and sign in into your account. In the last post, we had set up Power Bi and sent data to Power Bi using stream analytics job. In this post, we are using Azure function to send the sensor data to power Bi. To set up Power Bi using Azure Function we need to follow these steps
Setting up power Bi
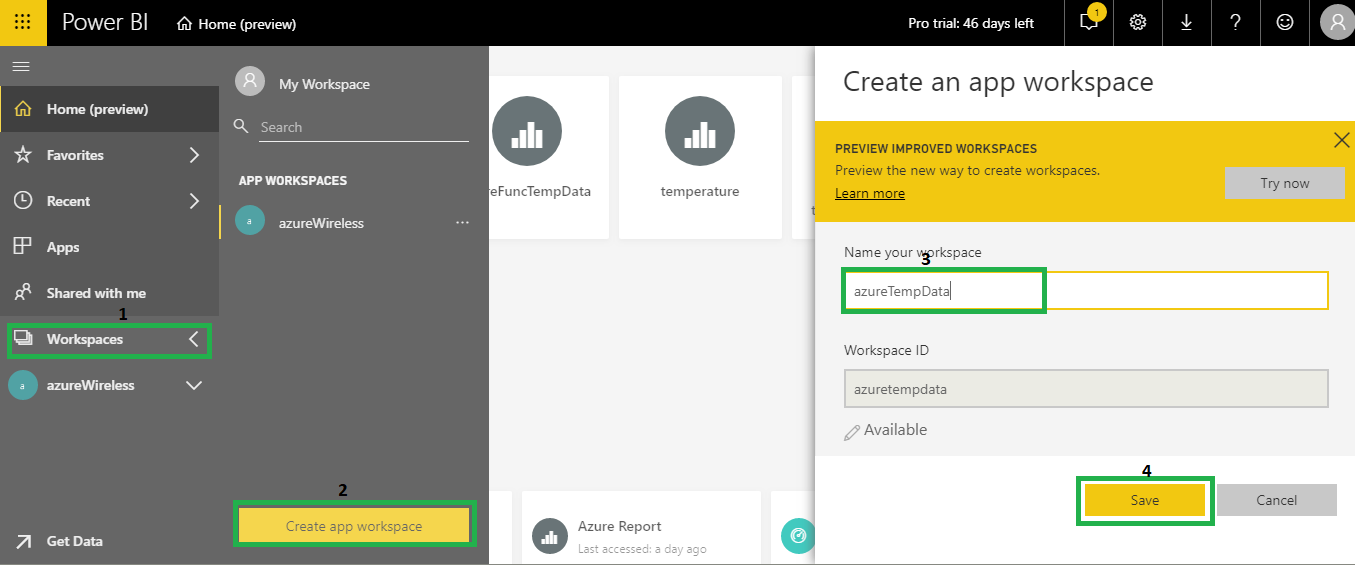
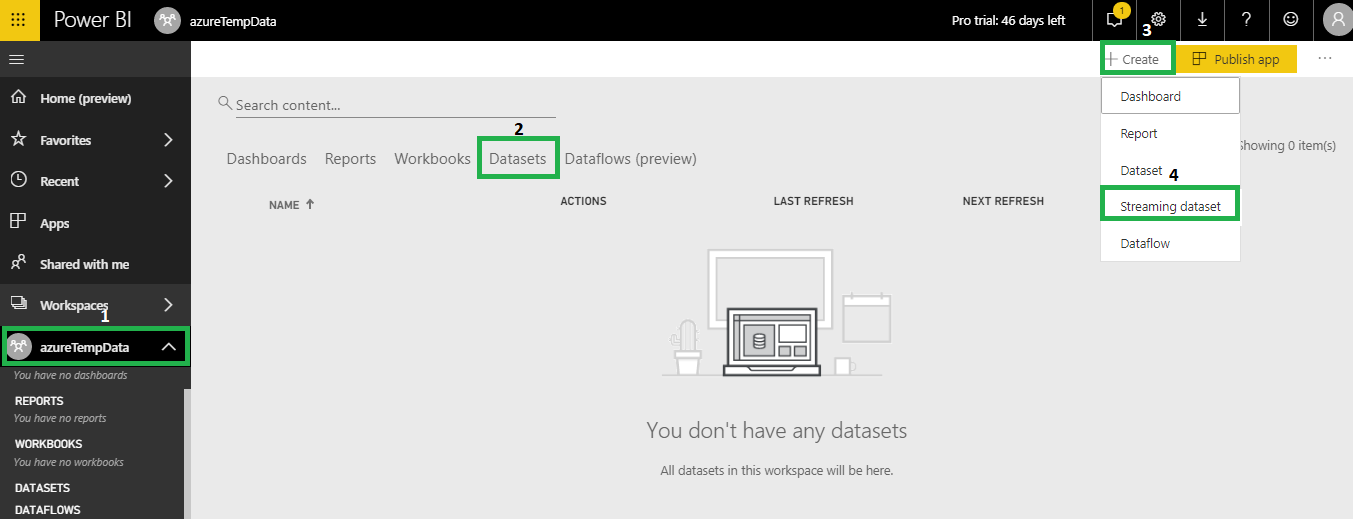
- Firstly, We need to create a WorkSpace.
- Click on Workspaces listed in the navigation panel on left
- Click on Create app workspace
- Give a name to your workspace and hit Save
- Click on skip on the bottom right corner to skip to the dataset page
- Now click on +Create and select Streaming dataset option
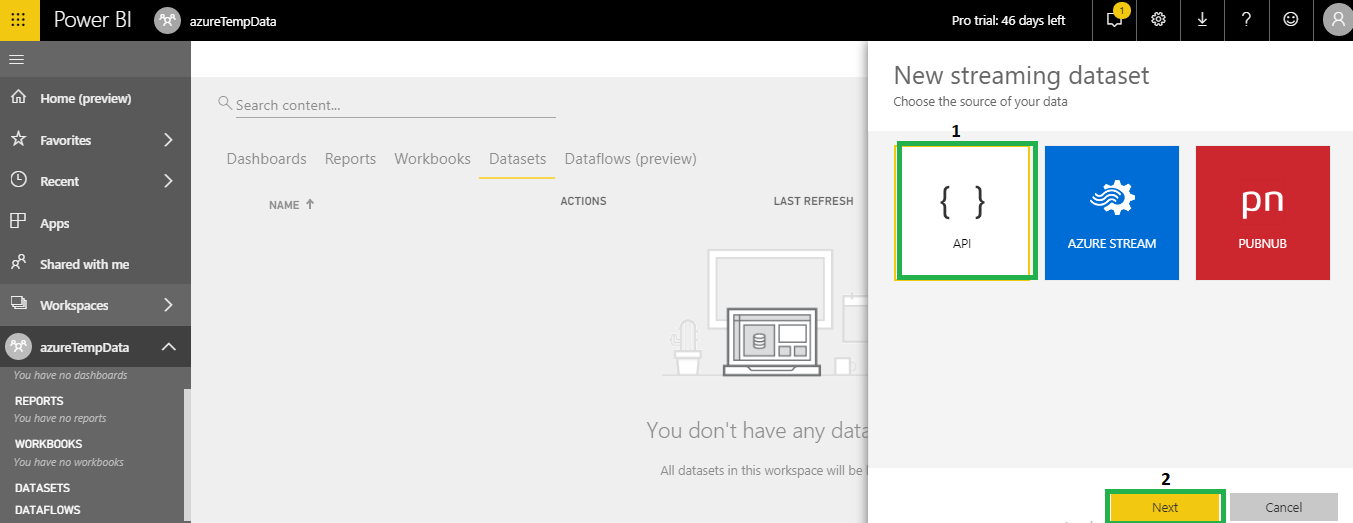
- We will be using POST request for posting data to PowerBi API, So choose API option
- Click on Next
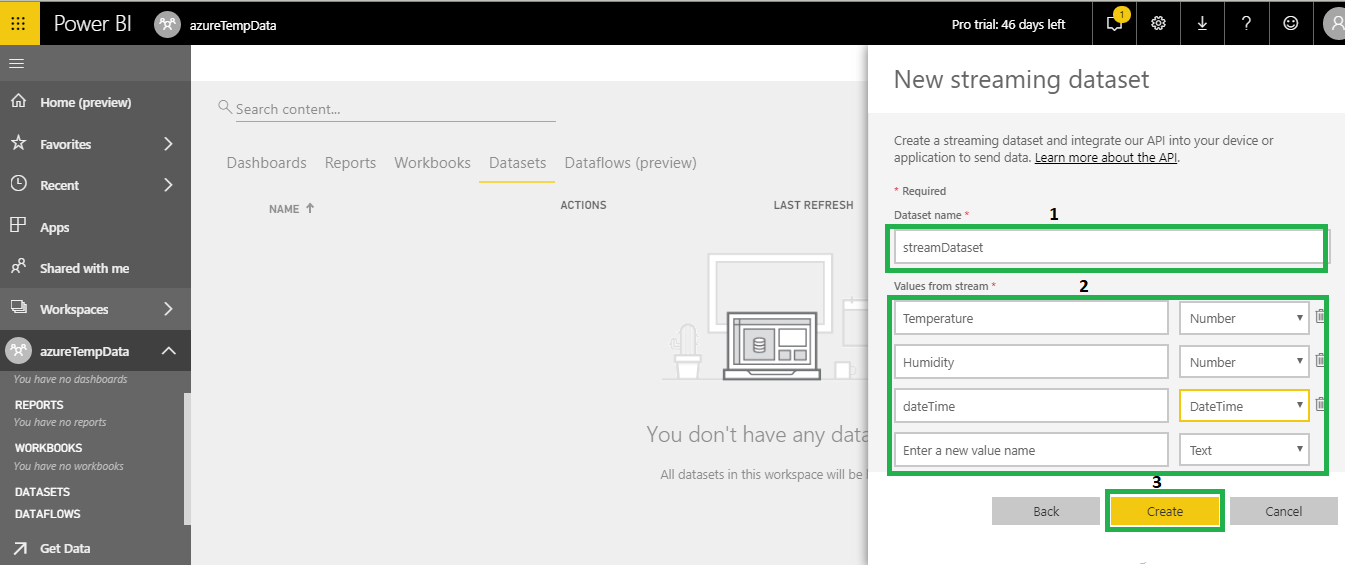
- Give Name to your New Streaming Dataset
- Give Values to the Stream and click on Create
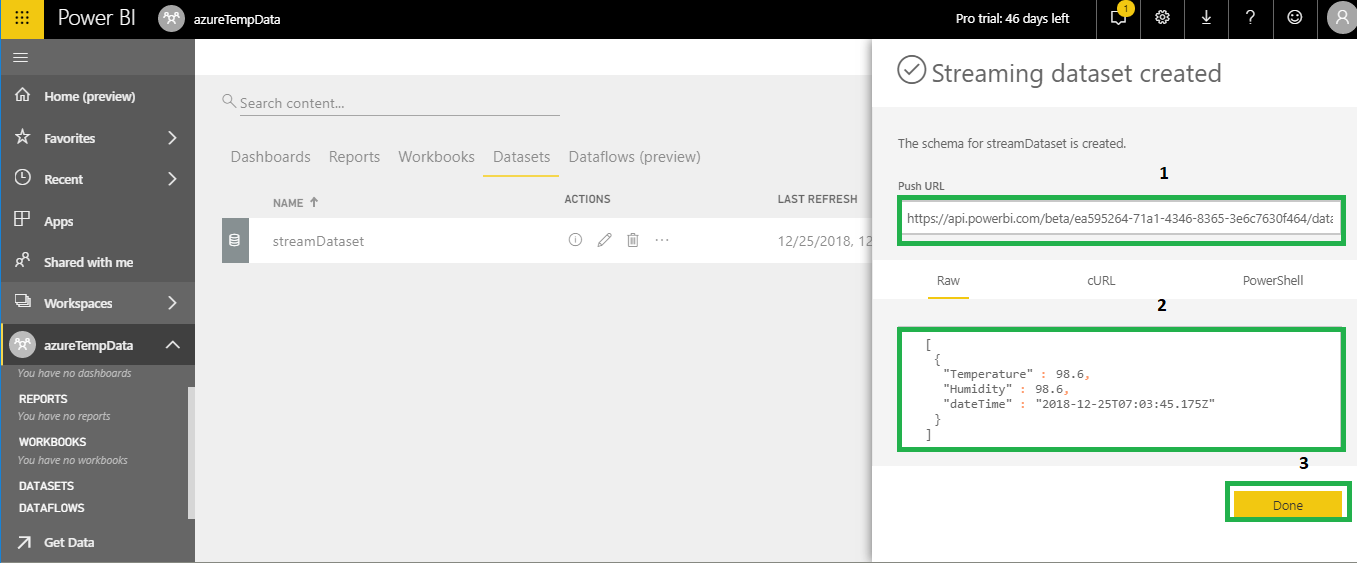
- Now you will be provided with PowerBi URL in the next page, using this API we can POST the data to PowerBi.
- Click on Done
Gateway Code
Here we are going to illustrate, How to collect sensor data from Wireless Temperature and Humidity Sensors, How to connect ESP32 to Azure, using MQTT link. Sending data to Azure and receiving messages from Azure.
Collecting Sensor data
- Create variables for storing temperature, humidity, battery, and other sensor values.
- Set the Rx, Tx pin, baud rate and parity bits for the hardware serial.
- First, check that there is something to read using Serial1.available().
- Check for 0x7E which is start byte.
- Humidity, temperature and battery values will be containing 2 bytes of data.
- Get the sensor name, type, sensor version will be containing 1 byte of data and can be got from there respective address.
Connecting to Azure
- Include AzureIotHub.h, Esp32MQTTClient.h header files to set up a connection with Azure IoT hub.
- Enter your connection String.
- Create char variable to store your JSON, in this case, we have created messageData to store JSON.
- Send the message Data to azure IoT hub.
ESP32 Firmware
ESP32 Azure firmware can be found here.
Azure Function Code
Azure Function Code can be found here
Here We will be describing the code for Azure functions first we will create an HTTP Trigger
Add these dependencies, Newtonsoft.Json is for JSON serializing and deserializing
#r "Newtonsoft.Json"
using Newtonsoft.Json;
using Newtonsoft.Json.Linq;
using System.Net;
Create variables for storing temperature, humidity, battery and other values
double humidity;
  int rawTemp ;
  double Ctemp ;
  double Ftemp ;
  double voltage ;
  string utcEnque ;// utcEnqueueTime
  string utcProcess ;// utcProcessTime
Parse the JSON array
JArray array = JArray.Parse($"{await req.Content.ReadAsStringAsync()}");
Parse all the JSON objects from the JSON, and get the real values of temperature, humidity, and others. Here the product is a Product class object where we are storing the parsed values
Product product = new Product();
foreach(dynamic message in array){
humidity = ((message.humid1)*256 + (message.humid2))/100;
rawTemp = ((message.temp1)*256 + (message.temp2));
Ctemp = rawTemp /100.0;
Ftemp = Ctemp *1.8 + 32;
int bat = ((message.bat1)*256 + (message.bat2));
voltage = 0.00322 * bat;
utcProcess = message.EventProcessedUtcTime;
utcEnque = message.EventEnqueuedUtcTime;
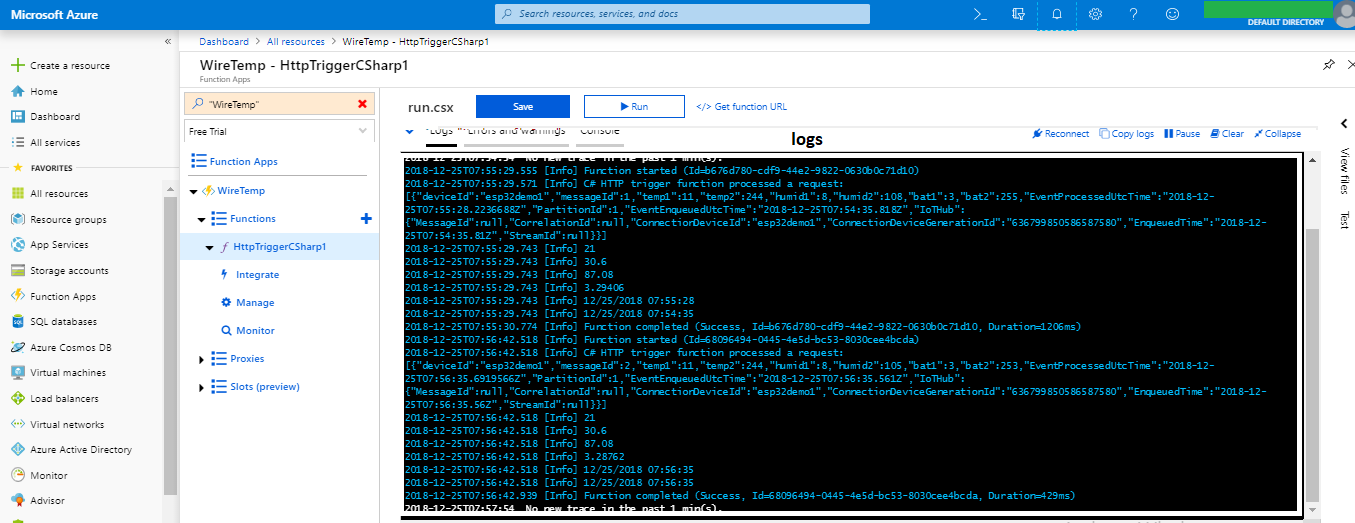
log.Info(humidity.ToString());
log.Info(Ctemp.ToString());
log.Info(Ftemp.ToString());
log.Info(voltage.ToString());
log.Info(utcProcess);
log.Info(utcEnque);
product.Ctemperature = Ctemp;
product.Ftemperature = Ftemp;
product.humid = humidity;
product.battery = voltage;
//product.dateTime = ;
product.EventProcessedUtcTime=utcProcess;
product.EventEnqueuedUtcTime=utcEnque;
}
public class Product{
public double Ctemperature{get; set;}
public double humid{get; set;}
public double battery{get; set;}
//public double dateTime{get; set;}
public string EventProcessedUtcTime { get; set; }
public string EventEnqueuedUtcTime { get; set; }
public double Ftemperature{get; set;}
}
- Now create a variable to store a connection string of Power Bi
- Create an instance of HTTP client
  string connString = "https://api.powerbi.com/beta/***************";
  HttpClient client = new HttpClient();
- We need to send JSON to power Bi. So, Serialize the Json using model class object.
- Send the converted JSON to power bi as an HTTP request.
string output = JsonConvert.SerializeObject(product);
HttpContent httpContent = new StringContent("[" + output + "]");
HttpResponseMessage response = await client.PostAsync(connString, httpContent);
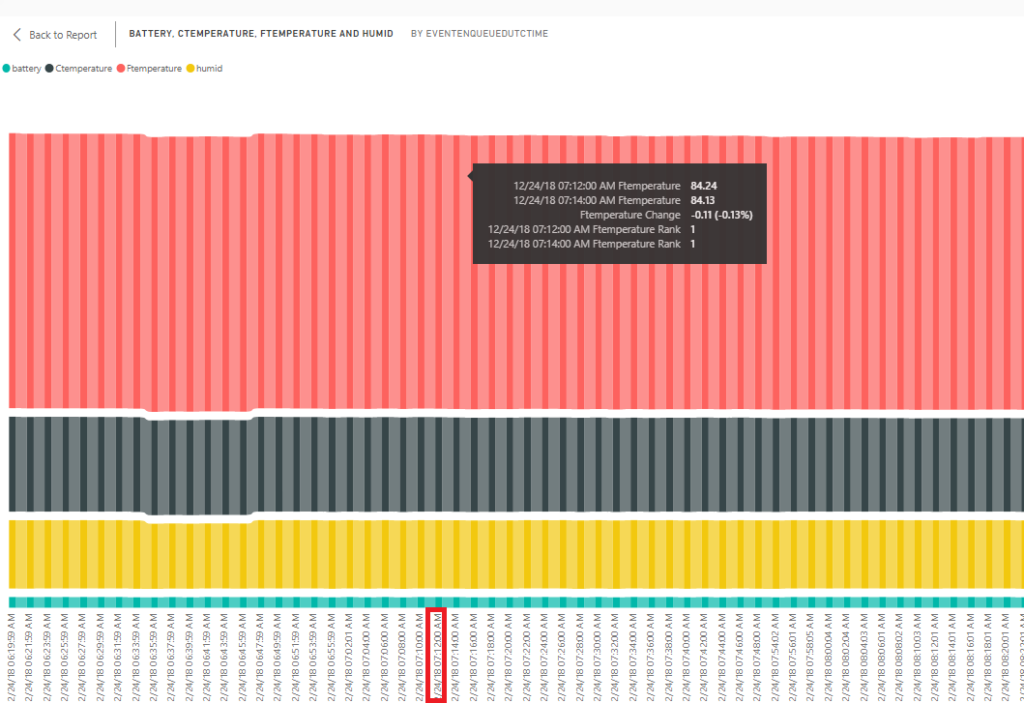
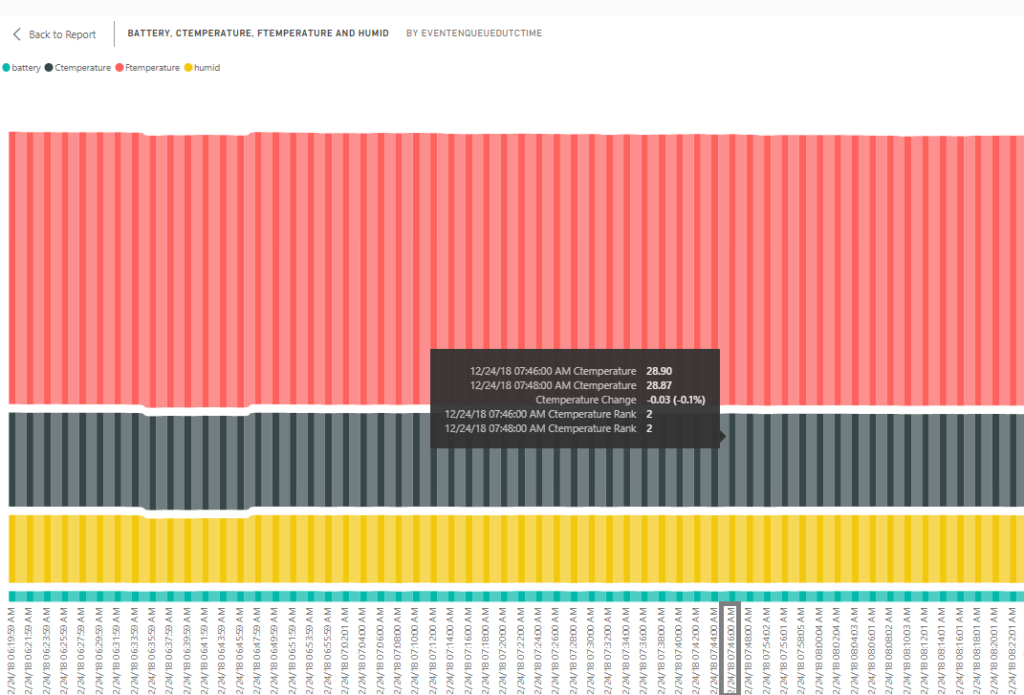
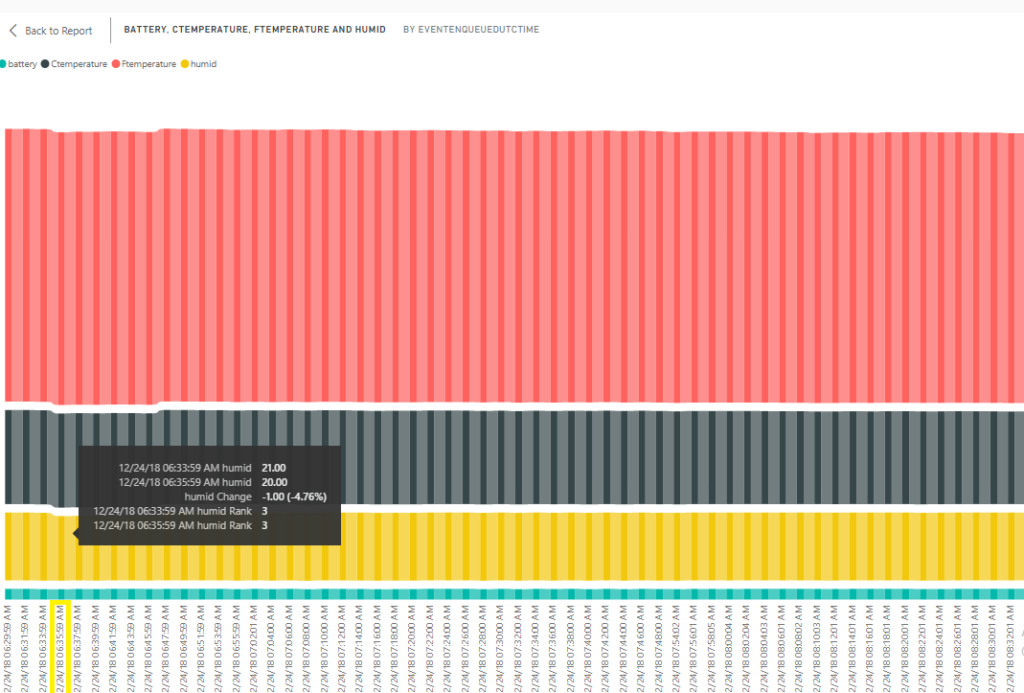
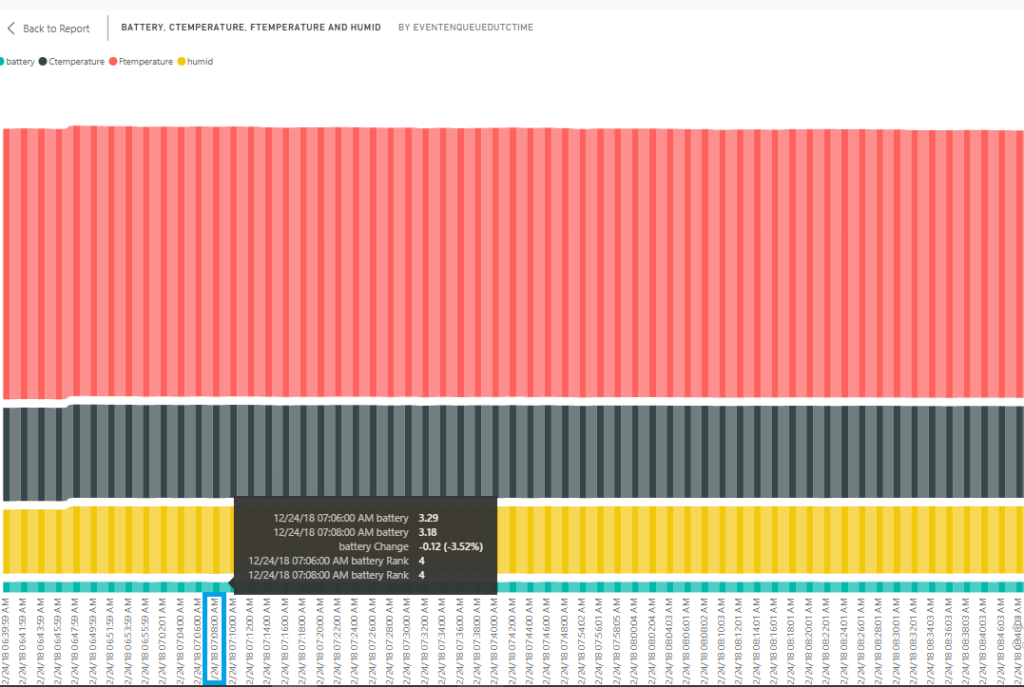
response.EnsureSuccessStatusCode();Data Visualization
Here we are visualizing our sensor data at different dates and time. We can see the percentage change in Humidity, Temperature and Battery Usage during different days with there values respectively.