Connect the entire ecosystem of NCD IoT sensors to Ubidots in just a few minutes! Ubidots is an innovative IoT company with a strong focus reliability, connectivity, and easy of use. NCD sensors are easily integrated into the Ubidots platform. Before proceeding through this article I would highly recommend referencing the WiFi Micro Gateway Setup for MQTT article. It explains the MQTT Gateway in greater detail. This article simply serves as a reference as to connecting the MQTT Gateway to Ubidots.
Things you will need
Be sure to setup Ubidots account before you get started.
A WiFi network with internet connectivity for connecting the MQTT Gateway. Please note that only 2.4GHz connections are currently supported.
In this setup guide, NCD Long Range wireless sensors will send data to a Gateway located up to 2 miles away from the sensors in your installation. The Gateway will forward the IoT sensor data to Ubidots using the MQTT Protocol. Data about the gateway and all associated sensors will be visible on the Ubidots dashboard.
The first step is getting a token for connecting an MQTT client to Ubidots. Sign into your Ubidots account, then click on your user icon in the top right corner then copy out the token available there. We use this token for the username on the MQTT connection.
Note: This guide covers basic authentication on the MQTT connection. While Ubidots and the NCD MQTT Gateway both support TLS connectivity, we will not be using TLS in this example.
Step 2: Open the Gateway Setup Page
If your gateway is not already in setup mode (Flashing Blue LED) then open the lid by removing the 4 screws, then press and hold the Red CFG until the LED begins flashing Blue. Once the LED is flashing Blue then it is in setup mode.
On your computer, smart phone, or tablet scan for WiFi networks, then once it appears connect to WiFi Micro Gateway. Many devices will automatically pop up a window for configuration of the Gateway as soon as you connect, if this does not happen simply open your web browser and enter 172.217.28.1. Either way you should see the configuration page for the Gateway.
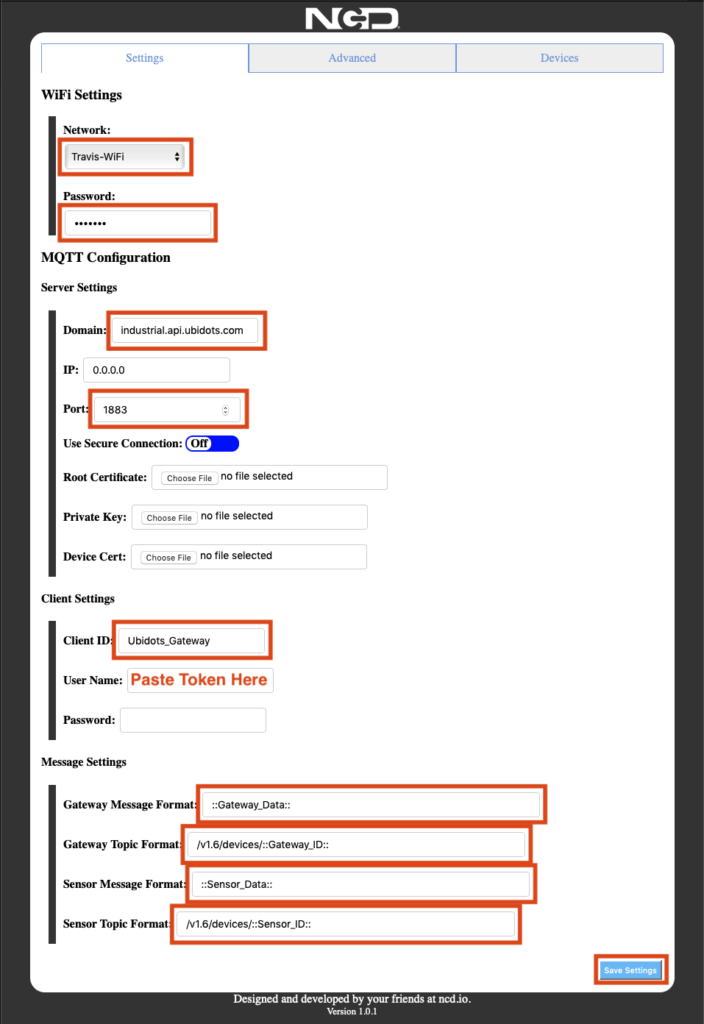
The screen shot to the right is an example of how to configure the MQTT Gateway for connection to a Ubidots account.
Select the WiFi network to associate the MQTT Gateway to a local router with internet connectivity.
Enter the password for your WiFi network.
Ubidots has a couple of possible MQTT broker host end points. This tutorial is using the Industrial end point. Enter industrial.api.ubidots.com into the Domain field.
Since TLS will not be used in this tutorial, Set the Port value to 1883. Use a port value of 8883 for TLS.
For Client ID, enter a unique name for the Gateway. Do not use multiple MQTT clients with the same Client ID.
In the User Name field, paste in the Token you previously copied from Ubidots (Step 1 Above).
Set the Gateway Message Format to ::Gateway_Data:: This is a token that indicates the formatting method for gateway communications. More information on supported gateway message formats may be found in the WiFi Micro Gateway Setup for MQTT article.
Ubidots documents the topic structure, which requires topics to be prepended with /1.6/devices/device_id so for Gateway Topic format. Enter /v1.6/devices/::Gateway_ID:: This is the topic the Gateway will use to report information about itself.
For Sensor Message format, enter ::Sensor_Data:: this will simply post the sensor’s transmitted information as a JSON formatted packet.
For Sensor Topic format, Ubidot’s documentation suggests prepending the topic with /v1.6/devices/, be sure to enter /v1.6/devices/::Sensor_ID::
Finally, click the “Save Settings” button. The MQTT Gateway will now store your settings, reboot, connect to WiFi, then try to establish a connection to the Ubidots broker utilizing the indicated settings. The LED on the gateway should begin flashing Green, which indicates the gateway is fully functional and has an established connection to Ubidots.
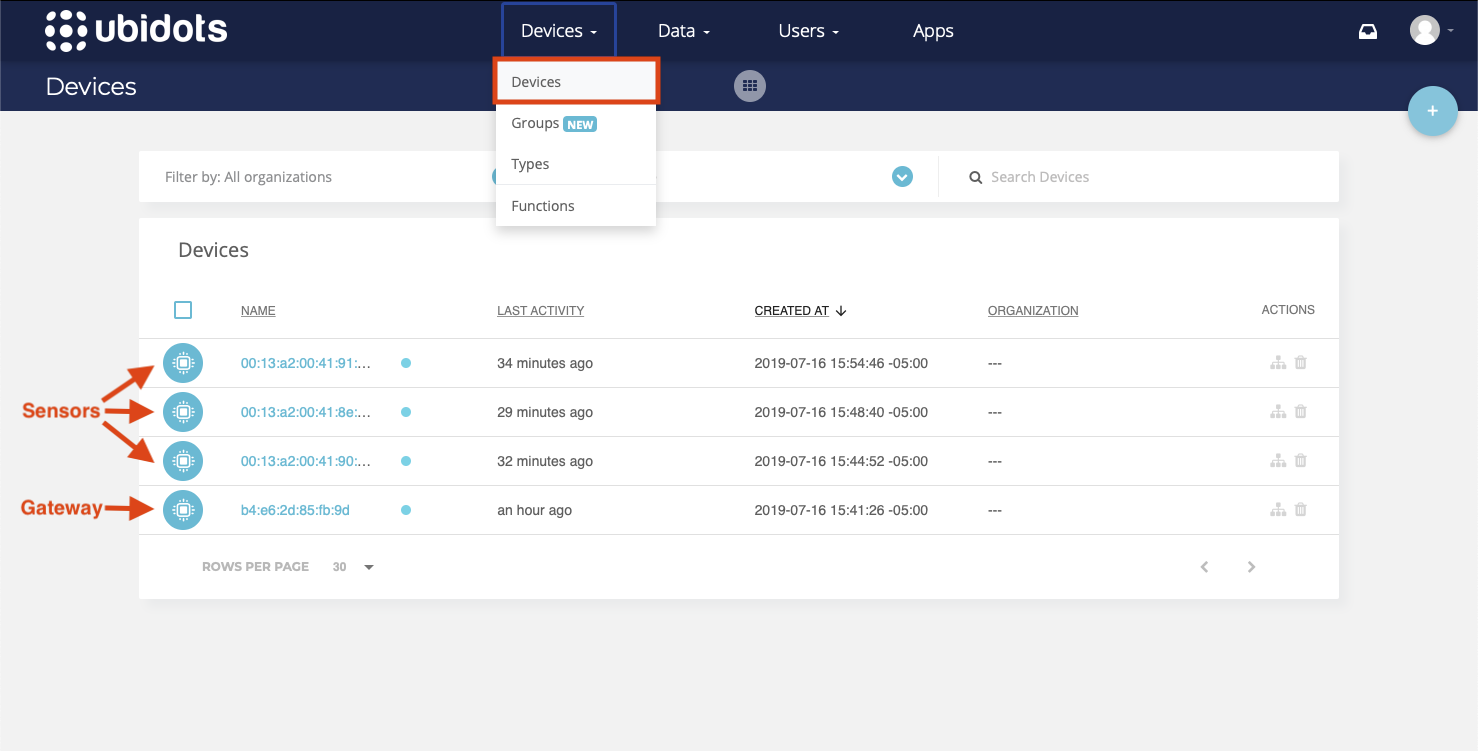
Step 4: Display Ubidots Devices
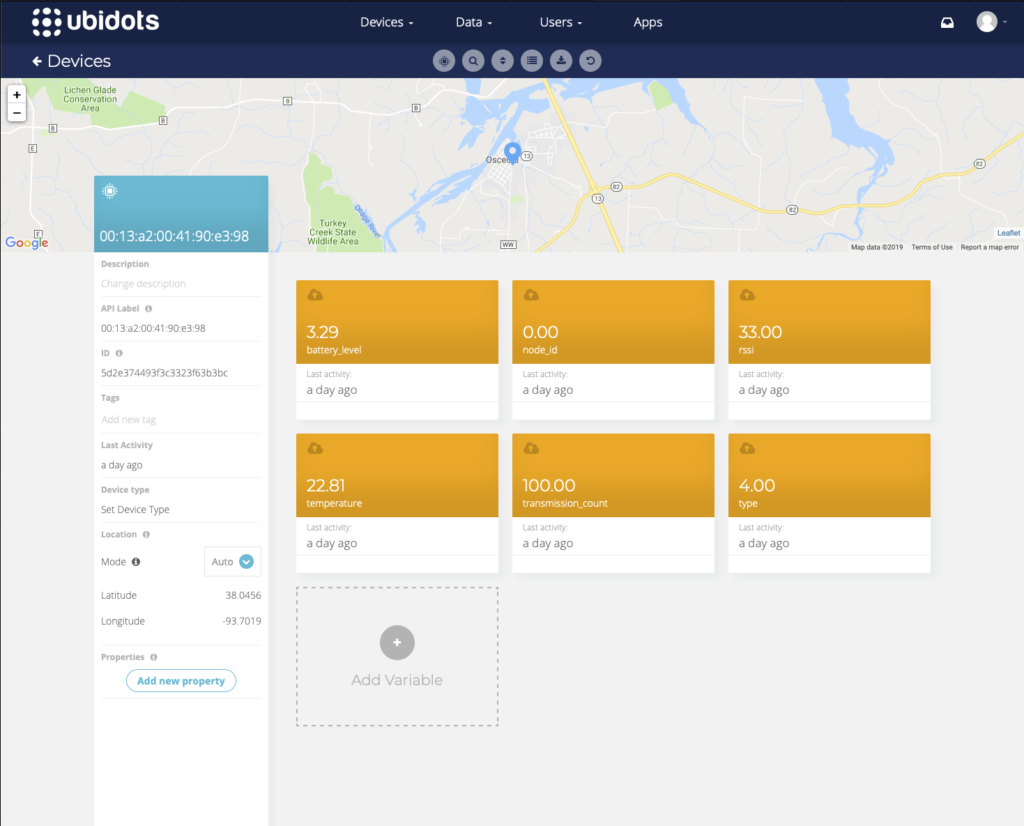
Reconnect your computer to your regular network with internet connectivity. From the Ubidots dashboard, go to your Ubidots account. Click on the “Devices” drop-down menu, then click “Devices” to view the list of devices. You should see NCD sensors and your MQTT gateway in this list. The name of the Gateway will never begin with 00:, as this is reserved for the sensors. If you have any sensors powered up, they will automatically appear here as well. Click on a sensor to view sensor readings and other information.
From here, we leave it to you to use the Ubidots platform to communicate with NCD sensors.