

Shop Floor User Guide
Shop Floor shows which machines are running right now and how long each one has run — this shift, today, this week, and all the way back to the day it was added. It sets up each machine’s sensor for you, counts cycles, tracks service hours, and tells people and other apps when a machine has been stopped too long.
01Overview
Shop Floor turns NCD run-detection sensors into a live view of the plant floor and a record of how much every machine runs.
Each machine gets a sensor that decides for itself whether the machine is running: a vibration sensor on the machine’s frame, a current clamp on its supply, or a contact input wired to a run signal. Shop Floor sets that sensor up with a guided procedure that measures the machine off and running, then follows every report it sends. Run time comes from the sensor’s own running counter, so a radio report that never arrives loses no time.
Shop Floor reports run time, not OEE. It does not need production targets, part counts or a schedule to be useful.
02Requirements
What has to be in place before you add your first machine.
| Item | Requirement |
|---|---|
| Atrium platform | 2.7.1 or newer. Learning a current sensor’s threshold needs 2.8.0; on an older platform the setup says so, and the threshold can be set by hand under Advanced. |
| Gateway | Atrium EG5120 or EG5100. |
| Sensors | One of the run-detection sensors below, whitelisted on the gateway. One sensor input per machine; a sensor with several inputs can serve several machines. |
| Sensor configuration | Atrium manages this sensor’s configuration must be on for the sensor (it is by default). Shop Floor changes the sensor’s settings through Atrium. |
| License | The app is free and needs no license. |
Supported sensors
| Sensor | Type | Detects running from |
|---|---|---|
| Machine Runtime Hour Meter | 119 | Vibration (also a magnetic-field input) |
| AC Current Detection Sensor | 33 | Current through a clamp-on CT (100, 200, 600 or 1000 A) |
| Machine Uptime Monitoring Sensor | 108 | Contact, current (CT), opto, vibration or magnetic-field input |
| Two-channel contact input | 2 | Either of two dry-contact inputs |
| One-, two- and three-channel production counters | 132, 133, 123 | The counter’s inputs |
03Installing
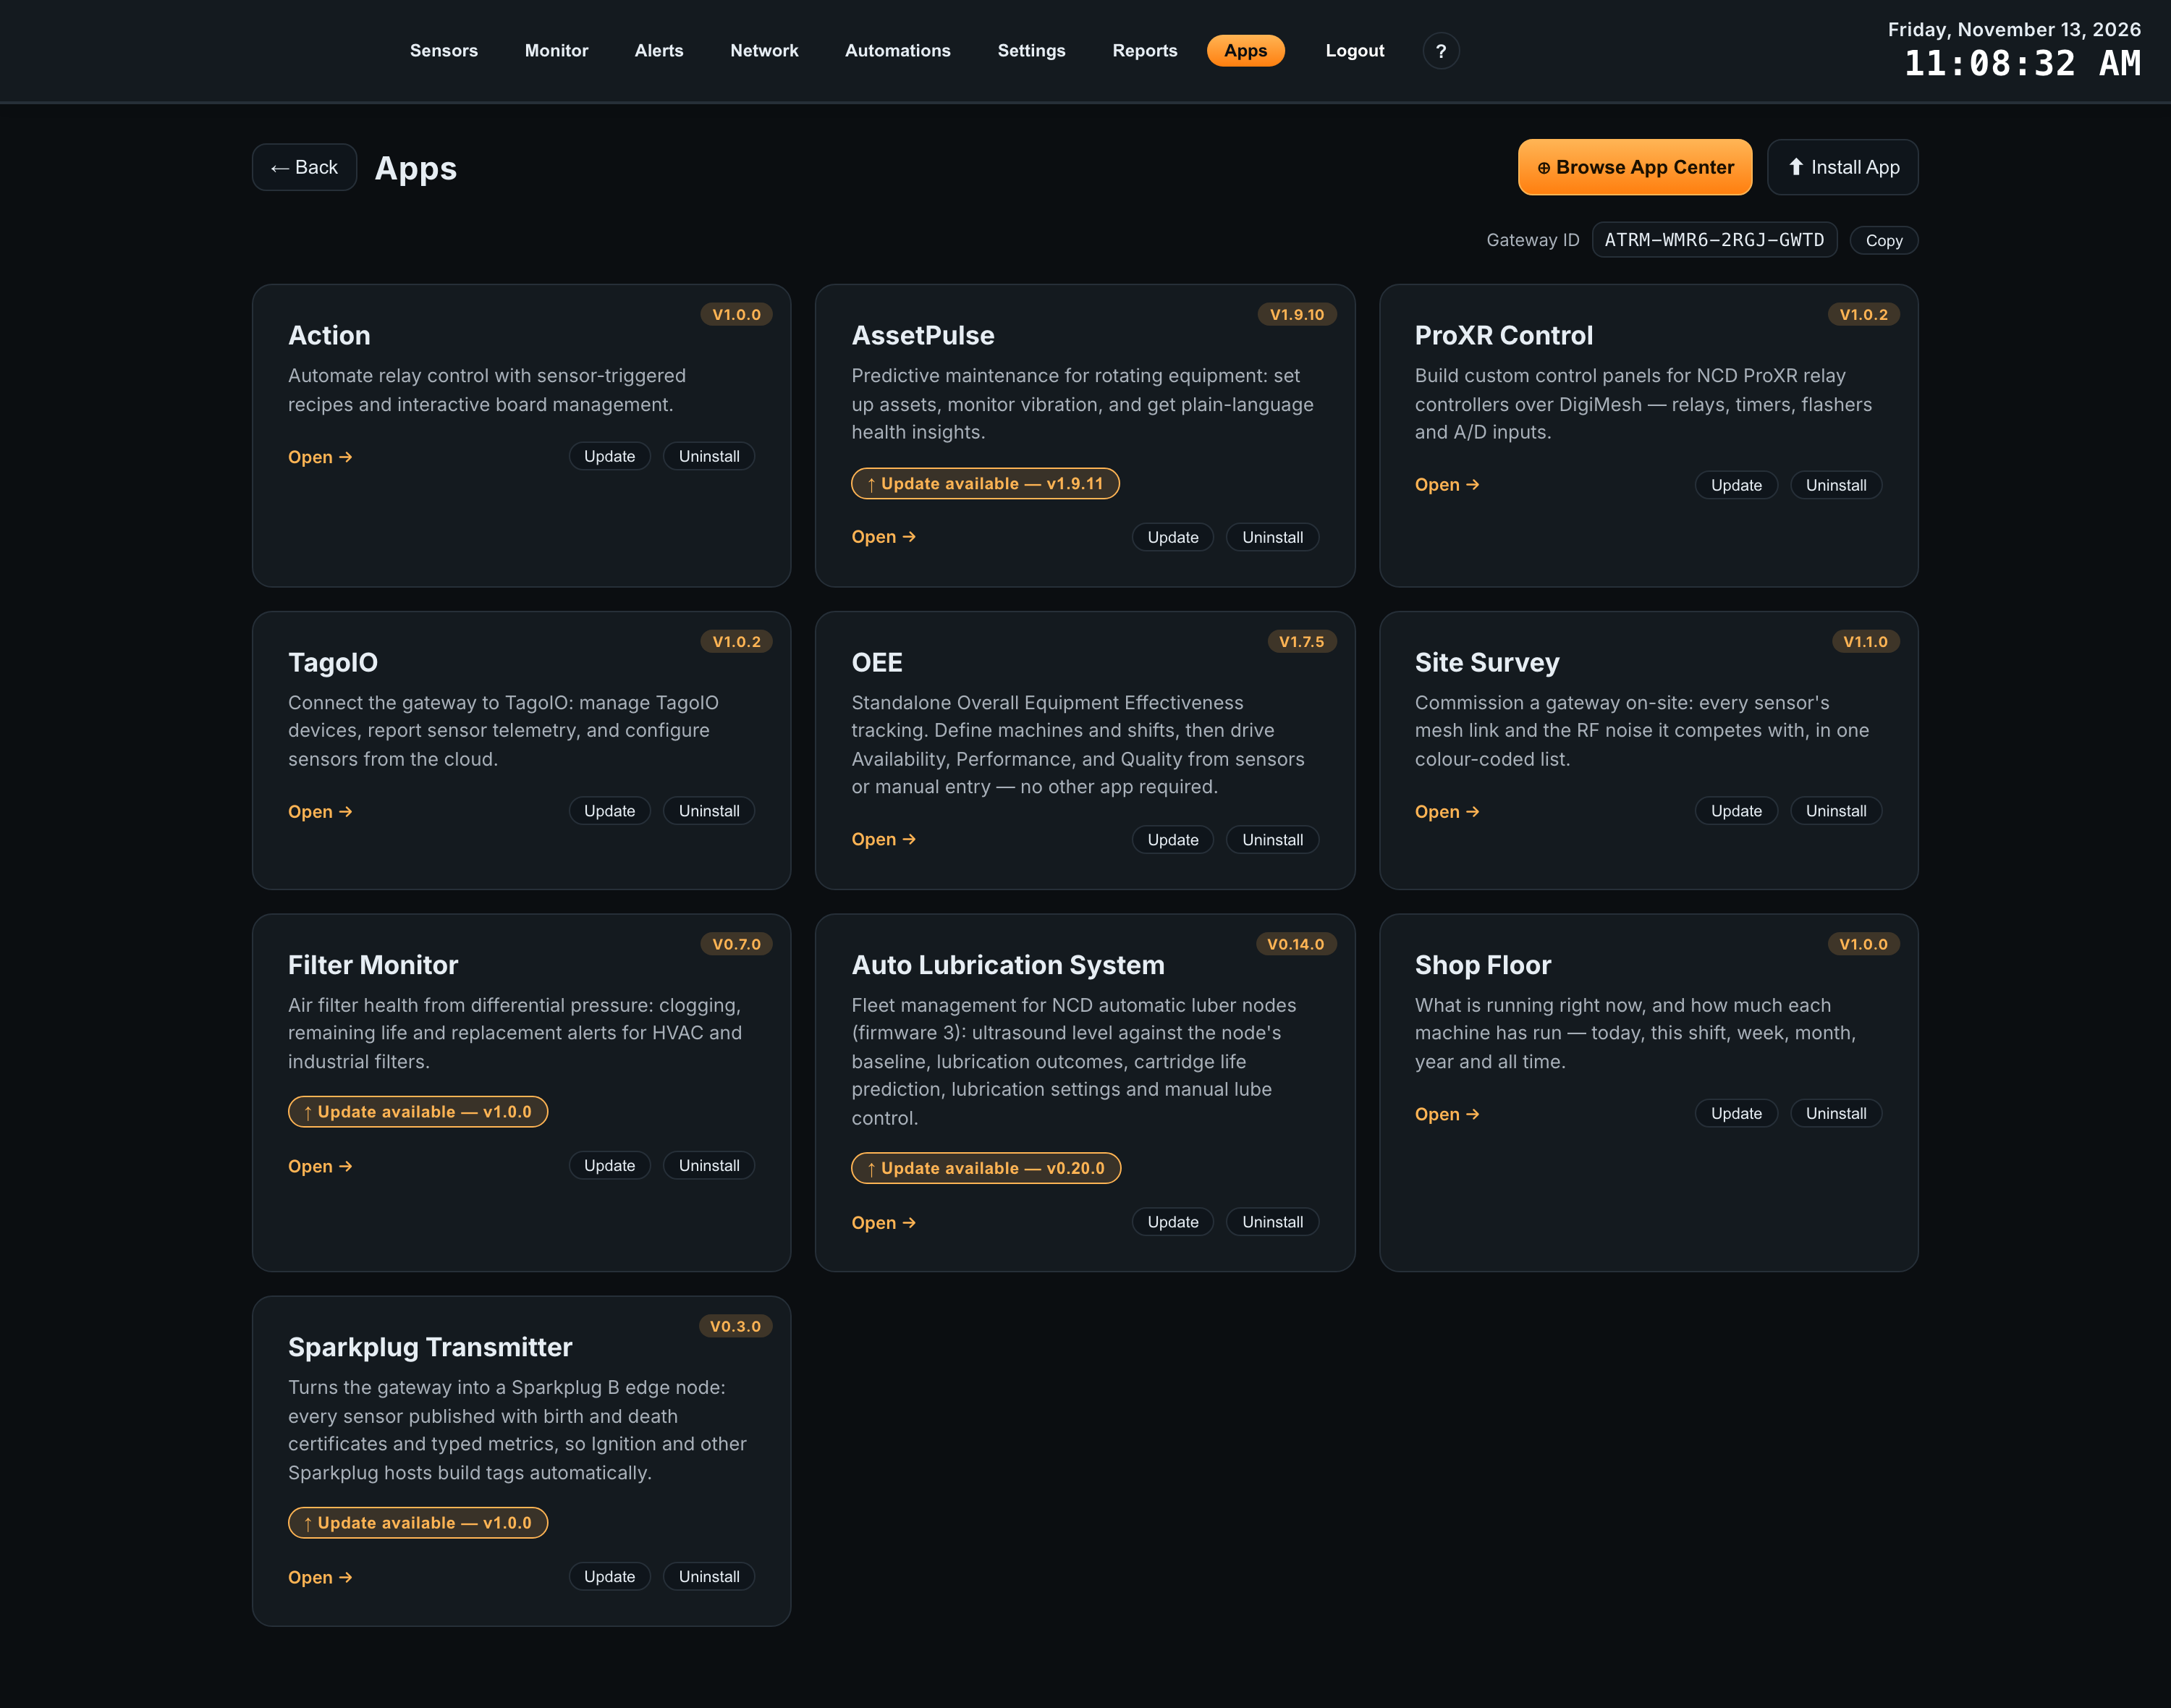
Install the app from the gateway’s Apps page like any other Atrium app.
-
1
Open Apps on the gateway dashboardClick Browse App Center and install Shop Floor, or click Install App and upload the app package you were given.
-
2
Wait for the services to restartInstalling restarts the gateway’s services, which takes a few seconds. The app then appears on the Apps page as Shop Floor.
-
3
Open the appClick Open on the card. Shop Floor opens on the floor view, which reads No machines yet until you add one.
04First-Time Setup
The shortest path from a fresh install to a machine on the floor view. Do it at the machine: setup asks you to start and stop it.
1. Set your shifts
Shifts are optional, but set them first if you run them: run time is filed under the shift it happened in from the moment it is recorded.
-
1
Open SettingsClick Settings at the top right of the floor view.
-
2
Add each shiftUnder Shifts, click + Add shift, then enter its name, start and end time, and the days it runs.
-
3
Check the production dayUnder Production day, set Day starts at to when your first shift starts (default 6:00 AM). Click Save settings.
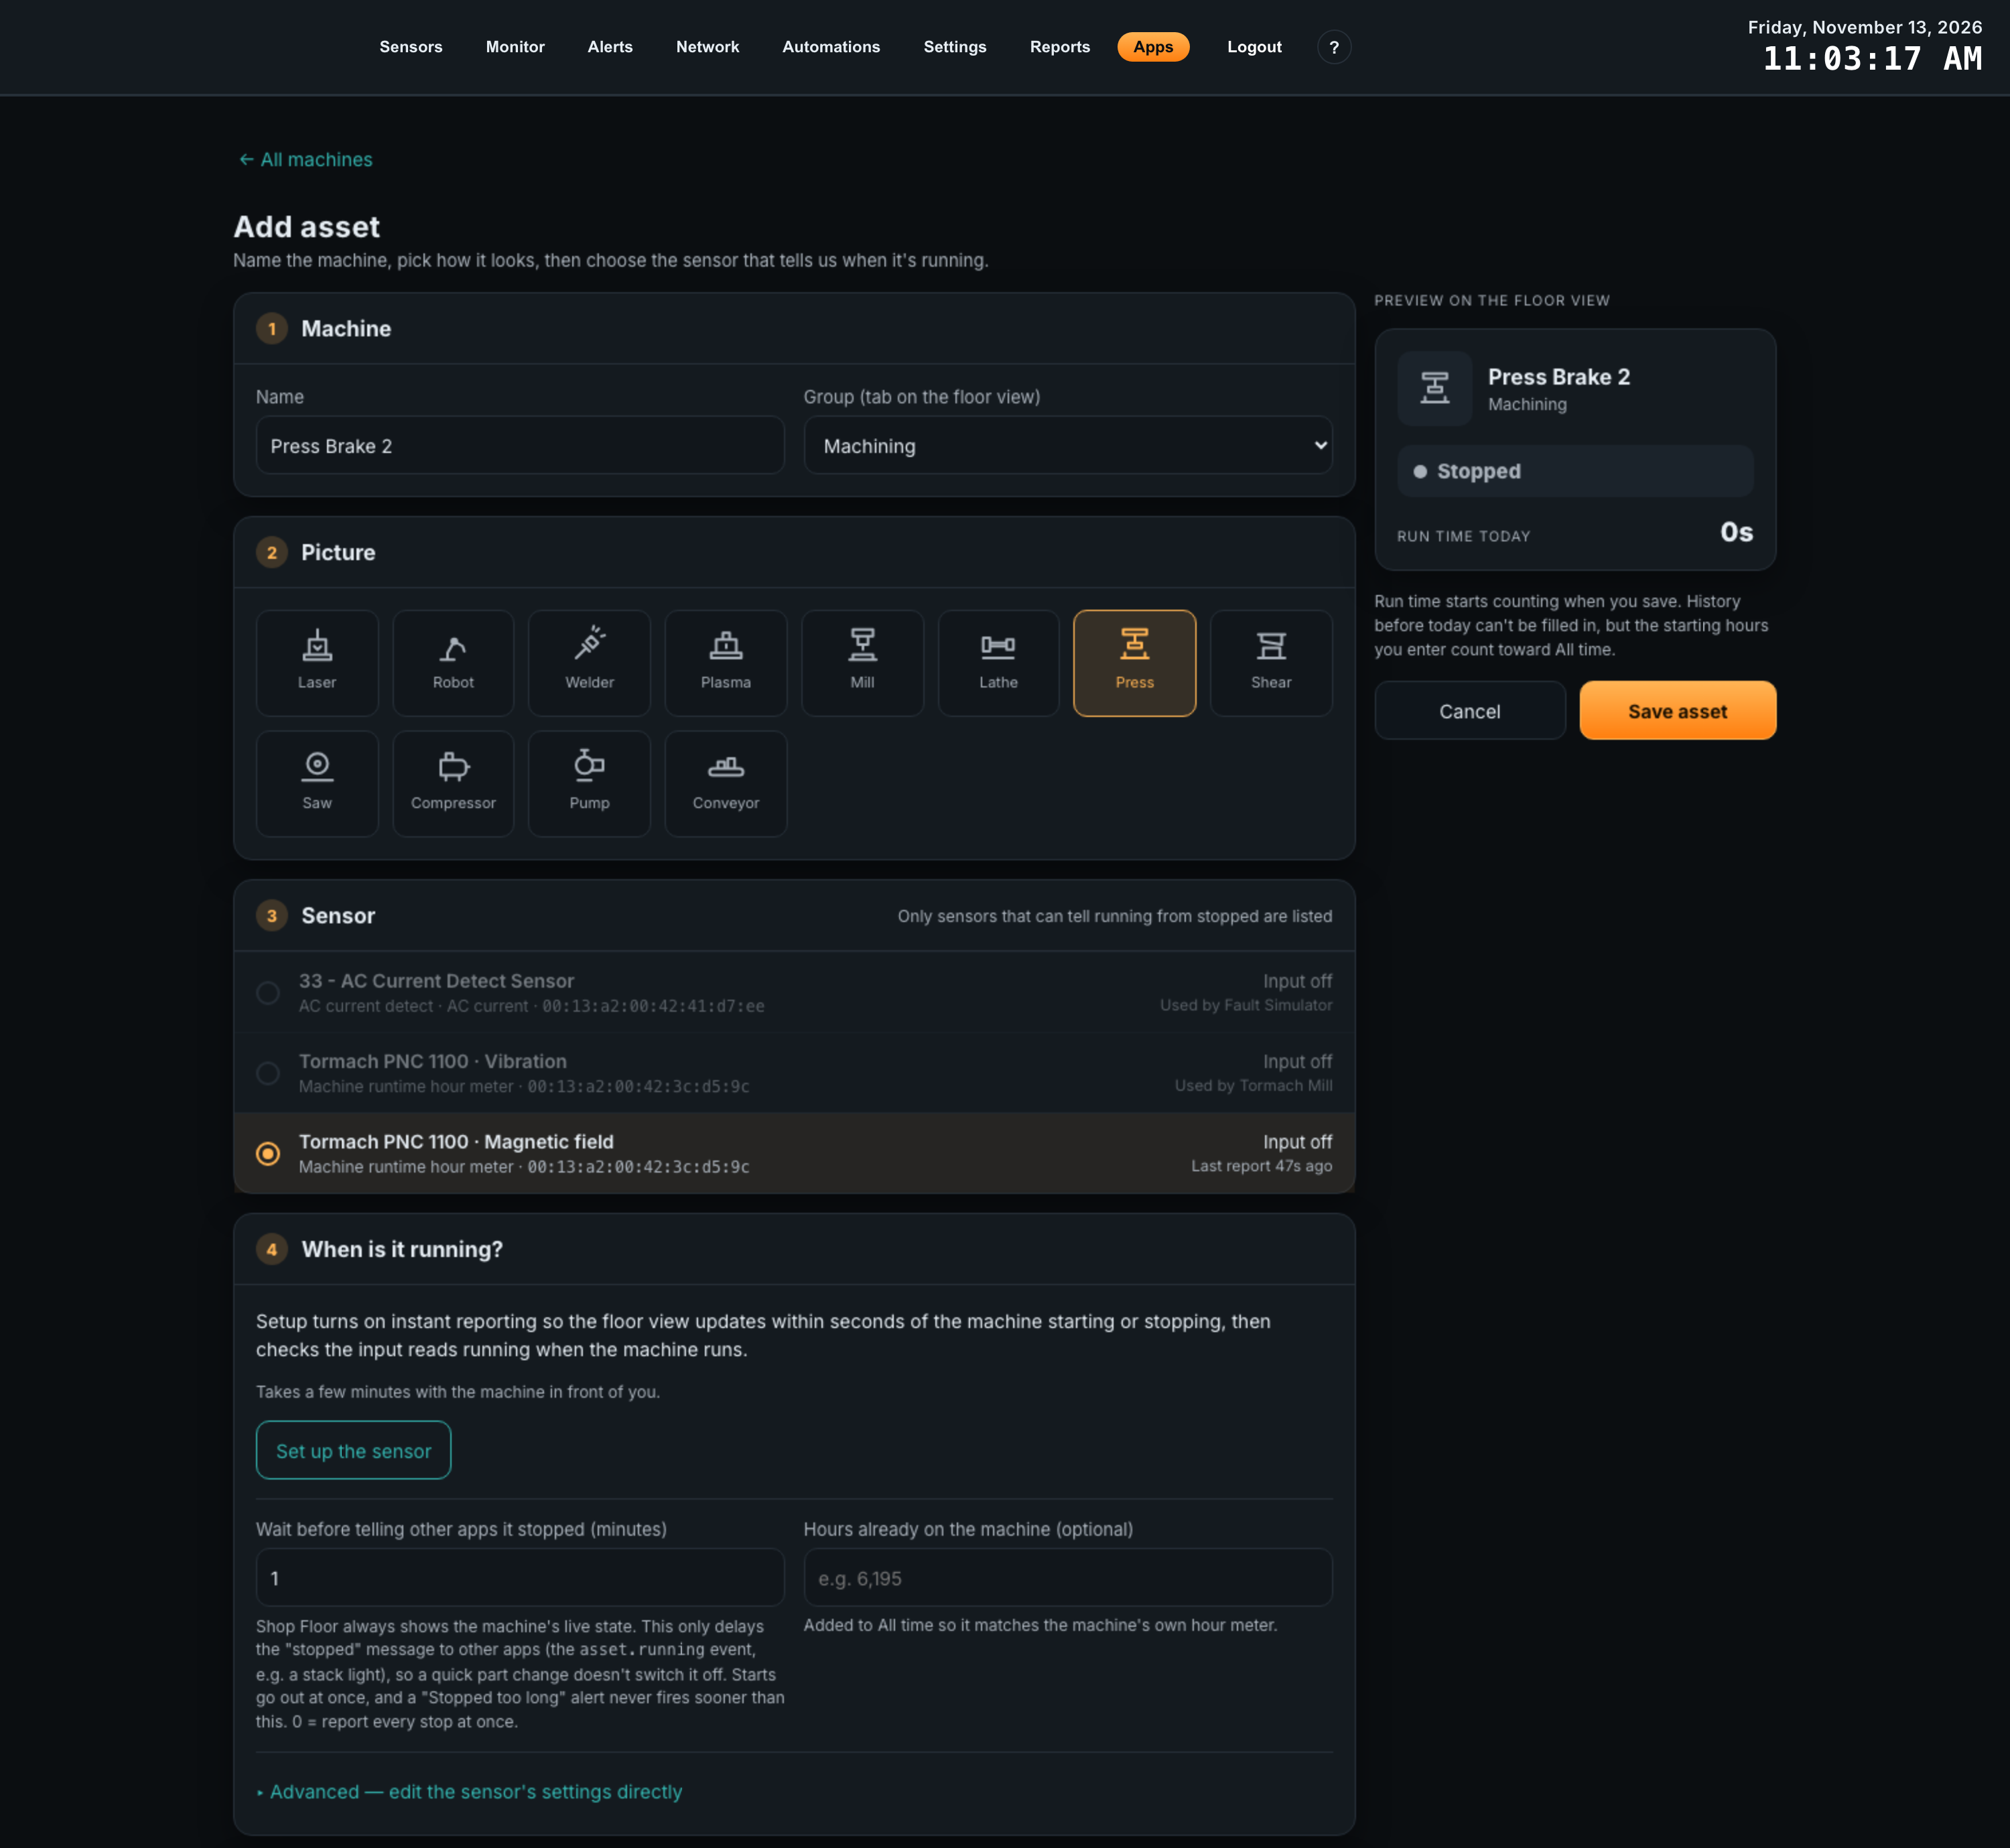
2. Add a machine
-
1
Click + Add assetOn the floor view, click + Add asset.
-
2
Name it and pick a pictureEnter a Name, choose a Group (or + New group…), and pick the picture that matches the machine.
-
3
Choose its sensorUnder Sensor, click the sensor input on this machine. Only sensors that can tell running from stopped are listed; inputs already used by another machine are greyed out.
3. Set up its sensor
-
1
Start the sensor setupUnder When is it running?, click Set up the sensor. Setup opens in its own window and walks you through the steps for that sensor type; Sensor Setup describes each one.
-
2
Finish with the checkThe last step asks you to start the machine. Setup finishes by itself with Setup complete as soon as Shop Floor sees it running.
-
3
Save the machineClick Save asset. Run time starts counting from now; enter Hours already on the machine first if you want All time to match the machine’s own hour meter.
05Floor View
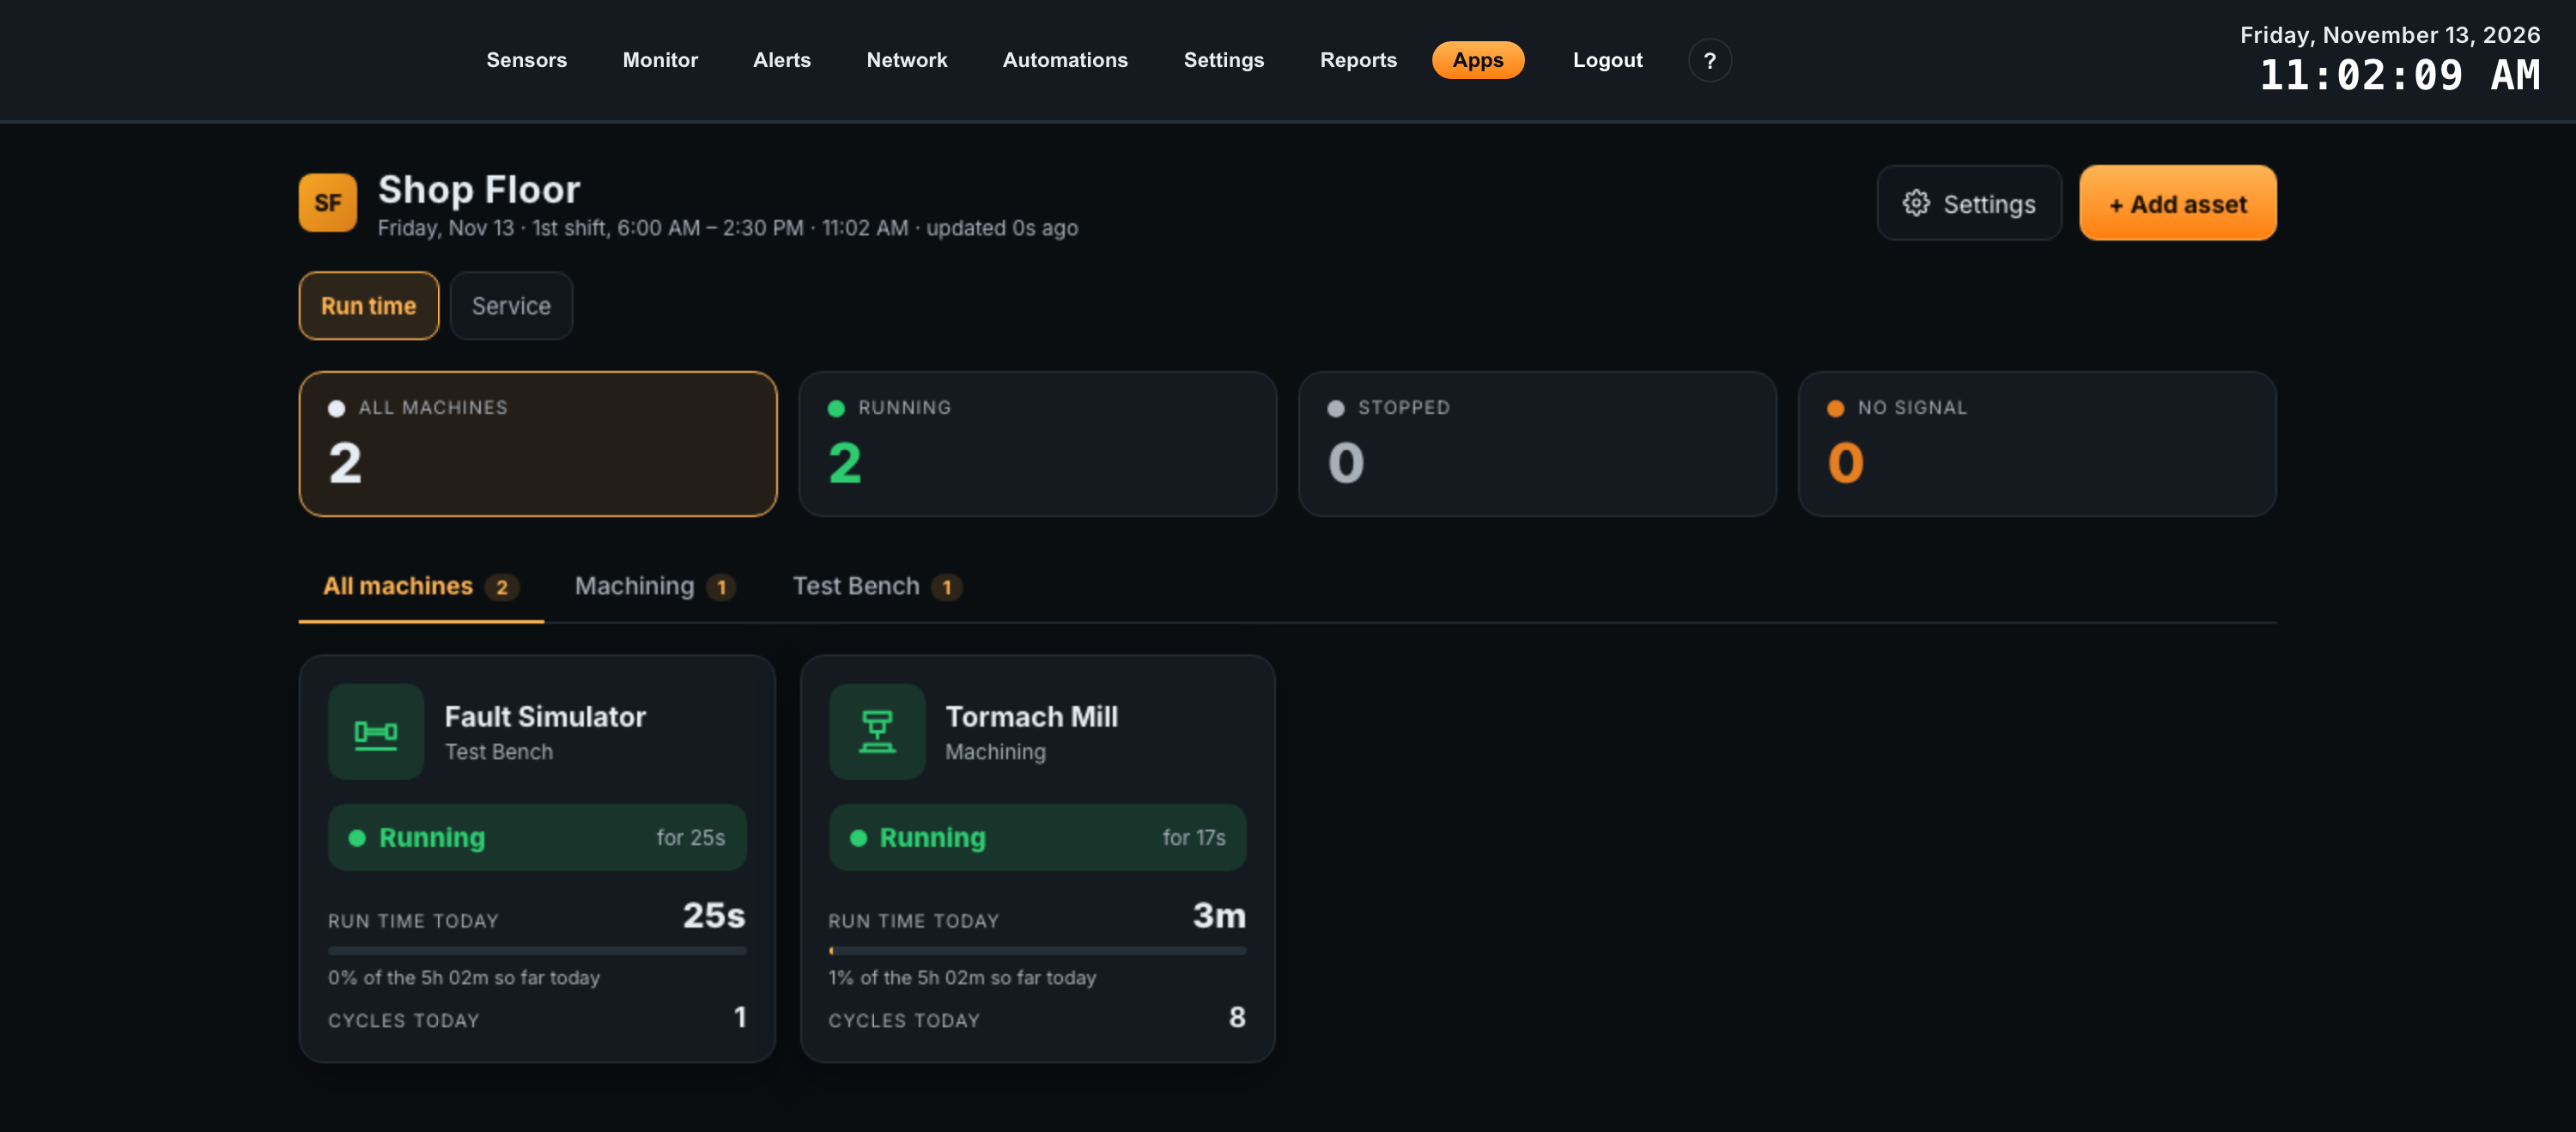
The floor view is the app’s home screen. It refreshes every 5 seconds and has two views, switched with Run time and Service at the top.
Run time view
The header shows the date, the current shift and its hours, and the time. Below it, the state counters total the machines in the selected tab. Click a counter to show only those machines; click it again, or Show all, to clear the filter.
| State | Means |
|---|---|
| Running | The sensor’s last report says the machine is running. |
| Stopped | The sensor’s last report says it is not. |
| No signal | The sensor has missed several reports in a row (3 by default; see Lost sensors). Run time stops counting until it reports again. |
| Waiting | The machine was added and its sensor has not reported since, or it has no sensor yet. |
The tabs below the counters are your groups. Each tile shows:
- The machine’s name, group and picture, coloured by its state.
- Its state and how long it has been in it (for 2h 14m), or when its sensor was last heard from.
- Run time for the period chosen in Settings (Today by default), with a bar showing what share of that period it has run so far.
- Cycles for the same period: how many times the machine started.
- A red border and the alert text, such as Stopped longer than 1h, when a Stopped too long alert is active.
- A Service due badge when the machine’s service hours are used up.
Click a tile to open the machine page.
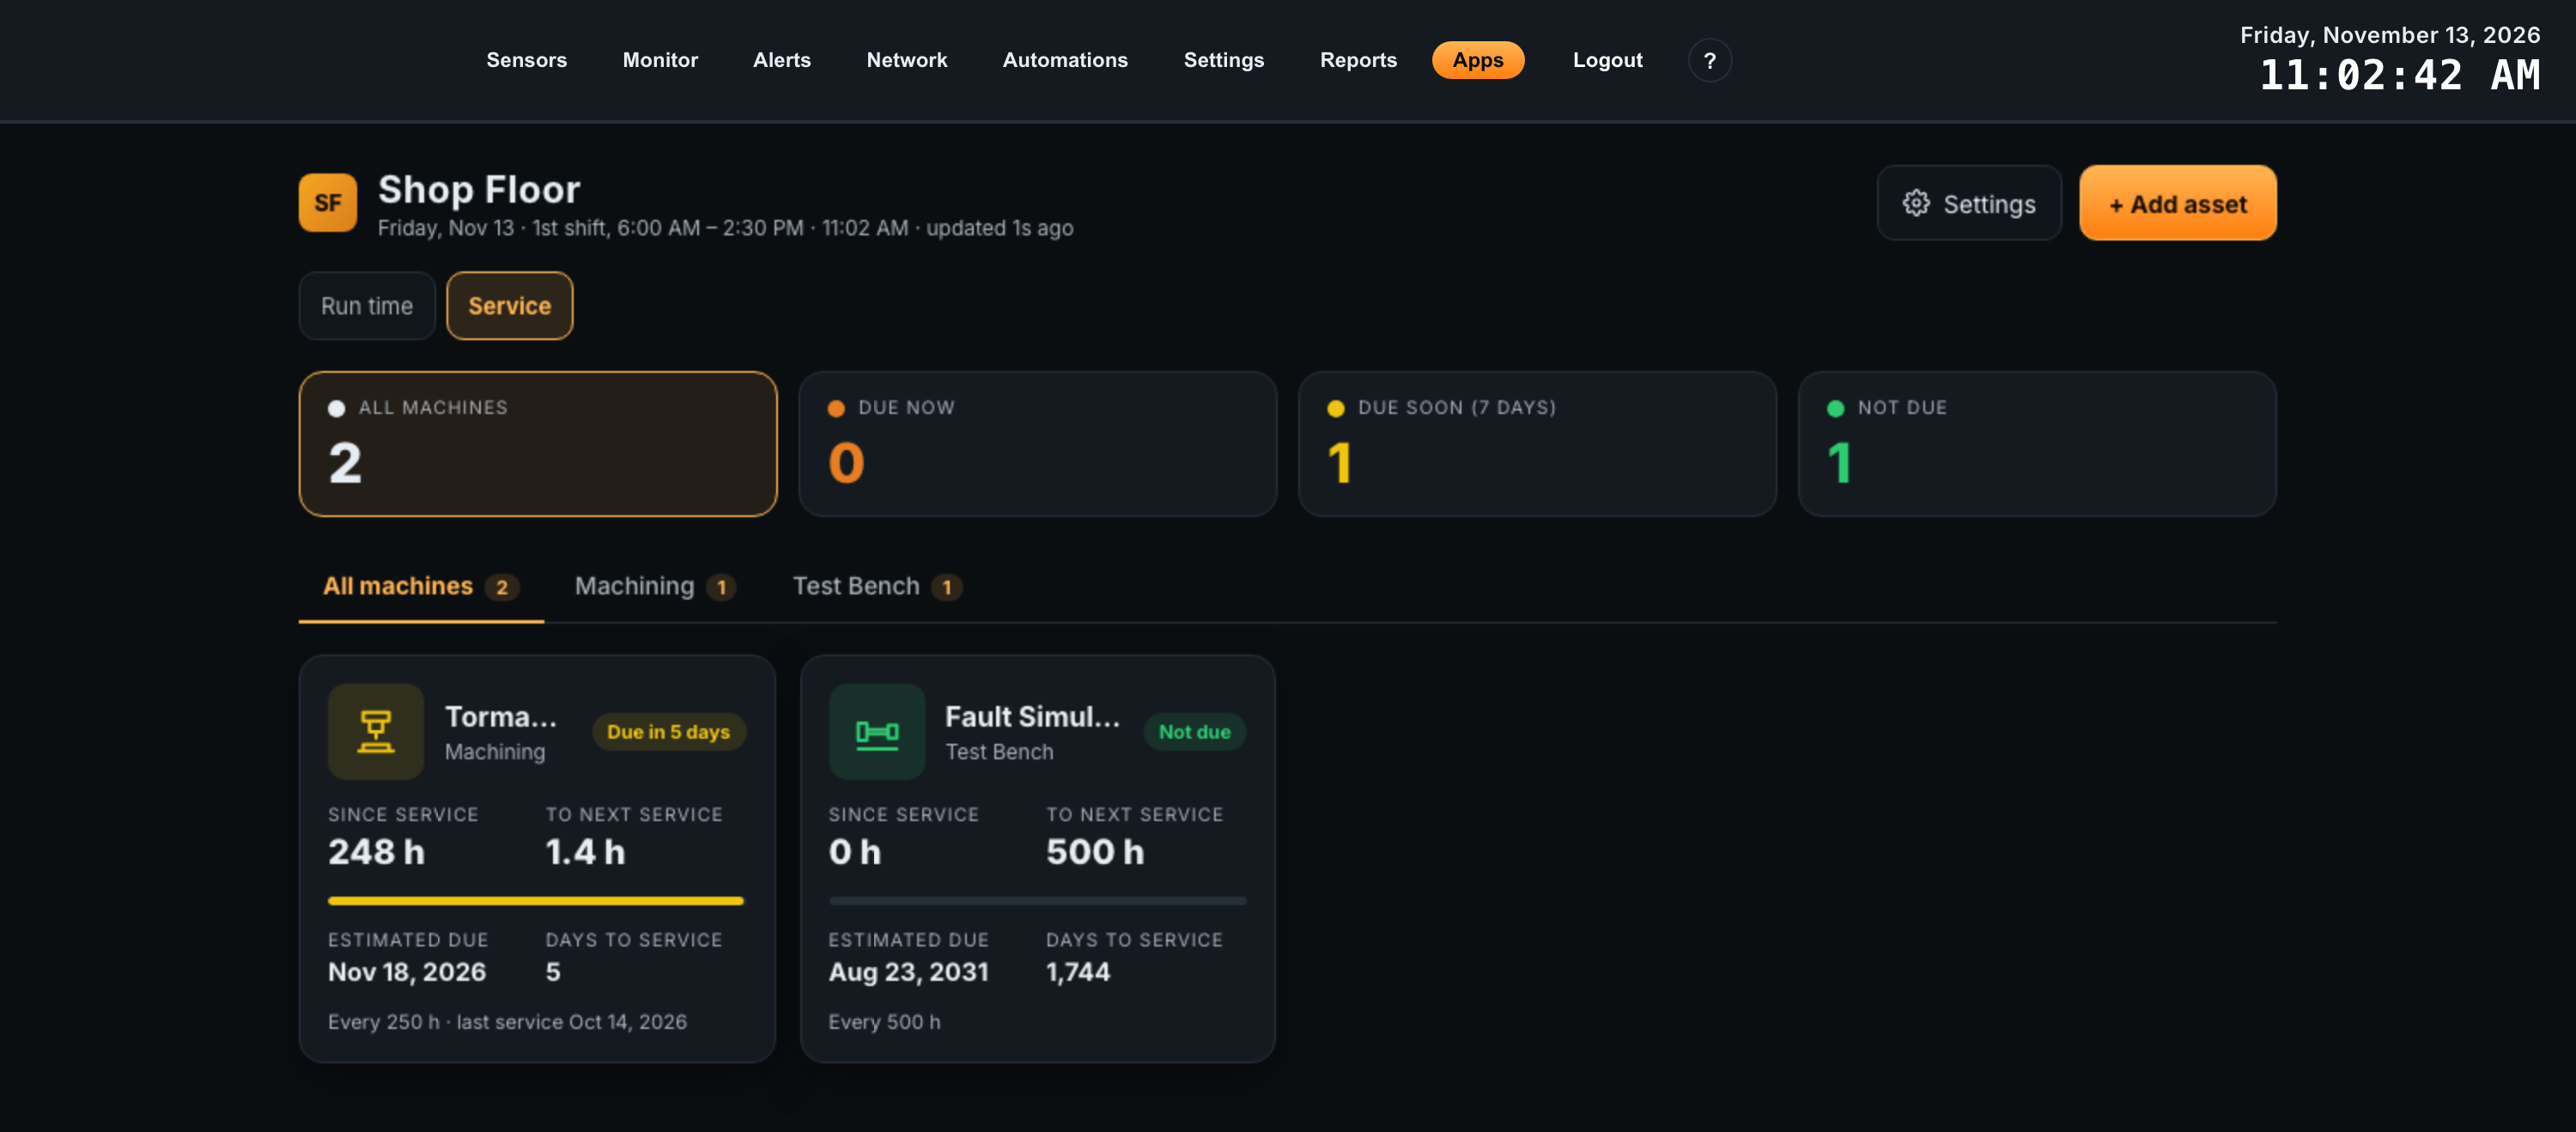
Service view
Service swaps the tiles for one service card per machine, soonest due first. When any machine is due, the Service button carries a count, such as 1 due.
| Card field | Shows |
|---|---|
| Since service | Hours of run time since the last service. |
| To next service | Hours left before service is due. Becomes Overdue by once they are used up. |
| Estimated due | The date service will be due at the machine’s recent rate of use (see Reference). Now when due; a dash until the machine has run enough to estimate. |
| Days to service | Calendar days until the estimated date. |
The counters become filters: Due now, Due soon (7 days) and Not due. Machines without a service interval appear under All machines as Not tracked; clicking one opens its form to set an interval.
06Machine Page
Everything about one machine: its state now, its run time over any period, any single day in detail, its service hours, and its sensor. Click a tile on the floor view to open it.
Run time and cycles
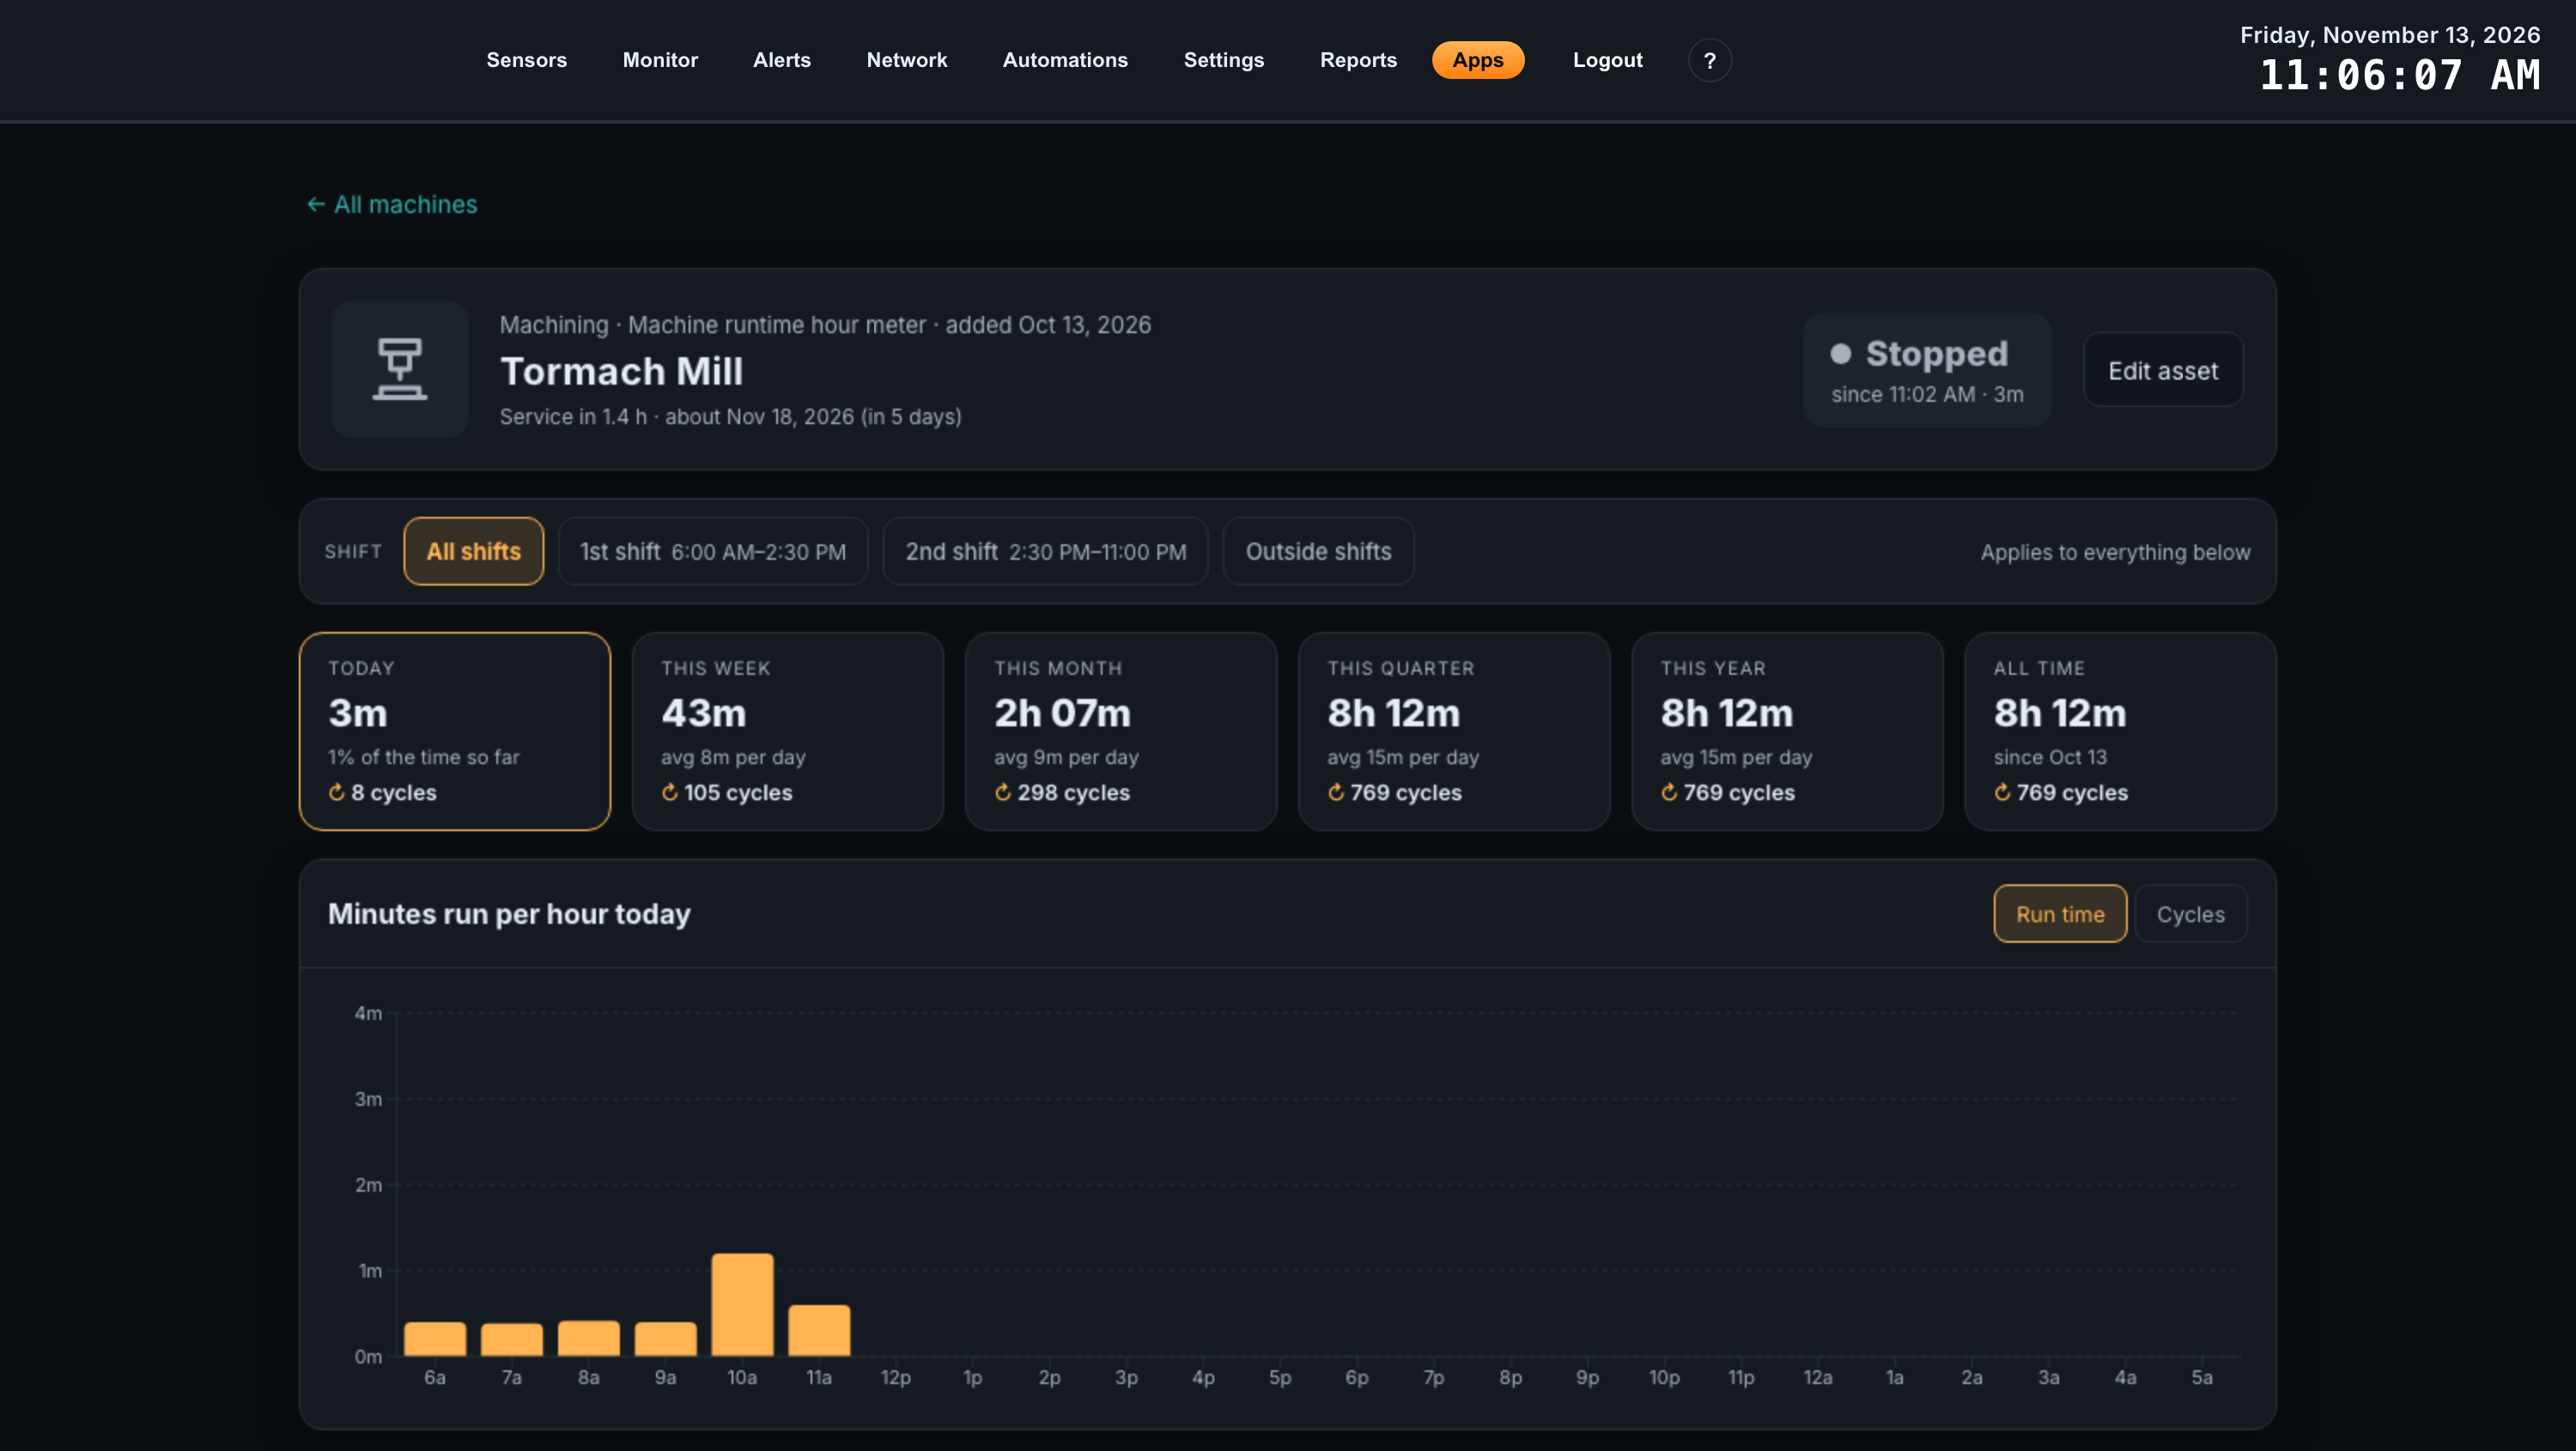
The header shows the machine’s state and since when, and its service status (Service in 120 h · about Mar 4, 2027 (in 112 days)). Edit asset opens its form.
If you have shifts, the Shift bar narrows everything below it to one shift, or to Outside shifts. All shifts is the default.
The period cards show run time for Today, This week, This month, This quarter, This year and All time, each with its cycle count. Today also shows the share of the day so far; the longer periods show the average per day. Click a card to chart that period below it, and switch the chart between Run time and Cycles.
| Period | Chart shows |
|---|---|
| Today | Minutes run per hour |
| This week, This month | Hours run per day |
| This quarter | Hours run per week |
| This year | Hours run per month |
| All time | Hours run per year |
Day view
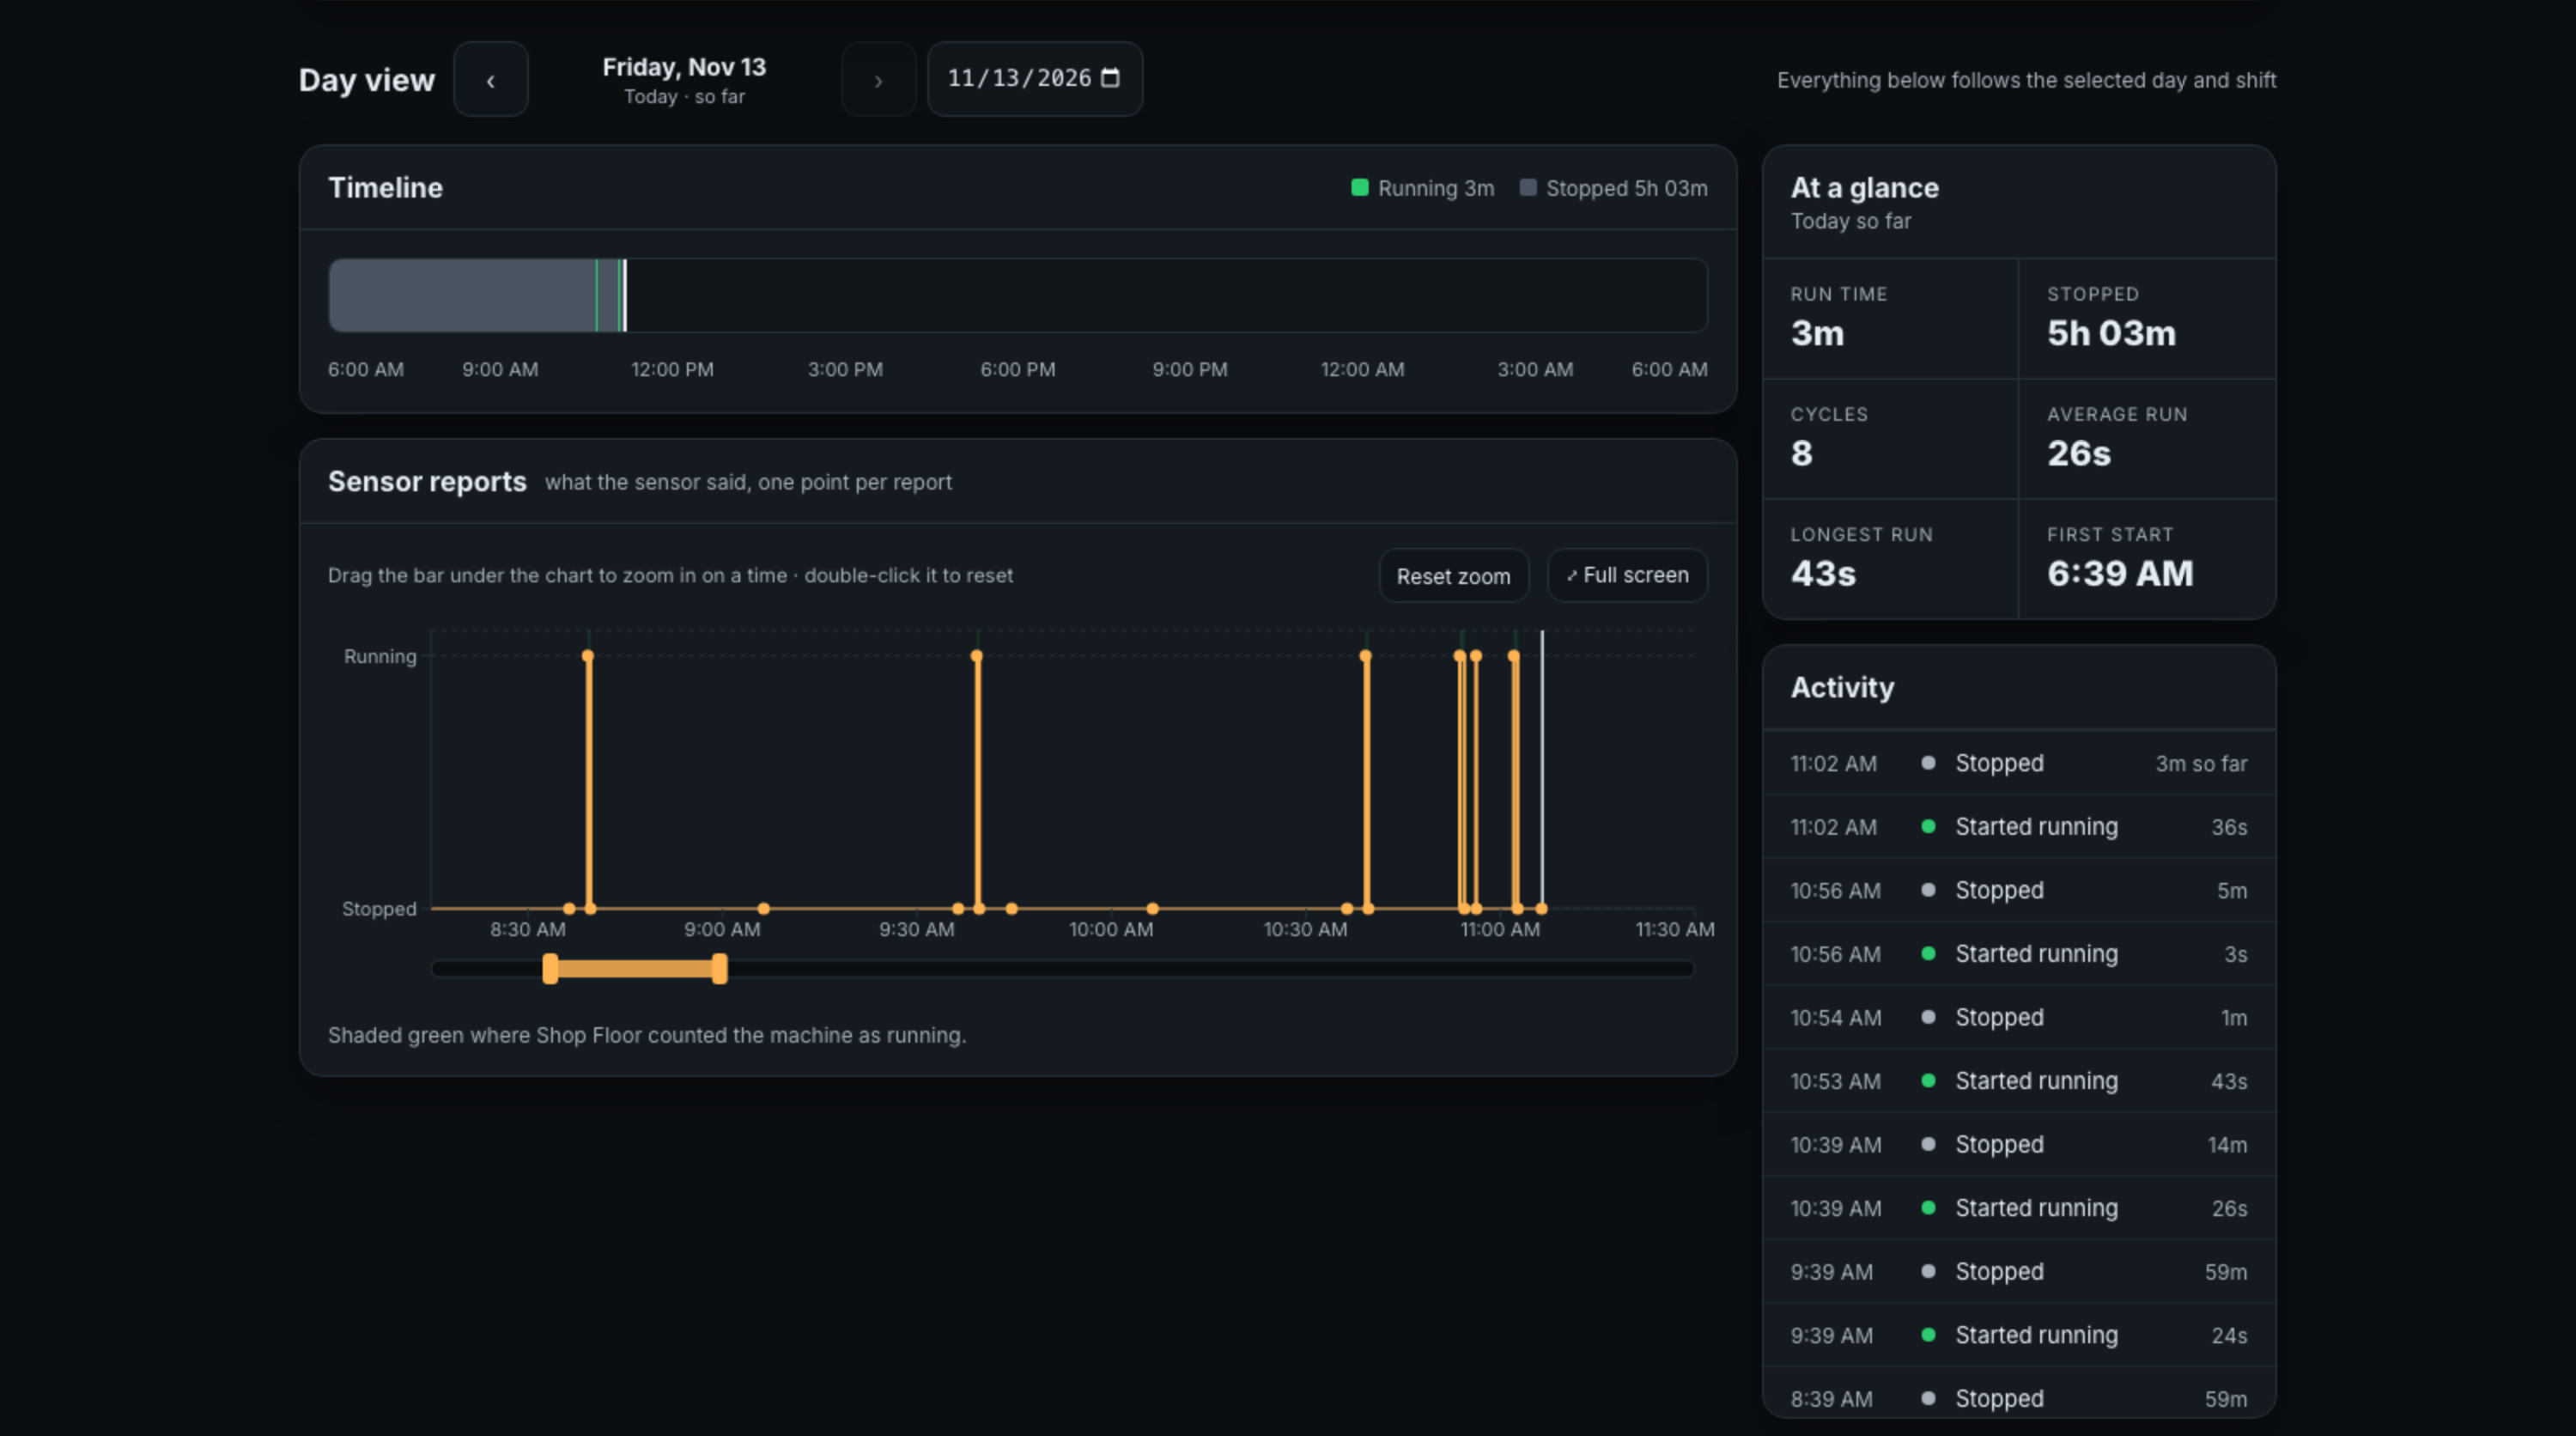
Below the chart, Day view shows one production day. Step between days with the arrows or pick a date. Everything in it follows the selected day and shift.
- Timeline — the day as a bar: running, stopped and no signal, with the time outside the selected shift dimmed.
- Sensor reports — every report the sensor sent, as Running or Stopped, with the periods Shop Floor counted as running shaded green. Drag the bar under the chart to zoom into a stretch of time, drag the window to move along the day, and double-click the bar or click Reset zoom to see the whole day. Full screen opens the same chart, keeping the zoom; Esc closes it.
- At a glance — Run time, Stopped, Cycles, Average run, Longest run and First start.
- Activity — each start and stop, newest first, with how long it lasted.
Service
The Service panel appears when the machine has a service interval. It shows the hours since the last service against the interval, the estimated due date and what the estimate is based on (at 3.2 h a day, its average over the last 30 days), and the last service.
-
1
When the service is done, click Reset service hoursOptionally enter who did it in Done by.
-
2
Click Reset to 0 hHours since service go back to 0, the Service due badge clears, and the service is added to Service history.
Another app can do the same through the service.reset action, for example when a maintenance ticket is closed (see Integration).
Sensor
The Sensor panel shows whether the sensor was set up with Shop Floor (a green check and the date), its type and input, what it is set to, and its signal, battery and last report.
| Row | Shows |
|---|---|
| Running when | The sensor’s threshold, such as vibration above 0.096 g or current above 22 A. |
| Starts and stops | Whether the sensor reports a change straight away (sent instantly) or only at its next check-in. |
| Checks in | How often it reports when nothing changes. |
| Ignores flickers under | The sensor’s input filter (1 s for vibration and current sensors). |
| Signal | Good, Fair or Weak, from the last report’s signal strength. |
07Adding and Editing a Machine
+ Add asset on the floor view and Edit asset on a machine page open the same form. A preview of the machine’s tile updates as you fill it in.
Machine, picture and sensor
| Field | Notes |
|---|---|
| Name | Required, up to 80 characters. |
| Group | The floor-view tab it shows under. + New group… creates one; No group shows it only under All machines. |
| Picture | Laser, Robot, Welder, Plasma, Mill, Lathe, Press, Shear, Saw, Compressor, Pump or Conveyor. |
| Sensor | One sensor input. Each row shows the input’s last state and when the sensor last reported. An input another machine uses shows Used by that machine. |
Delete machine, on an existing machine’s form, asks for confirmation and deletes its run-time history too. The sensor keeps its settings.
When is it running?
This section holds the sensor setup. Once a sensor has been set up, a green Sensor configured panel lists what it is set to, and Set up again repeats setup. Two fields sit below it:
| Field | Default | Notes |
|---|---|---|
| Wait before telling other apps it stopped (minutes) | 1 | 0 to 60. Shop Floor always shows the machine’s live state; this only delays the stopped message to other apps (the asset.running event, see Integration), so a quick part change does not switch off a stack light. Starts go out at once, and a Stopped too long alert never fires sooner than this. 0 reports every stop at once. |
| Hours already on the machine (optional) | empty | Added to All time so it matches the machine’s own hour meter. Run time history before the machine was added cannot be filled in. |
Service
| Field | Default | Notes |
|---|---|---|
| Service every (hours of run time) | empty (not tracked) | 1 to 100,000 hours. Leave empty to turn service tracking off. |
| Hours since the last service | 0 | Where the count starts. Changing it does not log a service. |
Below the fields, Shop Floor shows the hours until service and, once the machine has some history, the estimated due date.
Alerts
Two optional alerts, each switched on with its toggle.
Stopped too long
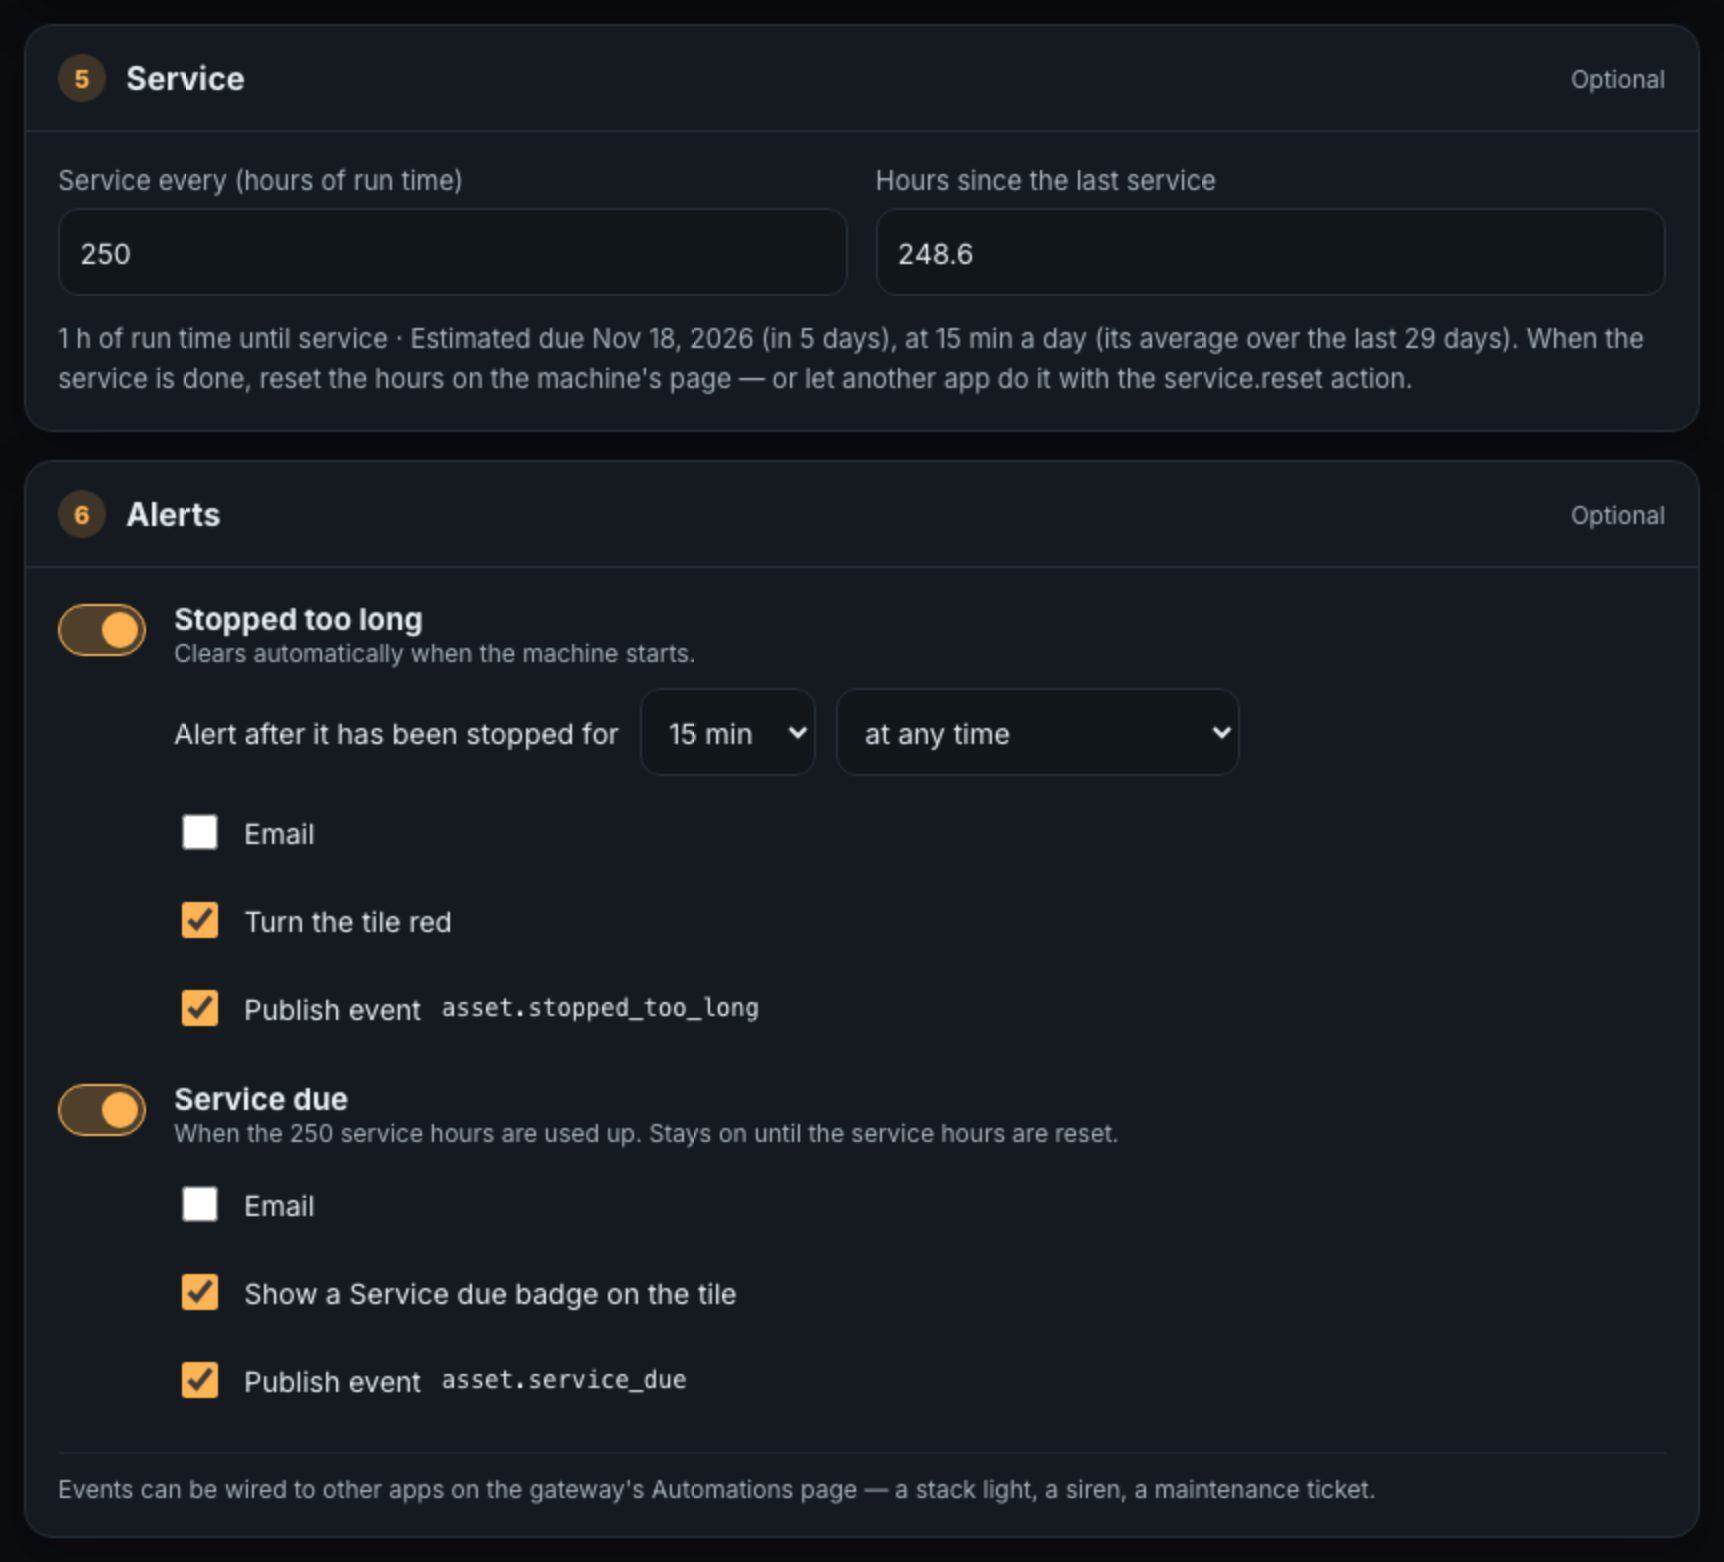
Alert after it has been stopped for 15 min, 30 min, 1 h, 2 h (default) or 4 h, during a scheduled shift (default), during one shift only, or at any time. Only stopped time inside the window counts. The alert clears by itself when the machine starts.
Service due
Comes on when the machine’s service hours are used up and stays on until they are reset. It needs a service interval.
| When the alert comes on | Default | Notes |
|---|---|---|
| off | One email per alert, to the addresses entered (comma-separated). Uses the gateway’s email settings. | |
| Turn the tile red / Show a Service due badge on the tile | on | The floor-view tile marking. |
| Publish event | on | Publishes asset.stopped_too_long or asset.service_due for the Automations page. |
08Sensor Setup
The sensor, not Shop Floor, decides whether the machine is running. Setup measures the machine and sends the sensor the settings that let it decide well. Have the machine in front of you; setup takes a few minutes.
Setup opens in its own window, full screen on a phone. The progress bar at the top names each step; Cancel setup at the bottom left puts back any sensor settings setup changed for measuring. The steps depend on what the sensor detects.
Vibration sensors
For the Machine Runtime Hour Meter’s vibration input. Shop Floor turns on the sensor’s raw accelerometer readings, measures the machine off and then running, and sets the vibration threshold between the two.
-
1
Machine offIs the machine off? Make sure it is, then click Next — it’s off.
-
2
Off readingsReset the sensor now as shown: touch a magnet to the sensor’s case, as in the video. The sensor takes the measuring settings within a few seconds and Shop Floor collects three off-state readings, about 10 seconds apart. This moves on by itself.
-
3
Start machineStart the asset now, running the way it normally runs. Wait until it is up to its normal speed, then click Next — it’s running. Nothing is measured until you click, and a reading taken while it is still starting looks like an off reading.
-
4
Running readingsShop Floor collects running readings (minimum 3). If how hard the machine works varies, wait for more before clicking Next.
-
5
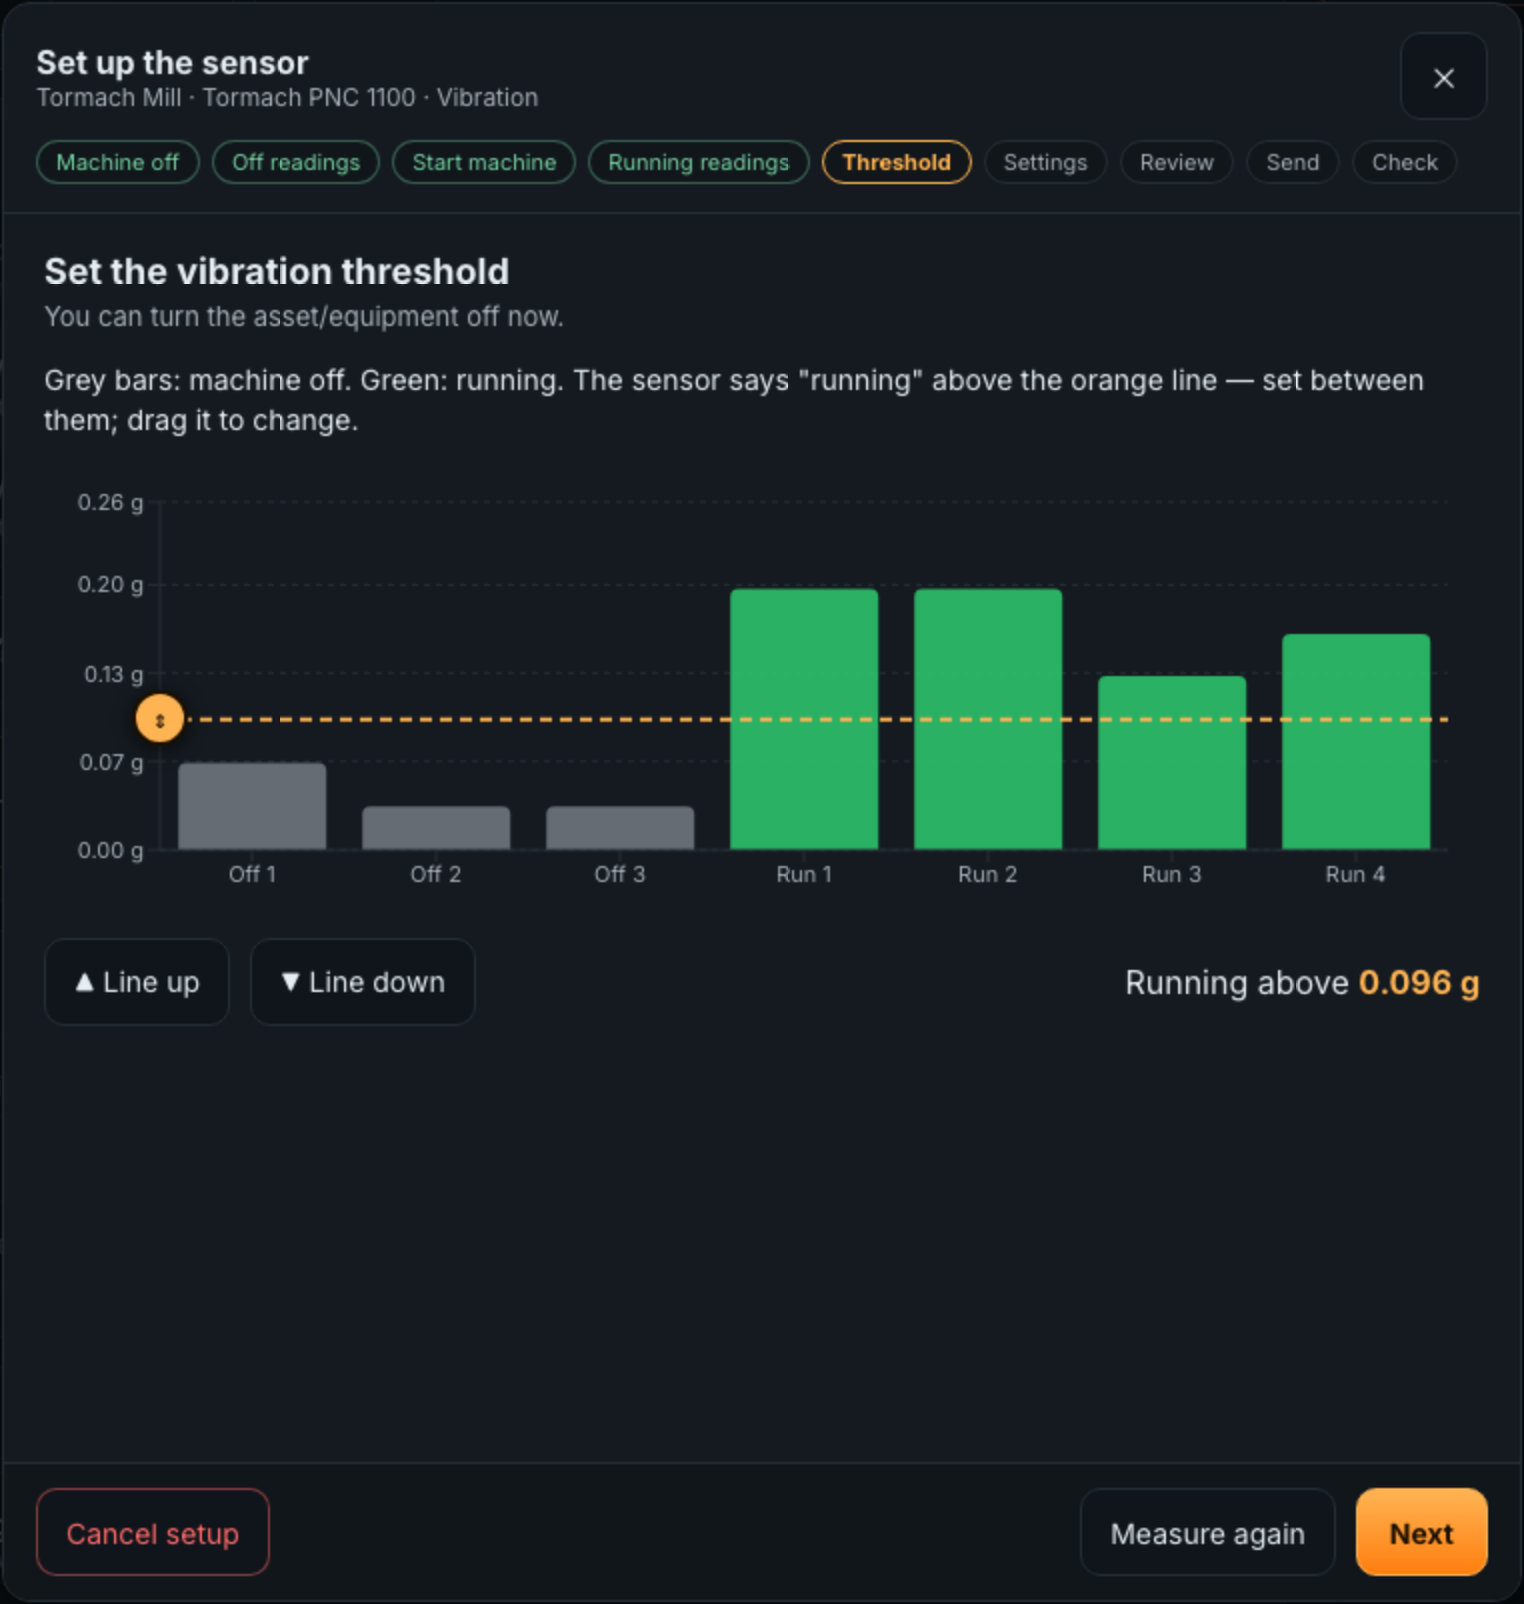
ThresholdA bar chart shows every reading, off and running, with the suggested threshold as a line between them. Drag the line or its handle, or use Line up and Line down, to move it; it snaps to the sensor’s 32 mg steps. Running above shows the value. You can turn the machine off now. Measure again starts over.
Current sensors
For the AC Current Detection Sensor. The sensor cannot report how many amps it sees, only whether the current is above its threshold. So Shop Floor finds the right threshold by asking: it sets a test threshold, the sensor restarts and reports whether the machine’s current trips it, and Shop Floor narrows in. Each test takes about 8 seconds and a search takes about a minute. This needs Atrium 2.8.0.
-
1
Start machineStart the machine and keep it running. Current clamp (CT) on the sensor is read from the sensor; change it only if the clamp fitted is a different size. Click Next — it’s running.
-
2
Running currentPress the reset button on the sensor now. Each test threshold appears as it is tried, with whether it trips. The step ends with, for example, Running, it trips the sensor up to 37 A. Keep the machine running until then.
-
3
Stop machineNow stop the machine — or leave it idling the way it sits between jobs, so the threshold ends up above its idle current. Click Next — it’s stopped, or Skip — it draws nothing when stopped.
-
4
Stopped currentPress the reset button again. The same search runs with the machine stopped and ends with, for example, Stopped, it still trips the sensor up to 6 A.
-
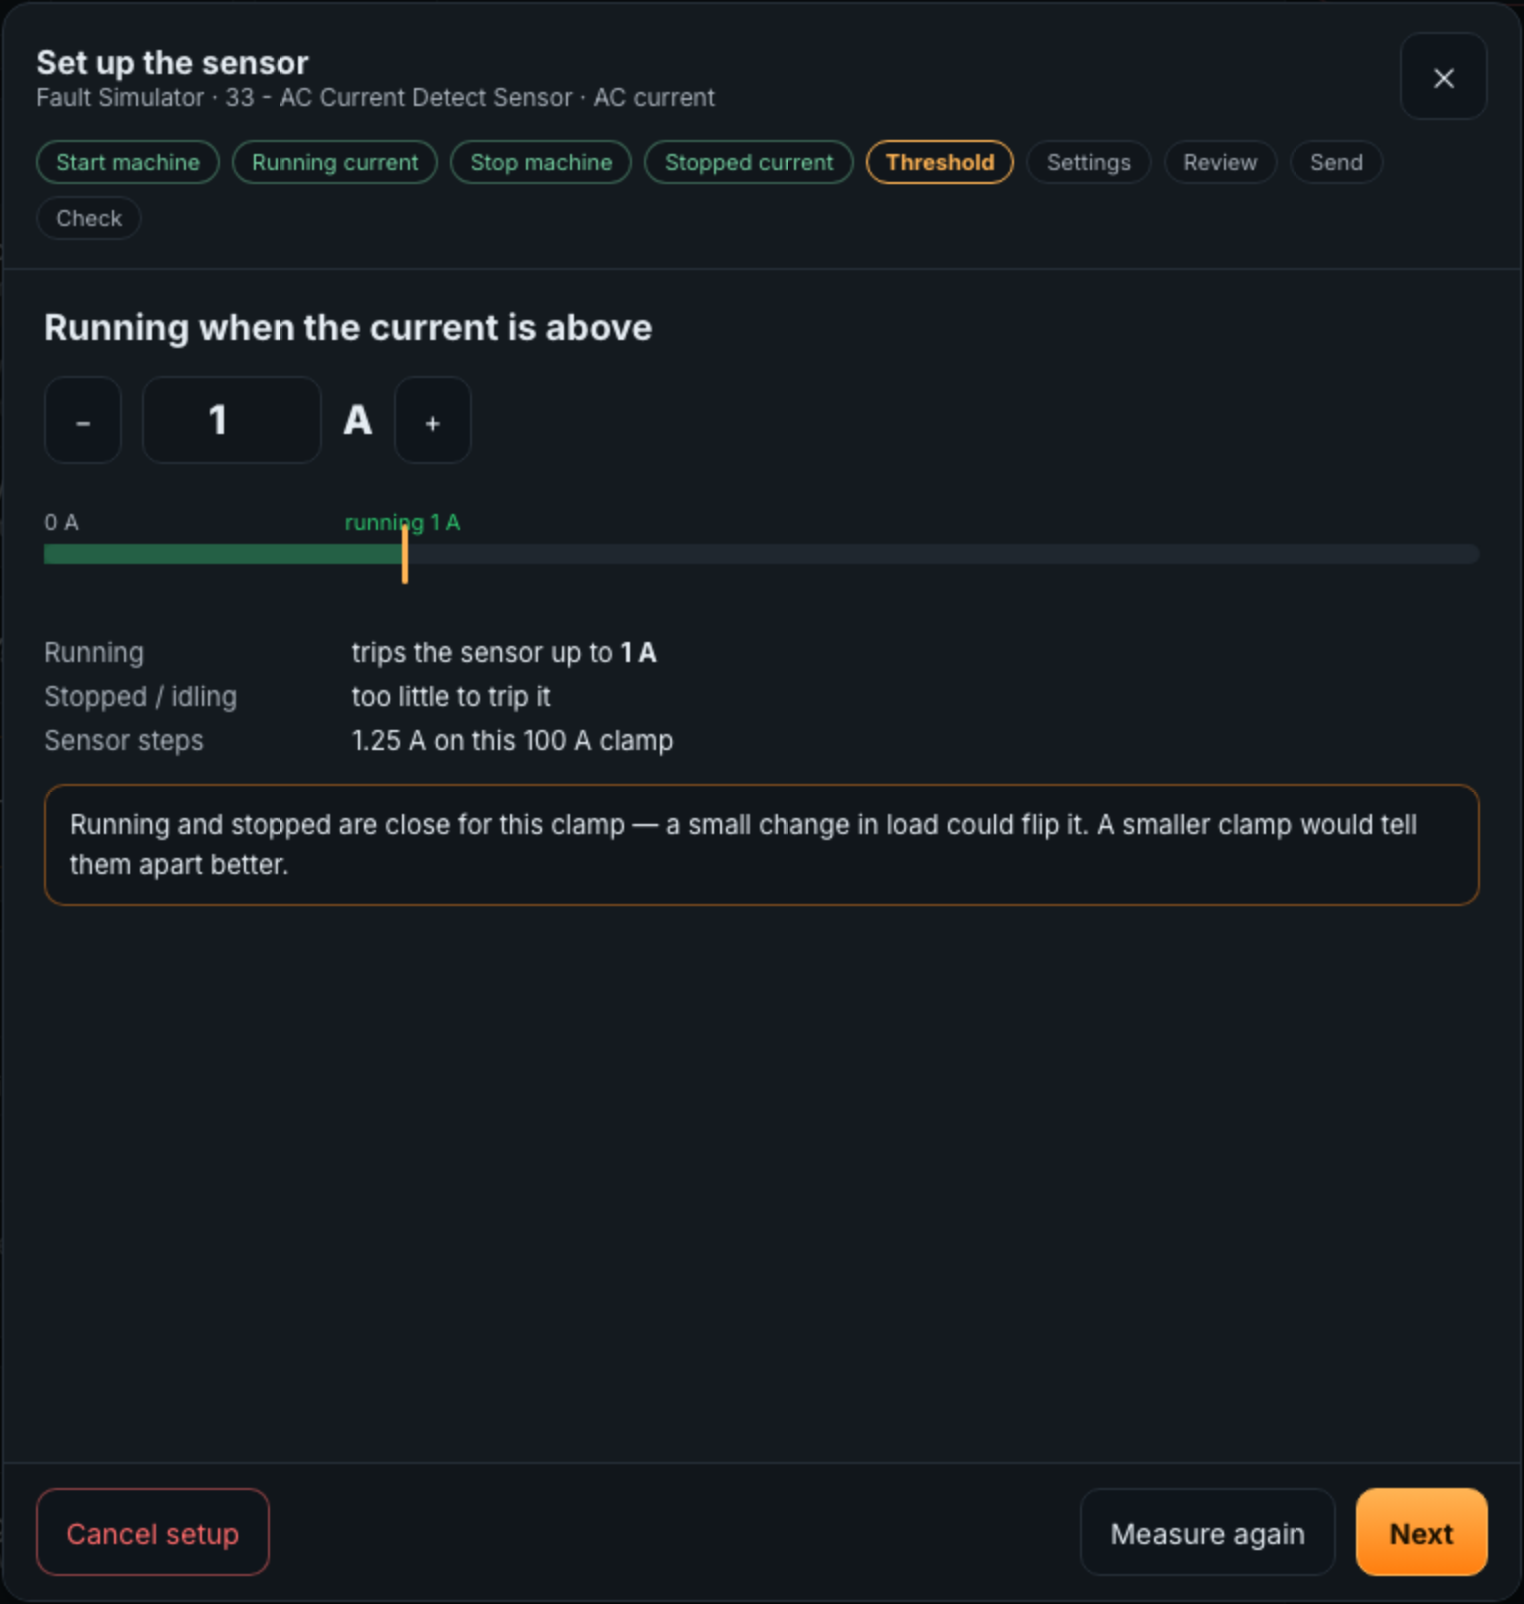
5
ThresholdRunning when the current is above, in whole amps, starts at the midpoint between the two, which leaves the most room for load changes. Adjust it with − and +; Shop Floor warns if the value would trip with the machine stopped, would miss it running, or if the two are close for this clamp.
Contact and counter inputs
Contact inputs, production counters and the Machine Uptime Monitoring Sensor’s contact, opto and magnetic inputs need no measuring: the input is either on or off. Setup goes straight to Settings. At the check, if the machine runs but Shop Floor shows it stopped, the input is wired the other way round: set Running when the input is to Off (open).
Settings, send and check
The last steps are the same for every sensor.
Settings
When nothing changes, how often should the sensor check in? This decides battery life, and how soon a silent sensor shows No signal.
| Check-in | No signal shows within | Battery |
|---|---|---|
| Every minute | about 3 minutes | Most use |
| Every 5 minutes (recommended) | about 15 minutes | |
| Every 15 minutes | about 45 minutes | |
| Every 30 minutes | about 1.5 hours | Longest life |
Starts and stops are reported the moment they happen, whatever the check-in interval. Vibration and current sensors ignore on/off flickers shorter than 1 second. Contact and counter inputs also offer a reporting speed (Fast, Balanced, Battery saver or Custom). The machine fields from When is it running? are repeated here.
Review and send
Review lists every setting that will change on the sensor, old value to new, and the threshold even when it is already set. Send to the sensor queues them; reset the sensor as shown (magnet or reset button) so it takes them now, or wait for its next check-in. This moves on by itself once the sensor has them.
Check
Turn on the asset/equipment now. Setup finishes by itself with Setup complete as soon as Shop Floor sees the machine running, usually within a few seconds of starting. If it does not, a link appears after 15 seconds: The machine is running but isn’t being detected? It offers to adjust the threshold and send it again.
Advanced settings
Advanced — edit the sensor’s settings directly, on the machine’s form, lists every setting the sensor has, as the sensor reports it, and lets you change any of them. Values are checked against what the sensor accepts; network settings are not editable here. Changes are sent the same way as setup’s, and apply at the sensor’s next check-in or when you reset it.
09Integration
Shop Floor publishes each machine’s state to the gateway’s other apps, provides actions they can run, and answers questions from AI assistants connected to the gateway.
Events
Wire these on the gateway’s Automations page, for example to light a stack light while a machine runs, or open a maintenance ticket when service comes due. Each is kept per machine and republished every 5 minutes.
| Event | Fields | When |
|---|---|---|
| asset.running | running (true/false), state, since | A start at once; a stop once it has lasted the machine’s Wait before telling other apps it stopped. |
| asset.state | state (running, stopped, no_signal, waiting), running, since, run_today_h, run_total_h, cycles_today, cycles_total | The live state, at once on every change. |
| asset.stopped_too_long | active (true/false), stopped_minutes, limit_minutes, shift | Machines with a Stopped too long alert set to publish. |
| asset.service_due | due (true/false), hours_since_service, service_interval_h, hours_remaining, estimated_due, run_total_h | Machines with a service interval. |
Every event also carries asset_id, asset_name and group.
Actions
| Action | Does |
|---|---|
| Reset machine service hours (service.reset) | Logs a service and sets the machine’s hours since service back to 0, as if Reset service hours were clicked. |
| Add a machine to Shop Floor (machine.create) | Adds a machine and optionally binds it to a sensor input. Does not change the sensor’s settings; run setup for that. |
| Change a machine’s settings (machine.update) | Changes only the fields given: name, group, picture, sensor, polarity, wait before telling apps it stopped, hours on the machine, service interval. |
| Change Shop Floor settings (settings.update) | Production day, week start, tile settings, shifts and groups. |
AI assistants and API tokens
An AI assistant connected to the gateway’s MCP server can read the floor status, machine configuration, run time and cycles by period, run-time history and any single day, and can run the actions above. The same reads are available to scripts with a gateway API token that has the apps:data scope, and the actions with apps:actions:
GET  /api/apps/shop-floor/reads/floor
GET  /api/apps/shop-floor/reads/machines?asset_id=
GET  /api/apps/shop-floor/reads/run-time?asset_id=&shift=
GET  /api/apps/shop-floor/reads/history/<asset_id>?period=week
GET  /api/apps/shop-floor/reads/day/<asset_id>?day=YYYY-MM-DD
POST /api/bus/actions/shop-floor/<action id>10Settings
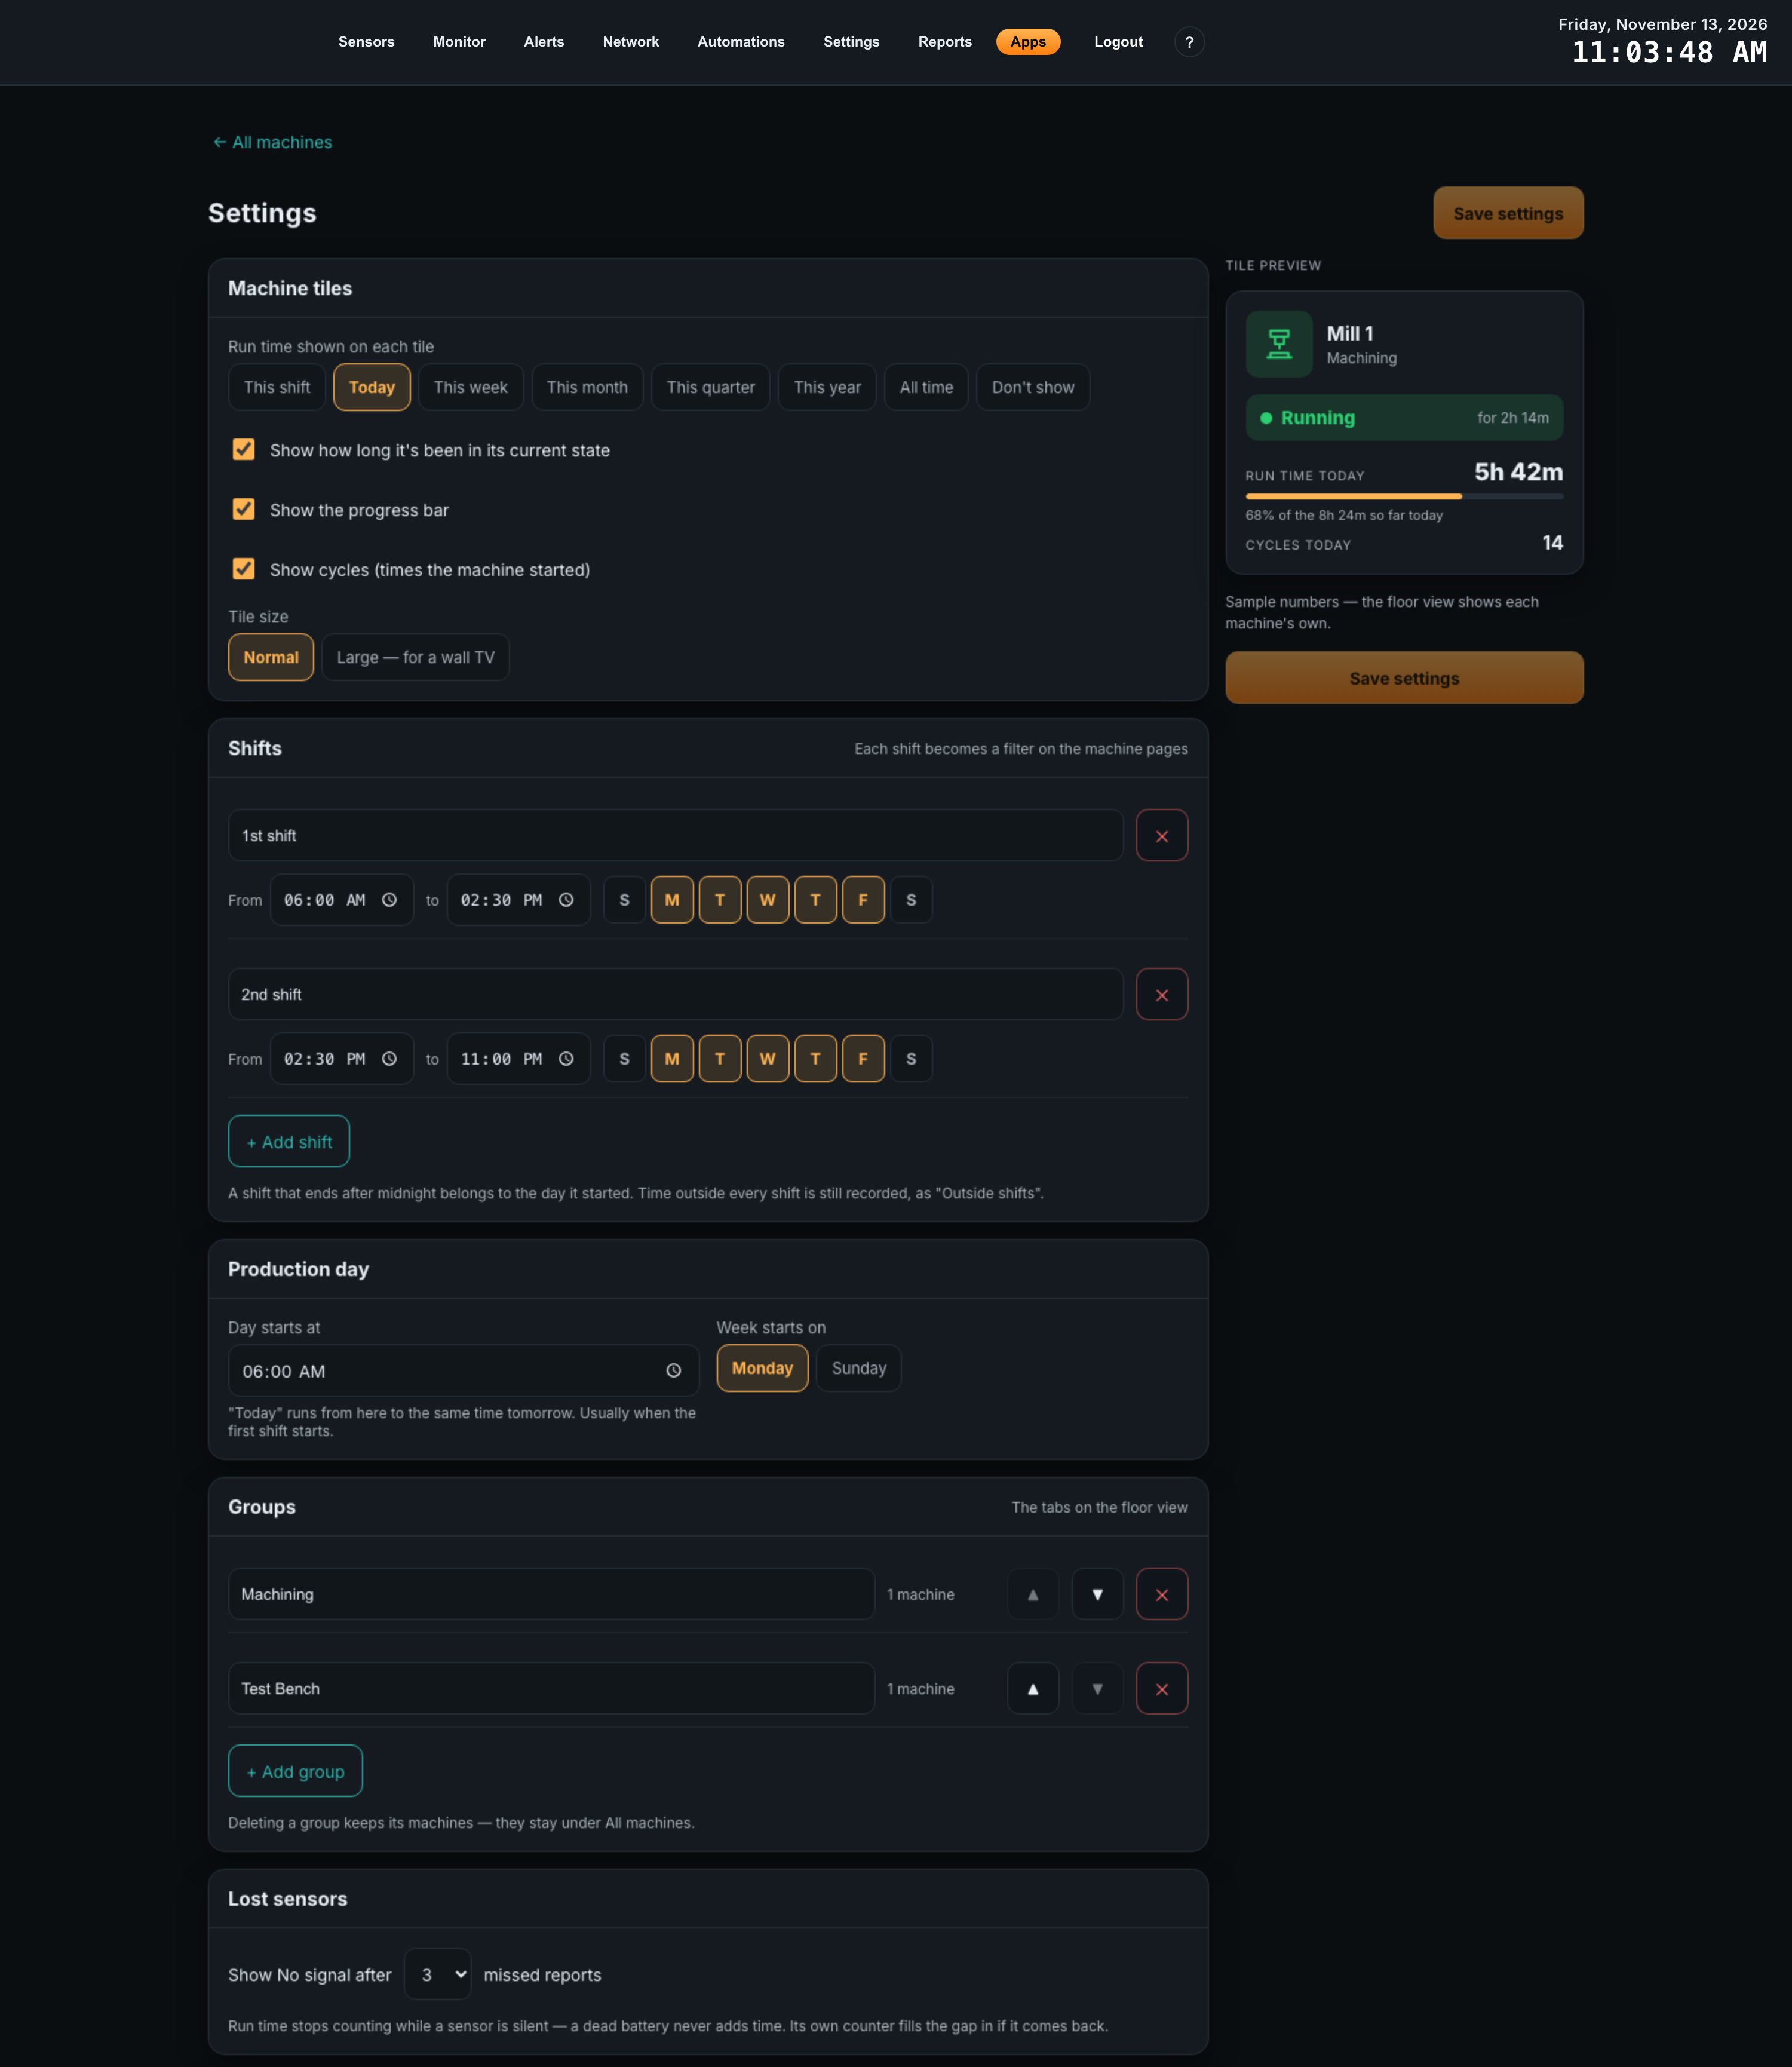
Plant-wide settings, from Settings on the floor view. A tile preview on the right follows your changes. Nothing applies until you click Save settings; Undo changes puts back the saved values.
Machine tiles
| Setting | Default | Notes |
|---|---|---|
| Run time shown on each tile | Today | This shift, Today, This week, This month, This quarter, This year, All time, or Don’t show. This shift shows no number until you add shifts. |
| Show how long it’s been in its current state | on | |
| Show the progress bar | on | The share of the period the machine has run so far. |
| Show cycles (times the machine started) | on | |
| Tile size | Normal | Large — for a wall TV enlarges tiles and text. |
Production day
| Setting | Default | Notes |
|---|---|---|
| Day starts at | 6:00 AM | “Today” runs from here to the same time tomorrow. Usually when the first shift starts. A run at 2:00 AM Friday belongs to Thursday’s production day. |
| Week starts on | Monday | Monday or Sunday. Sets where This week begins. |
Shifts
+ Add shift adds a row: Shift name, start and end time, and Days. The arrows reorder shifts. A shift that ends after midnight belongs to the day it started. Time outside every shift is still recorded, as Outside shifts. Shop Floor warns if two shifts overlap.
Shift changes apply from now on; run time already recorded keeps the shifts it was recorded under. To file today’s run time under the new shifts as well, tick Also apply these to today’s run time before saving.
Groups and lost sensors
Groups are the tabs on the floor view, in the order listed here. + Add group adds one; renaming keeps its machines. Deleting a group keeps its machines: they stay under All machines.
Lost sensors: Show No signal after 2, 3 (default), 4, 5 or 10 missed reports, counted at each sensor’s own check-in interval. Run time stops counting while a sensor is silent, so a dead battery never adds time. If the sensor comes back, its own running counter fills in the time it ran meanwhile.
11Troubleshooting
Most problems show up during sensor setup, which says what it is waiting for. The machine page’s Sensor reports chart shows exactly what the sensor said.
Sensor setup
| Symptom | Cause | Fix |
|---|---|---|
| Setup stays on Reset the sensor now as shown | The sensor has not taken the settings yet. It only listens when it checks in. | Reset the sensor (magnet or reset button). If it still waits, open the sensor’s configuration page in Atrium: if the settings are repeatedly not acknowledged, contact NCD support. |
| The sensor didn’t keep one of the settings | The sensor acknowledged a value but kept its old one; the value is outside what its firmware stores. | Click Back to settings and choose a different value. The message names the setting. |
| This sensor’s settings are managed outside Atrium | Configuration management is off for the sensor. | Turn Atrium manages this sensor’s configuration back on for it in Atrium. |
| This gateway’s software is older than 2.8.0 | Learning a current sensor’s threshold needs Atrium 2.8.0. | Update the gateway, or set the threshold under Advanced. |
| No answer from the sensor for a while during a current search | The sensor missed a restart. | Press its reset button again; the search carries on from where it was. |
| The sensor didn’t see the machine’s current | The clamp is around the whole cable, where the currents cancel; the clamp size is wrong; or the machine was not running. | Clamp one conductor of the machine’s supply, check the clamp size, and click Measure again. |
| Stopped, it trips the sensor as high as it does running | The machine was not really stopped, or its idle current is as high as its running current. | Stop the machine fully, or measure with it idling, and measure again. |
| The current changed while measuring | The machine’s load changed during the search. | Measure again while the machine does its usual work. |
| The check never sees the machine running | The threshold is above what the machine produces running, or a contact input is wired the other way round. | Click The machine is running but isn’t being detected? and lower the threshold, or set Running when the input is to Off (open). |
Floor view and run time
| Symptom | Cause | Fix |
|---|---|---|
| A machine shows No signal | Its sensor has missed several reports: battery, range, or an obstruction. | Check the sensor’s battery and signal in Atrium. A longer check-in interval takes longer to show No signal. |
| A machine stays Waiting | Its sensor has not reported since the machine was added. | Reset the sensor, or wait for its next check-in. |
| A machine shows running when it is off, or flickers on and off | The threshold is too low for vibration or current from nearby machines. | Set up again from the machine’s form. |
| A stack light switches off during a quick part change | The machine really stopped, and other apps are told at once. | Raise Wait before telling other apps it stopped. |
| All time is lower than the machine’s hour meter | Shop Floor counts from when the machine was added. | Enter Hours already on the machine. |
| Today’s run time is all under Outside shifts | The shifts were added after today’s run time was recorded. | Save the shifts again with Also apply these to today’s run time ticked. |
| No estimated service date | The machine has not run enough recently to estimate. | The date appears once it has some run time. |
12Reference
How Shop Floor works out what it shows, and the settings it sends to each sensor.
How run time is counted
- State follows the sensor’s reports at once: the floor view shows a start or stop as soon as the sensor reports it.
- Run time comes from the sensor’s own running counter, the seconds its input was on between two reports. A report lost in the radio loses no run time, and short pauses inside a run are not counted as running.
- While a sensor is in No signal, nothing is added. If it comes back, the counter fills in the time the machine ran meanwhile.
- Cycles count every start: each time the machine goes from stopped to running. A part change between cuts makes a new cycle. A start after No signal is not counted, because Shop Floor cannot tell whether the machine stopped in between.
- There is no industry standard behind these numbers. They are what the sensor measured, filed under your production day and shifts.
Estimated service date
Hours remaining before service, divided by the machine’s average run hours per day over the last 30 production days (fewer if it was added more recently), counted forward from today. It is an estimate at the recent rate of use; a busier or quieter month moves it.
Settings Shop Floor sends
| Setting | Vibration (119) | Current (33) |
|---|---|---|
| Threshold | From setup, in steps of 32 mg | From setup, in whole amps (the sensor’s step is 1.25 A per 100 A of clamp) |
| Report starts and stops instantly | On | On |
| Check-in interval | From setup (default 5 minutes) | From setup (default 5 minutes) |
| Input debounce | 1000 ms | 1000 ms |
| Interrupt timeout | 0 | 0 |
| Counter reset mode | Do not reset counters | Do not reset counters |
| Raw accelerometer data | On only while measuring | — |
| CT size | — | As read from the sensor, or as corrected in setup |
Limits
| Item | Value |
|---|---|
| Floor view refresh | 5 seconds |
| No signal | After the chosen number of missed check-ins, plus 15 seconds |
| Wait before telling other apps it stopped | 0 to 60 minutes |
| Service interval | 1 to 100,000 hours of run time |
| Stopped too long | 15 minutes to 4 hours |
| Machine name | 80 characters |