MultiViz App User Guide
Send vibration data from NCD wireless sensors to Viking Analytics MultiViz, directly from your Atrium Gateway.
1. Overview
MultiViz is an Atrium app that connects NCD wireless vibration sensors to MultiViz, the condition monitoring and predictive maintenance platform from Viking Analytics.
MultiViz analyzes vibration data with machine learning to detect machinery faults early and prioritize maintenance. To do that, it needs a steady stream of overall vibration values and time waveforms from each machine. The MultiViz app delivers that stream from the Atrium Gateway: it opens its own encrypted MQTT connection to the broker that MultiViz provisions for your account, and publishes the data of every sensor you link, in the NCD data format. No extra server, Node-RED flow or programming is needed.
The app also gathers the sensor settings MultiViz depends on into one window, can request waveforms from sensors on demand, and shows each sensor’s battery, signal and publishing status.
How the data flows
- The sensor transmits over the wireless mesh network to the Atrium Gateway, which decodes it.
- If the sensor is linked and its Report switch is on, the MultiViz app publishes the message to the MultiViz MQTT broker.
- MultiViz receives the message on the sensor’s topic and builds its asset view on its own platform. There is no asset or machine mapping to do in Atrium.
Each linked sensor sends two kinds of messages:
- Overall: overall vibration and temperature values, at every Data Transmission Interval.
- Waveform: the raw vibration signal (time domain), sent automatically at the Auto Waveform Transmission Interval (Gen4 sensors), or in reply to an on-request waveform command.
2. Requirements
What you need before installing the app.
| Item | Requirement |
|---|---|
| Atrium Gateway | Atrium 2.8.0 or later. The app installs on older versions, but cannot connect to MultiViz until the gateway is upgraded (see Troubleshooting). |
| MultiViz account | A Viking Analytics MultiViz account with the ncd.io integration, which provides the broker details. |
| Network | Outbound internet access from the gateway to the MultiViz broker (MQTT over TLS, normally port 8883). |
| Sensors | One or more supported NCD vibration sensors, paired and whitelisted on the gateway. |
| License | None. The app does not require a license. |
Supported sensors
| Sensor | Type | Configure from the app | Waveforms |
|---|---|---|---|
| Vibration Temperature Sensor Gen4 (1-channel) | 110 | Yes | Automatic or on request |
| 2-Channel Vibration Temperature Sensor Gen4 | 111 | Yes | Automatic or on request |
| Predictive Maintenance Sensor Gen4 | 112 | Yes | Automatic or on request |
| Smart Vibration Sensor Gen4 | 114 | Yes | Automatic or on request |
| Ultrasound Vibration Temperature Sensor Gen4 | 127 | Yes | Accelerometer waveforms only |
| Vibration Temperature Sensor V3, C1D2 | 80 | No (Node-RED) | On request only (Regular) |
| 2-Channel Vibration Temperature Sensor V3, C1D2 | 81 | No (Node-RED) | On request only (Regular) |
3. Installing
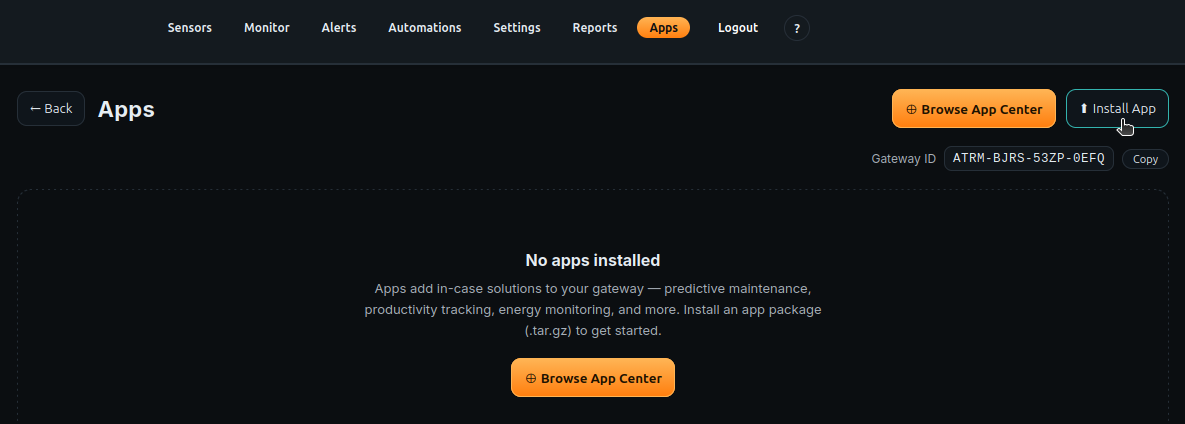
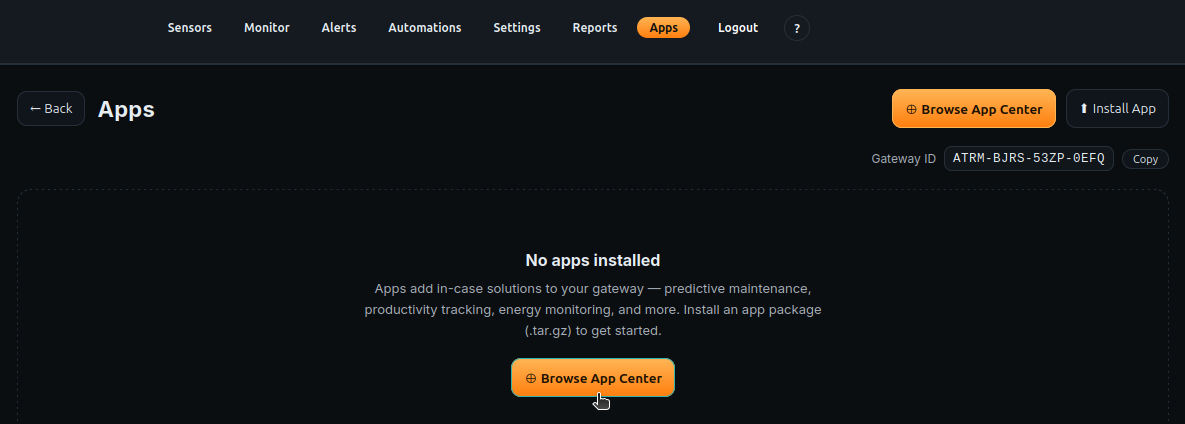
Install the app from a package file (.tar.gz) on the gateway’s Apps page.
-
1
Open the Apps pageLog in to the Atrium dashboard and click Apps in the top navigation.
-
2
Upload the packageUse the upload control on the Apps page to select the MultiViz package file (for example
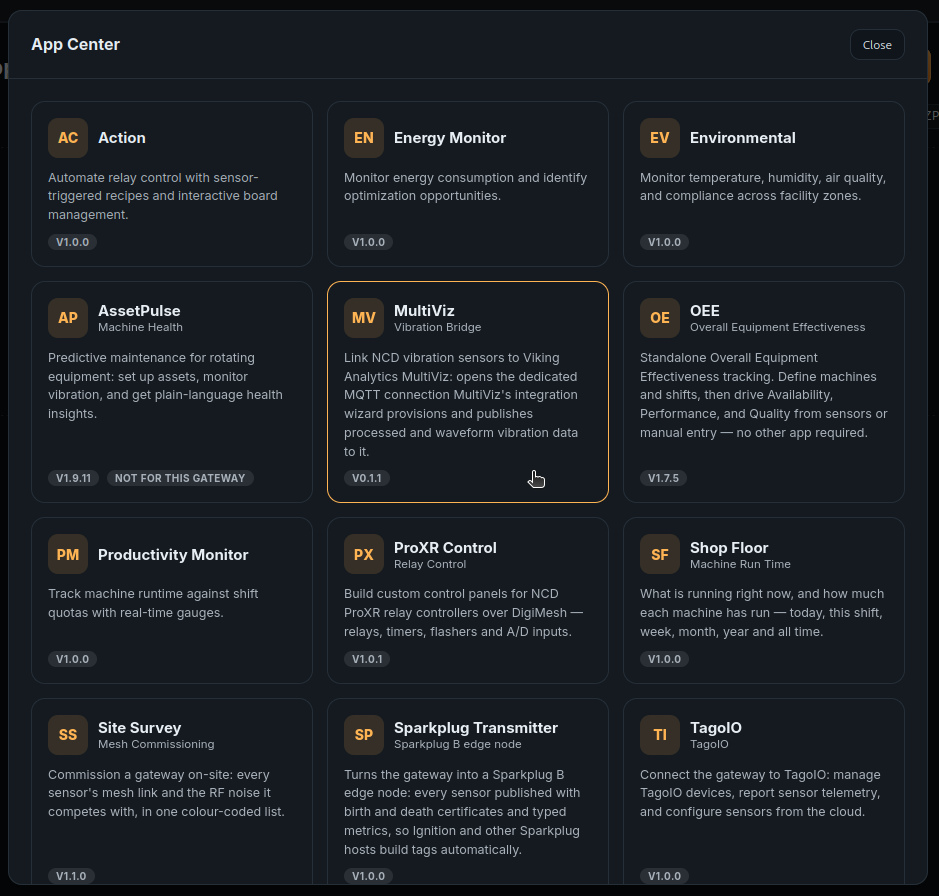
multiviz-0.1.0.tar.gz). If MultiViz is listed in the App Center, you can install it from there instead. -
3
Wait for the gateway to reloadInstalling an app restarts the gateway’s services. This takes a few seconds; the page reconnects on its own. Sensor data and settings are kept.
-
4
Open the appMultiViz appears as a card on the Apps page, with the subtitle Vibration Bridge. Click it to open the app on its Overview screen.
Reinstalling or upgrading the package keeps your broker settings, linked sensors and history.
4. First-Time Setup
The shortest path from a fresh install to data arriving in MultiViz.
Get the MQTT broker details from MultiViz
-
1
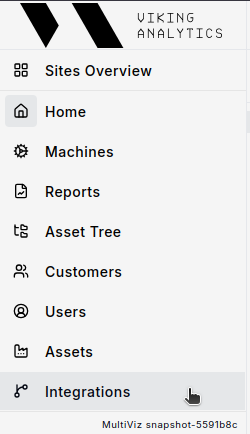
Open the integration in MultiVizLog in to MultiViz, click Integrations in the sidebar.

- 2
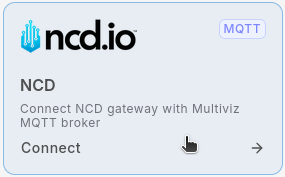
ConnectFind the ncd.io integration and click Connect.- 3
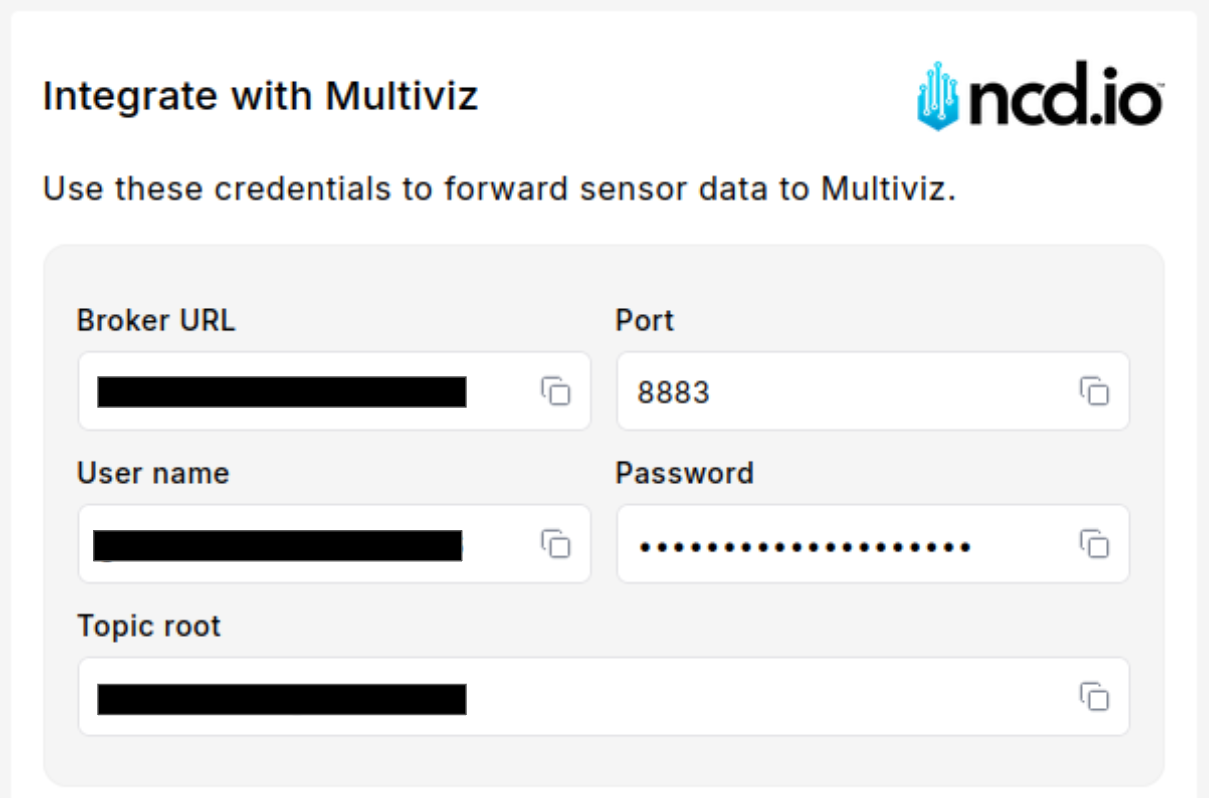
Copy the generated credentialsMultiViz generates the broker details: broker address, port, user name, password and topic root. Keep them at hand for the next steps.
MultiViz > MQTT Credentials Connect the Atrium MultiViz app and link a sensor
-
3
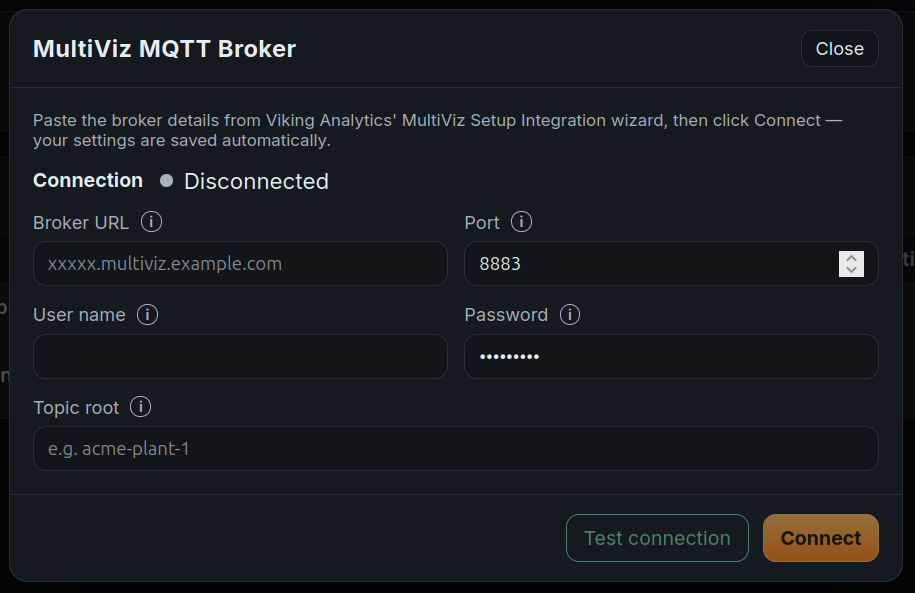
Open the broker settingsIn the app’s Overview, click the gear button on the MultiViz MQTT Broker card.
-
4
Enter the details and connectFill in Broker URL, Port, User name, Password and Topic root, optionally click Test connection, then click Connect. Wait for the Connection status to read Connected, then click Close.
-
5
Link a sensorClick + Link a sensor, select the sensor in the Sensor list and click Link to MultiViz. Read the popup and click OK. The sensor appears at the top of the Linked Sensors table with its Report switch off.
-
6
Apply the recommended settings (Gen4)Click the gear button on the sensor’s row, set the values in Recommended values, click Save hardware settings, and reset the sensor (RESET button or magnet on the RESET switch) so it checks in and receives them. Wait for Settings status: Settings applied.
-
7
Start publishingTurn the sensor’s Report switch on. Reset the sensor to force a transmission, and check that Last Report MultiViz updates and that the data arrives in your MultiViz account.
5. Overview Screen
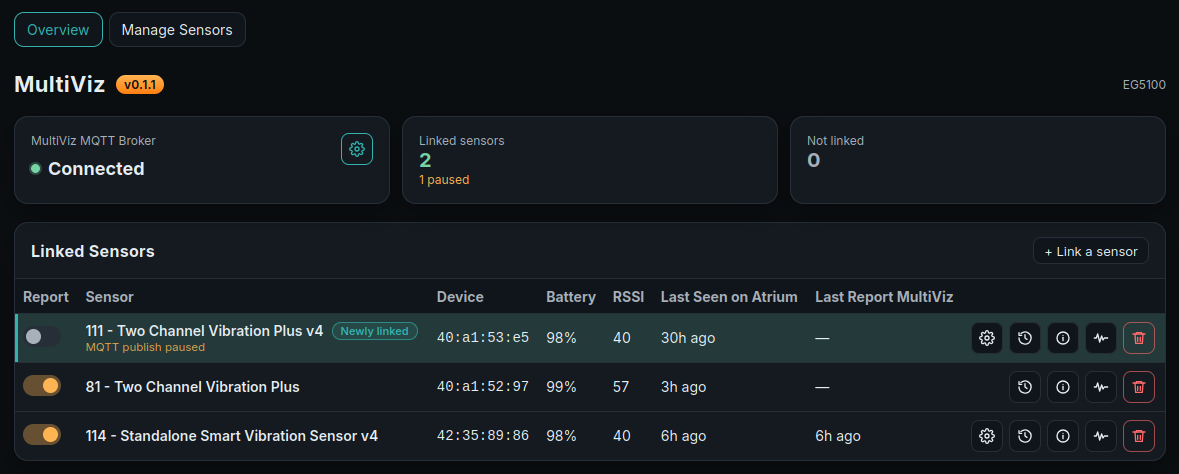
The app’s home screen: the broker connection, sensor counts, and the sensors linked to MultiViz. It refreshes automatically every 5 seconds.
MultiViz > Overview The two tabs at the top, Overview and Manage Sensors, switch between the app’s screens. The header shows the app version and the gateway model. Hover over any column title, button or field to see a tooltip.
Status cards
Card Shows MultiViz MQTT Broker The live connection status (below) and a gear button that opens the MultiViz MQTT Broker window. Linked sensors How many sensors are linked to MultiViz, and below it how many are paused (for example “1 paused”). Not linked How many supported vibration sensors on the gateway are not linked. Connection status Meaning Connected The gateway is connected to the MultiViz broker. Data only reaches MultiViz in this state. Connecting… The gateway is trying to connect. If it stays this way, check the broker details. Disconnected No broker is configured, or the connection was turned off with Disconnect. Linked Sensors table
Lists every linked sensor, the most recently linked first. + Link a sensor opens the Manage Sensors screen. With no sensors linked, the table reads “No sensors linked yet.”
Column Description Report The MQTT publish switch. On: the sensor’s data is sent to MultiViz. Off: publishing is paused, the sensor stays linked, and its row is shaded amber with the note “MQTT publish paused”. Takes effect immediately. Sensor The sensor’s name in Atrium. A sensor you have just linked is highlighted for 5 seconds and tagged “Newly linked”. Device The last 8 characters of the sensor’s radio (MAC) address. Battery Battery level at the sensor’s last transmission. Shown in amber at 30% or below. RSSI Signal strength of the last transmission, as Atrium reports it. Lower is stronger. Shown in amber at 75 or above (weak signal). Last Seen on Atrium When the gateway last received data from the sensor, published or not. Last Report MultiViz When the sensor’s data was last published to the MultiViz broker. Kept while the sensor is paused. Row buttons
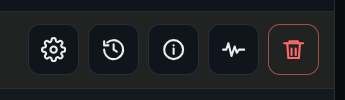
Overview > Linked Sensors > row buttons Button Opens Configure (gear) Sensor Basic Hardware Settings. Not shown for V3 sensors (types 80 and 81). Historical (clock) The sensor’s latest publications. Details (i) The sensor’s full details. On-request Waveform Data (waveform) The On-request Waveform Data window. While a request is enabled, a colored dot on the button shows its status. Remove (trash can) A confirmation to unlink the sensor. 6. MultiViz MQTT Broker Window
Opened from the gear button on the MultiViz MQTT Broker card. Holds the connection to your MultiViz broker.
Overview > MultiViz MQTT Broker > Configure Field Default Description Broker URL empty The broker address from the MultiViz Setup Integration wizard: the host name or IP address only, without mqtt://.Port 8883 The broker port. MultiViz normally uses 8883. User name empty The user name MultiViz gave you. Password empty The password MultiViz gave you, stored encrypted on the gateway. Once saved, the field reads “Saved — leave blank to keep it”; leave it blank to keep the saved password. Topic root empty The topic prefix MultiViz assigned to you. Each sensor publishes on <Topic root>/<sensor address>.Button Action Test connection Checks that the gateway can reach and log in to the broker with the details on screen. Saves nothing and doesn’t affect the current connection. Takes up to 10 seconds, then shows “Connection test succeeded.” or “Connection test failed:” with the reason. Connect Saves the settings and connects. There is no separate Save button. Disconnect Stops sending data to MultiViz. The settings stay saved, so you can reconnect any time. Close Closes the window. 7. Sensor Basic Hardware Settings
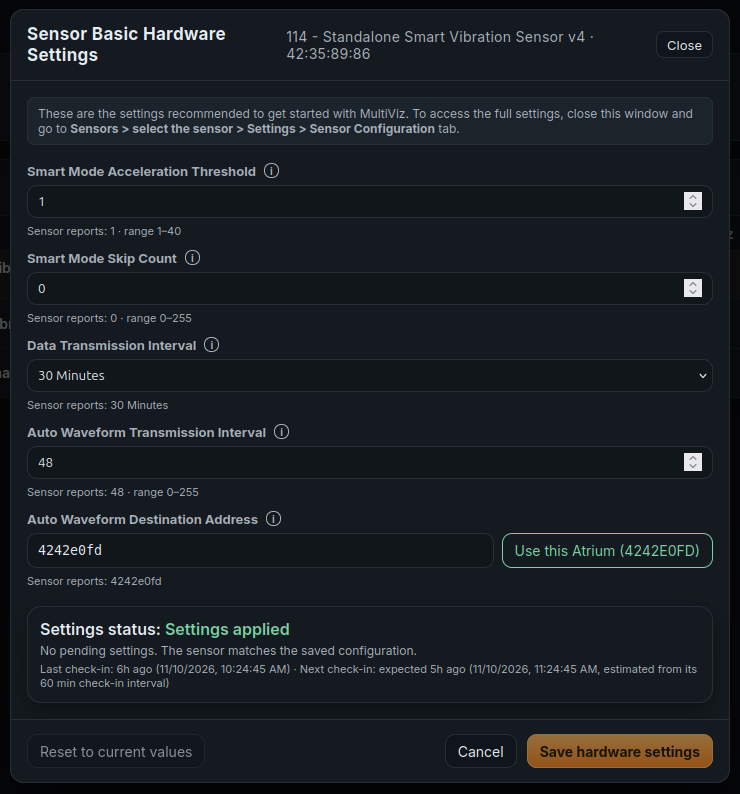
Opened from the gear button on a Gen4 sensor’s row. Contains the sensor settings recommended to get started with MultiViz.
From the factory, Gen4 sensors use Smart Mode features and have automatic waveform transmission off, to save battery. MultiViz needs regular overall data and periodic waveforms, so these settings usually need changing. All other settings stay on the sensor’s own page in Atrium: Sensors > select the sensor > Settings > Sensor Configuration.
Overview > Linked Sensors > Configure Fields
The window shows only the fields the sensor’s type and firmware support. Under each field, Sensor reports shows the value the sensor has now, the allowed range, and any value still waiting to send.
Field Range / options Description Smart Mode Acceleration Threshold 1–40 (steps of 50 mg) In Smart Mode, the sensor transmits when RMS acceleration on any axis is above this value. 1 = 50 mg, 2 = 100 mg, and so on. 2-channel sensors (type 111) show one field per probe: Probe 1 and Probe 2. Smart Mode Skip Count 0–255 How many transmissions the sensor skips while vibration stays below the threshold. 0 = never skip. Data Transmission Interval 1, 5, 10, 15, 20, 30, 60, 120 or 180 Minutes How often the sensor takes readings and transmits the overall message. Auto Waveform Transmission Interval 0–255 How often the sensor transmits a waveform on its own, as a multiplier of the Data Transmission Interval. Example: 5 with a 10-minute interval = one waveform every 50 minutes. Auto Waveform Destination Address 8 hex digits The radio address the sensor sends its waveforms to. Use this Atrium (XXXXXXXX) fills in this gateway’s address. Sending waveforms to one gateway, instead of broadcasting them, makes their delivery much more reliable. Recommended values
Field Value Why Smart Mode Acceleration Threshold 1 (50 mg) With a skip count of 0, the sensor never skips a transmission. Smart Mode Skip Count 0 MultiViz receives data even when the machine runs smoothly. Data Transmission Interval 30 Minutes One overall message every 30 minutes. Auto Waveform Transmission Interval 48 48 × 30 minutes = one waveform every 24 hours. Auto Waveform Destination Address This gateway Click Use this Atrium. Saving and applying
-
1
SaveClick Save hardware settings. Only changed fields are saved; the button is disabled until you change something.
-
2
Let the sensor check inSaved settings are sent the next time the sensor checks in with the gateway (every 60 minutes unless the sensor’s check-in interval was changed). To apply them right away, reset the sensor: press and release the RESET button, or hold a magnet near the RESET switch and move it away.
-
3
Watch the Settings statusThe box at the bottom shows the delivery status, the last check-in and the estimated next check-in. Close the window once it reads Settings applied.
Settings status Meaning Waiting for the sensor to check in Saved; sent at the sensor’s next check-in. Sending settings The sensor checked in and the settings are being sent. Waiting — radio busy The gateway’s radio is busy; sending resumes automatically. Settings applied The sensor has the saved settings. Sensor rebooted The sensor restarted after receiving the settings. No reply from sensor / Settings not accepted / Settings not kept / Settings rejected The settings did not take. See Troubleshooting. Configured outside Atrium Atrium does not manage this sensor’s configuration. No check-in yet Atrium has not seen the sensor check in. Reset to current values puts every field back to the value the sensor reports now and discards unsaved edits. Saving after a reset also cancels any change still waiting to be sent. Cancel closes the window without saving.
8. On-request Waveform Data
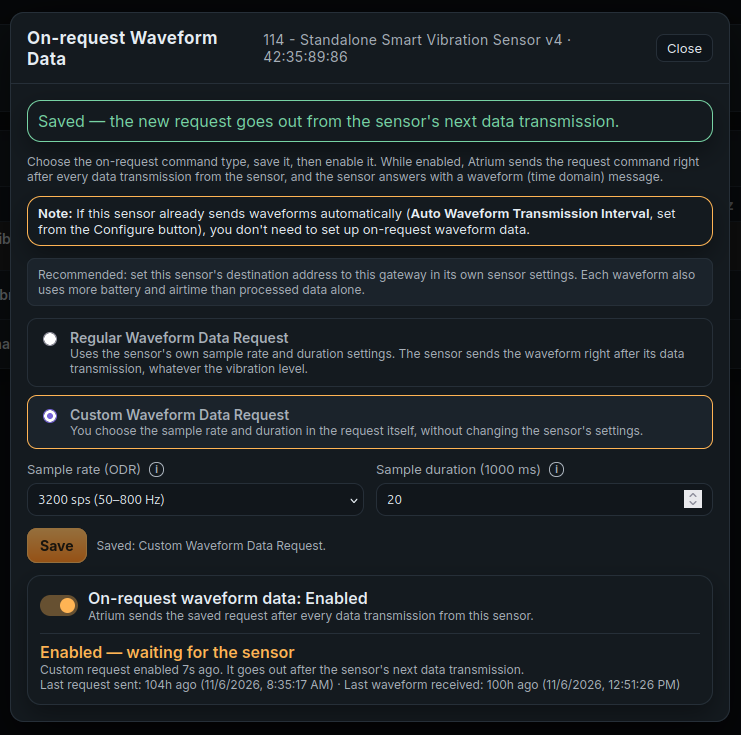
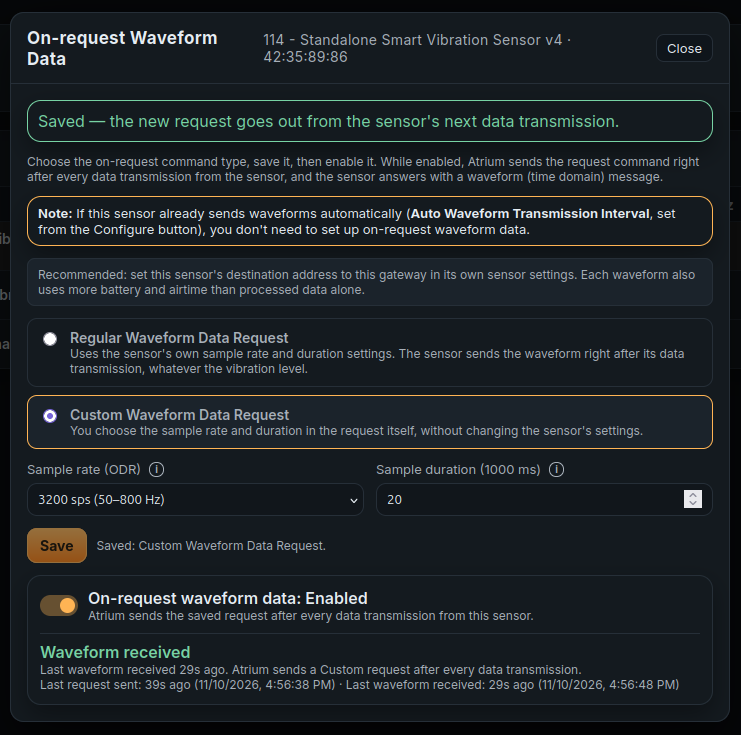
Opened from the waveform button on a sensor’s row. Makes Atrium send a waveform request to the sensor right after each of its data transmissions; the sensor answers with a waveform message, which is published to MultiViz.
- Gen4 sensors: optional. If the sensor already sends waveforms automatically (Auto Waveform Transmission Interval), you don’t need it.
- V3 sensors (types 80 and 81): the only way to get waveforms, because they don’t send them automatically.
Overview > Linked Sensors > On-request Waveform Data Request types
Option Description Regular Waveform Data Request (default) Uses the sensor’s own sample rate and duration settings. The sensor sends the waveform right after its data transmission, whatever the vibration level. The only option for V3 sensors. Custom Waveform Data Request You choose the sample rate and duration in the request, without changing the sensor’s settings. Gen4 sensors only. Field Shown for Options / default Probe 2-channel sensors (types 81 and 111) Probe 1 (default), Probe 2, Both probes Sample rate (ODR) Custom 400, 800, 1600, 3200 (default), 6400, 12800 or 25600 samples per second. Higher rates capture higher frequencies but make a bigger message. Sample duration Custom 1–100, in steps of 50 ms (1 = 50 ms, 100 = 5 s). Default 20 (1000 ms). Enable a request
-
1
Choose and saveSelect the request type (and probe, sample rate and duration if shown) and click Save. The text beside the button confirms what is saved, or warns about unsaved changes.
-
2
EnableTurn on the On-request waveform data switch. It reads Enabled, and Atrium sends the saved request after every data transmission from the sensor until you turn it off.
On-request Waveform Data > Enabled Status Meaning Enabled — waiting for the sensor The request goes out after the sensor’s next data transmission. Requested — waiting for the waveform The request was sent; the waveform hasn’t arrived yet. Waveform received The waveform for the latest request arrived and was published. Request can’t be delivered The sensor is in Processed mode, which ignores waveform requests. Request can’t be sent This gateway’s Atrium version can’t send the chosen request type. On 2-channel sensors, the status is shown per probe (for example “Probe 1: Waveform received”).
9. Historical, Details and Remove
The other three windows opened from a sensor’s row.
Historical
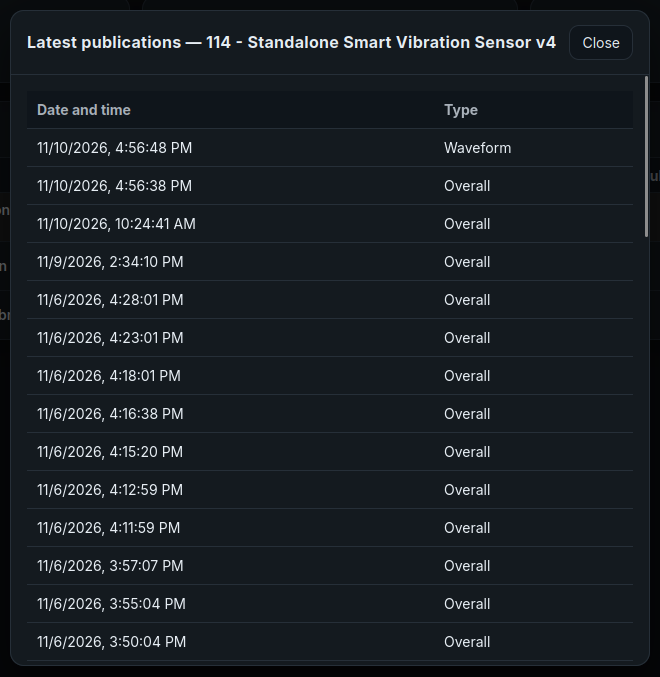
Titled Latest publications, it lists the sensor’s last 50 events, newest first, with their date and time.
Overview > Linked Sensors > Historical Type Meaning Overall An overall message published to MultiViz. Waveform A waveform published to MultiViz. If packets were lost, Details shows how much arrived; incomplete waveforms are still published. Sensor error — not sent The sensor reported an error instead of data (for example a probe it couldn’t read). Not published; Details shows the sensor’s message. Ultrasound waveform — not sent An ultrasound waveform from a type 127 sensor. MultiViz takes accelerometer waveforms only, so it isn’t published. Details
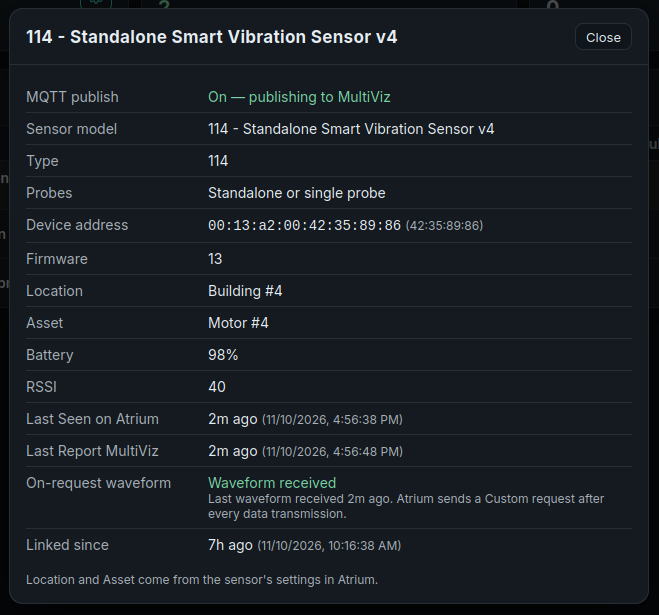
Shows everything that doesn’t fit in the table: MQTT publish (On or Off), Sensor model, Type, Probes, Device address, Firmware, Location, Asset, Battery, RSSI, Last Seen on Atrium, Last Report MultiViz, On-request waveform status and Linked since. Location and Asset come from the sensor’s settings in Atrium.
Overview > Linked Sensors > Details Remove
The trash-can button asks Remove sensor from MultiViz?. Click Remove to unlink the sensor: it stops sending data to MultiViz and leaves the table. The sensor itself stays on the gateway, and you can link it again from Manage Sensors. To stop publishing only for a while, turn its Report switch off instead.
10. Manage Sensors Screen
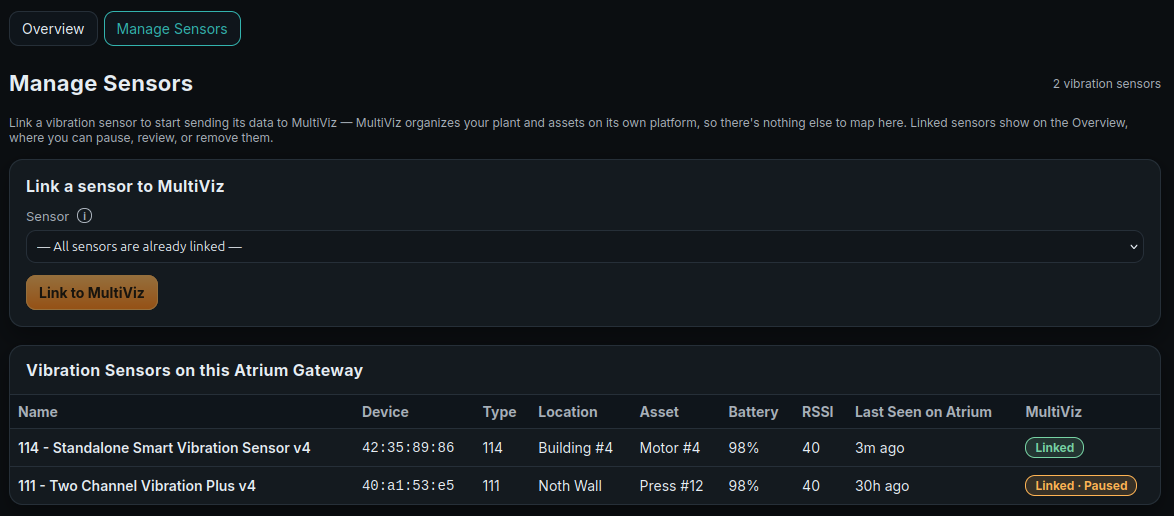
Lists every supported vibration sensor on the gateway and links new ones to MultiViz.
MultiViz > Manage Sensors Link a sensor to MultiViz
The Sensor list shows the whitelisted vibration sensors that aren’t linked yet, as type – name (last 8 characters of the address). Select one and click Link to MultiViz. A 2-channel sensor is linked as one sensor, both probes included.
The link starts with publishing off, and a popup confirms it:
- Sensor linked to MultiViz (Gen4): recommends checking the basic sensor configuration before enabling the Report switch.
- V3 vibration sensor linked to MultiViz (types 80 and 81): explains that the sensor has no automatic waveforms (use On-request Waveform Data) and is configured with Node-RED.
Click OK to go to the Overview, where the new sensor is highlighted at the top of the table.
Vibration Sensors on this Atrium Gateway
Column Description Name The sensor’s name in Atrium. Device The last 8 characters of the sensor’s radio (MAC) address. Type The NCD sensor type number. Location, Asset Set in the sensor’s settings in Atrium. Battery, RSSI As on the Overview. Last Seen on Atrium When the gateway last received data from the sensor. MultiViz Linked publishing · Linked · Paused linked, Report switch off · Not linked not sending to MultiViz 11. Integration
What the app sends, where, and what it reads from the gateway.
MQTT
Item Value Connection The app’s own connection to the broker in the MultiViz MQTT Broker window, encrypted with TLS. It is separate from any MQTT connection configured in Atrium itself. Topic <Topic root>/<sensor address>, for exampleacme-plant-1/00:13:a2:00:42:35:89:86. Overall and waveform messages share the sensor’s topic.Payload JSON, the sensor message as Atrium decodes it (NCD format: sensor_data,battery,rssi,addr,receivedand other fields). V3 waveforms are reshaped to the Gen4 waveform layout.QoS / retain QoS 0, not retained. Not published Sensor error messages and type 127 ultrasound waveforms (both recorded in Historical), and anything from a sensor whose Report switch is off. Radio commands to sensors
The app sends commands to sensors over the wireless network in two cases only: waveform requests while On-request Waveform Data is enabled, and the settings you save in Sensor Basic Hardware Settings (delivered by Atrium at the sensor’s check-in).
Automations, inter-app bus and AI assistants
The app does not publish events or provide actions on the Atrium inter-app bus, so it adds nothing to the Automations page. It does not expose any tools or data to an AI assistant over MCP.
Data the app reads from the gateway
- Sensor messages, as Atrium receives them.
- The sensor list: type, firmware, name, location, asset, battery, RSSI and last seen time. Only whitelisted sensors are shown.
- Sensor configuration and check-in status, for the Sensor Basic Hardware Settings window.
- The gateway model and the gateway’s radio address (for Use this Atrium).
12. Settings and Data Handling
Where the app keeps its settings and how it handles credentials.
- Broker password: stored encrypted on the gateway and never shown again after saving.
- TLS: always used; there is no setting to turn it off.
- History: the last 50 events per sensor are kept for the Historical window; older ones are deleted automatically.
- Upgrades and reinstalls keep the broker settings, linked sensors, on-request waveform settings and history.
- Removing a sensor unlinks it from MultiViz only. Its Atrium data and settings are not touched, and the app keeps its on-request waveform settings and history in case you link it again.
13. Troubleshooting
Common problems, their cause and the fix.
Symptom Cause Fix Broker window shows “Requires platform 2.8.0+ for an app-owned MQTT connection” Atrium is older than 2.8.0. Upgrade the gateway. The saved settings take effect automatically after the upgrade. Connection stays at Connecting… Wrong broker details, or no internet route to the broker. Click Disconnect, then Test connection. Check that Broker URL has no mqtt://, the port (normally 8883) and the credentials, and that the network allows outbound traffic on that port.Sensor missing from the Sensor list Not whitelisted, not a supported type, or already linked. Whitelist it in Atrium’s Sensors page; check its type against Supported sensors; look for it in the Linked Sensors table. Last Report MultiViz doesn’t update Broker not Connected, Report switch off, or the sensor hasn’t transmitted. Check the broker card and the Report switch. If Last Seen on Atrium isn’t updating either, reset the sensor to force a transmission. Check Historical for “not sent” rows. Settings status stays at “Waiting for the sensor to check in” The sensor hasn’t checked in since you saved. Wait for its next check-in, or reset the sensor. No reply from sensor, Settings not accepted, Settings not kept or Settings rejected The sensor didn’t receive or keep the settings. Reset the sensor to retry, and check its RSSI and battery. Contact NCD Technical Support if it persists. Hardware settings fields are disabled “Atrium manages this sensor’s configuration” is off. Turn it on in Sensors > the sensor > Settings > Sensor Configuration. Request can’t be delivered The sensor is in Processed mode. Change its Operation Mode to “Processed + Raw on demand” or “Smart” in its Atrium settings. Requests resume automatically. Request can’t be sent The gateway’s Atrium version can’t send this request type. Choose Regular and click Save. Waveforms arrive incomplete Packets lost on the way. Set the destination address to this gateway; improve RSSI by moving the sensor or gateway closer, or adding a repeater. Historical shows “Sensor error — not sent” The sensor reported an error, for example a probe it couldn’t read. Read the Details column. On 2-channel sensors, check the probe connections. 14. Reference
Defaults and limits.
Item Value App ID / version multiviz / 0.1.0 Minimum Atrium for MultiViz connection 2.8.0 Default broker port 8883 (TLS) Screen refresh Every 5 seconds Historical events kept 50 per sensor Newly linked highlight 5 seconds Low battery / weak signal thresholds 30% or below / RSSI 75 or above (same as Atrium’s Sensors page) Custom request sample duration 1–100 × 50 ms (50 ms to 5 s) - 2