Particle Photon Introduction:
The Particle Photon module is an engineer favorite here at NCD when we need to put together a control, monitoring, or automation project quickly and easily. With Particle’s backend cloud we have remote access and monitoring right out of the box. Writing application code and flashing it to the module is a breeze using Particle’s web based Build IDE and OTA firmware flashing.
Programming is via the very popular C/C++ based Arduino Wire language. Arduino developers will feel right at home developing application code for the Particle Photon module.
Power/Communication Connection Overview
Most NCD products connect to the Particle Photon module via I2C. This includes all relay controllers, current monitoring products, sensors, analog inputs, analog outputs, etc. This is done by simply plugging the Particle Photon module into a board(see figure 1-1) or by connecting a controller to the Photon module using a plug in cable (see figure 1-2).
Photon modules may also be installed in NCD IoT devices orginally designed for the Particle Electron, as the pinout and spacing are the same. Please note, the must be installed closest to the front edge of the board as showing in figure 1-3.
NCD Photon interface products take care of all that hardware connection for you. But what’s really going on? In order for an I2C communication port to work you must connect to the SDA and SCL lines. The Photon module uses pins D0 and D1 on the Photon for I2C communication so the board makes connection to those two pins. Those pins are also pulled high to 5VDC through a resistor network which is necessary for proper I2C communication to occur. On many controllers these pull up resistors on D0 and D1 are fixed on the board hard wired in the circuit traces, on other boards such as the PScrew or PPScrew there are jumpers on board which must be installed to pull the D0 and D1 lines on the photon high in order to communicate with I2C devices.
The I2C cable carries SDA, SCL, GND, and a +5VDC connections from the main board where the Photon module lives to all other boards in the chain. A shared ground line between the Photon module and connected I2C devices is also required for proper I2C communications. Many devices such as sensors, analog inputs, digital inputs, analog outputs, etc can be powered strictly from 5VDC on that cable. Other higher power demanding products like Relay Controllers require an alternative power source which is connected to the controller board itself.
All NCD I2C based products have an I2C in and an I2C out. There are no exceptions. I2C devices are meant to be chained on a bus. Not having both connections on a product would break that chain. The I2C in connection could be from a plugged in Photon module or from an I2C in plug in cable connection. There is always an I2C out plug in connection(on many products this connector is right under the USB connection on the Photon.
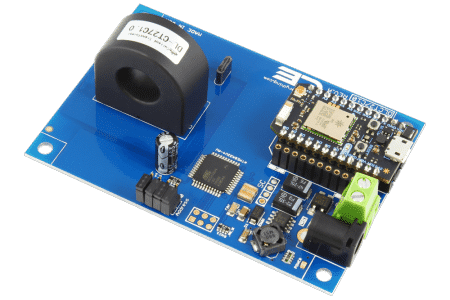
(1) Photon installed on board:
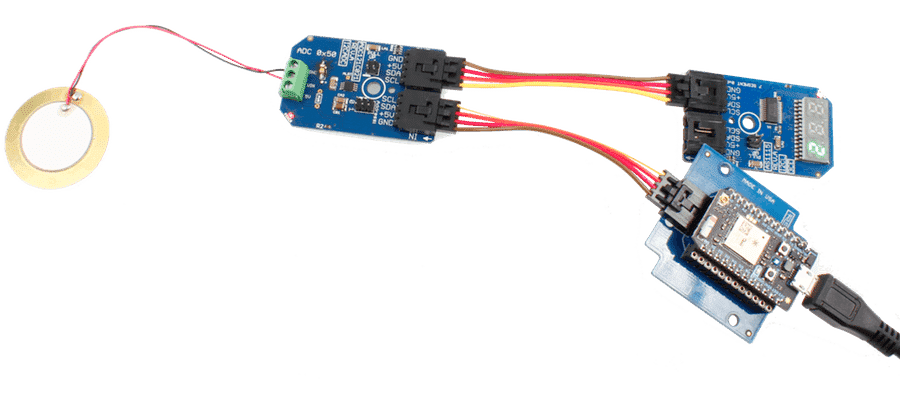
(2) Photon installed in I2C interface shield and connected to board using plug in cable:
(3) Particle Photon in NCD IoT Device originally designed for Particle Electron.

Get your Photon Module Ready
Setting up the Photon is really easy using Particle’s free iOS or Android app. You will also need to create a Particle account which you can do through the app as well if you wish. Particle has fantastic documentation on how to create your account, setup the Photon to your WiFi network with internet access, and claim that module to your Particle account. Take a look at their getting started guide here:
http://docs.particle.io/guide/getting-started/start/photon/
Once you have a Particle account, the module is connected to your WiFi network, and is associated with your account we are ready to get started programming. But first, hook up all your wonderful new ControlEverything hardware whether that means simply plugging the Photon module into the board, or connecting some I2C cables to get everything online and ready to go.
Writing your first application on Photon
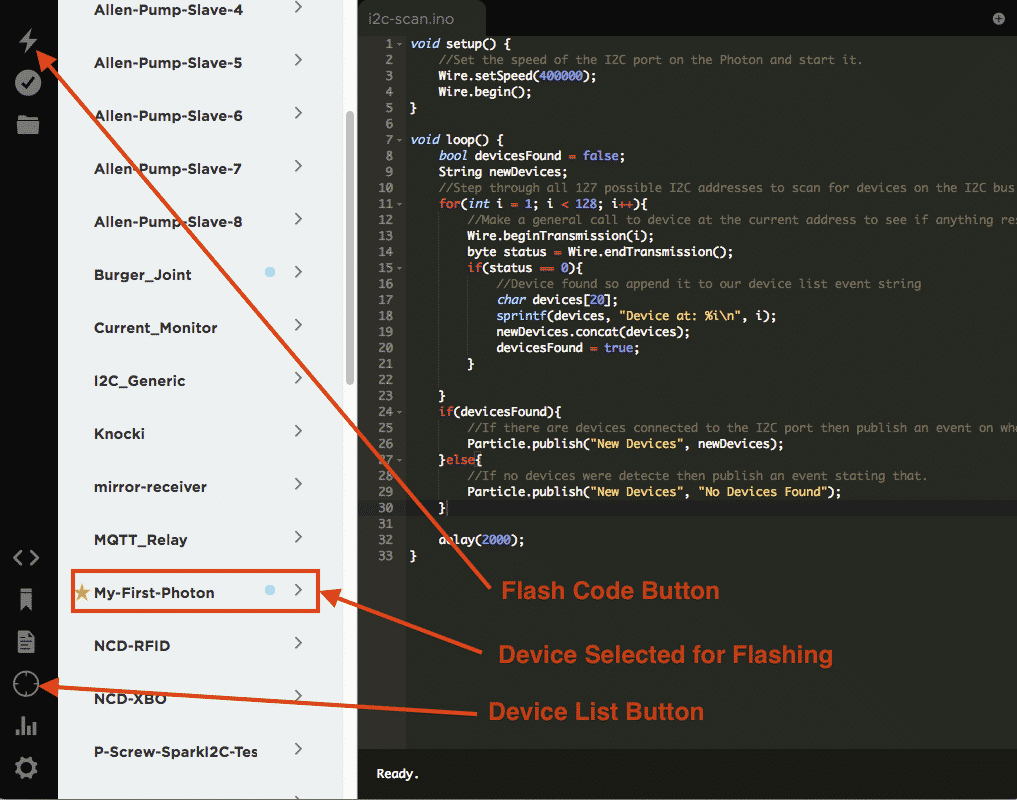
Open your favorite web browser and head over to http://build.particle.io This is Particle’s Build IDE. Take a moment to get familiar with the environment. Menus on the left side(top to bottom) will allow you to flash code to the module, check code for errors, save code, view your other custom coded applications, pull in community contributed libraries, browse Particle Docs, View your list of devices and their online status, link over to the console where you can get more info on the devices, and change various account settings. Be sure to check out Particle’s great documentation that goes into depth on the Build IDE here for more info:
http://docs.particle.io/guide/getting-started/build/photon/
So if this is your first time coming to Build if you look on the left side of the screen there is probably a text box over there waiting for you to enter the name of your very first awesome custom application. You have to put a name in there or you will not be allowed to save or flash the firmware so give your first application a name there and hit enter.
Ok. For our first application we are just going to scan the Photon module’s I2C port for connected devices, we will then publish a Particle event with that list of devices so we can see what’s connected. This is a super useful application you will be likely to use time and time again in the future when using NCD products. Paste this code into the code editor window:
void setup() {
    //Set the speed of the I2C port on the Photon and start it.
    Wire.setSpeed(400000);
    Wire.begin();
}

void loop() {
    bool devicesFound = false;
    String newDevices;
    //Step through all 127 possible I2C addresses to scan for devices on the I2C bus.
    for(int i = 1; i < 128; i++){
        //Make a general call to device at the current address to see if anything responds.
        Wire.beginTransmission(i);
        byte status = Wire.endTransmission();
        if(status == 0){
            //Device found so append it to our device list event string
            char devices[20];
            sprintf(devices, "Device at: %in", i);
            newDevices.concat(devices);
            devicesFound = true;
        }

    }
    if(devicesFound){
        //If there are devices connected to the I2C port then publish an event on what I2C bus addresses they were found at.
        Particle.publish("New Devices", newDevices);
    }else{
        //If no devices were detecte then publish an event stating that.
        Particle.publish("New Devices", "No Devices Found");
    }

    delay(2000);
}
This code is really handy for determining if all your hardware is hooked up and functioning correctly. It also helps you to identify the I2C address of all devices connected. Really handy code to have when working with I2C devices.
Now to flash that code into the module look on the Build IDE. On the left side of the screen you will see an icon that looks like a target, click that. This displays all Particle modules on your account and allows you to select the correct one to flash firmware to(also indicates devices online or not). If you have more than one Particle module make sure you select it with a star, this determines which module the code is flashed to. If you only have one Particle module then no need to worry, code will flash to it by default.
Now just click the Flash icon in the upper left corner(looks like a lightning bolt). Almost as if by magic that code will compile on Particle’s server and will then flash right into the Photon module and start running. You can watch the LED on the Photon module for fun. It will flash Magenta when code is being flashed. Once it is completely done it will go back to the “breathing Cyan” LED.
Monitor Data Published by Photon
Particle has a really cool tool called Console. You can pull it up in your browser by heading over to http://console.particle.io Do that now! Ok, here there is alot you can do and you should read Particle’s Documentation on the console here when you get a chance:
http://docs.particle.io/guide/tools-and-features/console/
All we are interested in right now is seeing that event the Particle module is publishing which will tell us if our I2C devices are connected and if so what their addresses are. So on the console page click on the Logs icon on the left. Here you will see the events published by your module showing the I2C addresses of all connected devices.
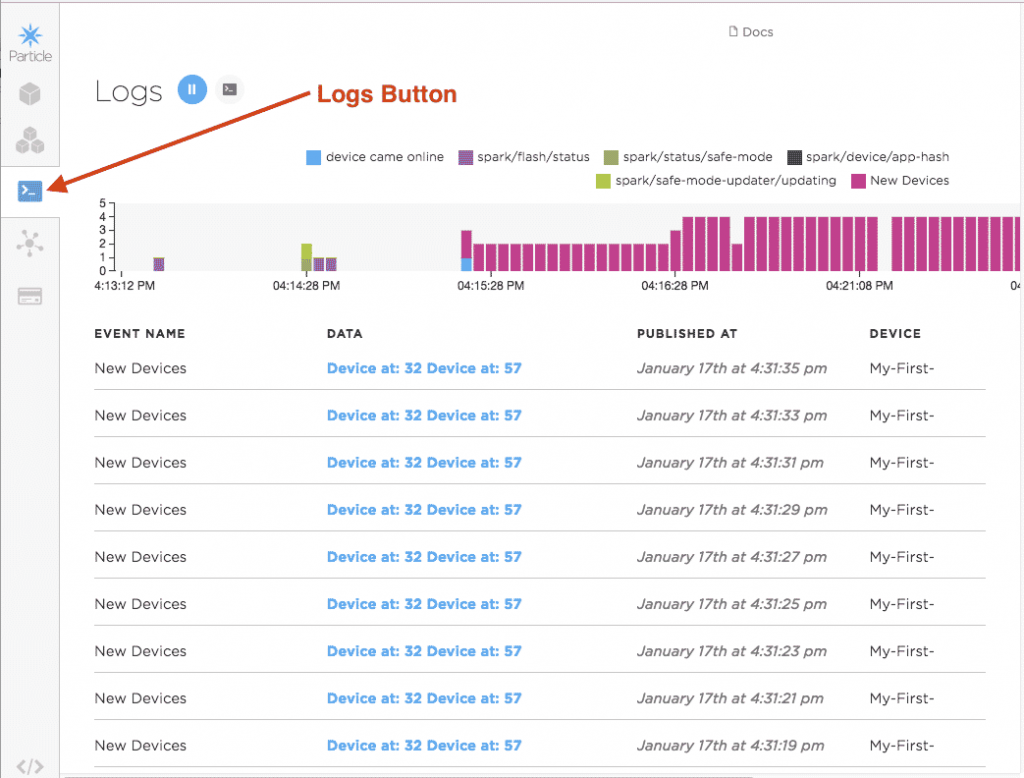
If all goes well you will see some devices listed in those published events.