Introduction
A cloud-based weather application providing daily weather reports as email notification. This web Application measure Temperature and Humidity using SHT25 and Adafruit Huzzah ESP8266. It provides us with Real-Time Temperature and Humidity data and hourly analytics. The data is sent using ThingSpeak MQTT API and later we are providing an email notification to the user whenever temperature reaches assigned threshold using IFTTT protocol.
SHT25 is a Temperature and Humidity Sensors made by Sensirion. The SHT25 provides a high level of accuracy around ±2% RH. Its Humidity range is between 0 to 100% and Temperature range is between -40 to 125 °C. It is much more reliable and fast with 8 sec of Sensor response time.
Features
- Provides you real-time analytics and stats using Thing Speak MQTT API
- An Email Notification is provided to the user at an assigned time using IFTTT
- Task Scheduler is used to Schedule the task like fetching data from sensors, Publishing the sensor readings, Subscribing to MQTT topic
- It uses I2C protocol to fetch the sensor reading which is more accurate, expandable and scalable
- sleep mode when the device is idle or no task callback is called.
- effective task scheduling provide hassle-free usage
- A separate webpage is hosted where the user has to provide his user credentials to avoid flashing your device every time are in reach of other wifi networks
- SPIFFS is used to store our webpage to make our code readable and less clumsy
Hardware Specification
- Adafruit esp8266 Huzzah board
- Huzzah Board Shield
- SHT25 Sensor module
- I2C cable


Software Apps and Online Sevices
- Arduino IDE
- IFTTT
- Thing Speak MQTT API
How does it work?
Here we are using SHT25 I2C sensor to read the real-time value of Temperature and Relative Humidity and posting these value to the cloud. To get the updated sensor value time to time and to post these updates simultaneously we are using Arduino’s Task Scheduler Library. For cloud operations, we are using ThingSpeak MQTT API. Later we are providing real-time weather report to the user using IFTTT applets. You can follow these steps to make your own weather station. So, DIY.
Storing User Credentials
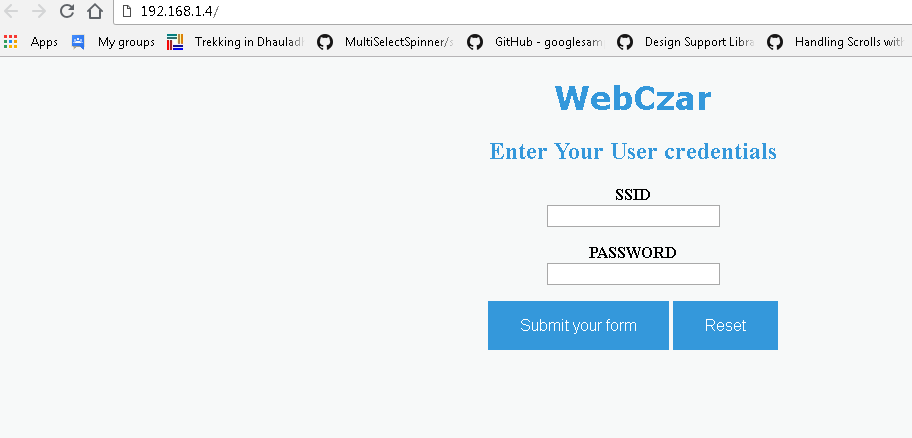
Before proceeding further. We need to save the user credentials. For this purpose, we are hosting a web server at 192.169.1.4. We have stored our web form in SPIFFS. Once the device starts it hosts a web server for 60 secs. The user should follow these steps.
- Connect to the AP ESPuser, This is listed in your available wifi network list. Connect to this AP and enter the password “*******”
- Once it gets connected, Go to your browser enter the IP 192.168.1.4.
- Enter the SSID and password of your local WiFi in the input fields and enter SUBMIT
- These credential will be saved in EEPROM
- After 60-sec Device will automatically disconnect from AP
- Next time when you turn on the device, The user doesn’t have to follow this procedure, The device will automatically fetch the user credentials from EEPROM and continue with getting the sensor readings from I2C Interface and posting it to cloud
SPIFFS
Serial Peripheral Interface Flash File System, or SPIFFS for short. It’s a light-weight file system for microcontrollers with an SPI flash chip. The onboard flash chip of the ESP8266 has plenty of space for your web pages, especially if you have the 1MB, 2MB or 4MB version. We have also stored our webpage in Flash System. There are a few steps we need to follow to upload data to spiffs
- Download the tool: https://github.com/esp8266/arduino-esp8266fs-plugin/releases/download/0.1.3/ESP8266FS-0.1.3.zip.
- In your Arduino sketchbook directory, create tools directory if it doesn’t exist yet
- Unpack the tool into tools directory (the path will look like <home_dir>/Arduino/tools/ESP8266FS/tool/esp8266fs.jar)
- Restart Arduino IDE
- Open a sketch (or create a new one and save it)
- Go to sketch directory (choose Sketch > Show Sketch Folder)
- Create a directory named data and any files you want in the file system there. We have uploaded our HTML page with name webform.html
- Make sure you have selected a board, port, and closed Serial Monitor
- Select Tools > ESP8266 Sketch Data Upload. This should start uploading the files into the ESP8266 flash file system. When done, IDE status bar will display SPIFFS Image Uploaded message.
//header to access SPIFFS
#include "FS.h"

//include this in setup()
SPIFFS.begin();

//get the webform file from SPIFFS
 File  file =SPIFFS.open("/webform.html", "r");
      server.streamFile(file,"text/html");
      //don't forget to close the file
      file.close();

//--------- AP config------------//
IPAddress ap_local_IP(192,168,1,4);
IPAddress ap_gateway(192,168,1,254);
IPAddress ap_subnet(255,255,255,0);
Serial.print("Configuring access point...");
WiFi.softAPConfig(ap_local_IP,ap_gateway,ap_subnet);
Serial.print("Setting up User Credentials");
WiFi.softAP(ssidAP,passAP);
server.on("/", handleRoot);
server.onNotFound(onHandleNotFound);
server.begin();
APTimer = millis();
while(millis()-APTimer<APInterval){
server.handleClient();
}
//****************************HANDLE ROOT***************************//
void handleRoot() {
if (server.hasArg("ssid")&& server.hasArg("password") ) {//If all form fields contain data call handelSubmit()
handleSubmit();
}
else {
//Redisplay the form
//read the file contained in spiffs
File file =SPIFFS.open("/webform.html", "r");
server.streamFile(file,"text/html");
//don't forget to close the file
file.close();
}
}
//**************************SUBMIT RESPONSE**************************//
void handleSubmit(){//dispaly values and write to memmory
String response="<p>The ssid is ";
response += server.arg("ssid");
response +="<br>";
response +="And the password is ";
response +=server.arg("password");
response +="</P><BR>";
response +="<H2><a href="/">go home</a></H2><br>";
server.send(200, "text/html", response);
//calling function that writes data to memory
ROMwrite(String(server.arg("ssid")),String(server.arg("password")));
}
void write_EEPROM(String x,int pos){
for(int n=pos;n<x.length()+pos;n++){
//write the ssid and password fetched from webpage to EEPROM
EEPROM.write(n,x[n-pos]);
}
}
Task Scheduling
In this tutorial, we are performing two operations:
- Read the data from SHT25 using I2C protocol
- Post the updated data to the cloud using ThingSpeak MQTT API
To achieve this we are using TaskScheduler library. We have scheduled two different tasks referring to two different control operations. this is done as follows
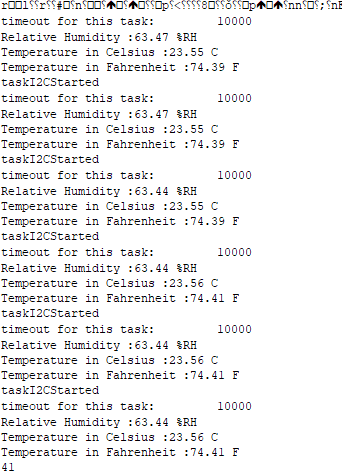
- Task 1 is for reading the sensor value this task runs for 1 second till it reaches timeout of 10 secs.
- When the Task1 reaches its timeout We are connecting to local Wifi and MQTT broker.
- Now Task 2 is enabled and we are disabling Task 1
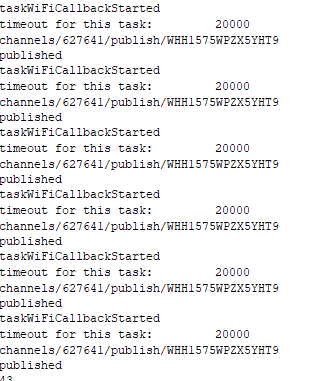
- Task 2 is for publishing the sensor data to Thing Speak MQTT broker this task runs for 20 seconds till it reaches timeout of 20 secs
- When the Task2 reaches its timeout Task 1 is enabled again and Task2 is disabled. here again, we are getting the updated value and the process goes on
- when no callback is called or the device is idle it goes to Light Sleep thus saving power.
void taskI2CCallback();
void taskI2CDisable();
void taskWiFiCallback();
void taskWiFiDisable();

//---------Tasks------------//
Task tI2C(2 * TASK_SECOND, TASK_FOREVER, &taskI2CCallback, &ts, false, NULL, &taskI2CDisable);
Task tWiFi(20* TASK_SECOND, TASK_FOREVER, &taskWiFiCallback, &ts, false, NULL, &taskWiFiDisable);

//---------Task Timeout------------//
tI2C.setTimeout(10 * TASK_SECOND);
tWiFi.setTimeout(20 * TASK_SECOND);

//enable I2C
tI2C.enable();
Reading Temperature and Humidity Values from SHT25
I2C is a two-wire interface which only uses two wires to communicate with the master device. The one is SCL(Serial Clock) and the other is SDA(Serial Data). Each slave device has a unique address. SHT 25 also has an 8-bit address and can be accessed by a 0x44 address. it has a 8bits of the address where 7 bits are actual address and while rightmost LSB bit 0 is used to signal reading from or writing to the device. If bit 0 is set to 1 then the master device will read from the slave I2C device. I2C is much more reliable, scalable and fast and even it has many modes of operation which makes it much more energy efficient
We are using Wire.h library to read the temperature and humidity values. This library facilitates i2c communication between the sensor and the master device. 0x44 is the I2C address for SHT25.
SHT25 operates in a different mode of operations. You can refer to datasheet for that. We are using 0x2C and 0x06 as MSB and LSB respectively for single shot operation.
//----------I2CCallback-----------//
void taskI2CCallback(){
  Serial.println("taskI2CStarted");
  Serial.print("timeout for this task: t");
  Serial.println(tI2C.getTimeout());
    unsigned int data[2];

  // Start I2C transmission
  Wire.beginTransmission(Addr);
  // Send humidity measurement command, NO HOLD master
  Wire.write(0xF5);
  // Stop I2C transmission
  Wire.endTransmission();
  delay(500);

  // Request 2 bytes of data
  Wire.requestFrom(Addr, 2);

  // Read 2 bytes of data
  // humidity msb, humidity lsb
  if(Wire.available() == 2)
  {
    data[0] = Wire.read();
    data[1] = Wire.read();

    // Convert the data
    float humidity = (((data[0] * 256.0 + data[1]) * 125.0) / 65536.0) - 6;

    // Output data to Serial Monitor
    Serial.print("Relative Humidity :");
    Serial.print(humidity);
    Serial.println(" %RH");
    humid = humidity;
  }

  // Start I2C transmission
  Wire.beginTransmission(Addr);
  // Send temperature measurement command, NO HOLD master
  Wire.write(0xF3);
  // Stop I2C transmission
  Wire.endTransmission();
  delay(500);

  // Request 2 bytes of data
  Wire.requestFrom(Addr, 2);

  // Read 2 bytes of data
  // temp msb, temp lsb
  if(Wire.available() == 2)
  {
    data[0] = Wire.read();
    data[1] = Wire.read();

    // Convert the data
    float cTemp = (((data[0] * 256.0 + data[1]) * 175.72) / 65536.0) - 46.85;
    float fTemp = (cTemp * 1.8) + 32;

    tempC = cTemp;
    tempF = fTemp;

    // Output data to Serial Monitor
    Serial.print("Temperature in Celsius :");
    Serial.print(cTemp);
    Serial.println(" C");
    Serial.print("Temperature in Fahrenheit :");
    Serial.print(fTemp);
    Serial.println(" F");
  }


  }
Posting Values to Cloud using ThingSpeak MQTT API
For posting our temperature and Humidity values to the cloud we are using ThingSpeak MQTT API. ThingSpeak is an IoT platform. ThingSpeak is a free web service that lets you collect and store sensor data in the cloud. MQTT is a common protocol used in IoT systems to connect low-level devices and sensors. MQTT is used to pass short messages to and from a broker. ThingSpeak has recently added an MQTT broker so devices can send messages to ThingSpeak. You can follow the procedure to set up ThingSpeak Channel from this post
ThingSpeak MQTT
MQTT is a publish/subscribe architecture that is developed primarily to connect bandwidth and power-constrained devices over wireless networks. It is a simple and lightweight protocol that runs over TCP/IP sockets or WebSockets. MQTT over WebSockets can be secured with SSL. The publish/subscribe architecture enables messages to be pushed to the client devices without the device needing to continuously poll the server.
A client is any device that connects to the broker and can publish or subscribe to topics to access the information. A topic contains the routing information for the broker. Each client that wants to send messages publishes them to a certain topic, and each client that wants to receive messages subscribes to a certain topic
Publish and Subscribe using ThingSpeak MQTT
- Publishing to channel feed channels<channelID>/publish/<writeAPIKey>
- Publishing to a particular field channels<channelID>/publish/fields/field<fieldnumber>/<writeAPIKey>
- Subscribe to the channel field channels<channelID>/subscribe/<format>/<APIKey>
- Subscribe to the private channel feed channels<channelID>/subscribe/fields/field<fieldnumber>/<format>
- Subscribe t0 all fields of a channel. channels/<channelID>/subscribe/fields/field<fieldNumber>/<apiKey>
void reconnectMQTT(){
   Serial.println("setting up mqtt");
   while(!mqttCli.connected()){
     if(mqttCli.connect("ESP8266Client123456789")==true){
        Serial.println("connected");
        String subTopic = String("channels/"+ String(channelID) + "/subscribe/json/" + String(readAPIKey));
        int subTopicLength = subTopic.length()+1;
        char subTopicBuffer[subTopicLength];
        subTopic.toCharArray(subTopicBuffer,subTopicLength);

        String pubMessage = "status=MQTTPUBLISH";
        String pubTopic =String("channels/"+String(channelID)+"/publish/"+String(writeAPIKey));
        int pubTopicLength = pubTopic.length()+1;
        char pubTopicBuffer[pubTopicLength];
        pubTopic.toCharArray(pubTopicBuffer,pubTopicLength);
        //Publish to MQTT Broker
        Serial.println(mqttCli.publish(pubTopicBuffer, pubMessage.c_str()) ? "Published" : "NotPublished");
        //Subscribe to MQTT Broker
        Serial.println(mqttCli.subscribe(subTopicBuffer) ? "Subscribed" : "Unsbscribed");
       }else{
           Serial.print("failed, rc=");
           Serial.println(mqttCli.state());
           delay(1000);
        }
    }
  }

//----------WiFiCallback-----------//
void taskWiFiCallback(){
  Serial.println("taskWiFiCallbackStarted");
  Serial.print("timeout for this task: t");
  Serial.println(tWiFi.getTimeout());
      if(!mqttCli.connected()){
          Serial.println("Client not connected");
          reconnectMQTT();
        }
        String topicString ="channels/"+String(channelID)+"/publish/"+String(writeAPIKey);
       int topicLength = topicString.length()+1;
       char topicBuffer[topicLength];
       topicString.toCharArray(topicBuffer,topicLength+1);
       Serial.println(topicBuffer);
       String dataString  = String("field1="+ String(tempC,1) + "&field2=" + String(tempF,1) + "&field3=" + String(humid,1));
       int dataLength = dataString.length()+1;
       byte dataBuffer[dataLength];
       dataString.getBytes(dataBuffer,dataLength);

       mqttCli.beginPublish(topicBuffer,dataLength,false);

       Serial.println(mqttCli.write(dataBuffer,dataLength) ? "published" : "published failed");

       mqttCli.endPublish();

       //mqttCli.loop();
  }


Weather Report Email Notification
We are using IFTTT applets to give real-time weather report Email notification to the user. So, We have implemented it through ThingSpeak. We are averaging the 5-fay values of temperature and humidity. Whenever the value of the last entry is greater than the average value. It will trigger an email notification “it’s a hot day”. and when it is lesser than the average value. It will trigger an email notification “What a beautiful day”. Every day at around 10:00 am (IST) we will be getting an email notification


% Enter your MATLAB Code below

channelID=627641;
iftttURL='https://maker.ifttt.com/trigger/SunnyDay/with/key/bQnimMzQgTMJECwLbMAC2j';
moistureData=thingSpeakRead(channelID,'Fields',3,'NumDays',5);
tempData = thingSpeakRead(channelID,'Fields',1,'NumDays',5);

perHumid=max(moistureData)-min(moistureData);
humidValue=0.1*perHumid+min(moistureData);

perTemp=max(tempData)-min(tempData);
tempValue=0.1*perTemp+min(tempData);

urlTemp=strcat('https://api.thingspeak.com/channels/',string(channelID),'/fields/1/last.txt');
urlHumid = strcat('https://api.thingspeak.com/channels/',string(channelID),'/fields/3/last.txt');
lastTempValue=str2num(webread(urlTemp));
lastHumidValue = str2num(webread(urlHumid));

if (lastTempValue<tempValue || lastHumidValuetempValue || lastHumidValue>humidValue)
    plantMessage=' Its A hot day.';
    webwrite(iftttURL,'value1',plantMessage,'value2',lastTempValue, 'value3', lastHumidValue);
end
Overall Code
The overall code is available in this GitHub repository
Limitations
- There are some issues with publishing the data using publish a method for the large bulk of data. to resolve this issue we are using write() function
- SPIFFS should be formatted before uploading the new data to SPIFFS.
- You must not use the delay() function. delay() hinders the background operation. Instead, create delays using millis() only if it is necessary