This guide walks through the complete process of connecting NCD.io wireless sensors to SORBA for Real-Time Industrial data collection and visualization. The integration uses NCD’s wireless sensor ecosystem combined with SORBA’s edge-native platform to deliver predictive maintenance and process monitoring.
How It Works
SORBA connects to an NCD Ethernet Modem over TCP/IP. The modem acts as a wireless gateway, receiving radio transmissions from nearby NCD sensors and making them available over the network. SORBA ingests this data through a configured Data Channel, applies ML models, and visualizes the results on dashboards.
NCD Wireless Sensors: Vibration, temperature, and other industrial sensors that transmit data via proprietary radio. This is NCD family of sensors with a wide range of applications.
NCD Ethernet Modem: Wireless gateway receiving sensor radio transmissions, accessible via TCP/IP on your network. The Modem receive the data from each sensor linked by Network ID.
SORBA Platform: Connects to the modem via a Data Channel; ingests sensors data, runs ML models, and displays dashboards.
ImportantNCD modems only support ONE active client connection at a time. If Node-RED is connected, SORBA cannot connect, and vice versa. The modem's Ethernet port red LED indicates an active connection. Always disconnect one client before connecting another.
Sensor Capacity and Key Limits
Parameter
Value / Guidance
Max Sensor Per Modem (Recommended)
32 NCD sensors
Recommended max
(if using waveform/Time-Domain data)
16 sensors per modem
Multiple modems in SORBA
One separate Data Channel per modem
PAN ID
Must be unique per modem (default: 7FFF)
Modem TCP port
2101 (default)
Sensor Generations and Configuration Methods
Vibration Sensor V3 and new Gen4: Must be configured via Node-RED Wireless Device node inside SORBA Workflow, here is a complete guide for sensor configuration using Node-RED:
NoteInternet connectivity is required during library installation inside SORBA Workflow.
Configure the NCD Ethernet Modem
Before any sensors can communicate with SORBA, the NCD modem must have an IP address on your network compatible with the subnet. This section covers how to configure the NCD Modem.
Assign IP Address Using NCD5500 Tool
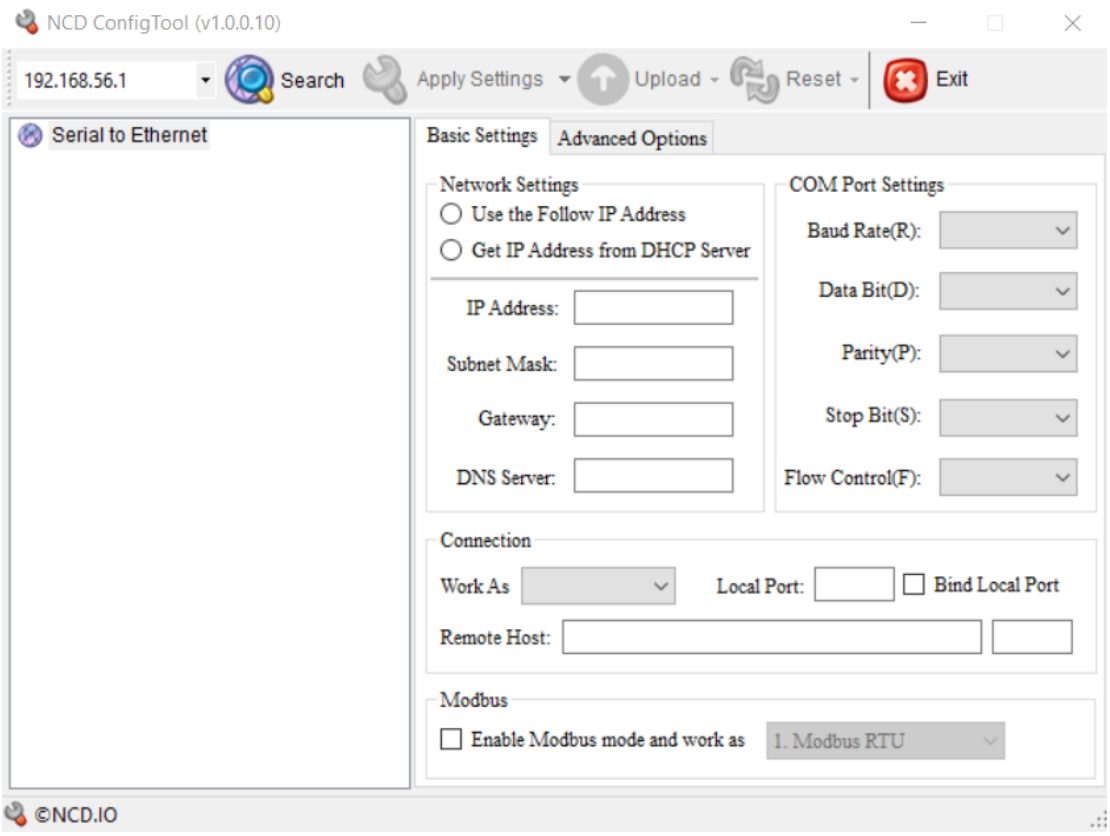
Step 1. Launch NCD5500 Configuration Software: Open the NCD5500 configuration application on your PC.
Click to Expand
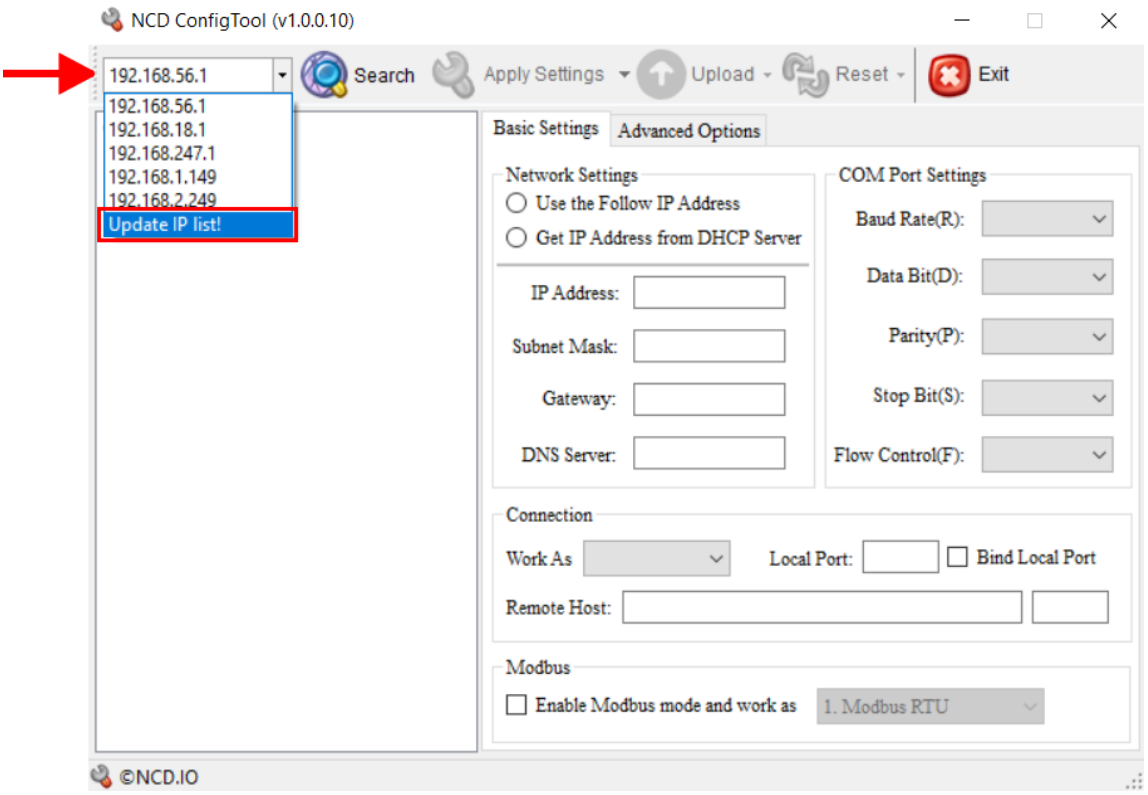
Step 2. Discover Modem on Network: In the IP Dropdown, select “Update List.”. This will update all network interfaces IPs.
Click to Expand
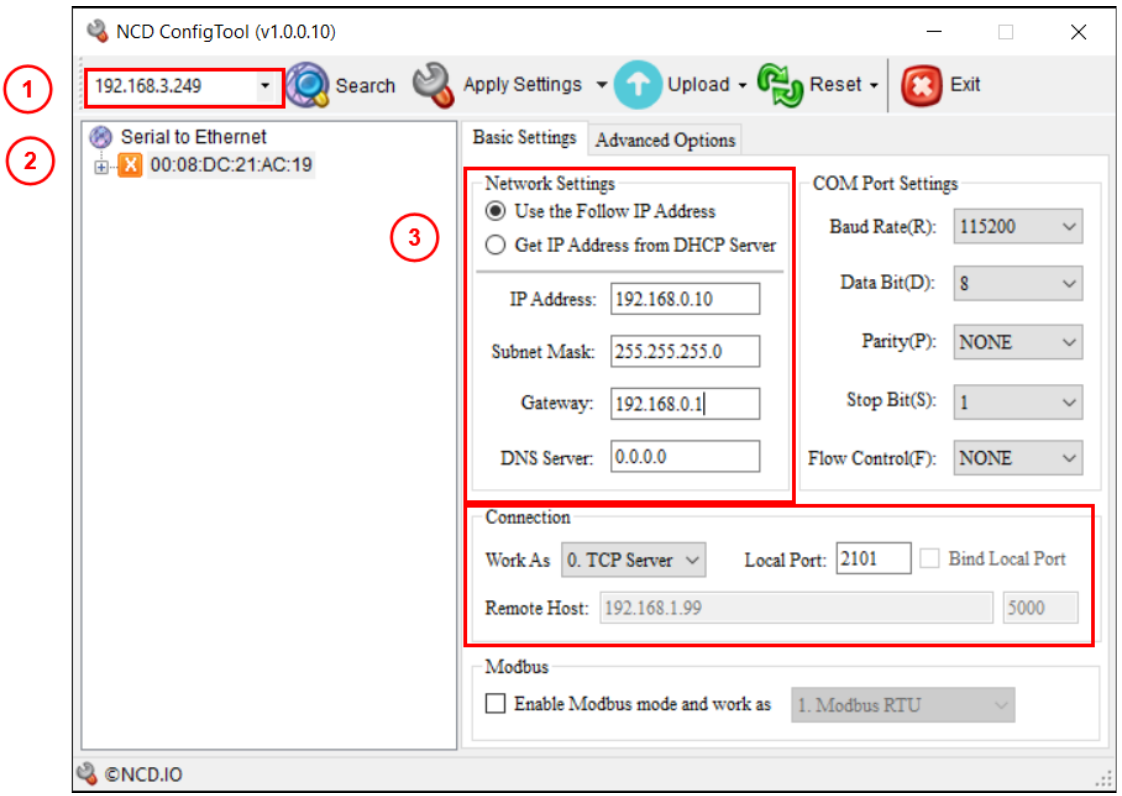
Step 3. Select the Network Interface & Modem: Select the network interface where the modem is physically connected e.g: 192.168.3.249. The tool will auto-detect modems regardless the subnet and IP the Modem have it by default.
Click to Expand
NoteIf multiple modems appear, identify each by MAC address. The MAC address is printed on the physical label on the side of the modem.
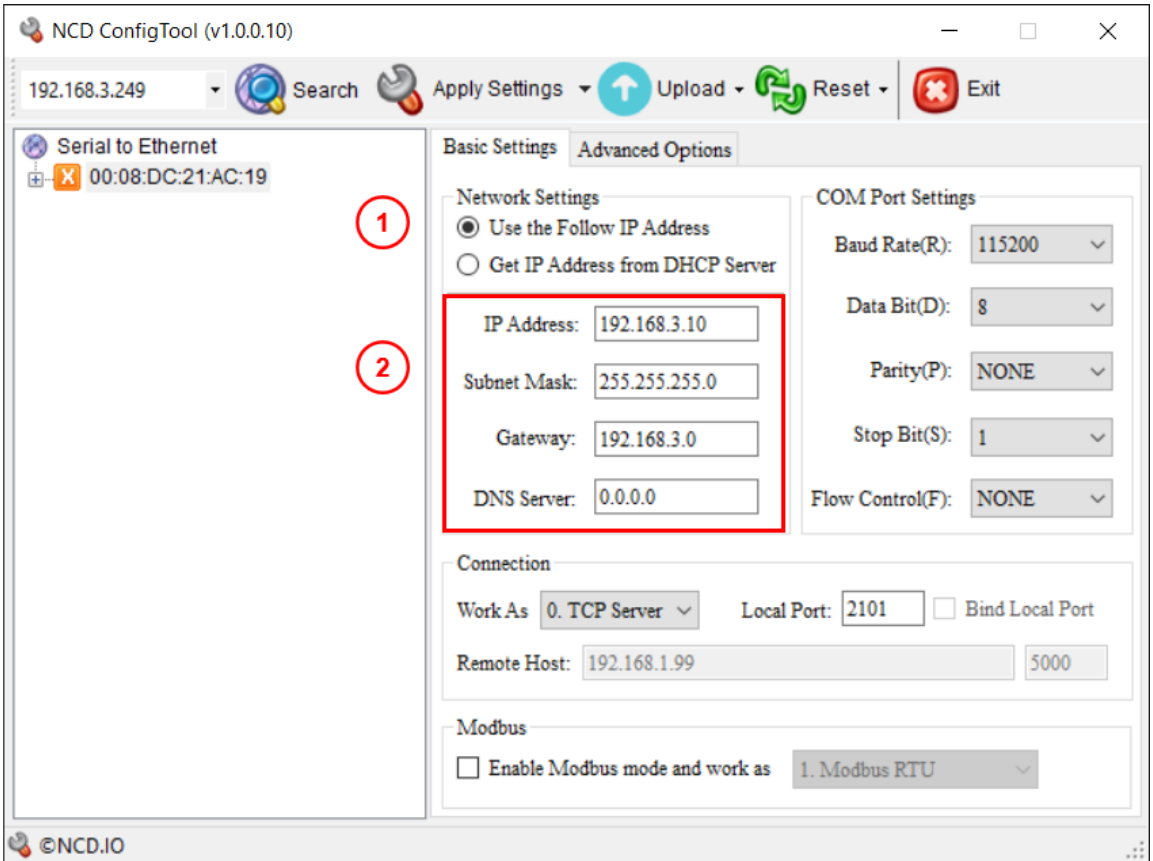
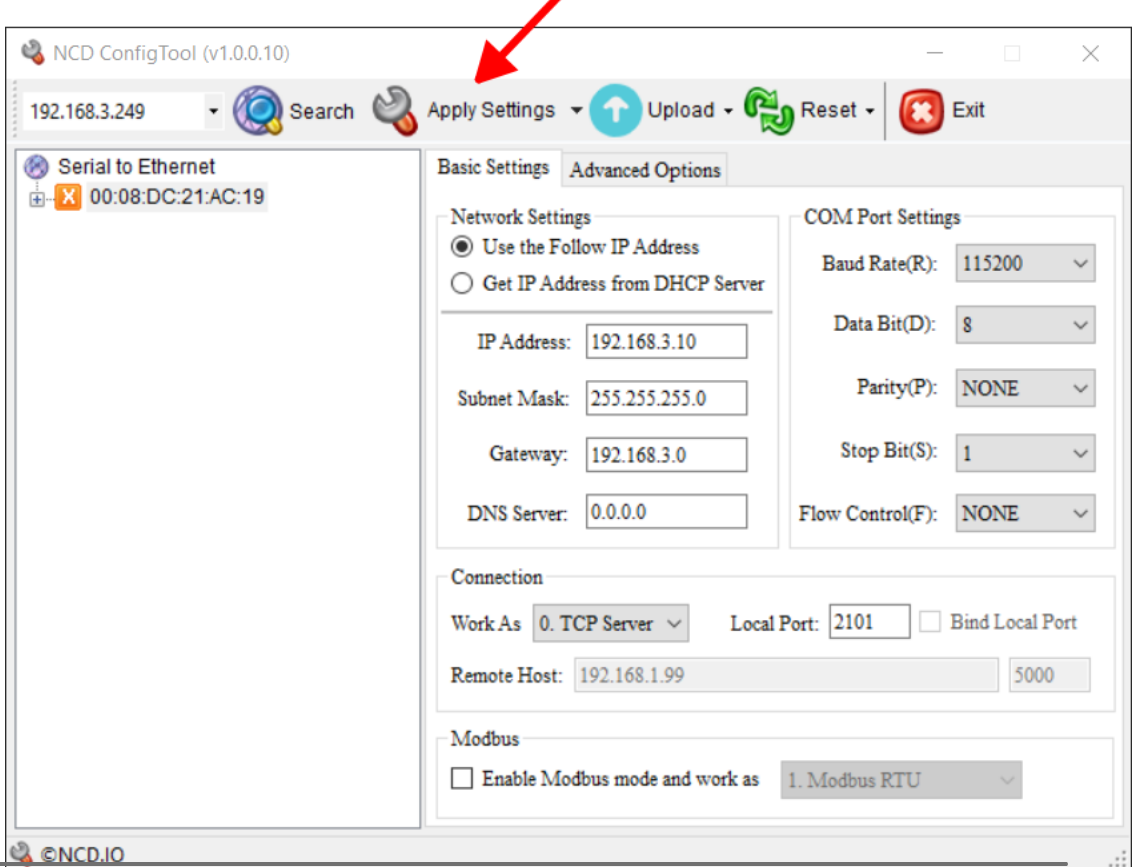
Step 4. Set IP configuration: In Network Settings, select “Follow IP Address” for static IP, and set the IP address, subnet mask and Gateway if applicable, e.g: 192.168.3.10.
Click to Expand
Step 5. Apply Settings: Click “Apply Settings” to push the configuration. Optionally save it: Apply Settings -> Save Current Settings to make backup of the settings in the PC.
Click to Expand
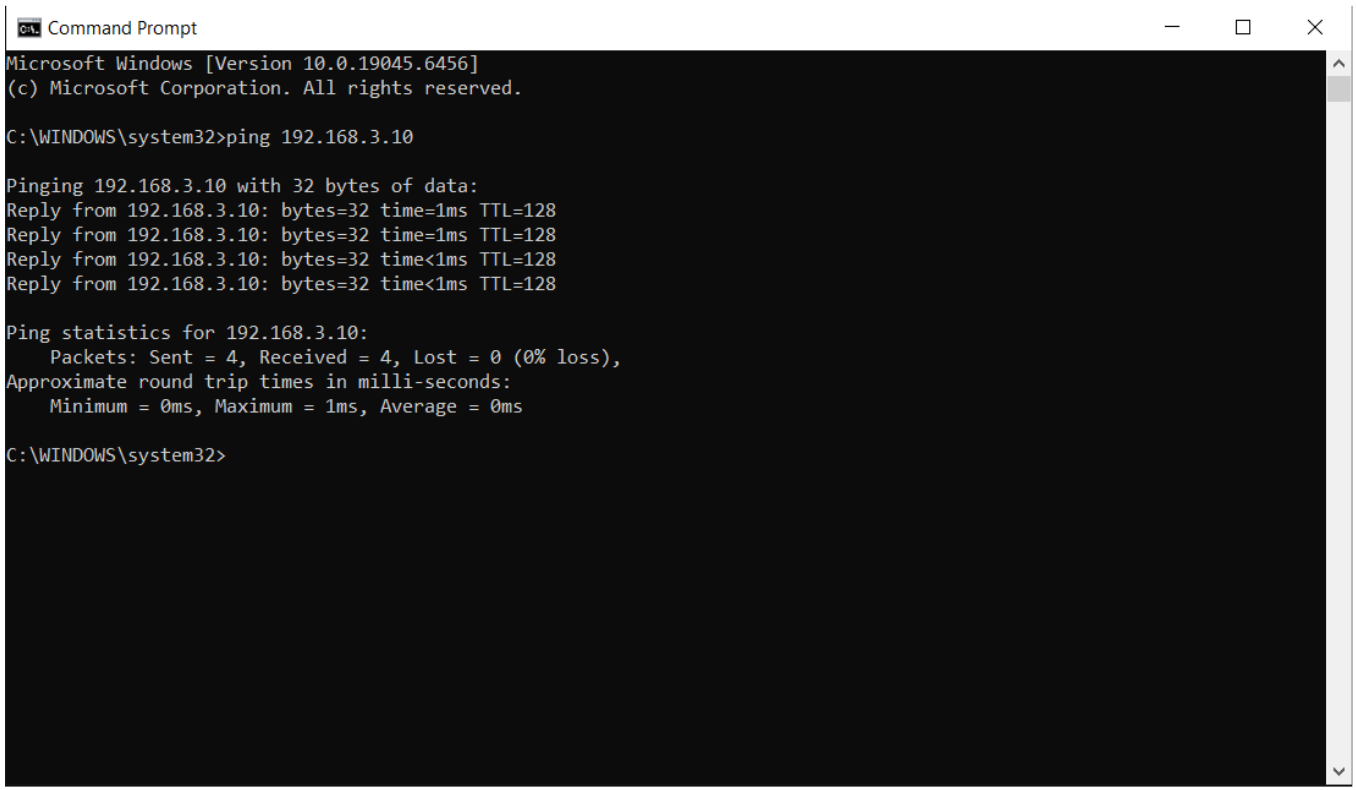
Step 6. Check Modem is reachable: Open Command prompt, and try to ping the Modem IP, e.g: 192.168.3.10
Click to Expand
ImportantThe modem IP address must be reachable from the SORBA host, ensure your computer in the same subnet.
Configure Vibration Sensor
Use the Node-RED Wireless Device node inside SORBA Workflow to program sensor parameters.
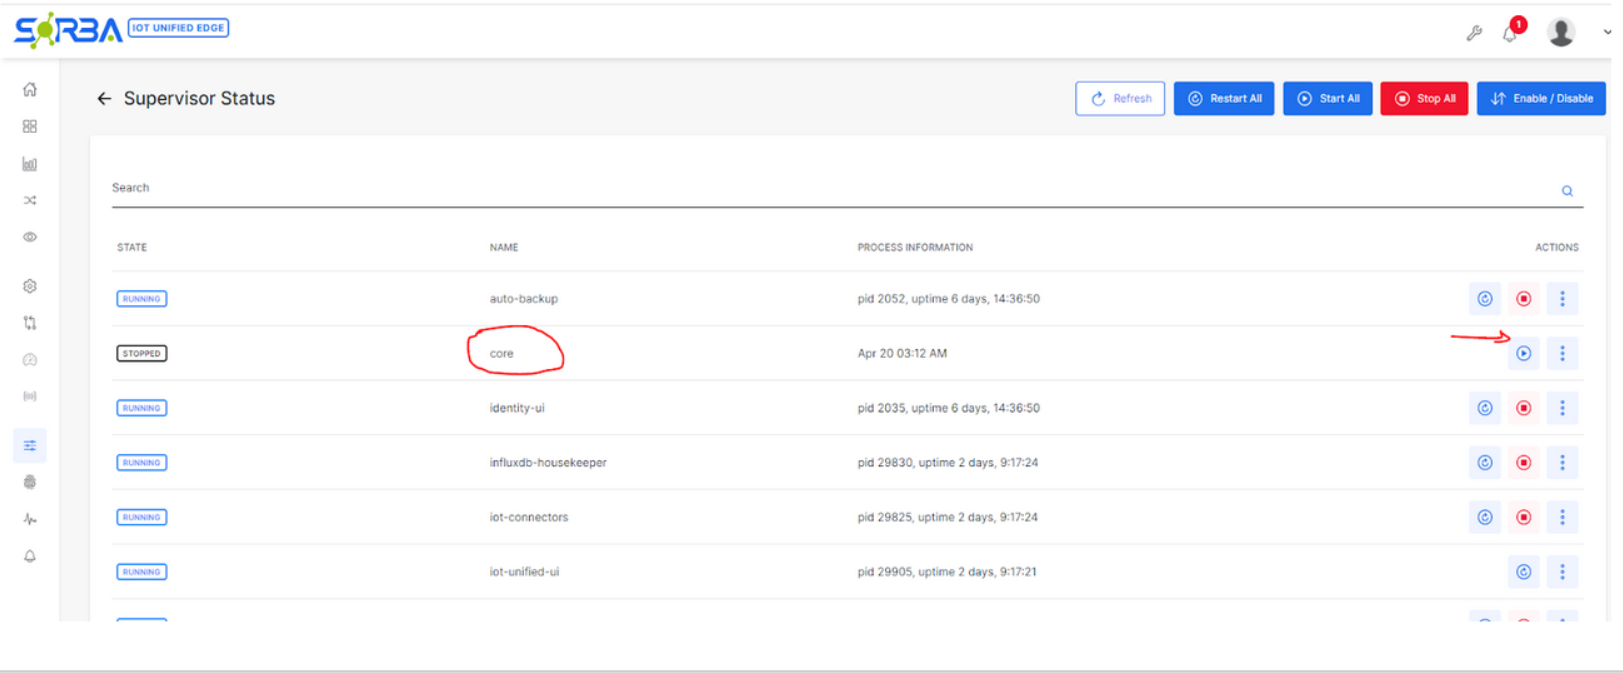
ImportantBefore starting: go to SORBA Supervisor and STOP the Core. Only one client can connect to the NCD modem at a time. Workflow will be the only active client during this section.
Stop Core and Open Workflow
Step 1. Enter Credentials: Log into SORBA when prompted as admin.
Click to Expand
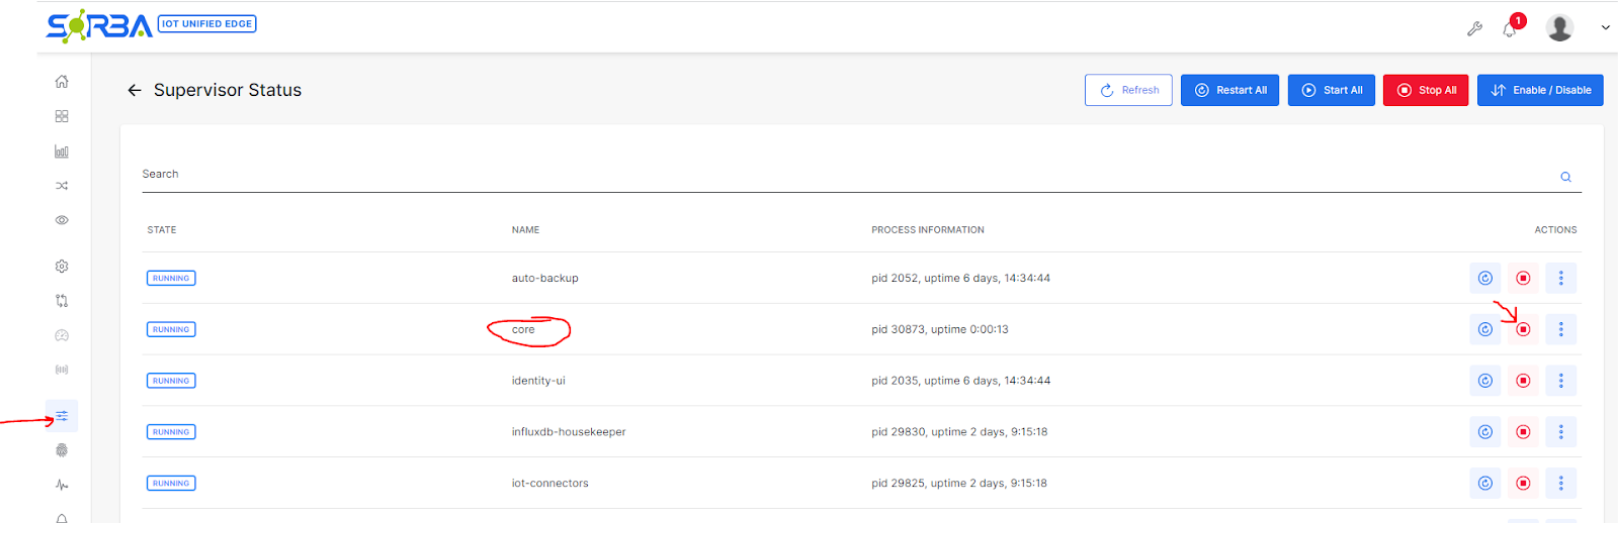
Step 2. Stop the SORBA Core: In SORBA Supervisor, stop the Core process to release the modem connection if any.
Click to Expand
NoteIf it is first time and there is no channel already connected to the modem you can skip this step and open the work flow directly.
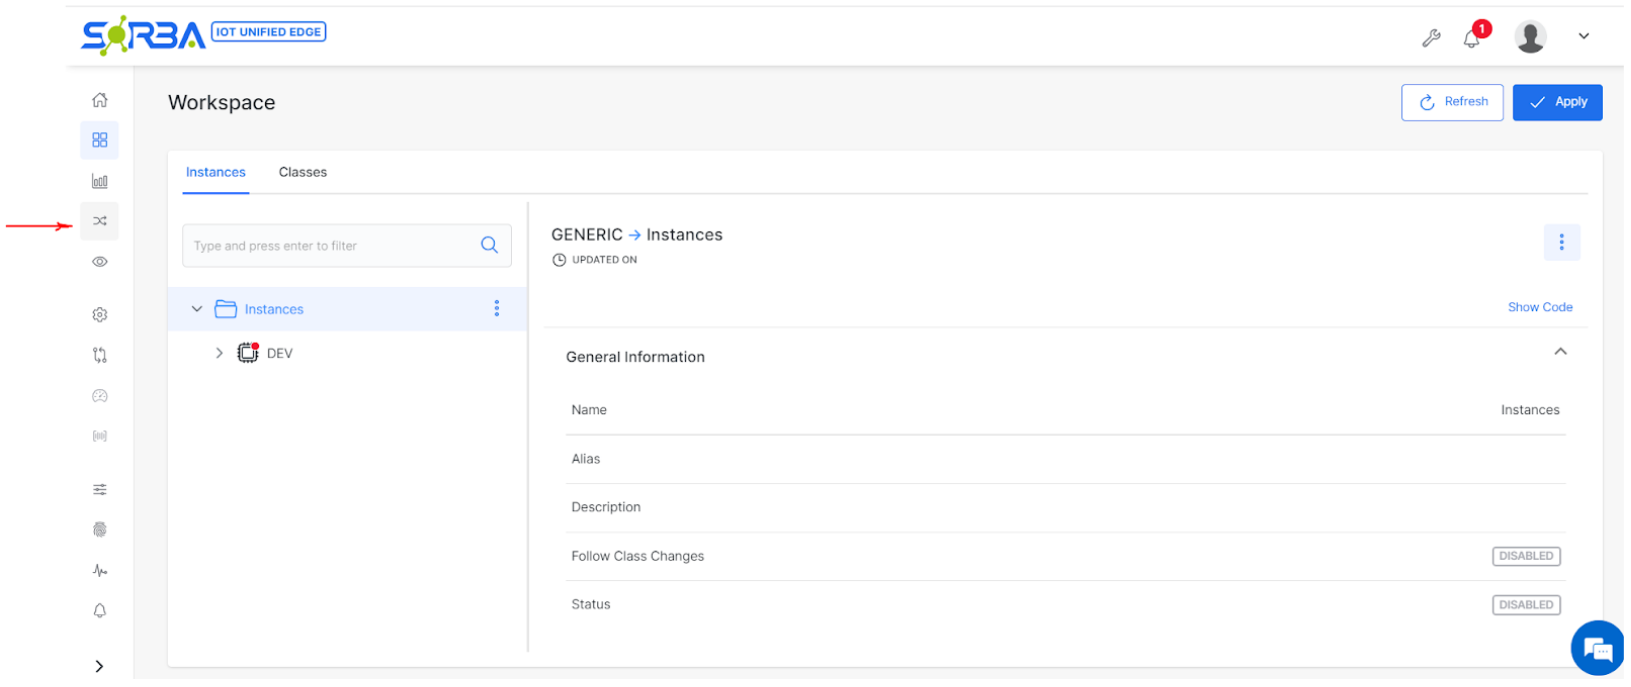
Step 3. Open a Workflow: Navigate to and open a Workflow inside SORBA.
Click to Expand
Step 4. Enter Credentials: Log in with your SORBA Workflow credentials when prompted.
Click to Expand
Install NCD Node-RED Library
NoteSkip this section if the NCD library is already installed in Workflow.
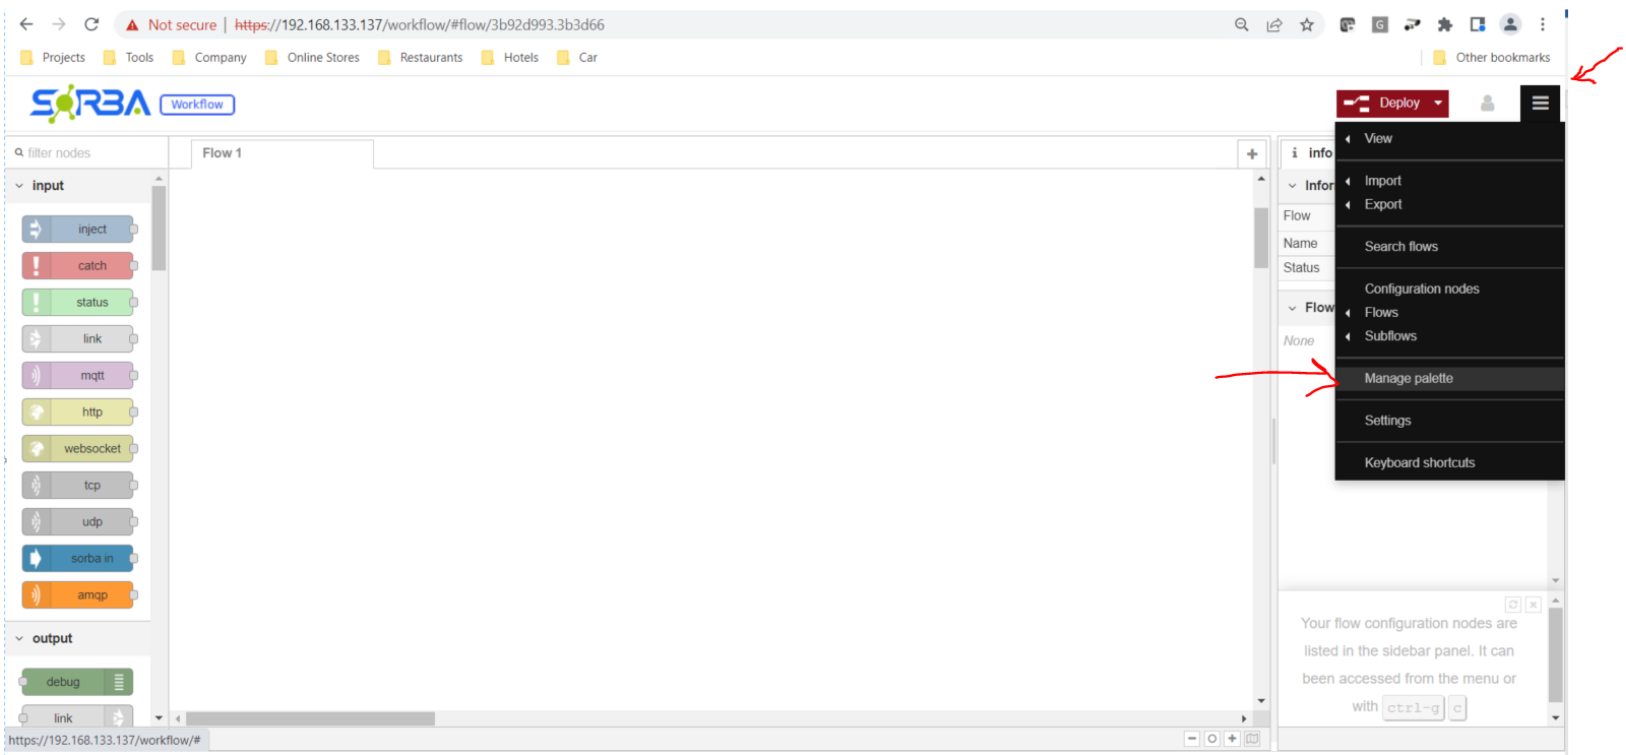
Step 5. Open Manage Palette: Click the menu in the top-right corner of Workflow, then select “Manage Palette.”
Click to Expand
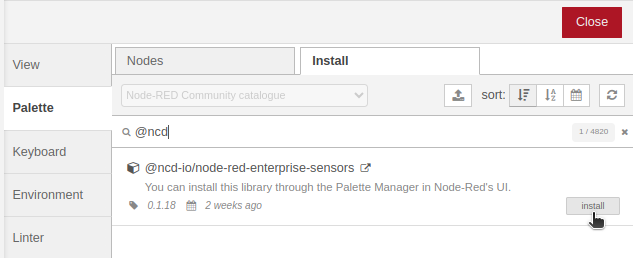
Step 6. Install NCD Library: Go to the “Install” tab, search “NCD,” and install ncd-io/node-red-enterprise-sensors (Node.js 10+) or ncd-red-wireless (Node.js < 10).
Click to Expand
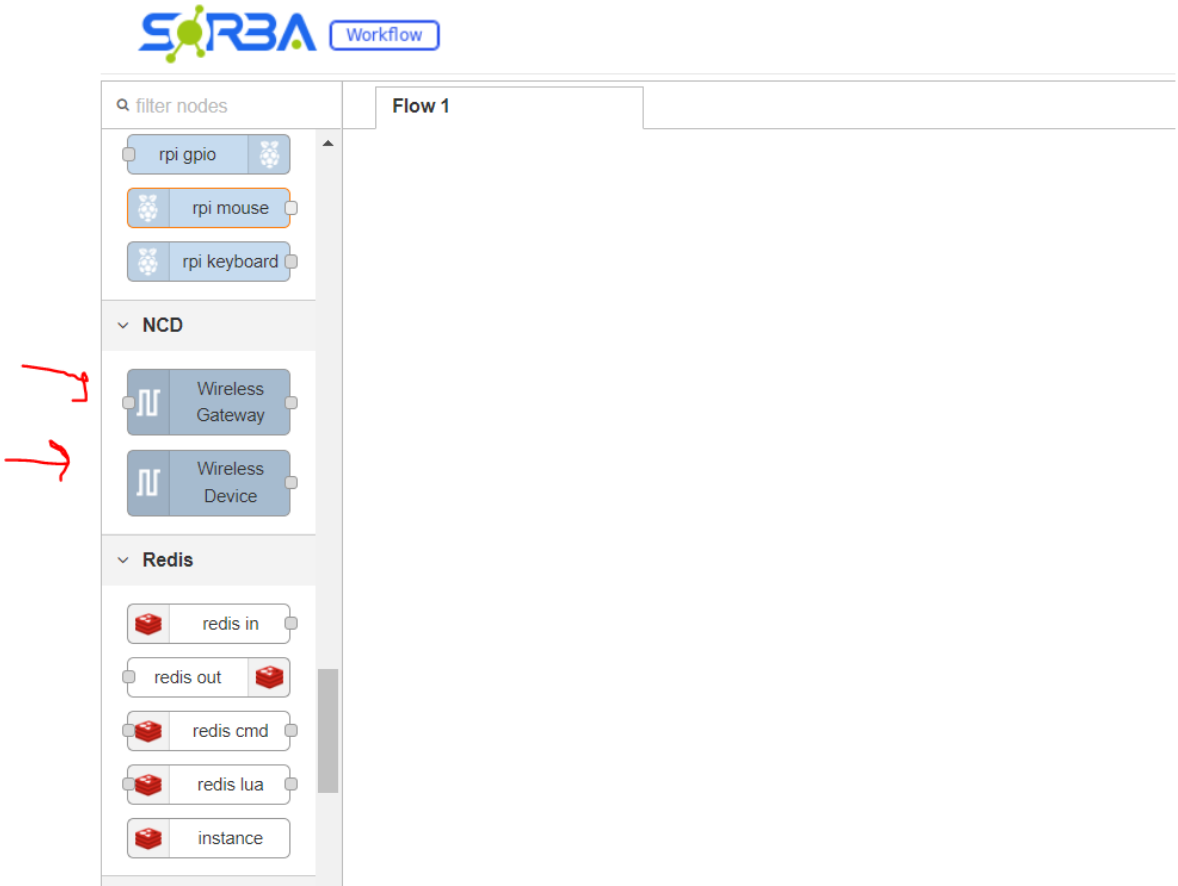
NoteRequires internet access. After installation, close the palette manager. The left palette should now show Wireless Gateway and Wireless Device nodes.
Click to Expand
Configure Wireless Gateway (Modem Connection)
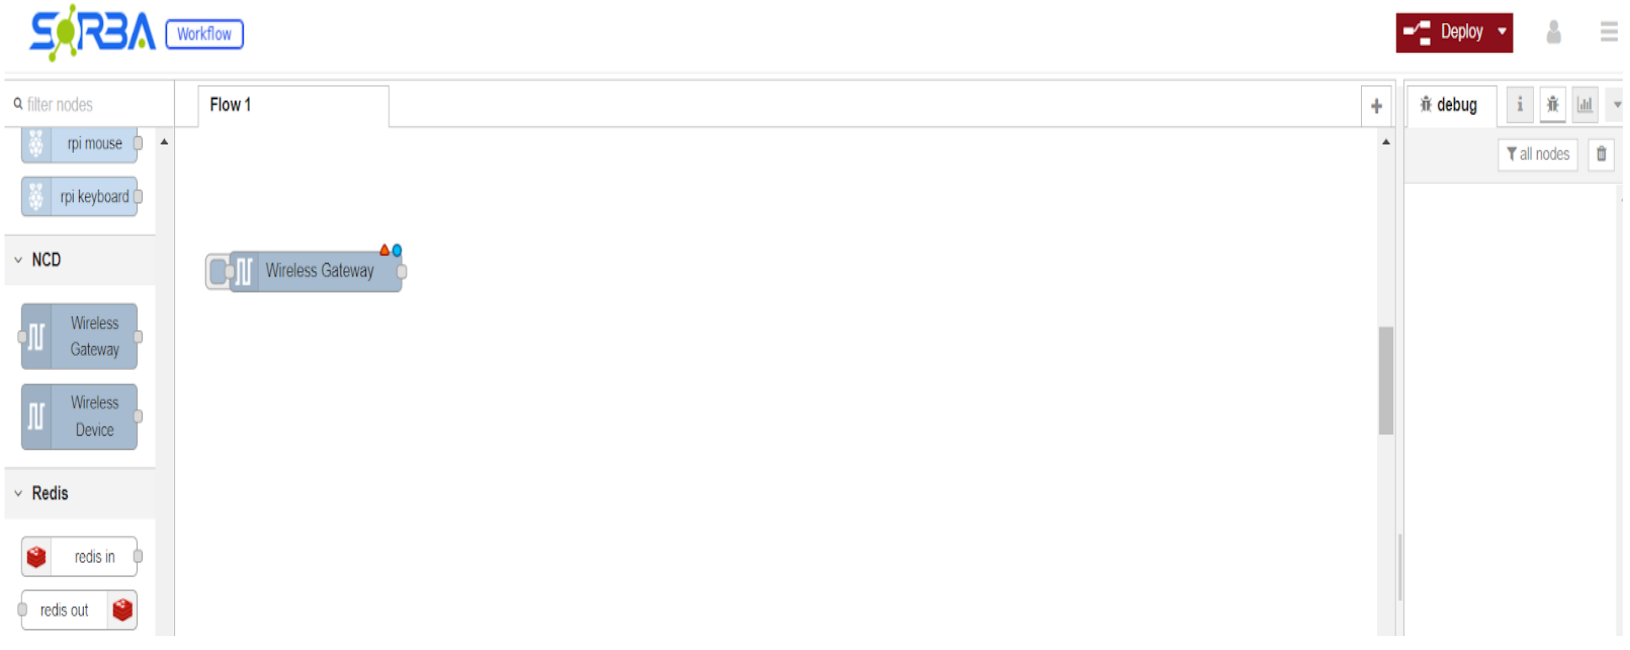
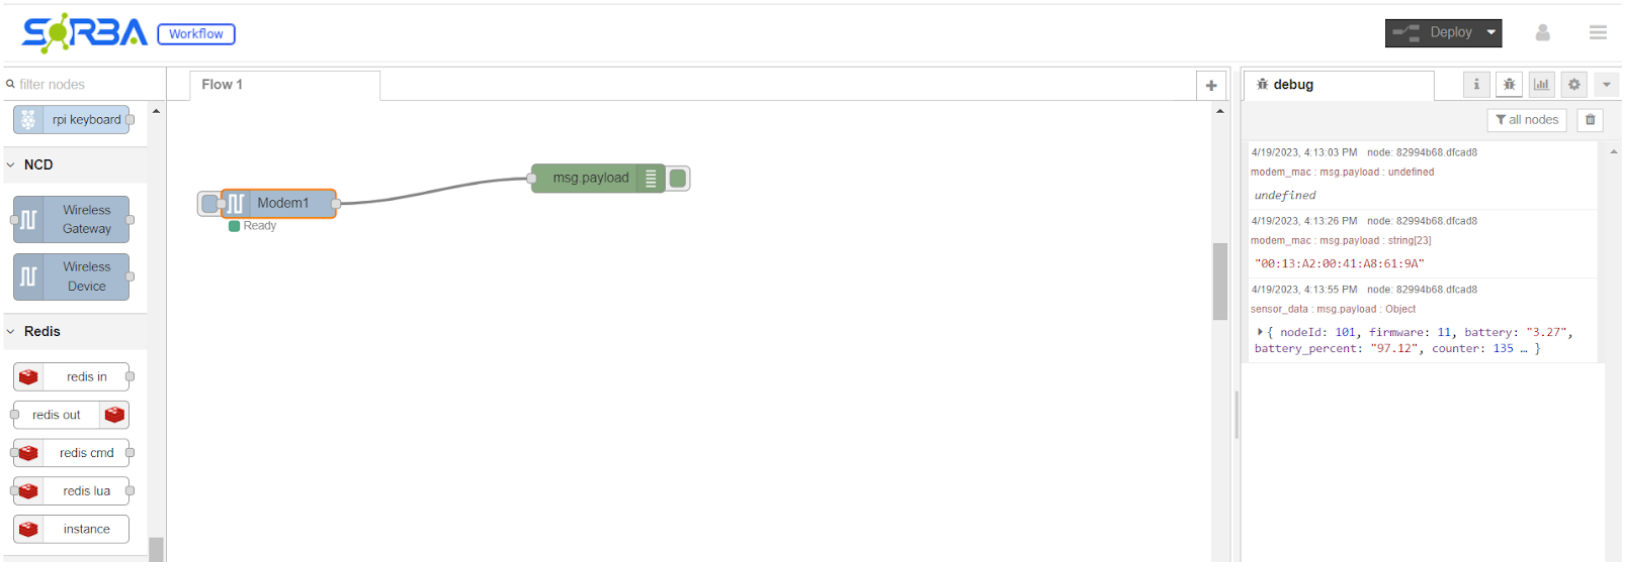
Step 7. Drag Wireless Gateway onto Canvas: Drag the “Wireless Gateway” node from the palette into your flow.
Click to Expand
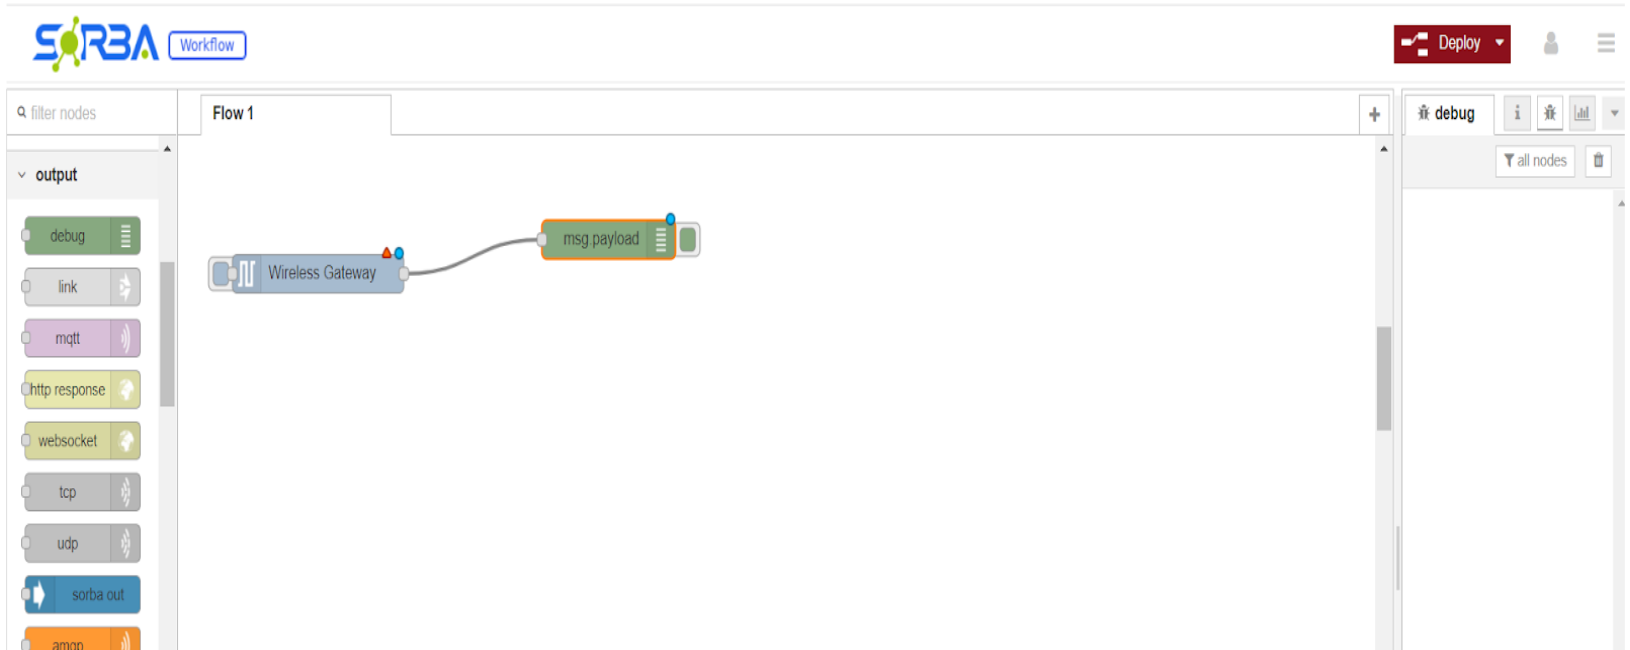
Step 8. Connect a Debug Node: Drag a “debug” node (Output group) and connect it to the Gateway output. Enable the Debug panel to monitor incoming payloads.
Click to Expand
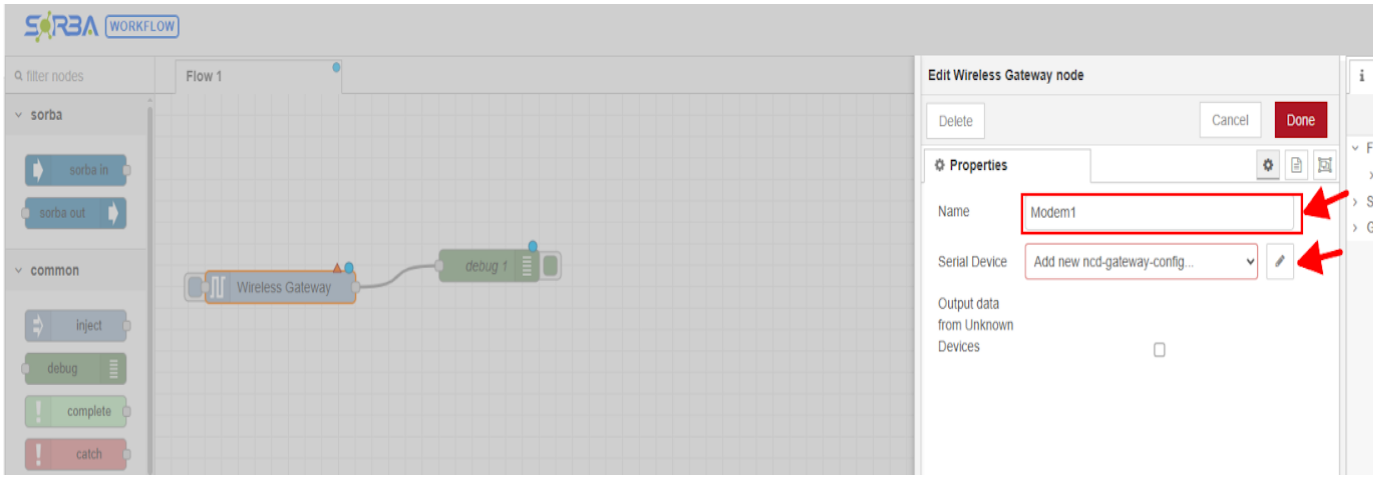
Step 9. Configure Gateway Properties: Double-click the Wireless Gateway node. Enter a name (e.g., Modem1) then click + to add a new configuration.
Click to Expand
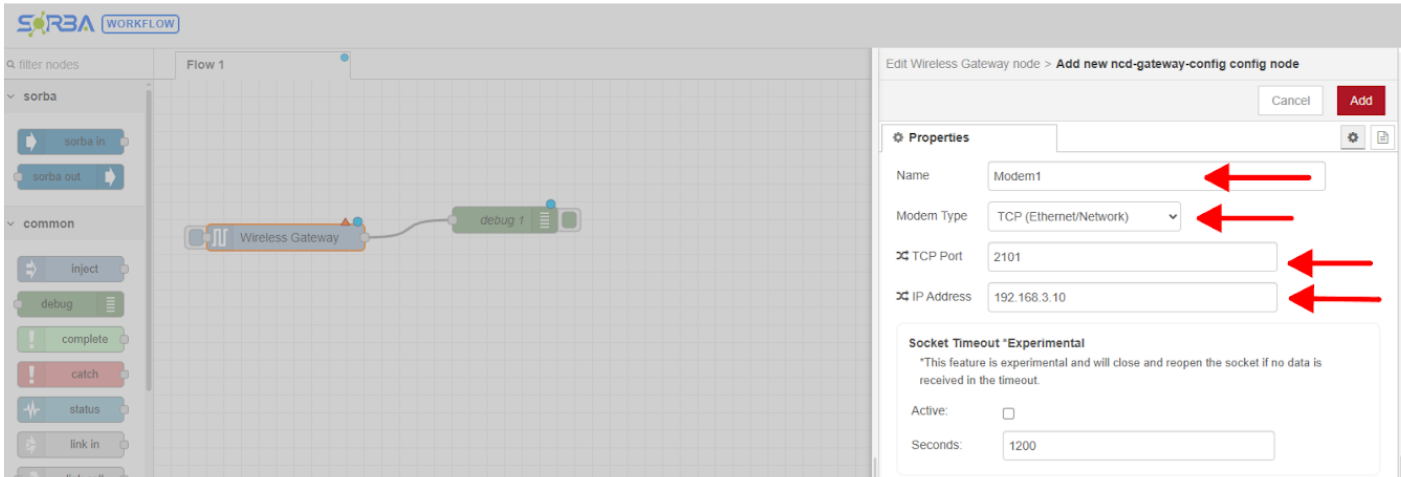
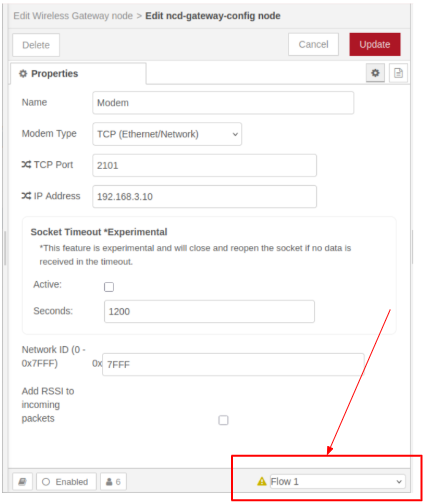
Step 10. Enter Network Details: Fill in the gateway connection properties:
Name: Descriptive name, e.g. Modem1
Mode Type: TCP Ethernet/Network
TCP Port: 2101 (default)
IP Address: Modem IP assigned in Section 3
Network ID: 0x7FFF (must match modem PAN ID)
Click to Expand
ImportantSet the node scope to "Current Flow (Flow 1)" — NOT "All Flows." Using All Flows keeps the modem connection alive in memory after configuration, which will block SORBA Core from reconnecting.
Step 11. Deploy and Verify Sensor Data: Click Deploy. Press the R (Reset) or C (Config) button on the sensor to force a transmission. Confirm payload appears in the Debug panel.
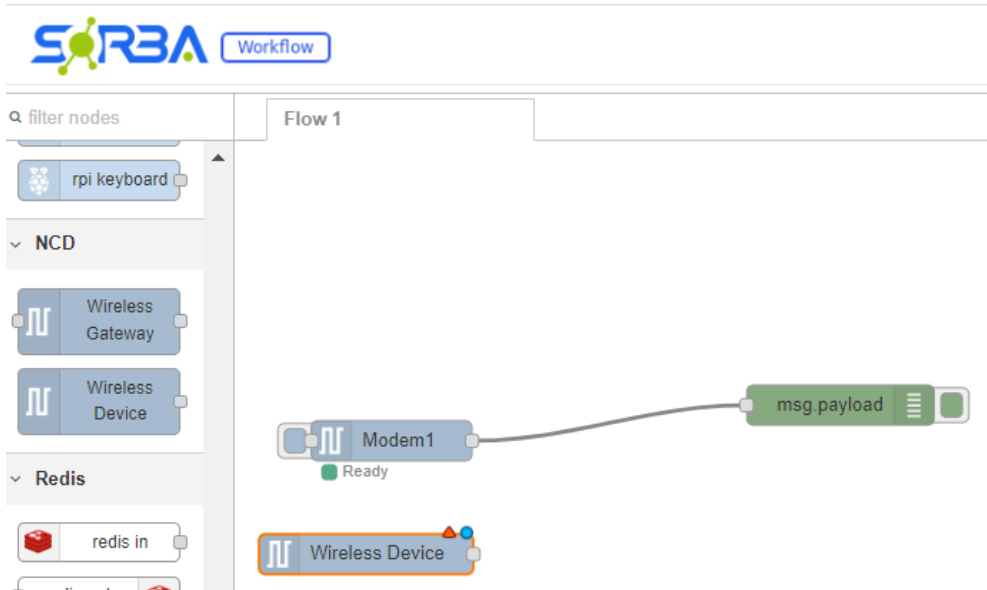
Step 12. Drag Wireless Device onto Canvas: Drag a “Wireless Device” node from the palette onto the flow.
Click to Expand
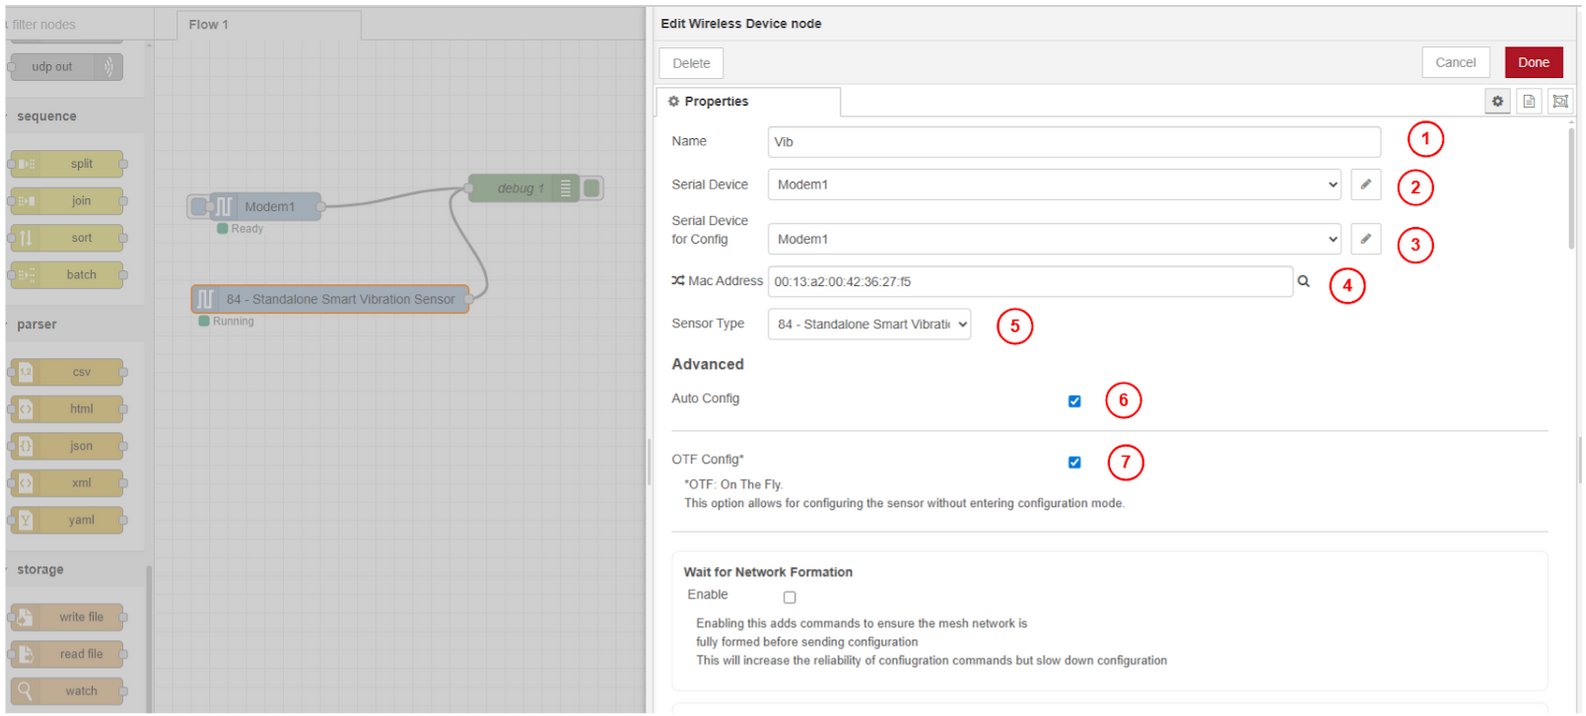
Step 13. Find Sensor by MAC Address: Double-click Wireless Device. Click the magnifier icon next to MAC Address to scan. Match the MAC to the label on the physical sensor.
Click to Expand
NoteEnable "Auto Config" to allow parameter download to the sensor. Enable "OTF Config" if the sensor model supports on-the-fly reconfiguration (check the product manual). Keep the sensor within 3 ft / 1 m of the modem during configuration; remove the antenna if closer.
Step 14. Set Sensor Working Parameters: Configure vibration sensor parameters appropriate for your application, e.g: the Network ID/PAN ID (default 7FFF), Node ID, and sampling interval.
NoteThe Sampling Interval controls how often the sensor collect and transmits data. Ensure the Channel Timeout in the next section is set high enough to allow the network sufficient time to receive these transmissions without timing out.
NoteFor battery-powered sensors, higher sampling frequencies reduce battery life. Select the lowest frequency that meets your monitoring requirements.
Step 15. Click Done then Deploy: Save sensor parameters by clicking Done, then Deploy the flow.
Step 16. Enter Physical FLY Mode to Download Settings: With the flow deployed, physically trigger configuration mode on the sensor by pressing reset button:
Click to Expand
You can Find a complete Sensor Configuration guide using Node-RED here:
We recommend to take a look at the corresponding User Manual to check all available sensor configurations.
Release the Modem and Restart SORBA Core
After all sensors are configured, release the modem connection from Workflow so SORBA Core can reconnect. If any Node-RED instance remains connected, the Core will be unable to collect data.
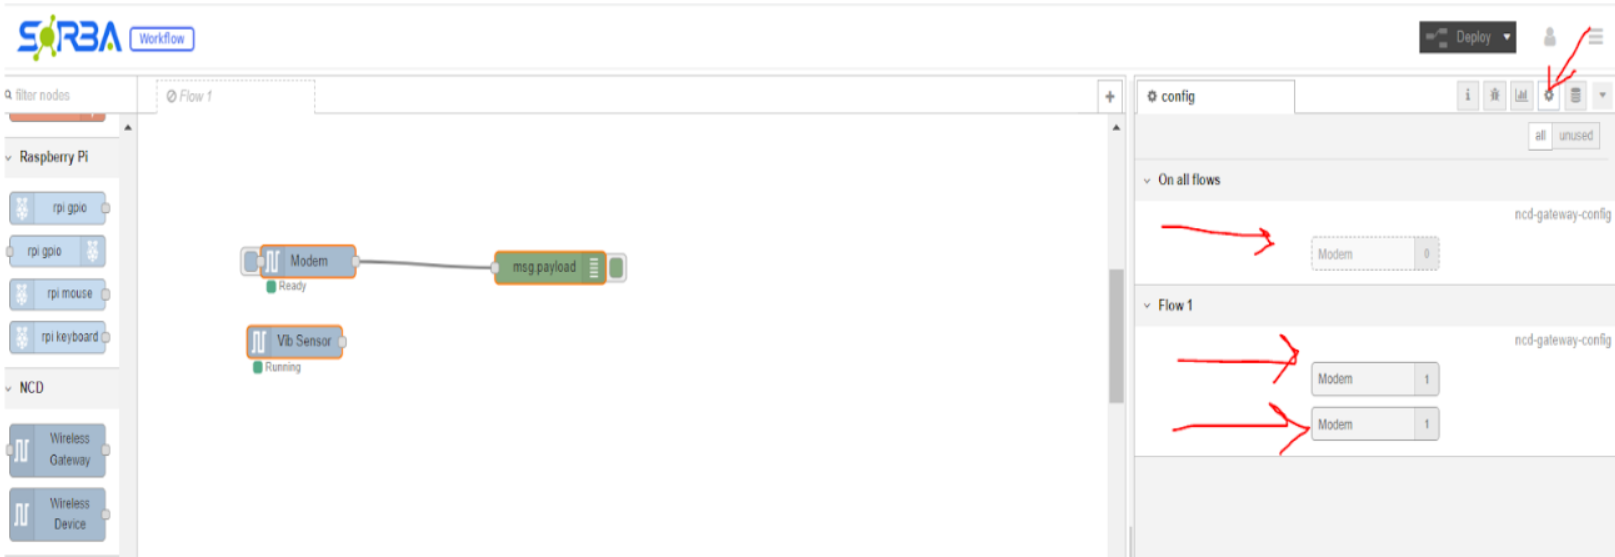
Remove All-Flows Gateway References
Step 1. Check for Global Gateway Instances: In Workflow, look for any Gateway (Modem) nodes configured to run across “All Flows.”
Click to Expand
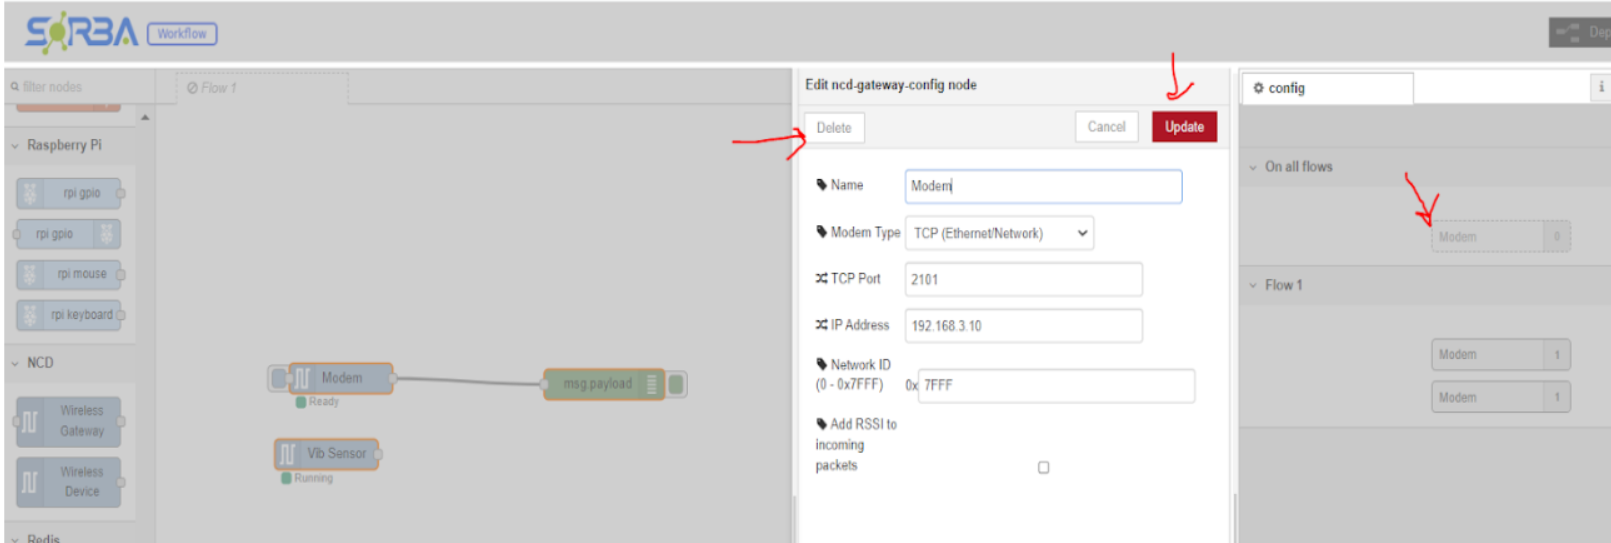
Step 2. Delete All-Flows References: Double-click any Modem entry in the “On all flows” list. Click Delete, then Update. Repeat for all listed NCD gateways.
Click to Expand
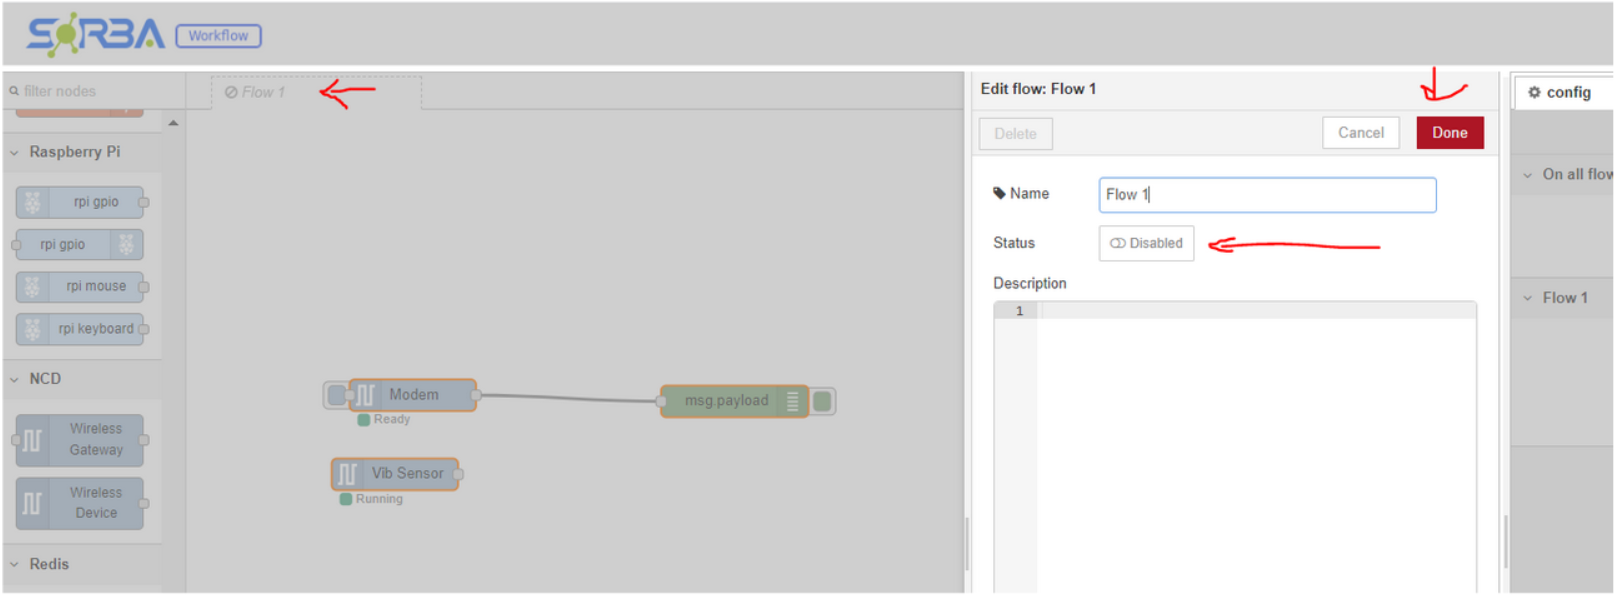
Disable the Configuration Flow
Step 3. Disable the Flow and Deploy: Double-click on the Flow tab, set it to Disabled, click Done, then click Deploy. This unloads the NCD nodes from Workflow.
Click to Expand
NoteAfter disabling, the modem's red LED should turn OFF, confirming no active client. If it turns off, skip to Step 6.3.
You can also just disable the entire SORBA Workflow (if not using for something else) to obtain same results in an easier way, and skip 6.3 section.
Kill Orphaned Node-RED Processes (if needed)
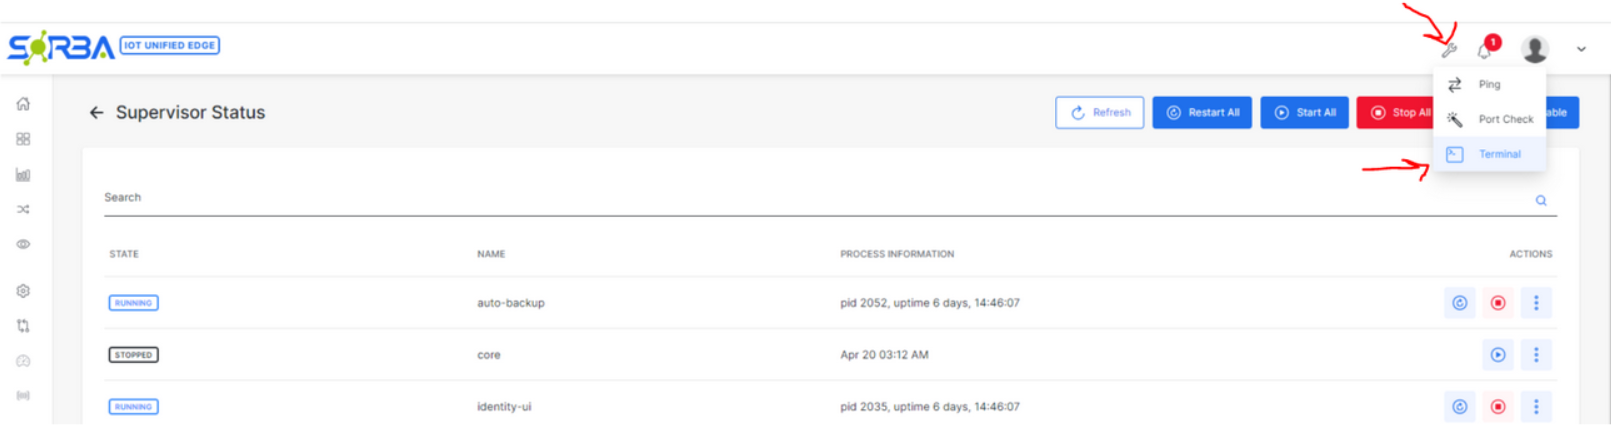
If the modem LED stays ON after disabling the flow, a background Node-RED process still holds the port 2101 connection. Use the SORBA Terminal to clear it.
Step 4. Open SORBA Terminal: Open the Terminal inside SORBA and enter the credentials.
Click to Expand
Step 5. Find and Kill the Process: Run these three commands in sequence:
NoteYou can also just disable the entire SORBA Workflow to obtain same results in an easier way.
					sudo su
# Enter with admin credentials
lsof -i:2101
# Shows all processes using port 2101 and their PID
kill -9
# Replace  with the process ID returned by lsof
Click to Expand
Click to Expand
Step 6. Confirm Port is Clear: Run lsof -i:2101 again. No output means port 2101 is fully released and the modem LED should be off.
Restart SORBA Core
Step 7. Start the Core: Return to SORBA Supervisor and start the Core. The modem red LED should turn ON again as SORBA Core establishes its client connection (if there was a channel already been configured).
Click to Expand
Set Up SORBA Data Channel for NCD
With sensors configured and the modem accessible, create a SORBA Data Channel to ingest NCD sensor data into the platform for storage, dashboards, and ML models.
Global Channel Configuration
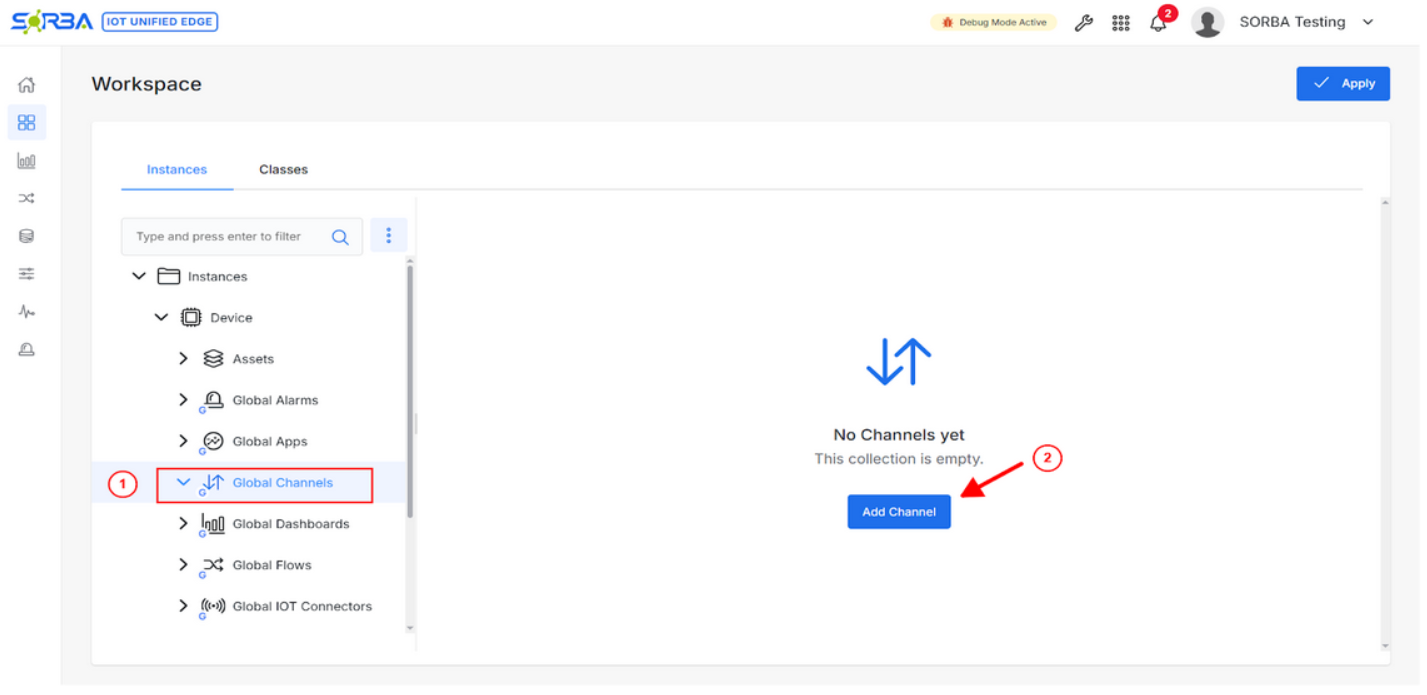
Step 1. Add Global Channel: Select Global Channels and add a new one.
Click to Expand
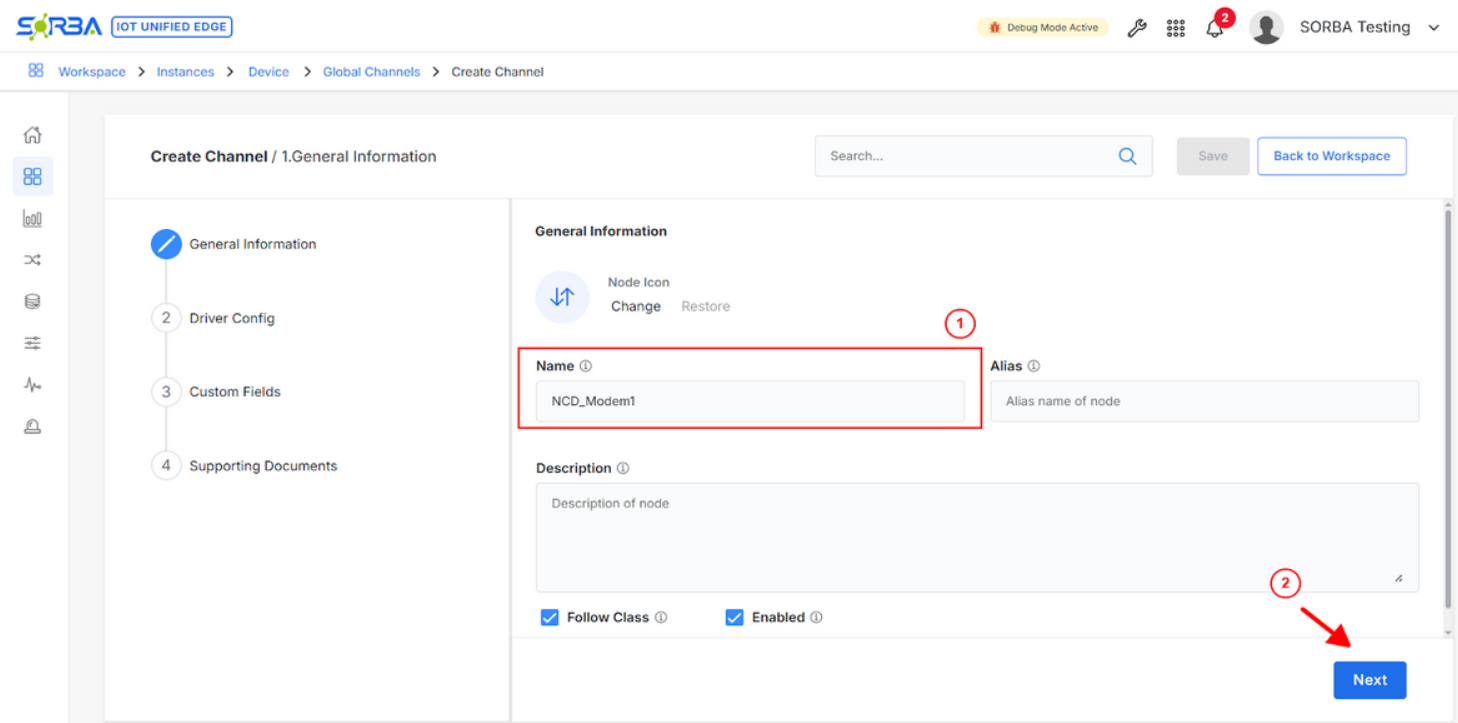
Step 2. Set Global Channel Name: Set the Channel Name for the Modem NCD, e.g: NCD_Modem1, and click Next button.
Click to Expand
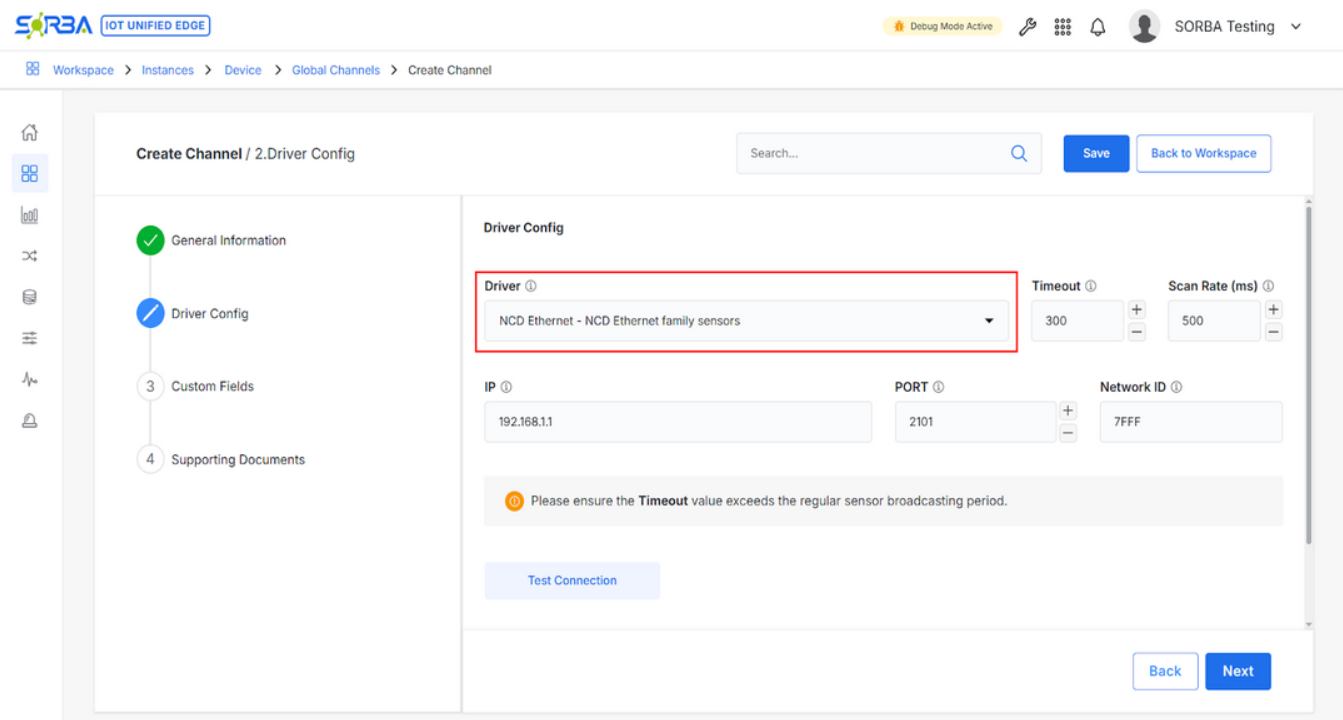
Step 3. Select NCD driver: Select NCD driver in driver drop box and click Next button.
Click to Expand
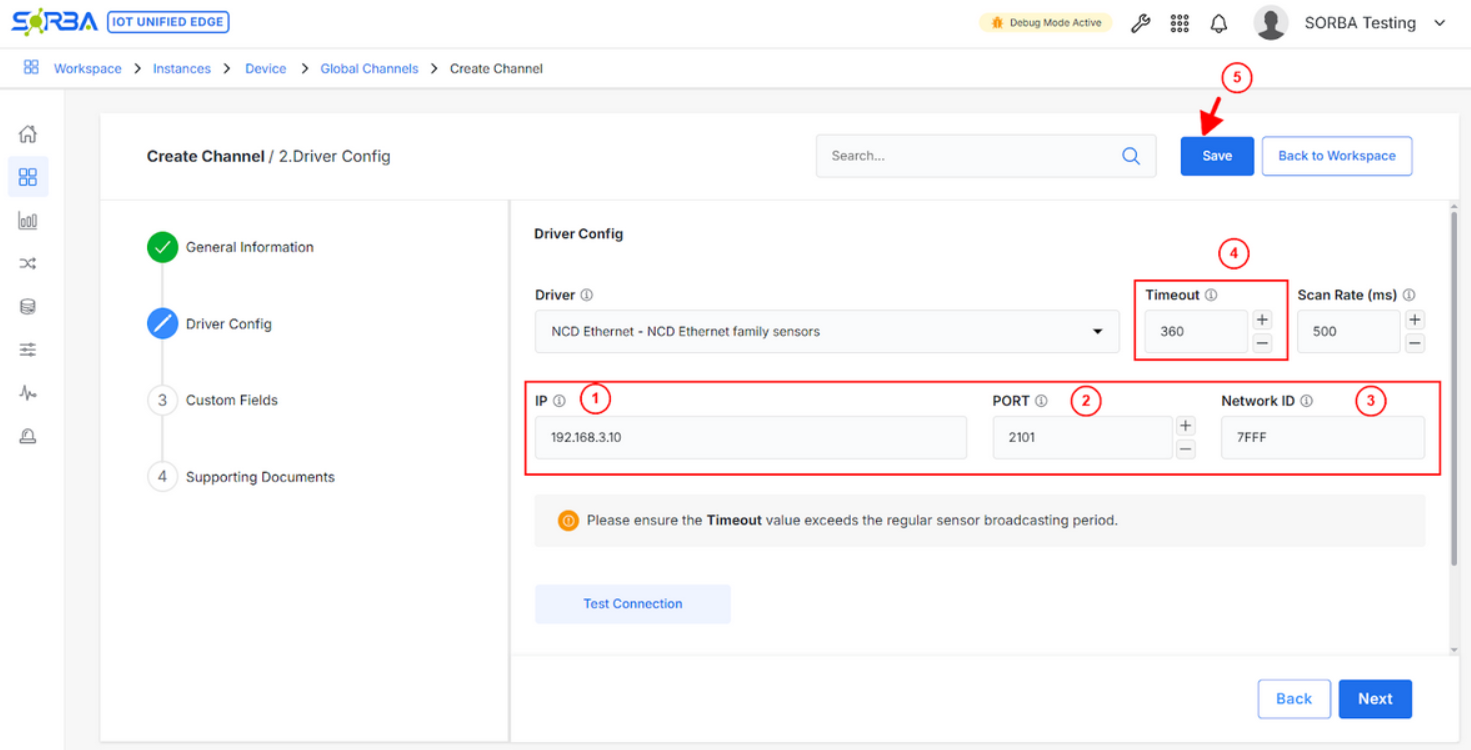
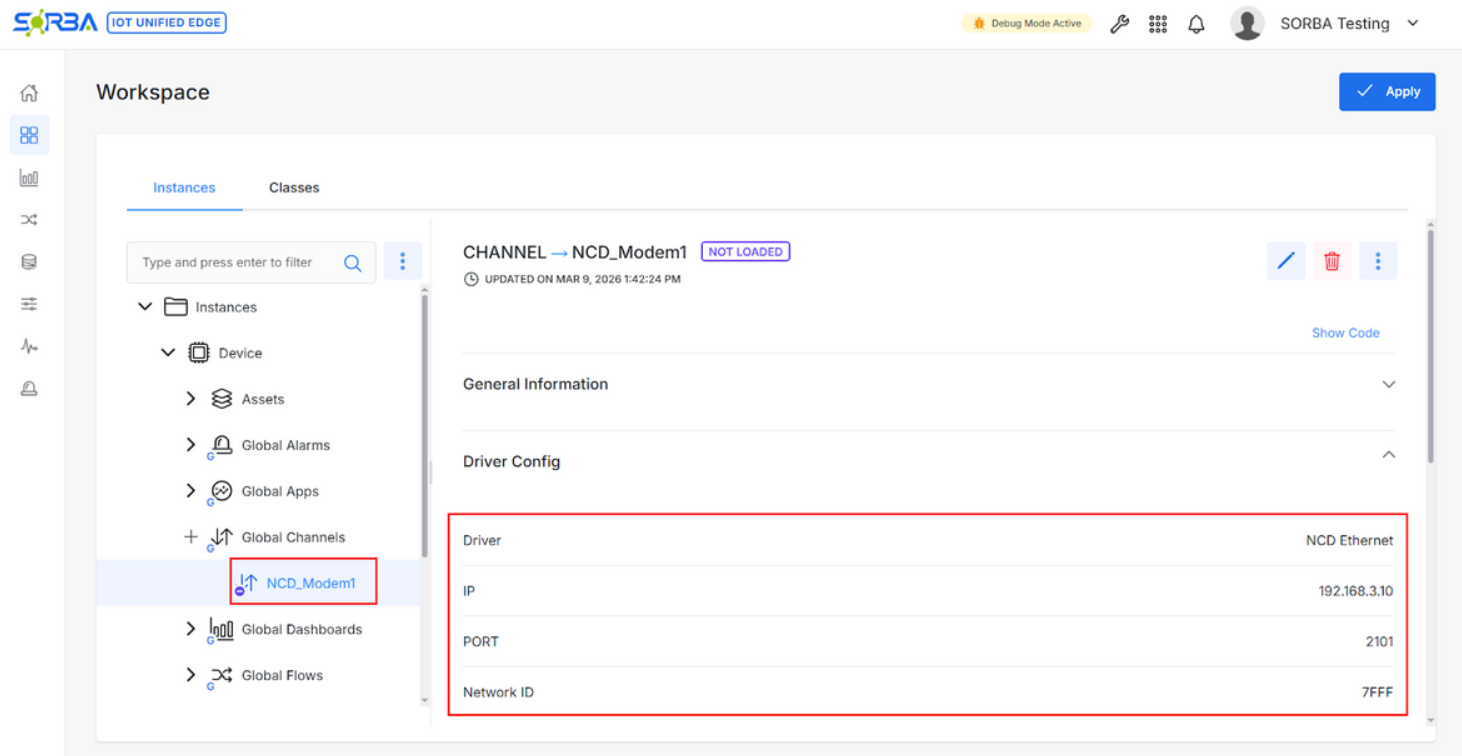
Step 4. Set the Channel Communication Parameters: Set the NCD Modem IP, Port, and Network ID/PAN ID, Timeout and click Save button, e.g: IP=192.168.3.10, Port=2101 (Default), Network ID= 7FFF (Default), Timeout =360 (6 minutes)
Click to Expand
ImportantIf you have multiple NCD modems, create one separate Data Channel per modem. Each channel connects to a single modem via its unique IP and Network ID/PAN ID. It is critical set the timeout bigger than the time used for the faster sensor sampling time.
Click to Expand
Asset Configuration
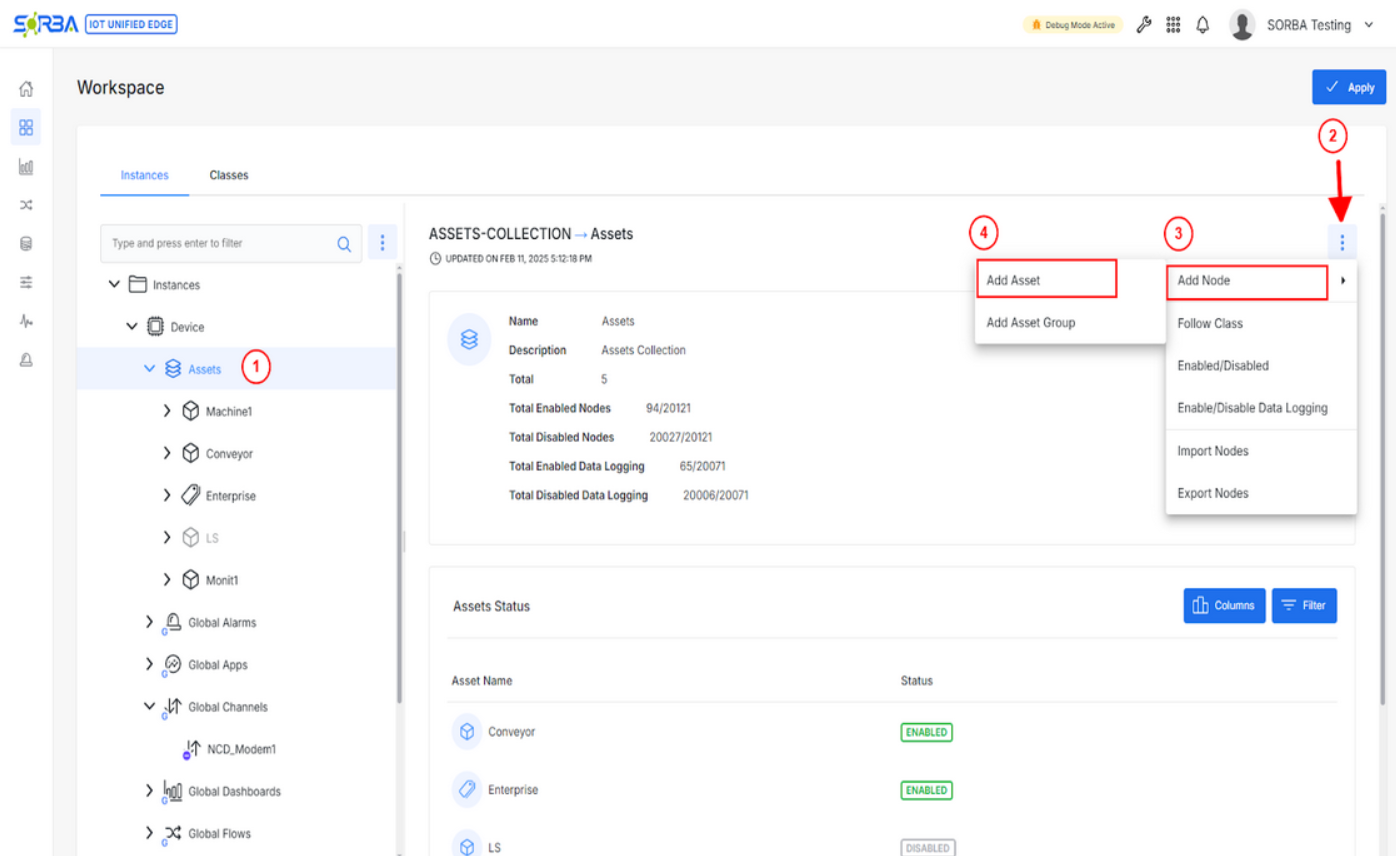
Step 5. Create Asset Node: Select Assets and add an Asset Node.
ImportantSkip this step if the Asset was already been added.
Click to Expand
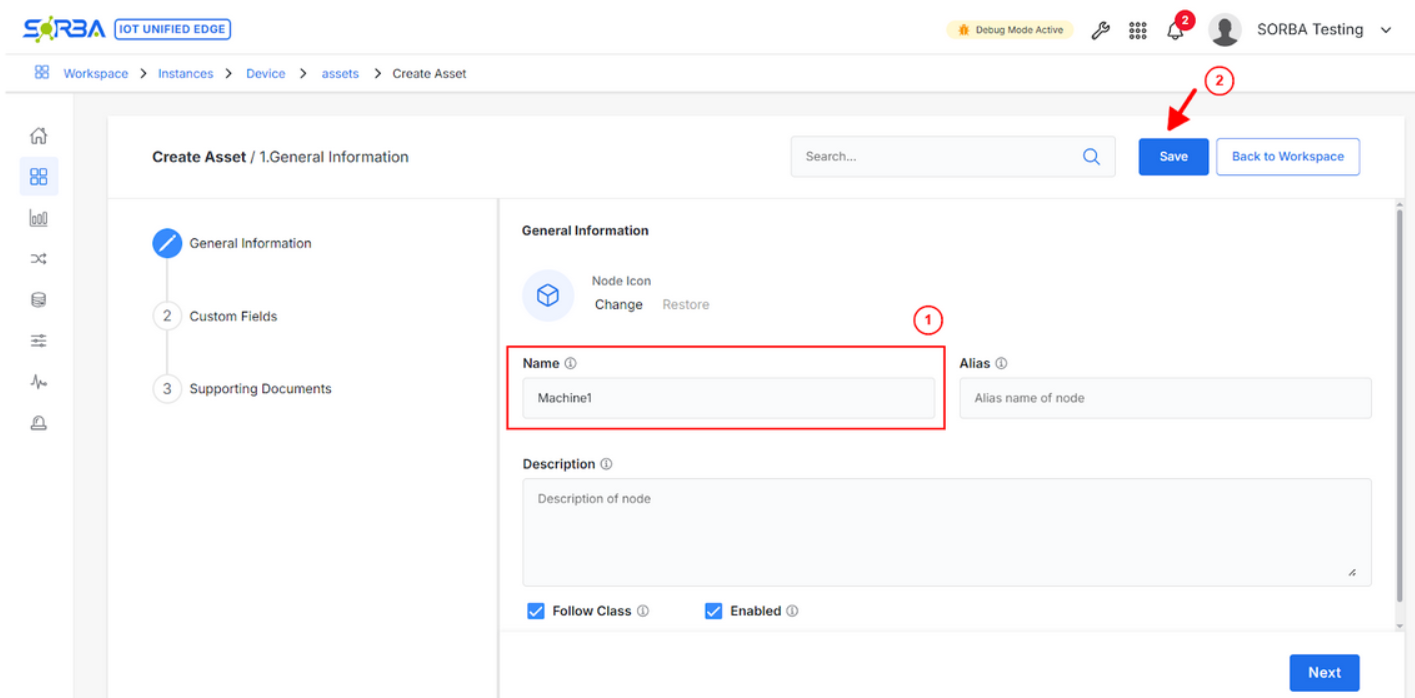
Step 6. Set the Asset Name and Save: Set Asset Name and click on Save, e.g: Machine1
Click to Expand
Group Configuration
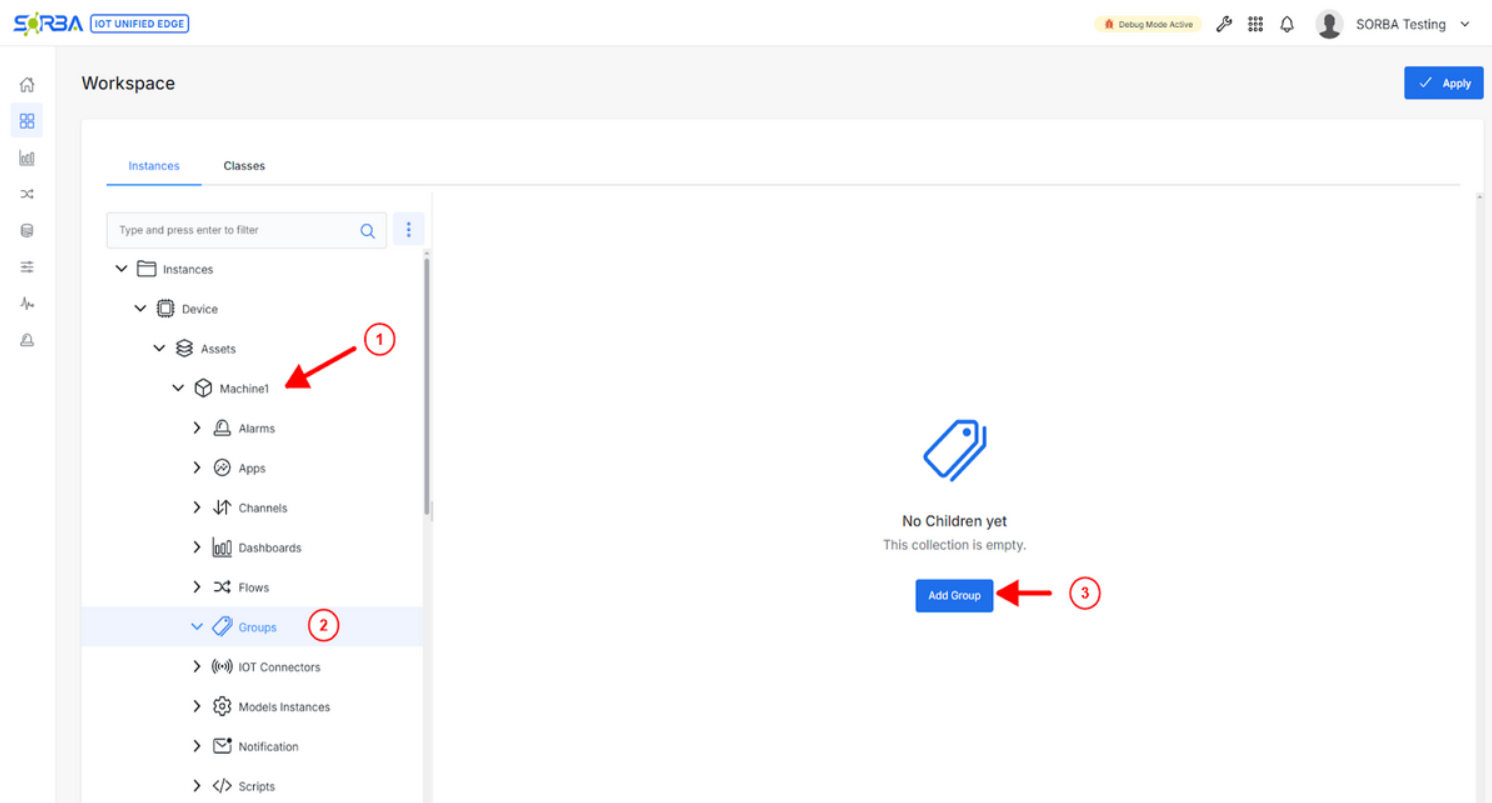
Step 7. Create Group Node: Select the Asset and add a Group Node.
ImportantSkip this step if the Group was already been added.
Click to Expand
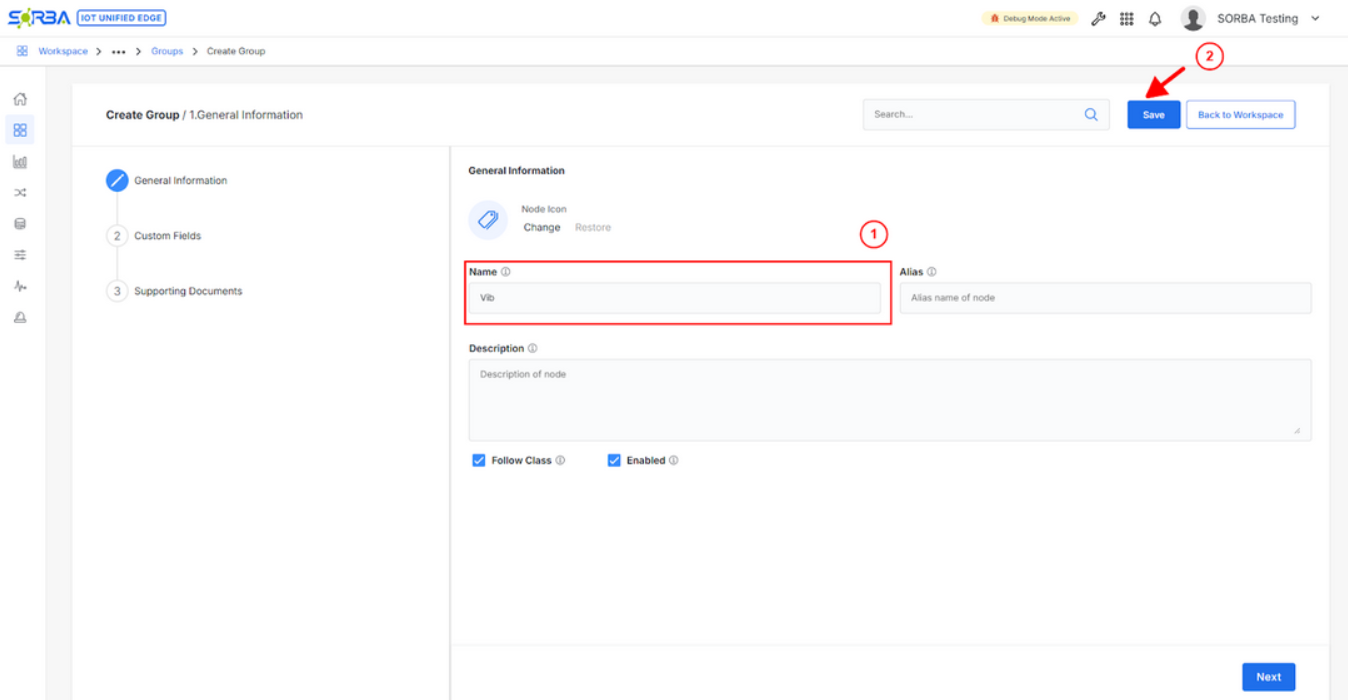
Step 8. Set Group Name and Save: Set the Group Name and click on Save, e.g: Vib
Click to Expand
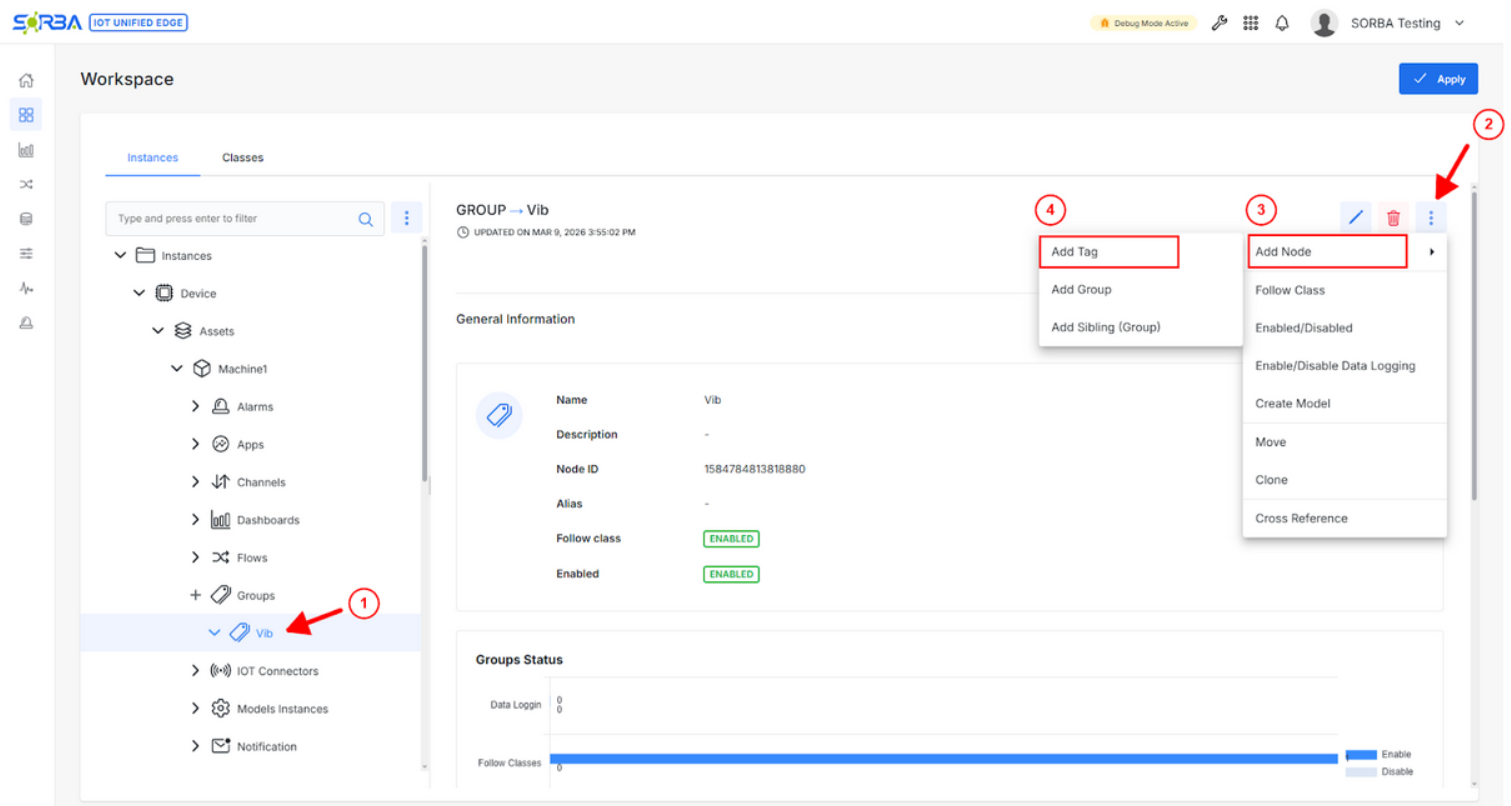
Tags Configuration
Step 9. Create Tag: Select the Group, add a Tag Node, e.g: “RMS_X” tag
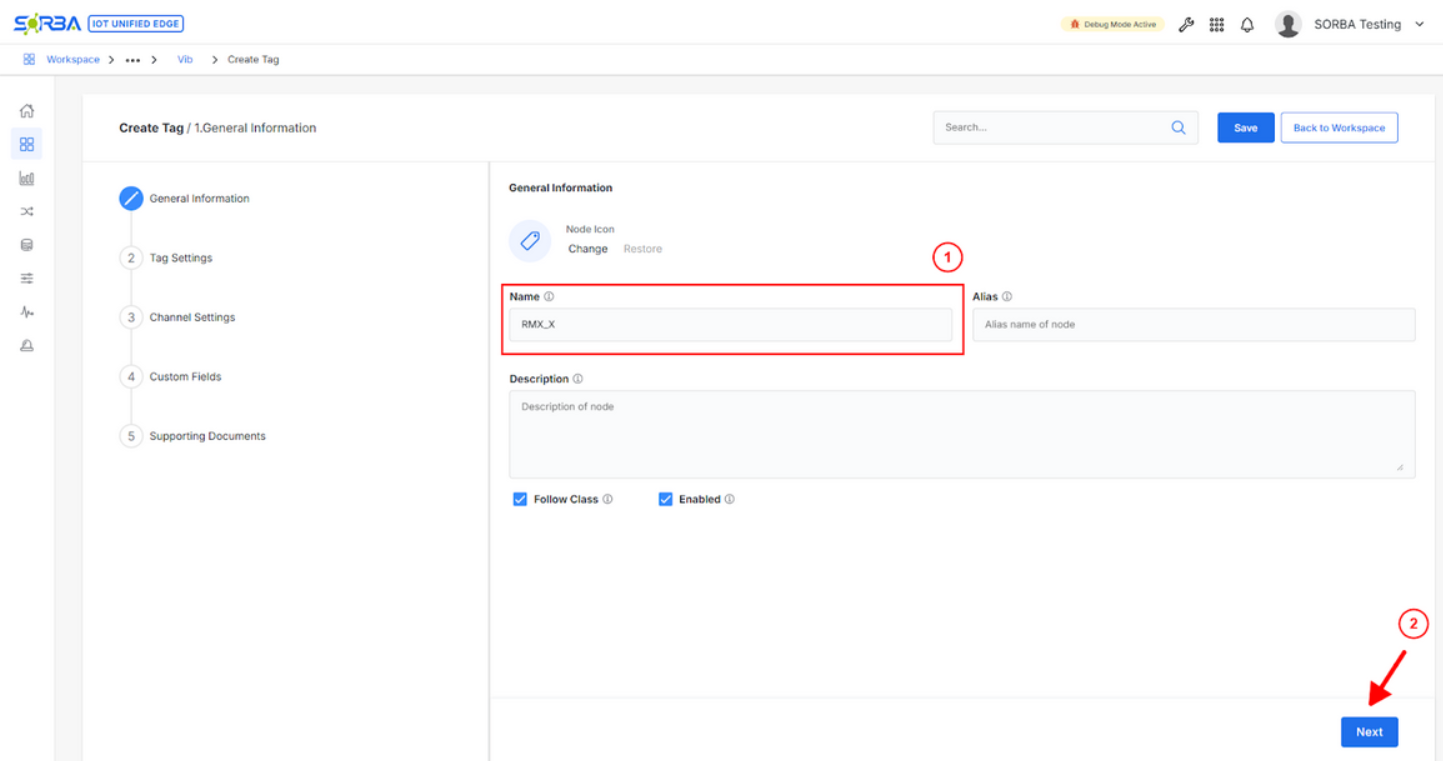
Click to Expand
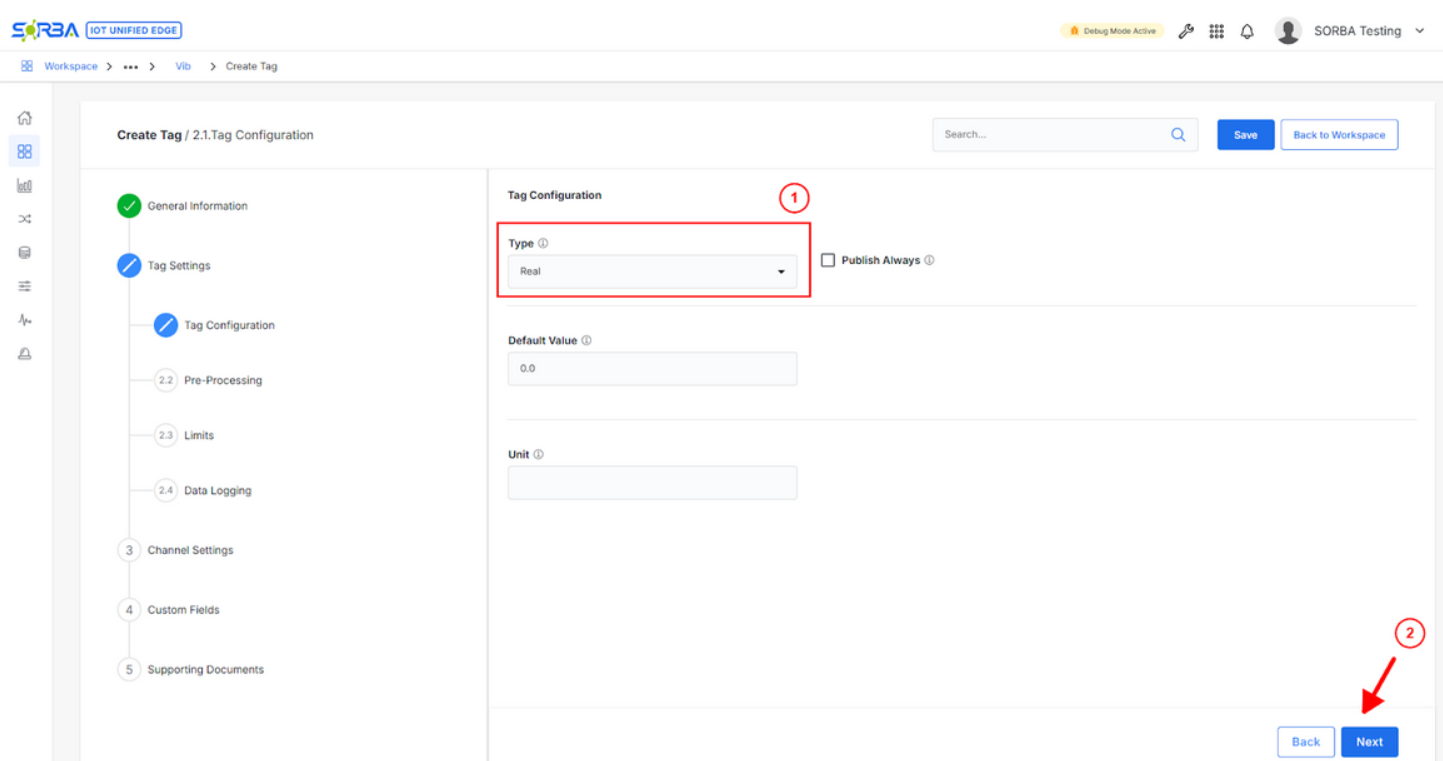
Step 10. Set Tag Name: Set the Tag Name and click on Next, e.g: “RMS_X” tag
Click to Expand
Step 11. Tags Settings: Set the Tag Data Type and click on Channel Settings or Next multiple times.
ImportantFor the tag settings if reading raw waveform need to change data type to an “Array” with correct length. Also the configuration of the Sensor Node has to be updated
Click to Expand
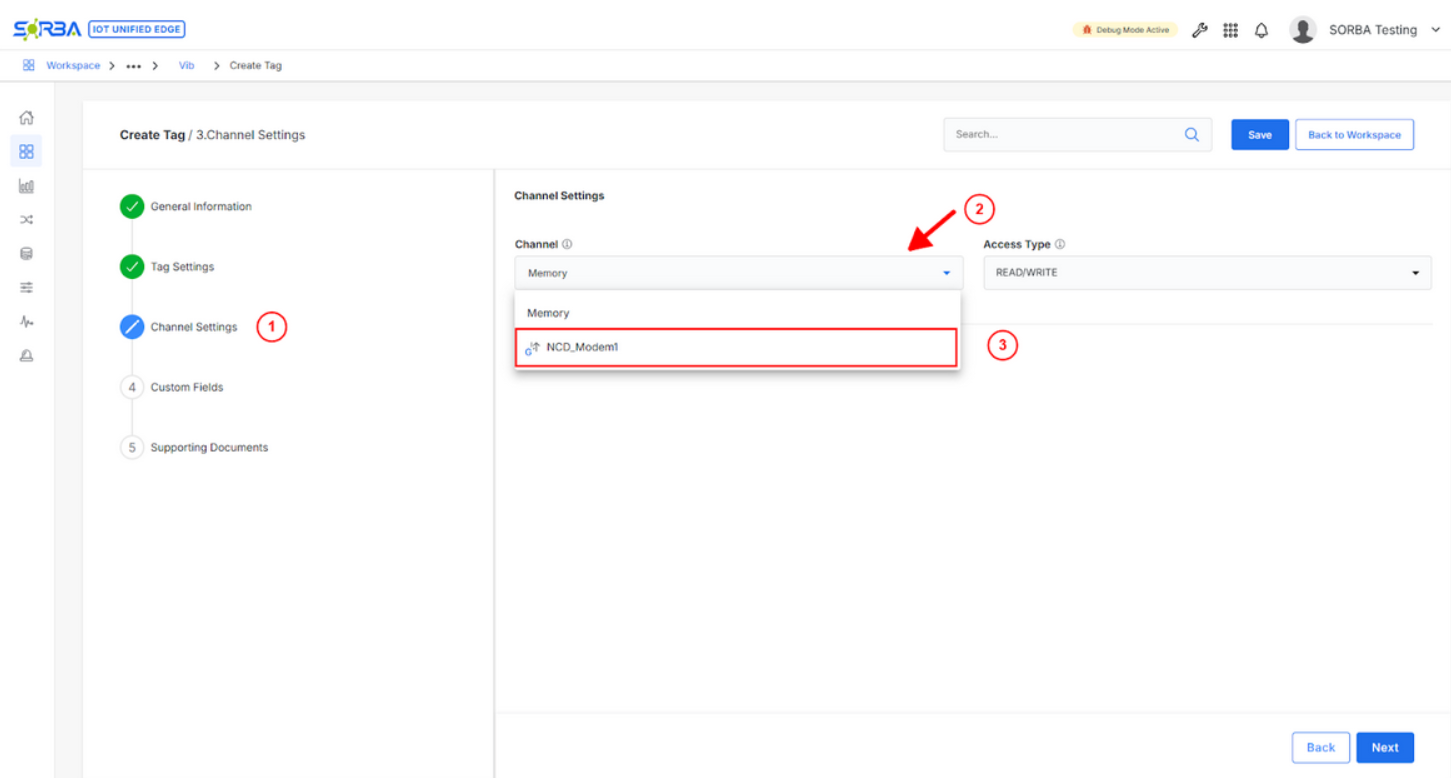
Step 12. Channel Settings: Select the Global Channel from Channel drop box, created in section 7.1, e.g: NCD_Modem1
Click to Expand
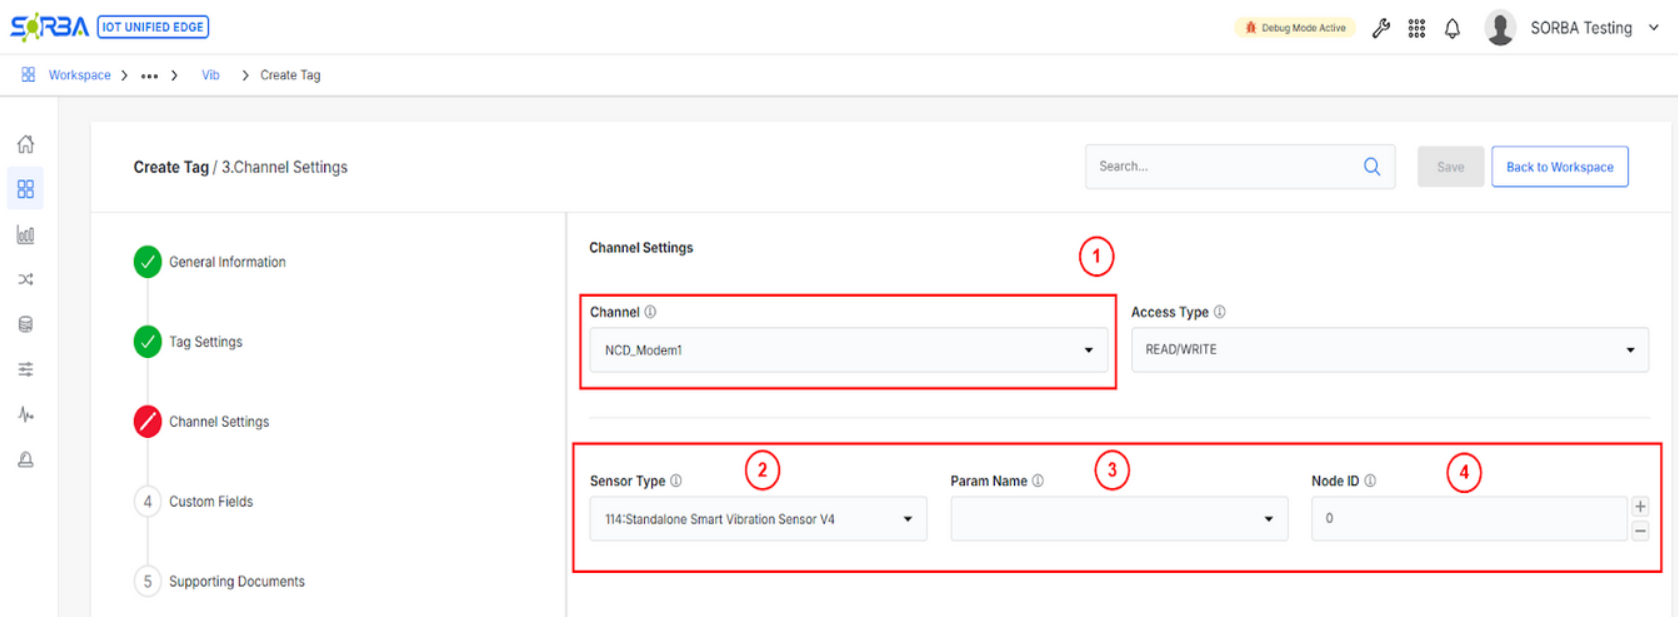
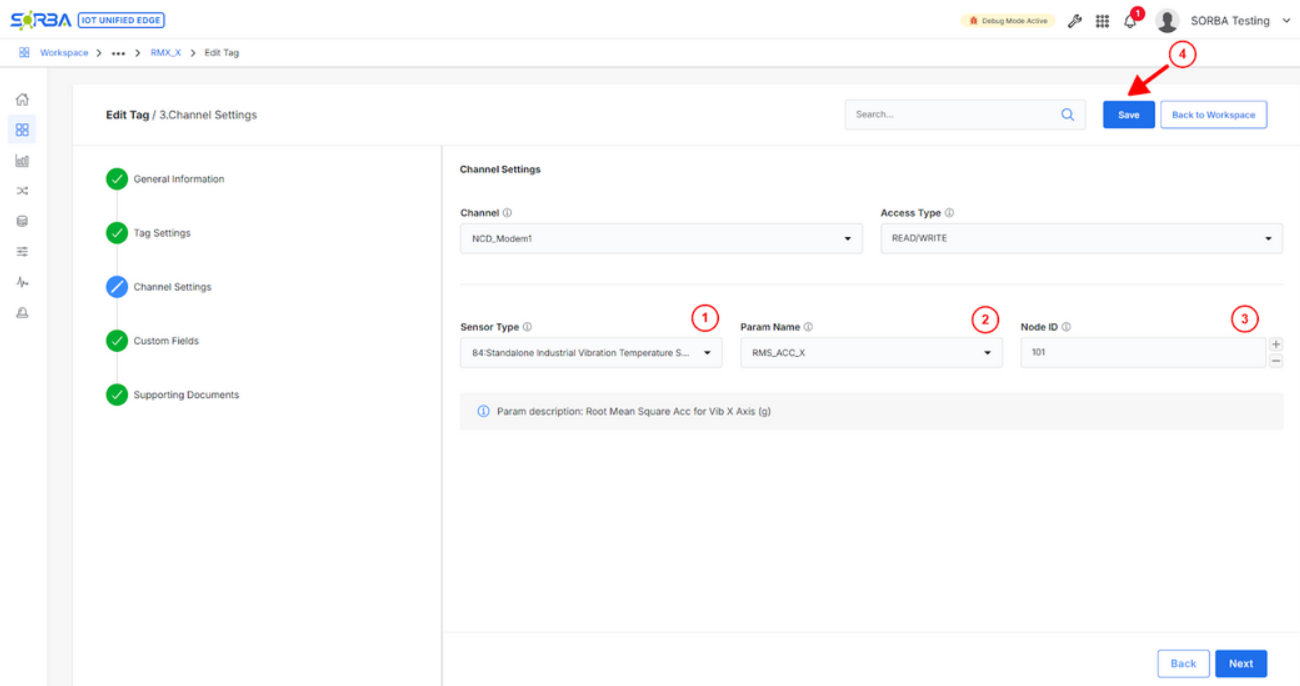
Step 13. Sensors Parameters Configuration: Select the Sensor Type, Parameter Name, Node ID. Hit Save.
Click to Expand
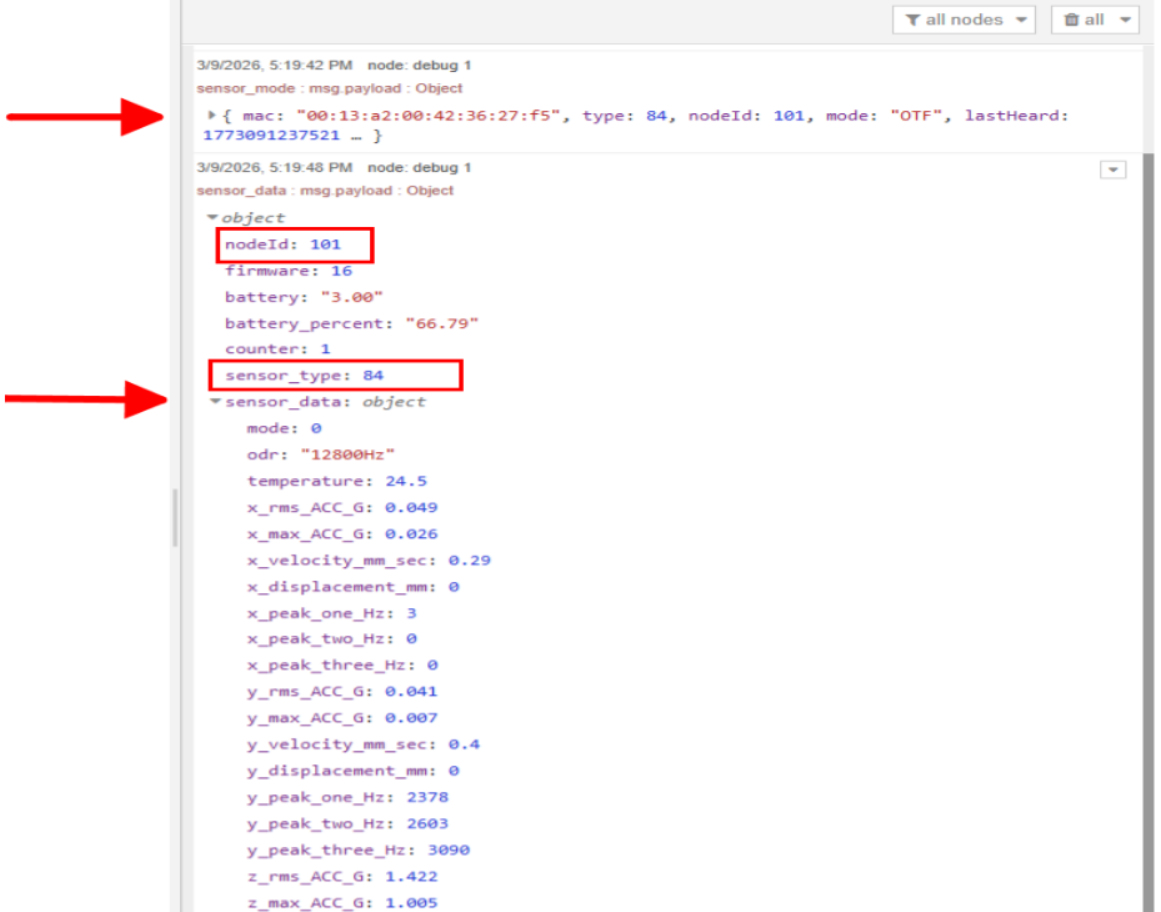
ImportantMake sure the Sensor Type ID match the “sensor_type” code found in Section 5.3-Step 10. This code is the first number appears at front of the sensor list, e.g: sensor_type = 84, “Standalone Industrial Vibration Sensor Temperature”. Select parameter name, e.g: RMS-X and corresponding Node ID, e.g: 101.
Click to Expand
Click to Expand
Step 14. Apply Configuration: Hit Apply button for loading the new configuration and start reading the data.
Click to Expand
Verify Live Data Ingestion
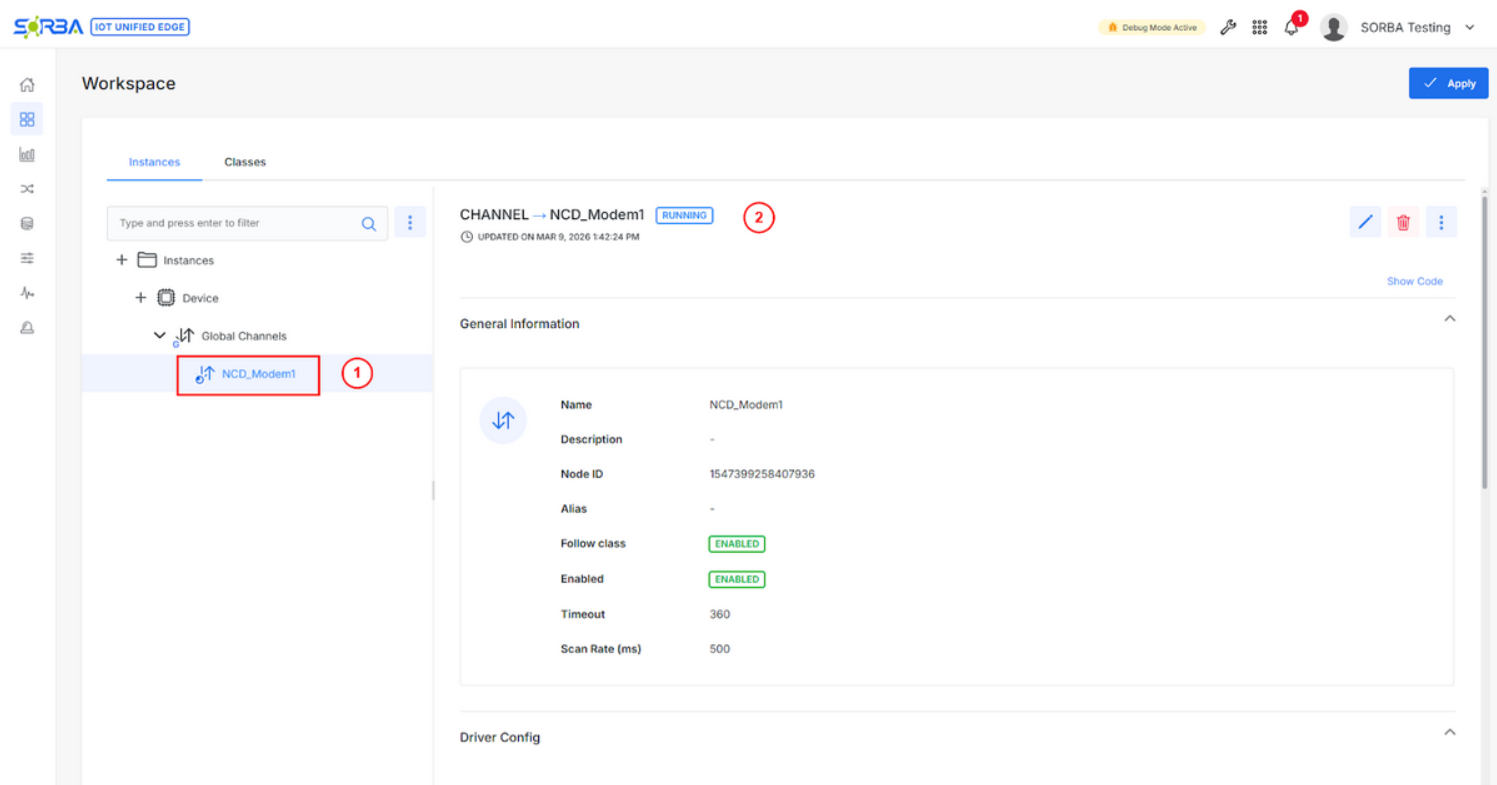
Step 15. Check Global Channel Running Status: Verify the NCD Channel is running and not in fault.
Click to Expand
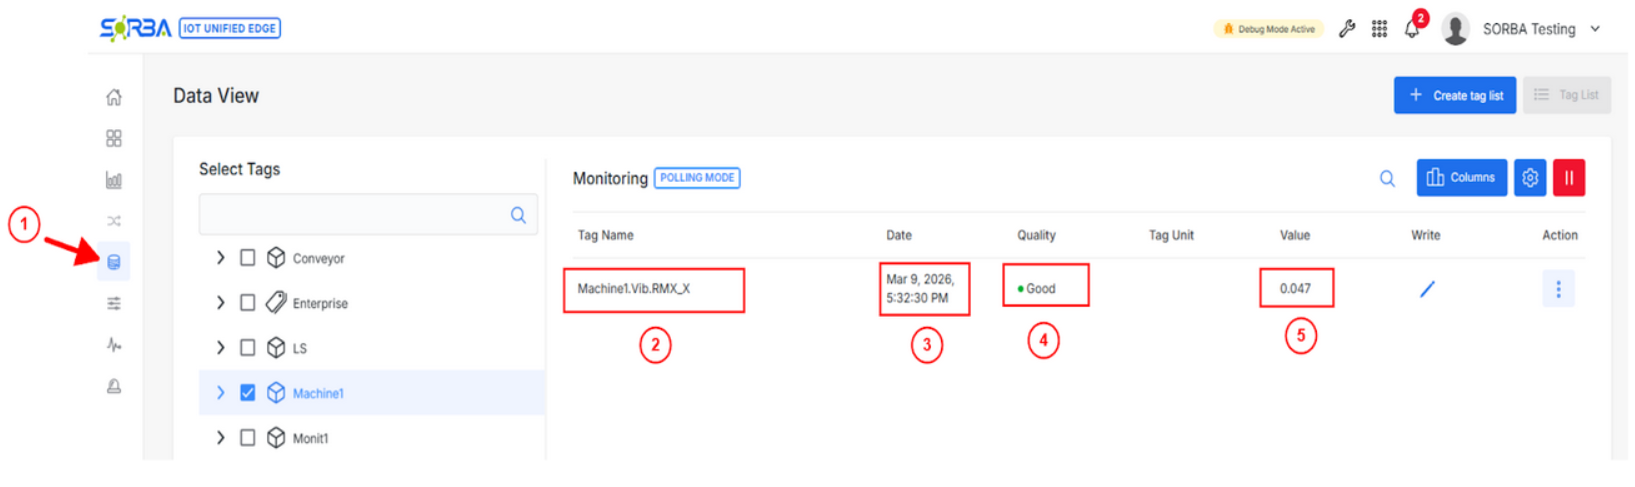
Step 16. Check Data Read in the Data View: Verify the NCD Channel is running and not in fault.
Open Data View — confirm NCD sensor tags are populating with live values.
Confirm timestamps are updating at the expected interval matching your sensor delay.
Click to Expand
NoteIf no data appears: (1) verify modem LED is ON meaning Core is connected, (2) press R on the sensor to force a transmission, (3) confirm sensor PAN ID matches modem PAN ID, (4) check no other client is connected to the modem.
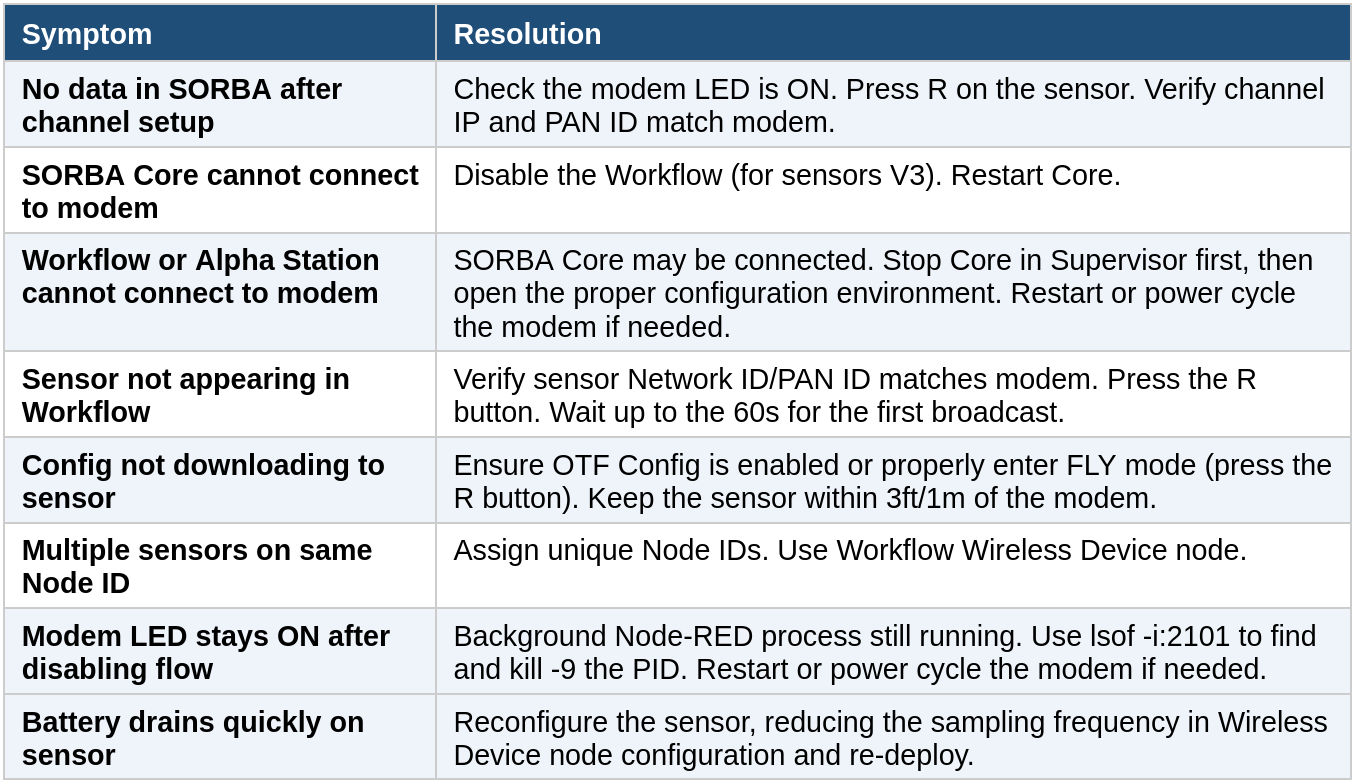
Troubleshooting Reference
Modem LED Status Guide
Connect
Seeking next-generation IIoT solutions and support? Here are some next steps: