Introduction
In this guide we will discuss the basic functionality and use of the Sensor Scout Modem in conjunction with the Sensor Scout App.
Disclaimer: At the time of this article creation the Sensor Scout App is iOS compatible. We will release an Android version of the app soon. So for now you will need an iOS device such as an iPhone or iPad.
What is the Sensor Scout?
Sensor Scout is a new Tablet/Smart phone based product. It consists of a hand held(pocket sized) modem which connects to the Phone/Tablet and the Sensor Scout app which would be installed on the Phone/Tablet.
The Sensor Scout Modem connects to the Sensor Scout App on your Phone/Tablet via BLE. Inside the Modem is a Processor, BLE Radio, and a DigiMesh module. When the Sensor Scout Modem is on it will forward readings from NCD Enterprise IIoT sensors to the app and display them in a list with useful information such as the RSSI, the type of sensor, the sensors address, battery level, and most recent readings from the sensor. It’s important to keep in mind the size of packets which can be sent over BLE are limited. This means some sensors such as the vibration sensors which send a lot of data may only include summary data rather than all readings from all Axis. Non the less it is a very useful diagnostic tool during installs.
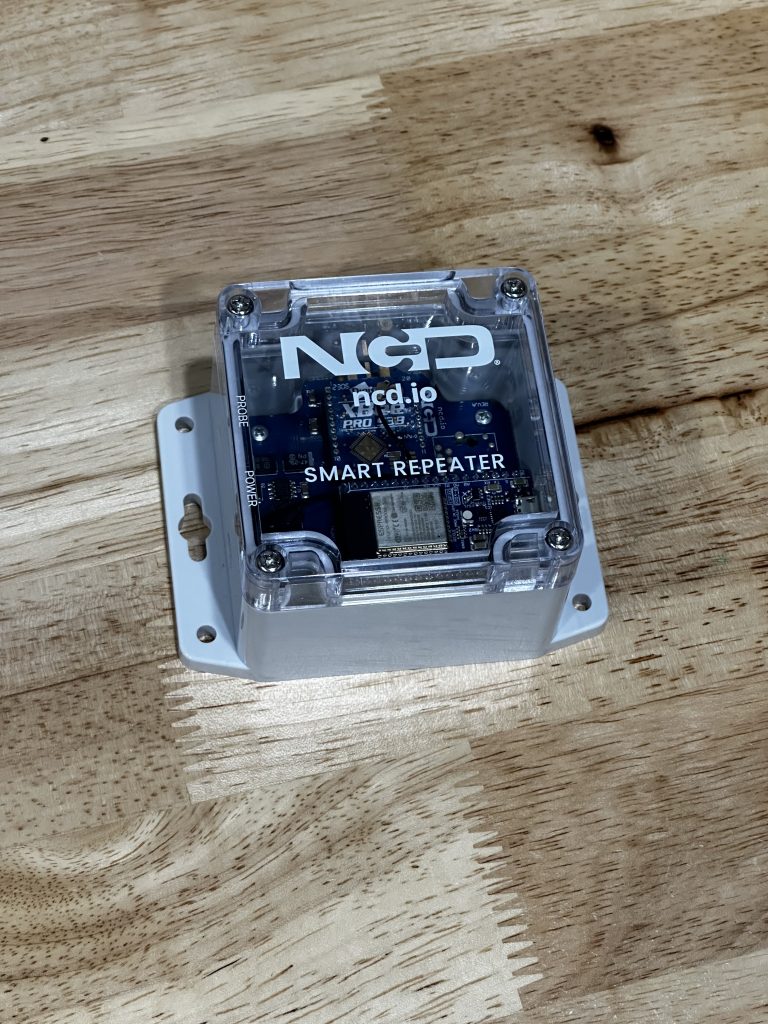
The Sensor Scout Modem Hardware
At the time of this Article creation Sensor Scout is a brand new product only being Beta tested by a select group of customers. It is a 3D printed enclosure with an RGB LED and button on the front as well as 2 screws on the back to open the unit up. Also on the back is a sticker detailing the Serial Address of the 900mhz module installed.
Inside are the main PCB which holds the button, the RGB LED, Processor/BLE radio, and the XBee socket for the DigiMesh wireless module.
The unit is powered by 2 AA batteries. When the device is not being utilized it goes into deep sleep. Deep Sleep is indicated by the RGB LED being completely off. In this deep sleep the device will deplete the batteries after approximately 2 years. In extreme use cases if the app is constantly connected to the device for 8 hours every day the device would deplete the batteries after approximately 5 days. Keep in mind however it is extremely unlikely you would be connect to the device for a constant 8 hours. When the app is not connected to the modem it automatically goes into deep sleep.
Currently if the App enters the background and the Phone/Tablet are still within range of the modem the connection will persist, thus keeping the Sensor Scout Modem awake. The only way it automatically goes to sleep is if the App is closed, the user gets out of range of the Sensor Scout Modem, or the user backs up to the Scan page in the app. It is unknown whether or not it would be preferable to put the Sensor Scout to sleep when the app enters the background. One annoyance could be receiving a phone call during use which would put the modem to sleep, we welcome your feedback in this regard.
Just keep in mind if the LED is on then the Sensor Scout Modem is awake, if it’s off then it’s asleep. This will help you conserve battery life.
You will notice there is no external antenna. We are utilizing an internal antenna which should achieve the exact same range as the Enterprise Series sensors. This is purposeful. We wanted the Sensor Scout Modem to simulate a sensor’s range during testing, so if the sensor Scout Modem has good range then the sensor will as well.
To Wake the Sensor Scout up from sleep simply press and release the button on the front of the modem. That is currently the only functionality this button serves.
After waking for sleep the Sensor Scout Modem will advertise itself over BLE for 10 seconds. If no connection is made in that 10 seconds it will go back to sleep. BLE advertising is indicated by a Green Flashing LED. The Yellow flashing LED upon wake indicates the Modem is booting and establishing communication with the DigiMesh module inside. It will not appear in the app until the LED flashes Green. Once the app is connected the LED will turn solid Green indicating connection from the App.


The Sensor Scout App Software
First View
The Sensor Scout Modem is relatively intuitive. When you first open the App you will see an empty list with a Scan button at the bottom. If this is the first time opening the app since install you will be prompted to allow the App access to Bluetooth(this is required).
Press the Scan Button

Discovered Sensor Scout Modems
After pressing the SCAN button at the bottom the App will listen for Sensor Scout Modems in the area.
Press the button on the Sensor Scout Modem.
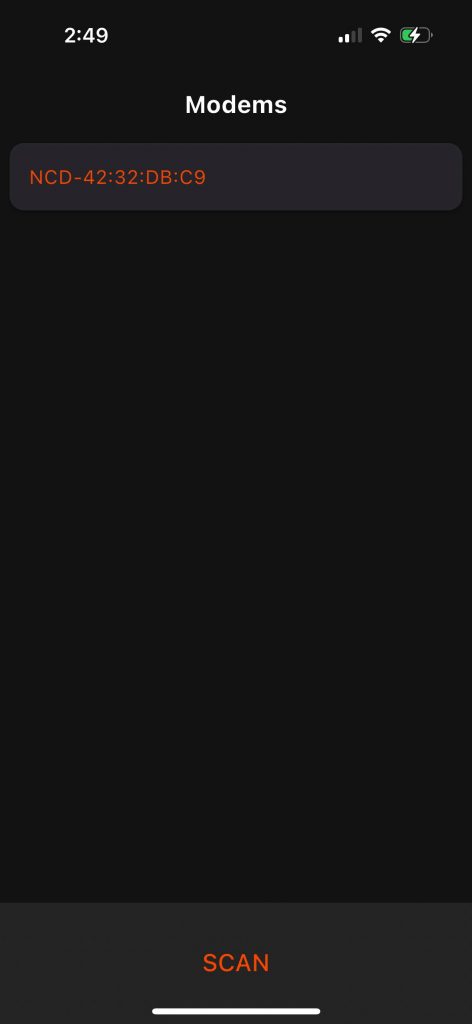
The Sensor Scout Modem should immediately appear in the list. If not press the SCAN button in the app again. Having to press the SCAN button a couple of times is a known bug we are working to resolve.
The Sensor Scout Modem will appear in the list as NCD-XXXXXXXX where XXXXXXXX is the last 8 characters of the devices Serial Address printed on the back of the Sensor Scout Modem.
Click to select the Sensor Scout Modem in the list.
Discovered Devices
After selecting the Sensor Scout Modem from the Modems List View you will be taken to a list of devices the Sensor Scout Modem has seen.
Power on a sensor, Smart Repeater, or Gateway to display it in the App.
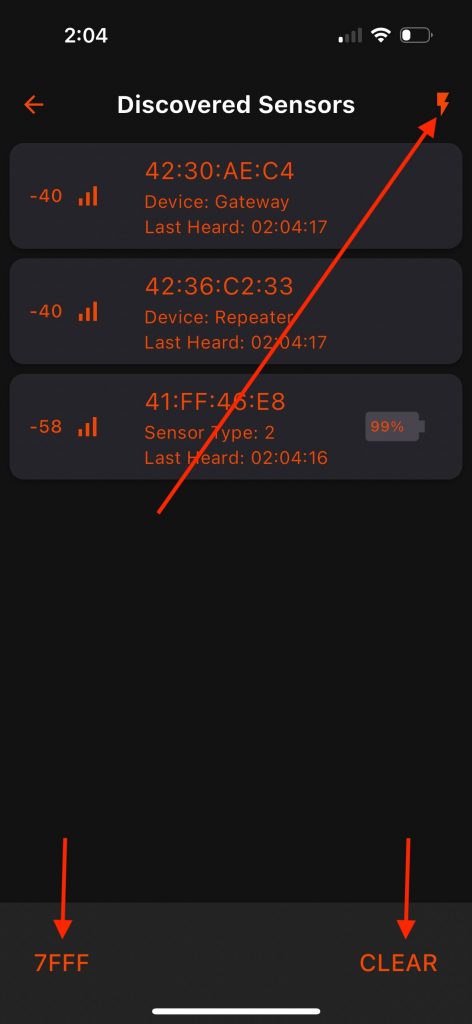
Once the Sensor Scout Modem sees a device it will appear in the list. To the right you can see the 3 different types of devices currently supported. Gateways, Smart Repeaters, and Sensors.
Gateways
Gateways displayed in the list show Signal Strength as well as their unique Serial Address. A timestamp is also included so you can keep track of when it was Last Heard.
Note that Gateways must be running a Node-Red flow that triggers them to send a transmission on interval. That flow can be downloaded here.
Smart Repeaters
Repeaters displayed in the list show Signal Strength as well as their unique Serial Address. A timestamp is also included so you can keep track of when it was Last Heard.
Only Smart Repeaters will appear in the app, it cannot discover USB modems yet.
Sensors
Sensors displayed in the list show Signal Strength, their unique Serial Address, Sensor Type, Battery level, as well as a timestamp so you can keep track of when it was last heard.
The Discovered Devices page will continue to update in the back ground even if you select a device from the list.
In the Image to the right you will see one of the sensors is white. This indicates that sensor has a fault. On this particular unit I purposely disconnected the vibration probe. This makes it easy to find problem sensors at a glance.
Select a Device from the list to see more.

Gateway Device View
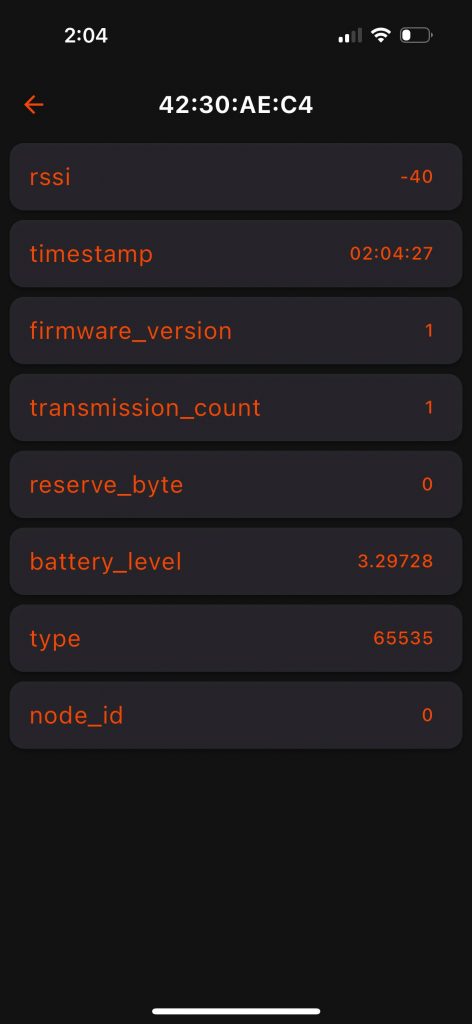
There is honestly not a lot of information on the Gateway view page at this point that is not already available in the Discovered Devices View. For now I would just use the Discovered Devices view for information on Gateways in the area.
We can see the Type here is 65535. That is the device type for a Gateway.
Smart Repeater Device View
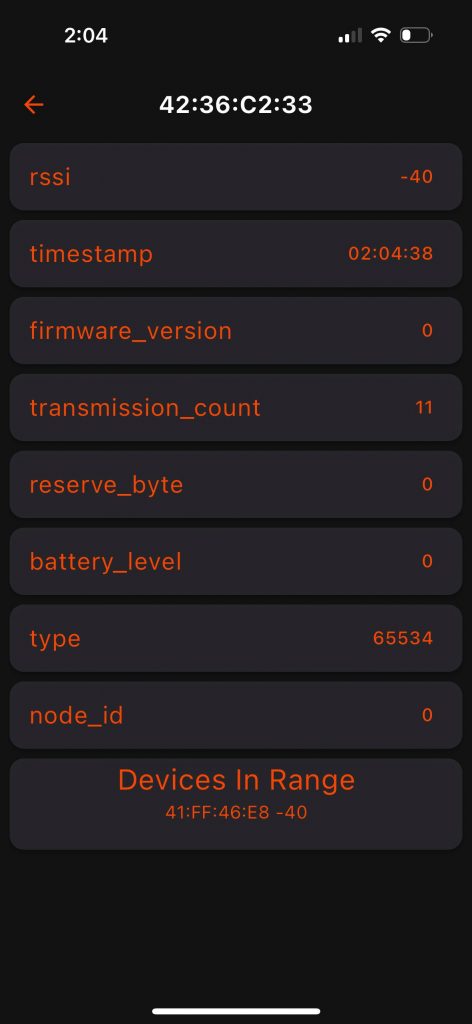
Here we can see quite a bit of information. The RSSI at the top is the Sensor Scout Modem’s connection strength with the Smart Repeater.
We can see the Transmission count here as well although I am not sure how useful that information is in practical use.
At the bottom we can see Devices In Range. This is very useful information. This is a scrollable list of all sensors the Repeater has seen since you opened this view. If you do not see Devices In Range try pressing reset on a sensor and it should pop into the list. Each line on this list is XX:XX:XX:XX -XX Where XX:XX:XX:XX is the unique Serial Address of a Device the Smart Repeater can see. This could be a Gateway, another Smart Repeater, a Sensor Scout Modem in Beacon mode, or a sensor. the -XX here is the RSSI connection between the Smart Repeater and that device, not to be confused with the RSSI at the top of the page which is the Smart Repeater’s RSSI to our Sensor Scout Modem.
Sensor Device View
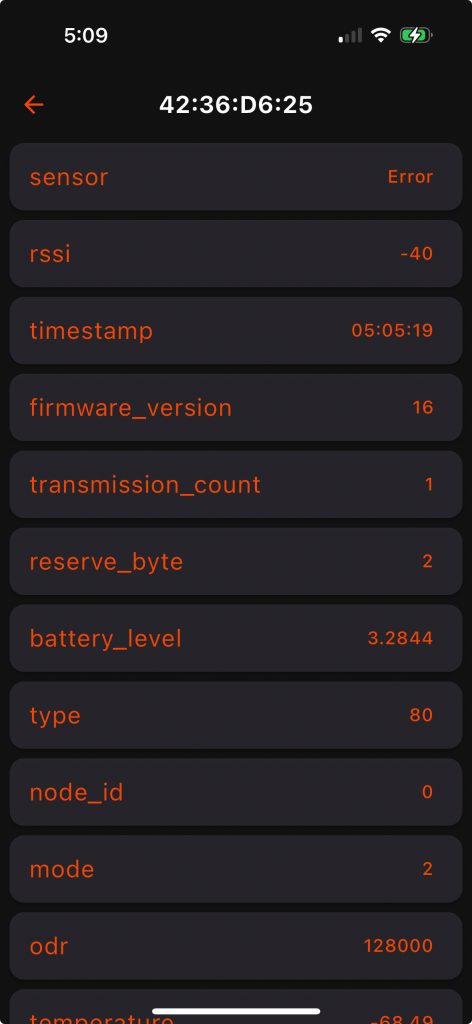
In the Sensor Device View we can see the RSSI between the Sensor Scout modem and the sensor, timestamp of the last transmission we received from the sensor, firmware version, sensor transmission count, reserve byte, battery level, type of sensor, node id, as well as sensor readings unique to this type of sensor.
For sensors which use the reserve byte to indicate sensor faults such as Vibration sensors we will also see warnings here which indicate if a sensor has a problem. If you have a vibration sensor with an external probe for instance try disconnecting the probe and press reset on the sensor. You will see the fault displayed here at the top. In this case it says sensor Error. If I connect the probe it will say Sensor Connected.
Discovered Devices View(Deep Dive)
One thing we did in the app was to make anything intractable Orange in color. This means if you see something orange you can click on it and interact(except for the Device View where readings are orange).
In the screenshot to the right you will see a back button to go back to the Sensor Scout Modems list, a lightning bolt button, 7FFF and CLEAR at the bottom.
7FFF is the network ID the Sensor Scout Modem is using. If you need to interact with devices on a different Network ID just click on 7FFF and in the pop up window edit the Network ID. That will change the Network ID of the DigiMesh module in the Sensor Scout modem so you will begin seeing devices on that alternate Network ID.
Click the Clear button if you want to clear the list of Discovered Sensors.
Click the Lightning Bolt button to view additional options covered in the next section.
Advanced Features
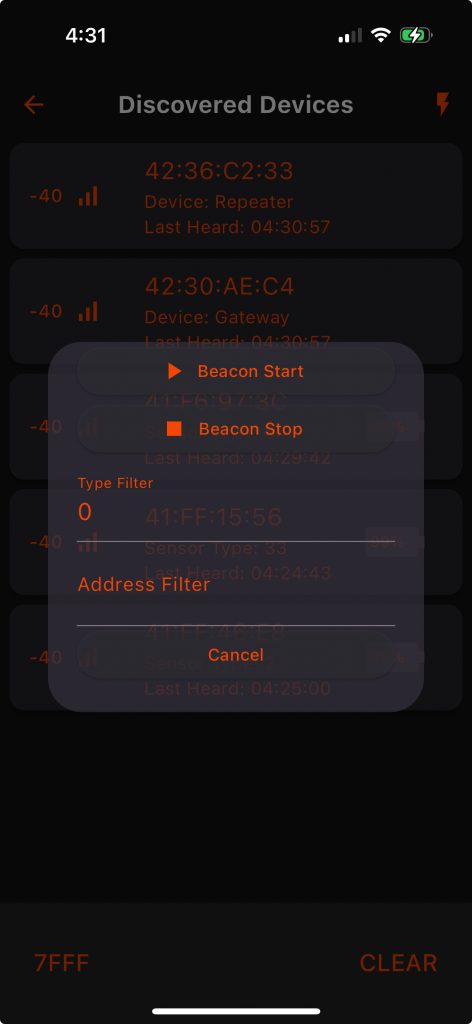
By clicking the Lighting Bolt button in the upper right corner of the Discovered Devices list we can access some Advanced Features.
- Beacon Start
- Put this Sensor Scout Modem into Beacon Mode. In this mode the Sensor Scout Modem will send out a transmission over 900 mHz every 5 seconds. This allows a second Sensor Scout Modem to discover it and display RSSI. This is especially helpful for on site range testing.
- Beacon Stop
- While in Beacon mode the Sensor Scout Modem is consuming quite a bit of power, so once you are done range testing it is important to connect back to the Sensor Scout Modem in Beacon mode and Stop the Beacon Mode.
- Type Filter
- Type filter allows you to filter the Discovered Devices view to only a specific type of sensor such as 80, 81, 84, ect. Set Type Filter to 0 to display all sensor types.
- Address Filter
- On large installations you might see a massive list of sensors. Scrolling through all of them is a pain. In the Address Filter just enter part of the Serial Address of the sensor you are looking for. For instance if I’m searching for a sensor with the serial address of 00:13:A2:00:41:F6:97:3C I could just enter 3C or 97:3C or F6:97. This will filter the list of devices to only show devices that contain this string of characters in the Serial Address.
Using Sensor Scout Modems for Range Testing
There are several ways Sensor Scout can be used for range testing. The first and most common involves two Sensor Scout Modems. To do this:
- Open the Sensor Scout App.
- Click the Scan Button.
- Press the button on the first Sensor Scout Modem.
- Once that modem appears in the list click to select it.
- On the next screen click the Lighting Bolt button in the upper right corner.
- In the pop up window click Beacon Start.
- Click the Back button to return to the Sensor Scout Scan view. You should notice the LED continues to flash on the Sensor Scout modem even though you disconnected from it.
- Press the button on the Second Sensor Scout Modem.
- Once the second Sensor Scout Modem appears in the list click to select it.
- On the next page the first Sensor Scout Modem should appear in the list. Here you can see it’s RSSI(-40 is a perfect signal and -85 is almost completely out of range).
- Now I recommend placing the Sensor Scout modem in Beacon mode in the proposed location of a Gateway or Repeater. Now with the Second Sensor Scout modem walk around to proposed sensor locations. This allows real time diagnostics of the wireless signal in the environment.
If it is found that a sensor location will not be able to communicate back to the Gateway location then find a suitable location for a repeater. With the Beacon Modem still in the Gateway location check the connection strength to that proposed Repeater location, if it looks good then move the Beacon modem to that proposed Repeater location, then return to the sensor location and see if you have good connectivity back to the repeater location, if so then you have identified a suitable install location for the repeater and should plan it in your bill of materials.
There is a lot to diagnosing wireless connectivity, especially in large industrial environments. The Sensor Scout should make your life easier.
What is a Smart Repeater
For years we have been recommending just picking up a USB modem and power it up to act as a DigiMesh repeater. It gets the job done but from a diagnostic standpoint it’s not very flexible. We developed the Smart Repeater in conjunction with Sensor Scout. We needed Sensor Scout to be able to see Repeaters and display them to the user. This wasn’t something the USB modem could do. Now in the Sensor Scout app you can see Smart Repeaters in the Discovered Devices View and see connectivity strength from the Sensor Scout Modem to the Smart Repeater, as well as the Smart Repeater’s signal strength with other devices in the area such as Gateways, sensors, Sensor Scouts, and other Smart Repeaters.
Other than this Smart functionality it’s still just a plug and play repeater. Just connect 12VDC to it and it’s going to join the local Mesh Network as a repeater device. There is some additional functionality of the Smart Repeater but we will get into that in a dedicated user guide.
Conclusion
Sensor Scout is still in its infancy. We rely on your valuable feedback to make improvements, fix bugs, and make everyone’s lives easier. Please do not hesitate to provide your feedback.
We are excited for everyone to get their hands on Sensor Scout. We designed and developed it because we’ve been in the field. We have seen what you go through as an installer. Things work great on a desk, but once you’re on a customer site dealing with the environment you need robust tools to get the job done. That’s what Sensor Scout aims to be, the next great tool in your tool belt.