OPC-UA Server on Enterprise IIoT Gateway with Node-RED

Table of Contents

Introduction

This article will guide you through the process of setting a basic OPC-UA Server using Node-RED inside Enterprise IIoT Gateway for ncd sensors, by creating a custom Information Model for the sensor’s data and publishing it.

OPC-UA (OPC Unified Architecture) is an evolution of OPC that addresses the limitations of previous versions. It was developed to provide a unified architecture and open standards for communication in Industrial Automation and other environments.

Among its features are:

  • Platform Independent: OPC UA is not tied to a specific platform and can run on various operating systems.
  • Security: Provides a robust set of security features, including authentication, authorization, integrity, and confidentiality.
  • Scalability: OPC UA is highly scalable and can be used in small and large systems, from embedded devices to enterprise environments.


Unified Information Model: Offers a unified information model that facilitates interoperability between different systems and devices.

Note: (Recommended) Install a client for OPC UA servers, this will help us see if the server structure is correct, and the values that each node has. For example the OPC-UA client called UaExpert, which is free and cross-platform or Prosys OPC-UA Browser.

IMPORTANT

This article does not cover the process of securing the server with SSL to make it production ready, it will be configured in anonymous mode for testing purposes.

Architecture Overview

A visual representation of our ncd Sensor Data to OPC-UA Server architecture is shown in the drawing below:

Consisting of 6 major parts:

  1. Setup the NCD Enterprise IIoT Gateway. (https://ncd.io/blog/quick-start-guide-for-the-ncd-enterprise-iiot-gateway/)
  2. Access to Node-RED.
  3. Setup the ncd-gateway-node and ncd-wireless-node to read the sensor data.
  4. Copy/Save the sensor data into Node-RED Context Memory (Flow Variables).
  5. Configure the OPC-UA Server Address Space.
  6. Test the OPC-UA Server with an OPC-UA Client.

Note: This article is based on Industrial IoT Wireless Environment Temperature Humidity Pressure and Air Quality Sensor and Enterprise IIoT Gateway hardware, but could be modified for use with other types of ncd sensors, just verify the structure of the input data to be stored in context memory.

Requirements

1.- Install Node-RED

Node-Red is a browser based no code/low code tool to connect hardware devices to each other as well as to cloud and database infrastructures. 

Every sensor packet creates a message which flows down the connected nodes which can alter that message to suit your application, package it into a new protocol such as MQTT, Modbus or OPC-UA (as in this article), or send it directly to your cloud.

Node-Red is pre-installed and running as a service in Enterprise IIoT Gateway.

2.- Install node-red-enterprise-sensors library

  • Using npm, to install through the command line navigate inside ~./node-red directory on a computer with Node-Red already installed:
				
					npm install @ncd-io/node-red-enterprise-sensors
				
			
  • Or you can install this library through the Palette Manager in Node-Red’s UI:
Noder Red install NCD

3.- Install node-red-contrib-opcua-server library

opcua-server library is a programmable OPC UA server for Node-RED based on node-opcua next generation version with less dependencies.

  • Using npm, run the following command in your Node-RED user directory – typically ~/.node-red:
				
					npm install node-red-contrib-opcua-server


try these options on npm install to build from source if you have problems to install:

				
					--unsafe-perm --build-from-source
				
			
  • Or you can install this library through the Palette Manager in Node-Red’s UI:

Configuration

Select Data

To obtain the data from the ncd sensors inside Node-RED it is necessary to configure the ncd-wireless-gateway and ncd-wireless-device nodes, depending on the type of sensor you have.

Once the nodes are configured, if you connect a debug node to the output of the ncd-wireless-device node, and it is configured as “complete msg object” in Output property, you will see something like the following in the debug tab:

This is the structure or object that sends the sensor, which contains all the information of interest of the sensor, such as; nodeId, firmware version, battery (voltage), battery percent, sensor type, sensor name, sensor data, address, timestamp, among others.

We are going to focus on the part of this information to expose in our OPC-UA Server, which will be:

  • mac
  • Battery percent
  • Temperature
  • Humidity
  • Pressure
  • Gas resistance
  • Indoor Air Quality


Note: you can add or remove information according to your application and the data you wish to expose on the OPC-UA server.

Compact-Server node

Before continuing, you can visually observe that the “Compact-Server” node does not have input terminals, i.e. we cannot directly connect the output of our Wireless Device node to the input of this node, instead the “Compact-Server” node can access the values of interest through context (variables in Node-RED).

Store data in Node-RED

Node-RED provides a way to store information that can be shared between different nodes without using the messages that pass through a flow. This is called ‘context’. In this case we will use flow context which allows us to store information, and that this information is visible to all the nodes of the same flow (or tab in the editor).

Note: If you want to learn more about the concept of context in Node-RED you can access to Node-RED context.

As already mentioned, it is necessary to store our values of interest in variables, so that our “Compact-Server” node can access them and configure our OPC-UA Server

To store our values of interest in flow context we can use one of two types of nodes:

  • Function node: For Intermediate/Advanced users.
  • Change node: For beginner users.


Both are available in the Node-RED node palette by default, without the need to install them.

Function node

In the case of the function node, the following function is available:

				
					flow.set('',);


Allows us to set a flow scope context property. For instance, if we use:

				
					flow.set("count", 123);


Where:

  • count” : Is the variable identifier.
  • 123: Is the value assigned to this variable (the value it will store).

Now to access the properties of our message coming from our Wireless Device node inside the function node, we use for example:

				
					msg.payload.temperature;


This will return the temperature value, stored in this property, for each object of our message of interest.

With this then to store the values that come in the message object in flow context variables inside the function node we can write the following:

				
					flow.set("mac", msg.data.original.mac);
flow.set("battery_percent", msg.data.battery_percent);
flow.set("temperature", msg.payload.temperature);
flow.set("pressure", msg.payload.pressure);
flow.set("humidity", msg.payload.humidity);
flow.set("gas_resistance", msg.payload.gas_resistance);
flow.set("iaq", msg.payload.iaq);


You can copy and paste this code into your function node and only modify the variable and object identifiers for your specific application:

Connect the output of the “Wireless Device” node to the input of the function node:

Change node

Change node in Node-RED is used for modifying the content of messages within a flow. It allows you to add, remove, modify, and set message properties, payload values and context variables (flow and global), making it a fundamental node for data transformation and manipulation.

In case you want to use the change node (which through the low-code principle facilitates the configuration process) you can create the flow context variables.

1.- Drag with the mouse a change node to your workspace.

2.- Connect the output of the “Wireless Device” node to the input of the change node:

3.- Double left click on the node to open its properties, then inside the node properties window we have the following:

4.-  The node can specify multiple rules that will be applied in the order in which they are defined, the rule we will use is “Set“, and the type is “flow context“:

5.- It will assign an identifier for each flow context created, then in the property “to the value” we select “msg” since we want to access a value inside this object, and we add the description of the specific object we want to access, this way we access the value of the object and store it in flow context variables, in our case we assign the following ones:

Waiting message

For the values of interest to be stored in the flow context variables, the function or change node must receive the object message from the Wireless Device node, be patient.

Verification

To verify that your values of interest that come in the object message are being stored correctly in your flow context variables:

1.- Go to the Context Data tab inside the sidebar.

2.- Go to the Flow tab, where we have two available buttons “Refresh on selection change” and “Refresh“, to observe the variables and stored values press the “Refresh” button:

3.- If the variables are set up correctly you should see the following:

On the left side of the tab you can see the identifiers of the context variables, and on the right side you can see the values.

Note: in blue color are represented the number type variables, and in cherry color the string type variables.

In this way we check that our flow context variables have been created, and that they can be accessed from any other node that is part of the current flow (or tab).

Configure Compac-Server node

Now it’s time to configure the OPC-UA server using the opcua-compact-server node, the Compact Server node is an OPC-UA server with a programmable address space to build your own information model. The address space is to expand with JavaScript source code based on node-opcua API and OPC UA specification. The product URI has to be unique if you set some other name as the default is! (default: NodeOPCUA-Server-(port))

  • Default endpoint: opc.tcp://localhost:54840
  • Named endpoint: opc.tcp://localhost:54840/UA/NodeRED/Compact
  • Default discovery: opc.tcp://localhost:4840/UADiscovery
  • All discovery: opc.tcp://localhost:4840

Note: As mentioned at the beginning of the article, it does not cover the process of securing the server with SSL, the server provides simple Node OPC-UA demo certificates and private keys. You could set up your own certificate and private key files.

1.- Add opcua-compact-server to workspace​

Drag with the mouse an opcua-compact-server node to your workspace.

Note: as mentioned above, this node has no input or output terminals.

2.- Port and Show Errors

Double click on the node to open its properties, the first tab you will see is “Settings“, and within its properties you have the port is available for the OPC-UA server, by default is “54840“, we will set it to “54845”, you need to enable “Show Error” option, you have other properties of the OPC-UA server configuration, which can be modified according to your application.

3.- Security

The Security tab has one important option “Allow Anonymous”, by default, anonymous access is enabled.

Note: For a production system, you will want to enable security, but for test purposes, you will leave anonymous access enabled.

The Limits tab specifies some default limits that we can configure if we like, but are not necessary to be modified for test purposes.

Users & Sets tab is related to security and permissions. You can leave this empty for testing.

4.- Endpoint Url

An endpoint is a physical address available on a network that allows clients to access one or more services provided by a server.

An OPC UA Endpoint URL (Uniform Resource Locator) is a formatted text string that consists of three or four parts (substrings):

  • Network protocol ((must be opc.tcp (case sensitive)).
  • Host name or IP address.
  • Port number.
  • (Optional) File or resource location.

Your port was defined on the Settings tab, which by default, is port 54845. You can configure your Endpoint Url in the “Discovery” tab. The address will be either the url or ip address of your Node-RED instance. In my case, it’s localhost. So the Endpoint Url = opc.tcp://localhost:54845

5.- Address Space

The Address Space tab is where our server OPC Information Model is constructed, using classes and methods from the node-opcua sdk.

We have a method called “constructAlarmAddressSpace()” and it explains with comments each argument we pass to this method:

				
					function constructAlarmAddressSpace(server, addressSpace, eventObjects, done) {
 // server = the created node-opcua server
 // addressSpace = address space of the node-opcua server
 // eventObjects = add event variables here to hold them in memory from this script


It shows part of the syntax we can use to build our OPC-UA Server:

				
					 // internal sandbox objects are:
 // node = the compact server node,
 // coreServer = core compact server object for debug and access to NodeOPCUA
 // this.sandboxNodeContext = node context node-red
 // this.sandboxFlowContext = flow context node-red
 // this.sandboxGlobalContext = global context node-red
 // this.sandboxEnv = env variables
 // timeout and interval functions as expected from nodejs


You can see that by default there are three lines of code within the method “contructAlarmAddressSpace()” which are responsible for invoking the server, create a rootFolder and create the namespace for OPC-UA Server:

				
					 const opcua = coreServer.choreCompact.opcua;
const rootFolder = addressSpace.findNode("RootFolder");
const namespace = addressSpace.getOwnNamespace();

 // your code here
      
 done();
}


6.- Import code

Now inside “// your code here” section, you need to copy and paste the following code:

				
					// your code here
 const Variant = opcua.Variant;
 const DataType = opcua.DataType;

 var flexServerInternals = this;

 this.sandboxFlowContext.set("mac", "00:00:00:00:00:00:00:00")
 this.sandboxFlowContext.set("battery_percent", "0.0")
 this.sandboxFlowContext.set("temperature", 0);
 this.sandboxFlowContext.set("pressure", 0);
 this.sandboxFlowContext.set("humidity", 0);
 this.sandboxFlowContext.set("gas_resistance", 0);
 this.sandboxFlowContext.set("iaq", 0);

 coreServer.debugLog("init dynamic address space");
 node.warn("construct new address space for OPC UA");

 const myDevice = namespace.addFolder(rootFolder.objects, {
   "browseName": "ncd"
 });
 const sensorFolder = namespace.addFolder(myDevice, {
   "browseName": "Sensors"
 });
 const typeFolder = namespace.addFolder(sensorFolder, {
   "browseName": "Environmental"
 });
 const payload = namespace.addFolder(typeFolder, {
   "browseName": "Payload"
 });

 const mac = namespace.addVariable({
   "organizedBy": payload,
   "browseName": "mac",
   "nodeId": "ns=1;s=mac",
   "dataType": "String",
   "value": {
     "get": function () {
       return new Variant({
         "dataType": DataType.String,
         "value": flexServerInternals.sandboxFlowContext.get("mac")
       });
     },
     "set": function (variant) {
       flexServerInternals.sandboxFlowContext.set(
         "mac", variant.value
       );
       return opcua.StatusCodes.Good;
     }
   }
 });

 const battery_percent = namespace.addVariable({
   "organizedBy": payload,
   "browseName": "Battery Percent",
   "nodeId": "ns=1;s=BattPercent",
   "dataType": "String",
   "value": {
     "get": function () {
       return new Variant({
         "dataType": DataType.String,
         "value": flexServerInternals.sandboxFlowContext.get("battery_percent")
       });
     },
     "set": function (variant) {
       flexServerInternals.sandboxFlowContext.set(
         "battery_percent", variant.value
       );
       return opcua.StatusCodes.Good;
     }
   }
 });

 const temperature = namespace.addVariable({
   "organizedBy": payload,
   "browseName": "Temperature",
   "nodeId": "ns=1;s=temperature",
   "dataType": "Float",
   "value": {
     "get": function () {
       return new Variant({
         "dataType": DataType.Float,
         "value": flexServerInternals.sandboxFlowContext.get("temperature")
       });
     },
     "set": function (variant) {
       flexServerInternals.sandboxFlowContext.set(
         "temperature",
         parseFloat(variant.value)
       );
       return opcua.StatusCodes.Good;
     }
   }
 });

 const humidity = namespace.addVariable({
   "organizedBy": payload,
   "browseName": "Humidity",
   "nodeId": "ns=1;s=humidity",
   "dataType": "Float",
   "value": {
     "get": function () {
       return new Variant({
         "dataType": DataType.Float,
         "value": flexServerInternals.sandboxFlowContext.get("humidity")
       });
     },
     "set": function (variant) {
       flexServerInternals.sandboxFlowContext.set(
         "humidity",
         parseFloat(variant.value)
       );
       return opcua.StatusCodes.Good;
     }
   }
 });

 const pressure = namespace.addVariable({
   "organizedBy": payload,
   "browseName": "Pressure",
   "nodeId": "ns=1;s=pressure",
   "dataType": "Float",
   "value": {
     "get": function () {
       return new Variant({
         "dataType": DataType.Float,
         "value": flexServerInternals.sandboxFlowContext.get("pressure")
       });
     },
     "set": function (variant) {
       flexServerInternals.sandboxFlowContext.set(
         "pressure",
         parseFloat(variant.value)
       );
       return opcua.StatusCodes.Good;
     }
   }
 });

 const gas_resistance = namespace.addVariable({
   "organizedBy": payload,
   "browseName": "Gas resistance",
   "nodeId": "ns=1;s=gasresistance",
   "dataType": "UInt32",
   "value": {
     "get": function () {
       return new Variant({
         "dataType": DataType.UInt32,
         "value": flexServerInternals.sandboxFlowContext.get("gas_resistance")
       });
     },
     "set": function (variant) {
       flexServerInternals.sandboxFlowContext.set(
         "gas_resistance", parseFloat(variant.value)
       );
       return opcua.StatusCodes.Good;
     }
   }
 });

 const iaq = namespace.addVariable({
   "organizedBy": payload,
   "browseName": "Indoor Air Quality",
   "nodeId": "ns=1;s=iaq",
   "dataType": "UInt16",
   "value": {
     "get": function () {
       return new Variant({
         "dataType": DataType.UInt16,
         "value": flexServerInternals.sandboxFlowContext.get("iaq")
       });
     },
     "set": function (variant) {
       flexServerInternals.sandboxFlowContext.set(
         "iaq", parseFloat(variant.value)
       );
       return opcua.StatusCodes.Good;
     }
   }
 });

 //------------------------------------------------------------------------------
 // Add a view
 //------------------------------------------------------------------------------

 const viewVar = namespace.addView({
   "organizedBy": rootFolder.views,
   "browseName": "ncd-sensors"
 });

 viewVar.addReference({
   "referenceType": "Organizes",
   "nodeId": mac.nodeId
 });

 viewVar.addReference({
   "referenceType": "Organizes",
   "nodeId": battery_percent.nodeId
 });

 viewVar.addReference({
   "referenceType": "Organizes",
   "nodeId": temperature.nodeId
 });

 viewVar.addReference({
   "referenceType": "Organizes",
   "nodeId": humidity.nodeId
 });

 viewVar.addReference({
   "referenceType": "Organizes",
   "nodeId": pressure.nodeId
 });

 viewVar.addReference({
   "referenceType": "Organizes",
   "nodeId": gas_resistance.nodeId
 });

 viewVar.addReference({
   "referenceType": "Organizes",
   "nodeId": iaq.nodeId
 });

 coreServer.debugLog("create dynamic address space done");
 node.warn("construction of new address space for OPC UA done");
    
 done();
}


Understanding part of the code

We are going to explain some important parts of the code, so that you understand the basics and can build your OPC-UA Server suitable for your ncd-sensor.

The data type Variant belongs to the built-in datatypes of OPC-UA and is used as a container type. A variant can hold any other datatype as a scalar (except variant) or as an array

OPC-UA servers store data retrieved from sensors, actuators and other data sources, in Variable Nodes. The Value of each Variable Node is stored and retrieved as a specific Server Data Type, and may be a single value, or an array of values of that data type.

				
					 const Variant = opcua.Variant;
 const DataType = opcua.DataType;


Create flow context variables

Inside the node we must create and initialize (in a default value) our flow context variables, this allows that when starting the OPC-UA server has defined the values of the variables even if no data has been received from the ncd sensor (inside the node you create the flow context variables, and inside the function or change nodes you only reassign the value to the variables).

				
					 this.sandboxFlowContext.set("mac", "00:00:00:00:00:00:00:00")
 this.sandboxFlowContext.set("battery_percent", "0.0")
 this.sandboxFlowContext.set("temperature", 0);
 this.sandboxFlowContext.set("pressure", 0);
 this.sandboxFlowContext.set("humidity", 0);
 this.sandboxFlowContext.set("gas_resistance", 0);
 this.sandboxFlowContext.set("iaq", 0);


Custom Folder Structure

Then we create our Custom Folder Structure that we can use as a base for other ncd sensors:

				
					const myDevice = namespace.addFolder(rootFolder.objects, {
   "browseName": "ncd"
 });
 const sensorFolder = namespace.addFolder(myDevice, {
   "browseName": "Sensors"
 });
  const typeFolder = namespace.addFolder(sensorFolder, {
   "browseName": "Environmental"
 });
 const payload = namespace.addFolder(typeFolder, {
   "browseName": "Payload"
 });


Define OPC-UA Nodes

The next step is to construct the nodes for each flow context variable, we will take the example of the temperature variable, but the structure is the same for any variable, you only have to adjust the appropriate parameters for each OPC-UA node.

To define your own UPC-UA nodes, you must focus on:

  • The variable identifier (red flag) by adjusting it to the one that corresponds to you, for example if the variable name is Humidity, then you create a copy of this code segment and change the variable identifier.
  • The data type of the variable (blue flag), for example if the data type of the variable is String, UInt16, Int32, Double, Boolean or other, then in your copy of this code segment change the data type of the variable, adjusting it to the corresponding one.
  • The variant.value (green flag), when your variable is of String or Boolean type as is the case of the “mac and “battery_percent“, the “parseFloat()” method is not applied, and we only have: 

Note: When the data type of your variable is not Boolean or String, i.e.; Float, Double, Int16, UInt32, etc. Then you need to use “parseFloat()”.

Set View on the Server

First define a Browser View on the server (blue box), then add a reference to the view for each of the variables of interest (gray box) the structure is the same for each element (on the right we have a preview from an OPC-UA client to observe the structure being built):

Save Changes

Finally to save the changes inside the node press the “Done” button:

The final flow can be as follows:

With Change node

With Function node

Deploy

Now the next step is to Deploy to save and apply the changes made in our workspace, and our OPC-UA server is initialized:

Running

Within the “Compact-Server” node we have “Node status” where the node shares status information with the UI editor. You can see in amber color that the server is starting up.

Within the node we have configured notification messages that appear within the debug window to indicate when the server is being configured.

If the configuration is correct you will see the status of the node in “active“, indicating that the OPC-UA server is running.

Once the server is mounted, we will be able to verify the state of the flow context variables, to verify that they have been initialized inside the node “Compact-Server” with initial values, for it again we go to the context tab of the sidebar, and refreshes the values of the flow context, you should observe the following thing:

(Optional) We can connect a debug node to the output of our Wireless Device node, to know when our sensor sends data to your Enterprise IIoT Gateway.

As soon as a message is received we will be able to observe the following in the debug window:

Now, once you confirm that the sensor data has been received, go back to the context tab and update the values of the flow context variables to verify if they have been updated with the values coming from the ncd sensor:

Verifying using OPC-UA Client

To verify the operation of our OPC-UA server you could use an OPC-UA client, to connect to our OPC-UA Server in Node-RED, we use the endpoint url in our case is:

Endpoint Url: opc.tcp://localhost:54845

OPC-UA Client 1

Before connecting to the server the client will ask for security settings. Remember that we configured anonymous access, so the default security mode “None” is the correct option.

Note: it is important to configure the security settings on the OPC-UA server for production use.

When the connection to the server is established, the main window shows the parameters configured from Node-RED.

OPC-UA Client 2

We use a second client to verify the connection, the result is as follows:

Node-RED Flow

You can copy and import the following flow containing this base example and modify it for use with your ncd sensor(s), in your own application, remember to pay attention to OPC-UA security before exposing your data.

				
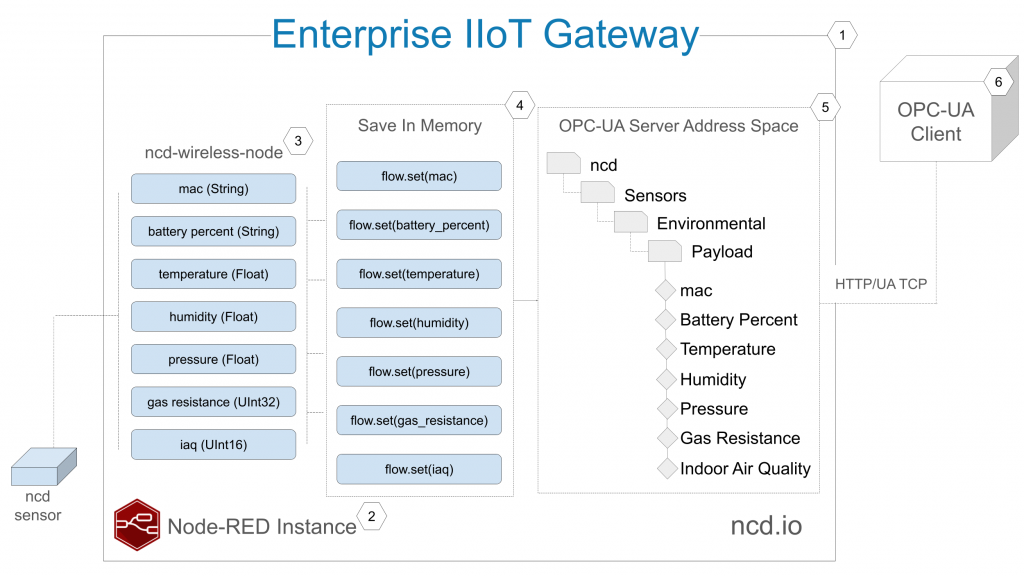
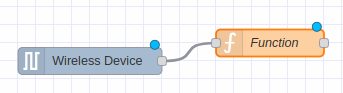
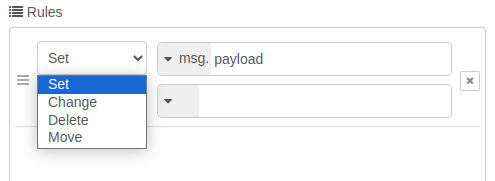
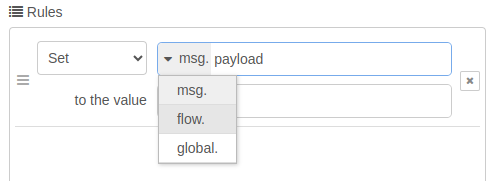
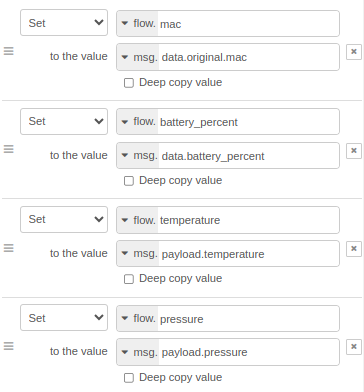
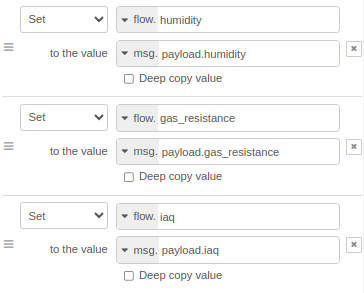
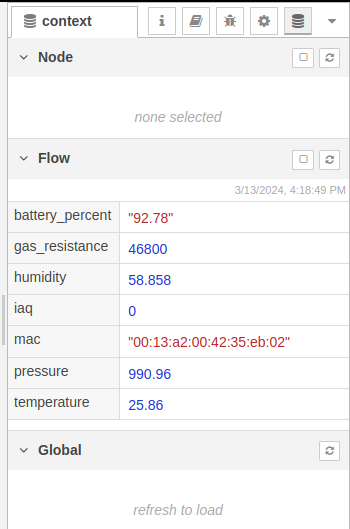
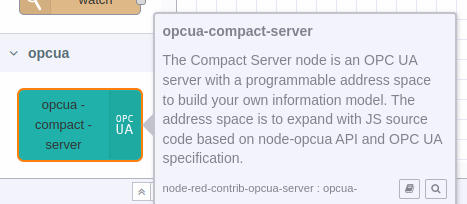
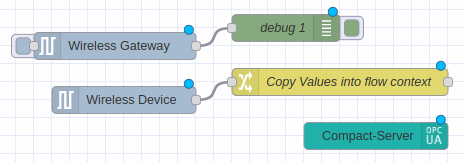
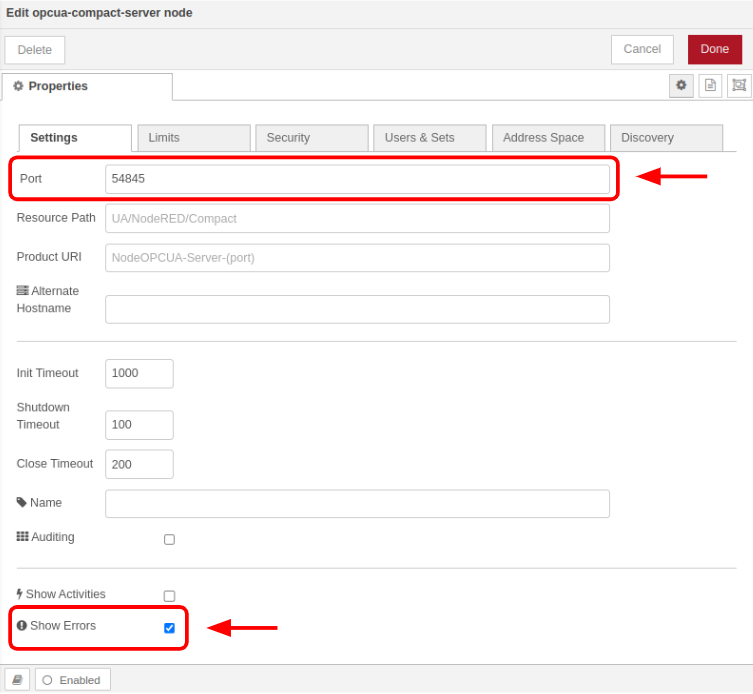
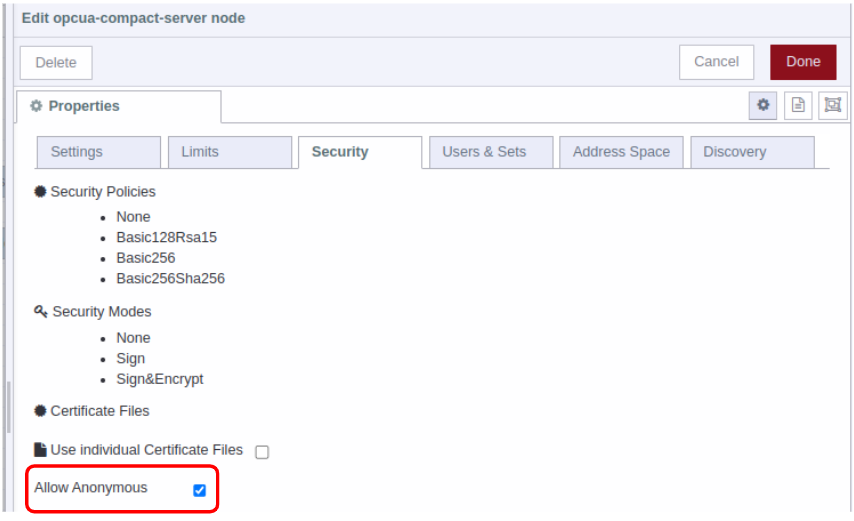
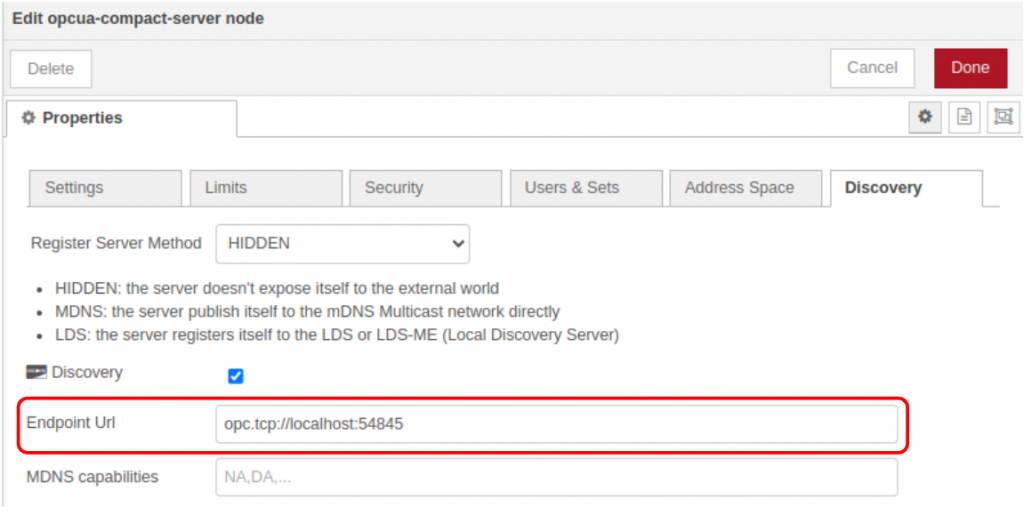
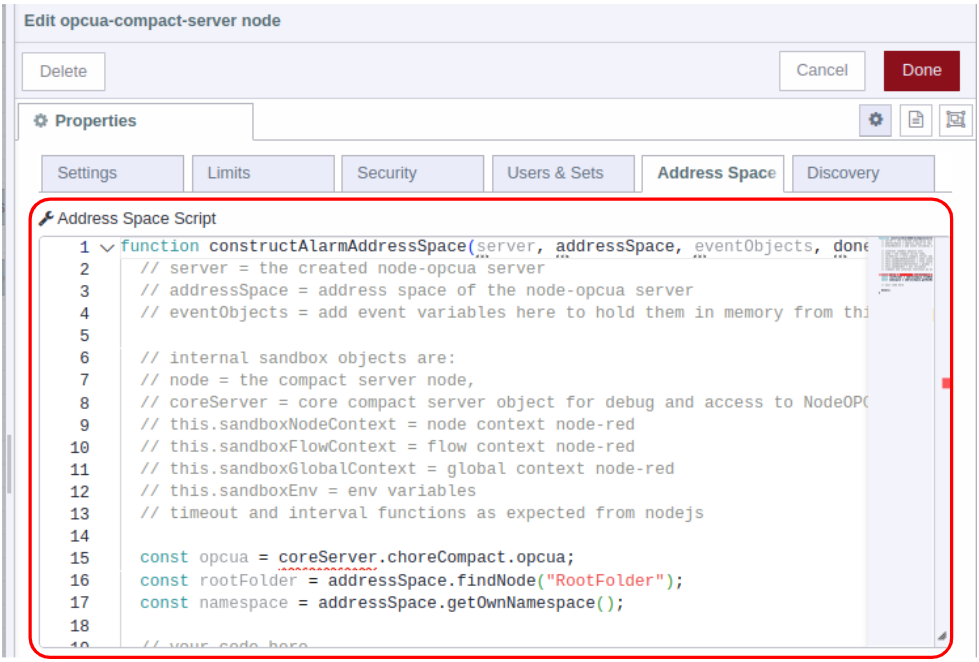
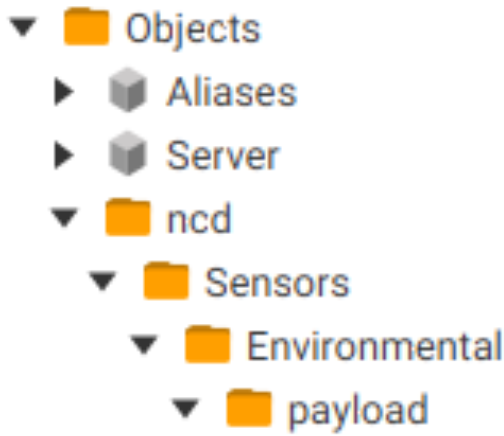
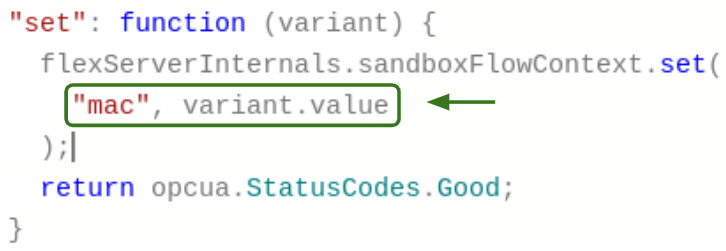
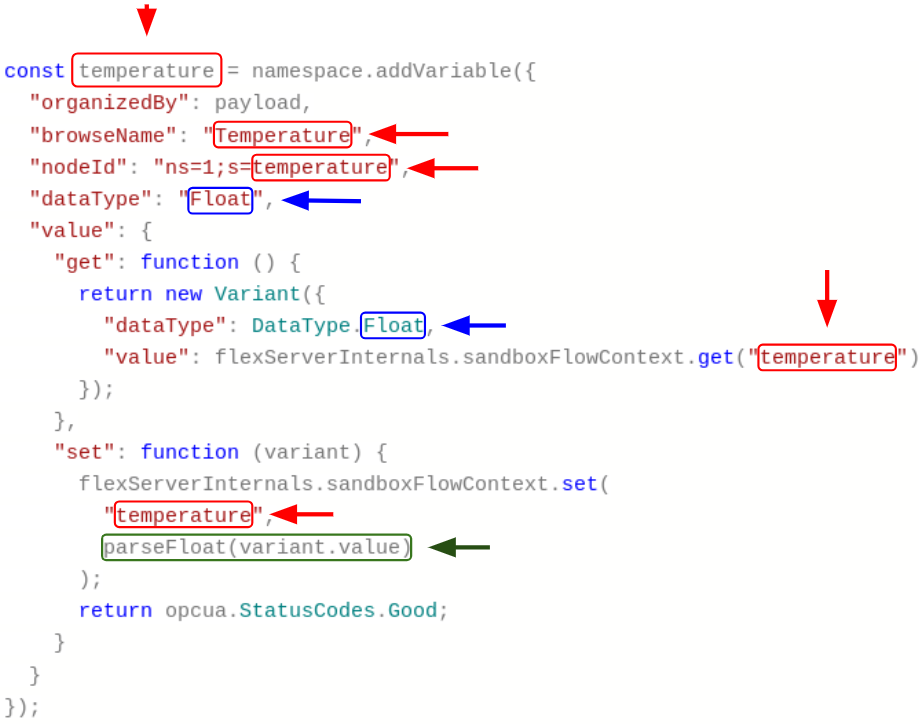
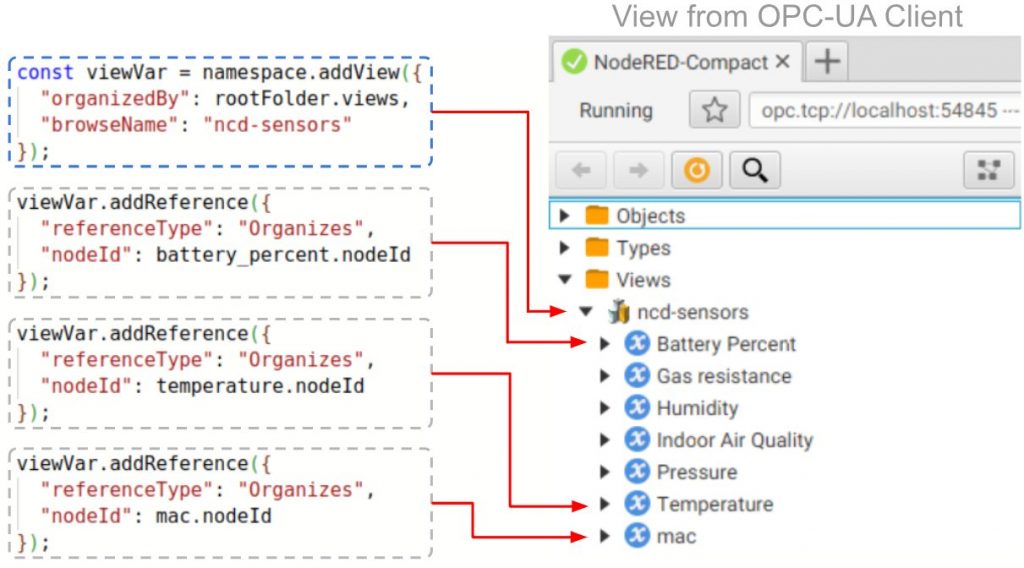
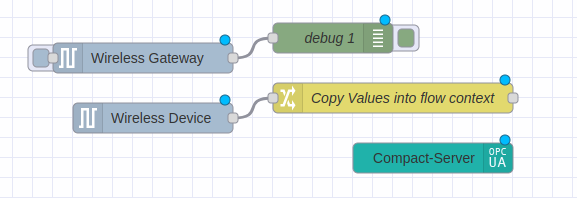
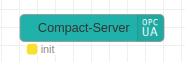
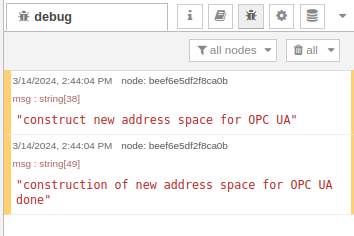
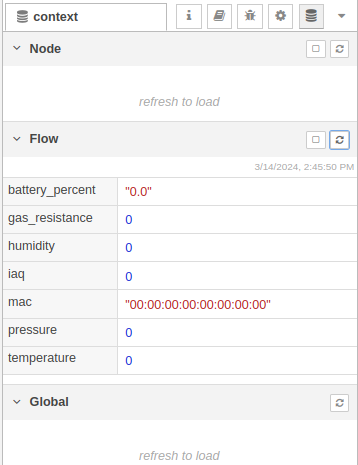
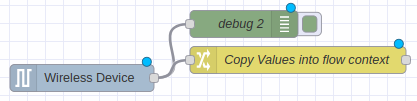
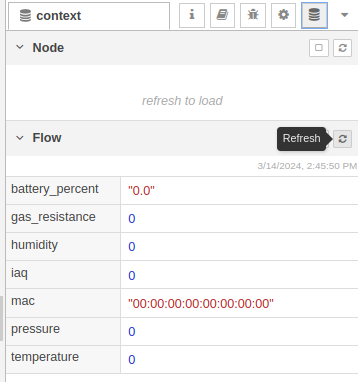
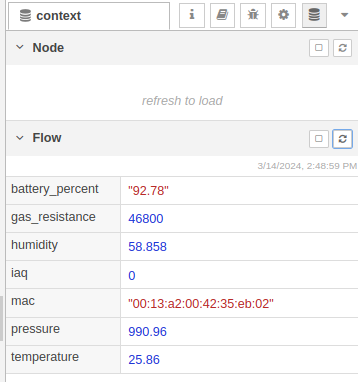
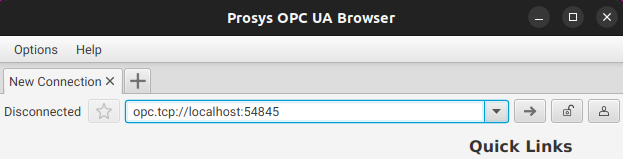
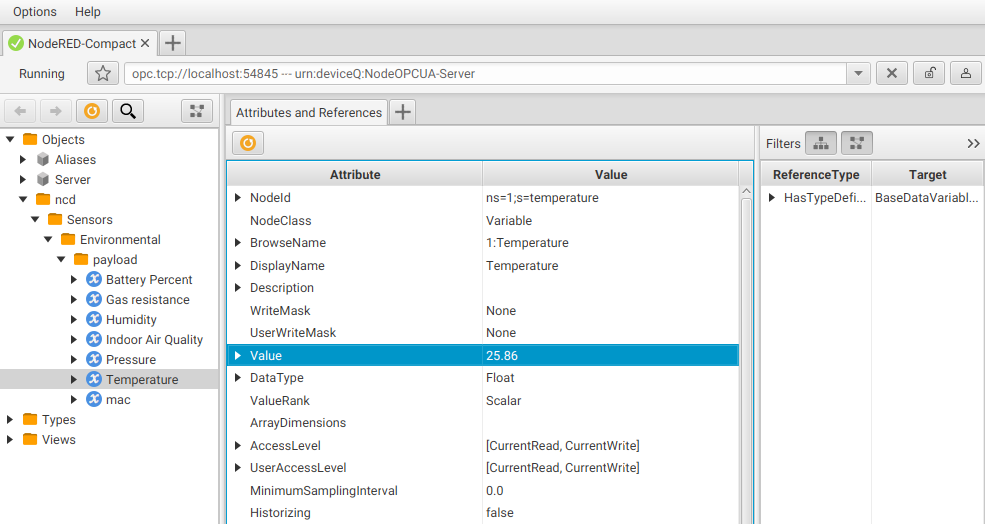
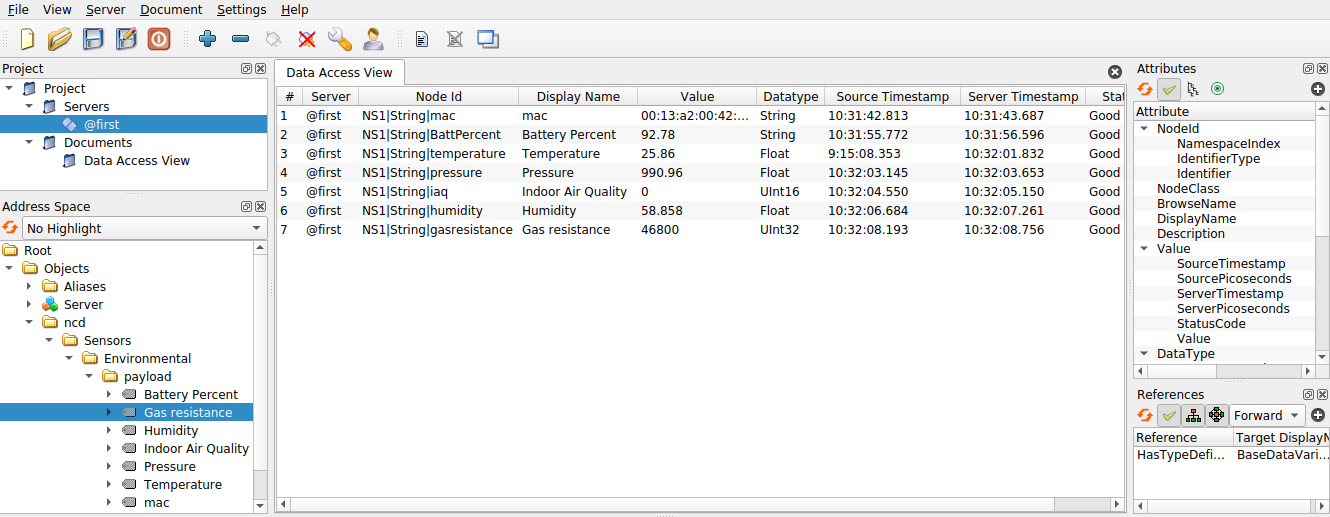
					[{"id":"aede333dd521ede1","type":"function","z":"2e8c7f5c.ab73d","d":true,"name":"Copy Values into Node-RED context memory","func":"flow.set(\"mac\", msg.data.original.mac);\nflow.set(\"battery_percent\", msg.data.battery_percent);\nflow.set(\"temperature\", msg.payload.temperature);\nflow.set(\"pressure\", msg.payload.pressure);\nflow.set(\"humidity\", msg.payload.humidity);\nflow.set(\"gas_resistance\", msg.payload.gas_resistance);\nflow.set(\"iaq\", msg.payload.iaq);\nreturn msg;","outputs":0,"timeout":0,"noerr":0,"initialize":"","finalize":"","libs":[],"x":690,"y":300,"wires":[]},{"id":"756e1710f5a38437","type":"opcua-compact-server","z":"2e8c7f5c.ab73d","port":"54845","endpoint":"","productUri":"","acceptExternalCommands":true,"maxAllowedSessionNumber":10,"maxConnectionsPerEndpoint":10,"maxAllowedSubscriptionNumber":100,"alternateHostname":"","name":"","showStatusActivities":false,"showErrors":true,"allowAnonymous":true,"individualCerts":false,"isAuditing":false,"serverDiscovery":true,"users":[],"xmlsetsOPCUA":[],"publicCertificateFile":"","privateCertificateFile":"","registerServerMethod":1,"discoveryServerEndpointUrl":"opc.tcp://localhost:54845","capabilitiesForMDNS":"","maxNodesPerRead":1000,"maxNodesPerWrite":1000,"maxNodesPerHistoryReadData":100,"maxNodesPerBrowse":3000,"maxBrowseContinuationPoints":10,"maxHistoryContinuationPoints":10,"delayToInit":1000,"delayToClose":200,"serverShutdownTimeout":100,"addressSpaceScript":"function constructAlarmAddressSpace(server, addressSpace, eventObjects, done) {\n  // server = the created node-opcua server\n  // addressSpace = address space of the node-opcua server\n  // eventObjects = add event variables here to hold them in memory from this script\n\n  // internal sandbox objects are:\n  // node = the compact server node,\n  // coreServer = core compact server object for debug and access to NodeOPCUA\n  // this.sandboxNodeContext = node context node-red\n  // this.sandboxFlowContext = flow context node-red\n  // this.sandboxGlobalContext = global context node-red\n  // this.sandboxEnv = env variables\n  // timeout and interval functions as expected from nodejs\n\n  const opcua = coreServer.choreCompact.opcua;\n  const rootFolder = addressSpace.findNode(\"RootFolder\");\n  const namespace = addressSpace.getOwnNamespace();\n\n  // your code here\n  const Variant = opcua.Variant;\n  const DataType = opcua.DataType;\n\n  var flexServerInternals = this;\n\n  this.sandboxFlowContext.set(\"mac\", \"00:00:00:00:00:00:00:00\")\n  this.sandboxFlowContext.set(\"battery_percent\", \"0.0\")\n  this.sandboxFlowContext.set(\"temperature\", 0);\n  this.sandboxFlowContext.set(\"pressure\", 0);\n  this.sandboxFlowContext.set(\"humidity\", 0);\n  this.sandboxFlowContext.set(\"gas_resistance\", 0);\n  this.sandboxFlowContext.set(\"iaq\", 0);\n\n  coreServer.debugLog(\"init dynamic address space\");\n  node.warn(\"construct new address space for OPC UA\");\n\n  const myDevice = namespace.addFolder(rootFolder.objects, {\n    \"browseName\": \"ncd\"\n  });\n  const sensorFolder = namespace.addFolder(myDevice, {\n    \"browseName\": \"Sensors\"\n  });\n  const typeFolder = namespace.addFolder(sensorFolder, {\n    \"browseName\": \"Environmental\"\n  });\n  const payload = namespace.addFolder(typeFolder, {\n    \"browseName\": \"Payload\"\n  });\n\n  const mac = namespace.addVariable({\n    \"organizedBy\": payload,\n    \"browseName\": \"mac\",\n    \"nodeId\": \"ns=1;s=mac\",\n    \"dataType\": \"String\",\n    \"value\": {\n      \"get\": function () {\n        return new Variant({\n          \"dataType\": DataType.String,\n          \"value\": flexServerInternals.sandboxFlowContext.get(\"mac\")\n        });\n      },\n      \"set\": function (variant) {\n        flexServerInternals.sandboxFlowContext.set(\n          \"mac\", variant.value\n        );\n        return opcua.StatusCodes.Good;\n      }\n    }\n  });\n\n  const battery_percent = namespace.addVariable({\n    \"organizedBy\": payload,\n    \"browseName\": \"Battery Percent\",\n    \"nodeId\": \"ns=1;s=BattPercent\",\n    \"dataType\": \"String\",\n    \"value\": {\n      \"get\": function () {\n        return new Variant({\n          \"dataType\": DataType.String,\n          \"value\": flexServerInternals.sandboxFlowContext.get(\"battery_percent\")\n        });\n      },\n      \"set\": function (variant) {\n        flexServerInternals.sandboxFlowContext.set(\n          \"battery_percent\", variant.value\n        );\n        return opcua.StatusCodes.Good;\n      }\n    }\n  });\n\n  const temperature = namespace.addVariable({\n    \"organizedBy\": payload,\n    \"browseName\": \"Temperature\",\n    \"nodeId\": \"ns=1;s=temperature\",\n    \"dataType\": \"Float\",\n    \"value\": {\n      \"get\": function () {\n        return new Variant({\n          \"dataType\": DataType.Float,\n          \"value\": flexServerInternals.sandboxFlowContext.get(\"temperature\")\n        });\n      },\n      \"set\": function (variant) {\n        flexServerInternals.sandboxFlowContext.set(\n          \"temperature\",\n          parseFloat(variant.value)\n        );\n        return opcua.StatusCodes.Good;\n      }\n    }\n  });\n\n  const humidity = namespace.addVariable({\n    \"organizedBy\": payload,\n    \"browseName\": \"Humidity\",\n    \"nodeId\": \"ns=1;s=humidity\",\n    \"dataType\": \"Float\",\n    \"value\": {\n      \"get\": function () {\n        return new Variant({\n          \"dataType\": DataType.Float,\n          \"value\": flexServerInternals.sandboxFlowContext.get(\"humidity\")\n        });\n      },\n      \"set\": function (variant) {\n        flexServerInternals.sandboxFlowContext.set(\n          \"humidity\",\n          parseFloat(variant.value)\n        );\n        return opcua.StatusCodes.Good;\n      }\n    }\n  });\n\n  const pressure = namespace.addVariable({\n    \"organizedBy\": payload,\n    \"browseName\": \"Pressure\",\n    \"nodeId\": \"ns=1;s=pressure\",\n    \"dataType\": \"Float\",\n    \"value\": {\n      \"get\": function () {\n        return new Variant({\n          \"dataType\": DataType.Float,\n          \"value\": flexServerInternals.sandboxFlowContext.get(\"pressure\")\n        });\n      },\n      \"set\": function (variant) {\n        flexServerInternals.sandboxFlowContext.set(\n          \"pressure\",\n          parseFloat(variant.value)\n        );\n        return opcua.StatusCodes.Good;\n      }\n    }\n  });\n\n  const gas_resistance = namespace.addVariable({\n    \"organizedBy\": payload,\n    \"browseName\": \"Gas resistance\",\n    \"nodeId\": \"ns=1;s=gasresistance\",\n    \"dataType\": \"UInt32\",\n    \"value\": {\n      \"get\": function () {\n        return new Variant({\n          \"dataType\": DataType.UInt32,\n          \"value\": flexServerInternals.sandboxFlowContext.get(\"gas_resistance\")\n        });\n      },\n      \"set\": function (variant) {\n        flexServerInternals.sandboxFlowContext.set(\n          \"gas_resistance\", parseFloat(variant.value)\n        );\n        return opcua.StatusCodes.Good;\n      }\n    }\n  });\n\n  const iaq = namespace.addVariable({\n    \"organizedBy\": payload,\n    \"browseName\": \"Indoor Air Quality\",\n    \"nodeId\": \"ns=1;s=iaq\",\n    \"dataType\": \"UInt16\",\n    \"value\": {\n      \"get\": function () {\n        return new Variant({\n          \"dataType\": DataType.UInt16,\n          \"value\": flexServerInternals.sandboxFlowContext.get(\"iaq\")\n        });\n      },\n      \"set\": function (variant) {\n        flexServerInternals.sandboxFlowContext.set(\n          \"iaq\", parseFloat(variant.value)\n        );\n        return opcua.StatusCodes.Good;\n      }\n    }\n  });\n\n  //------------------------------------------------------------------------------\n  // Add a view\n  //------------------------------------------------------------------------------\n\n  const viewVar = namespace.addView({\n    \"organizedBy\": rootFolder.views,\n    \"browseName\": \"ncd-sensors\"\n  });\n\n  viewVar.addReference({\n    \"referenceType\": \"Organizes\",\n    \"nodeId\": battery_percent.nodeId\n  });\n\n  viewVar.addReference({\n    \"referenceType\": \"Organizes\",\n    \"nodeId\": temperature.nodeId\n  });\n\n  viewVar.addReference({\n    \"referenceType\": \"Organizes\",\n    \"nodeId\": mac.nodeId\n  });\n\n  viewVar.addReference({\n    \"referenceType\": \"Organizes\",\n    \"nodeId\": humidity.nodeId\n  });\n\n  viewVar.addReference({\n    \"referenceType\": \"Organizes\",\n    \"nodeId\": pressure.nodeId\n  });\n\n  viewVar.addReference({\n    \"referenceType\": \"Organizes\",\n    \"nodeId\": gas_resistance.nodeId\n  });\n\n  viewVar.addReference({\n    \"referenceType\": \"Organizes\",\n    \"nodeId\": iaq.nodeId\n  });\n\n  coreServer.debugLog(\"create dynamic address space done\");\n  node.warn(\"construction of new address space for OPC UA done\");\n      \n  done();\n}\n","x":600,"y":380,"wires":[]},{"id":"18d3ef3b0f2d230b","type":"change","z":"2e8c7f5c.ab73d","name":"Copy Values into Node-RED context memory","rules":[{"t":"set","p":"mac","pt":"flow","to":"data.original.mac","tot":"msg"},{"t":"set","p":"battery_percent","pt":"flow","to":"data.battery_percent","tot":"msg"},{"t":"set","p":"temperature","pt":"flow","to":"payload.temperature","tot":"msg"},{"t":"set","p":"pressure","pt":"flow","to":"payload.pressure","tot":"msg"},{"t":"set","p":"humidity","pt":"flow","to":"payload.humidity","tot":"msg"},{"t":"set","p":"gas_resistance","pt":"flow","to":"payload.gas_resistance","tot":"msg"},{"t":"set","p":"iaq","pt":"flow","to":"payload.iaq","tot":"msg"}],"action":"","property":"","from":"","to":"","reg":false,"x":690,"y":340,"wires":[[]]}]


Summary

In this article, we show step by step how to build an OPC-UA server with Node-RED in an Enterprise IIoT Gateway for proof of concept based on the opcua-server node, we contemplate the requirements, basic configuration, selection of the data to be exposed, analyzing two approaches (function and change nodes). Using as an example the environmental temperature humidity pressure air quality sensor.

The configuration is mainly based on JavaScript code, but one of the advantages of this node is that it uses less dependencies package than other libraries. We tried to provide a basic code explaining the elements in an intuitive way (although in the end it is still code). We emphasized the importance of configuring a secure OPC-UA server before exposing data through this framework. We also used two free OPC-UA clients to verify the structure and basic operation of the server in a local network.

This article is based on an opc-ua node, but within the Node-RED community you can find other libraries, try them and use the one that best suits your application.

Thanks. Eduardo M.

Share this on:
Facebook
Twitter
LinkedIn
Pinterest
Reddit
WhatsApp
Email
You might also like...