In this tutorial, we will guide you through the process of setting up the NCD Industrial IoT Wireless Vibration and Temperature Sensor with the Enterprise IIoT Gateway. This includes creating a device, configuring parameters, transmitting sensor data to ThingsBoard via the MQTT protocol, and designing a real-time dashboard for sensor data monitoring and analysis.
Click to Expand
ThingsBoard
ThingsBoard is an IoT platform for data collection, processing, visualization, and device management. The platform enables device connectivity via industry-standard IoT protocols or stream data from devices connected to existing IoT Platforms.
The platform supports both cloud and on-premises deployments, combining scalability, fault tolerance, and performance so that the users’ data remains safe. It supports various device connectivity options like NB-IoT, LoRaWAN, MQTT, CoAP, OPC-UA, and HTTP, making it ideal for integrating sensors and Gateways. With ThingsBoard, users can quickly onboard IoT devices, visualize data on customizable dashboards, and automate data processing with a rule engine. It enables real-time monitoring of IoT sensor metrics.
Industrial IoT Wireless Vibration Temperature Sensor
This IIoT sensor is designed to monitor vibration, frequency, and temperature in industrial environments. It provides valuable data that can be used for predictive maintenance, equipment monitoring, and overall operational efficiency.
Some Vibration Plus Applications:
Advanced Predictive Maintenance for Rotating Equipment
Comprehensive Structural Health Monitoring
Process Automation and Quality Control in Manufacturing
Optimization of Energy Efficiency in Industrial Systems
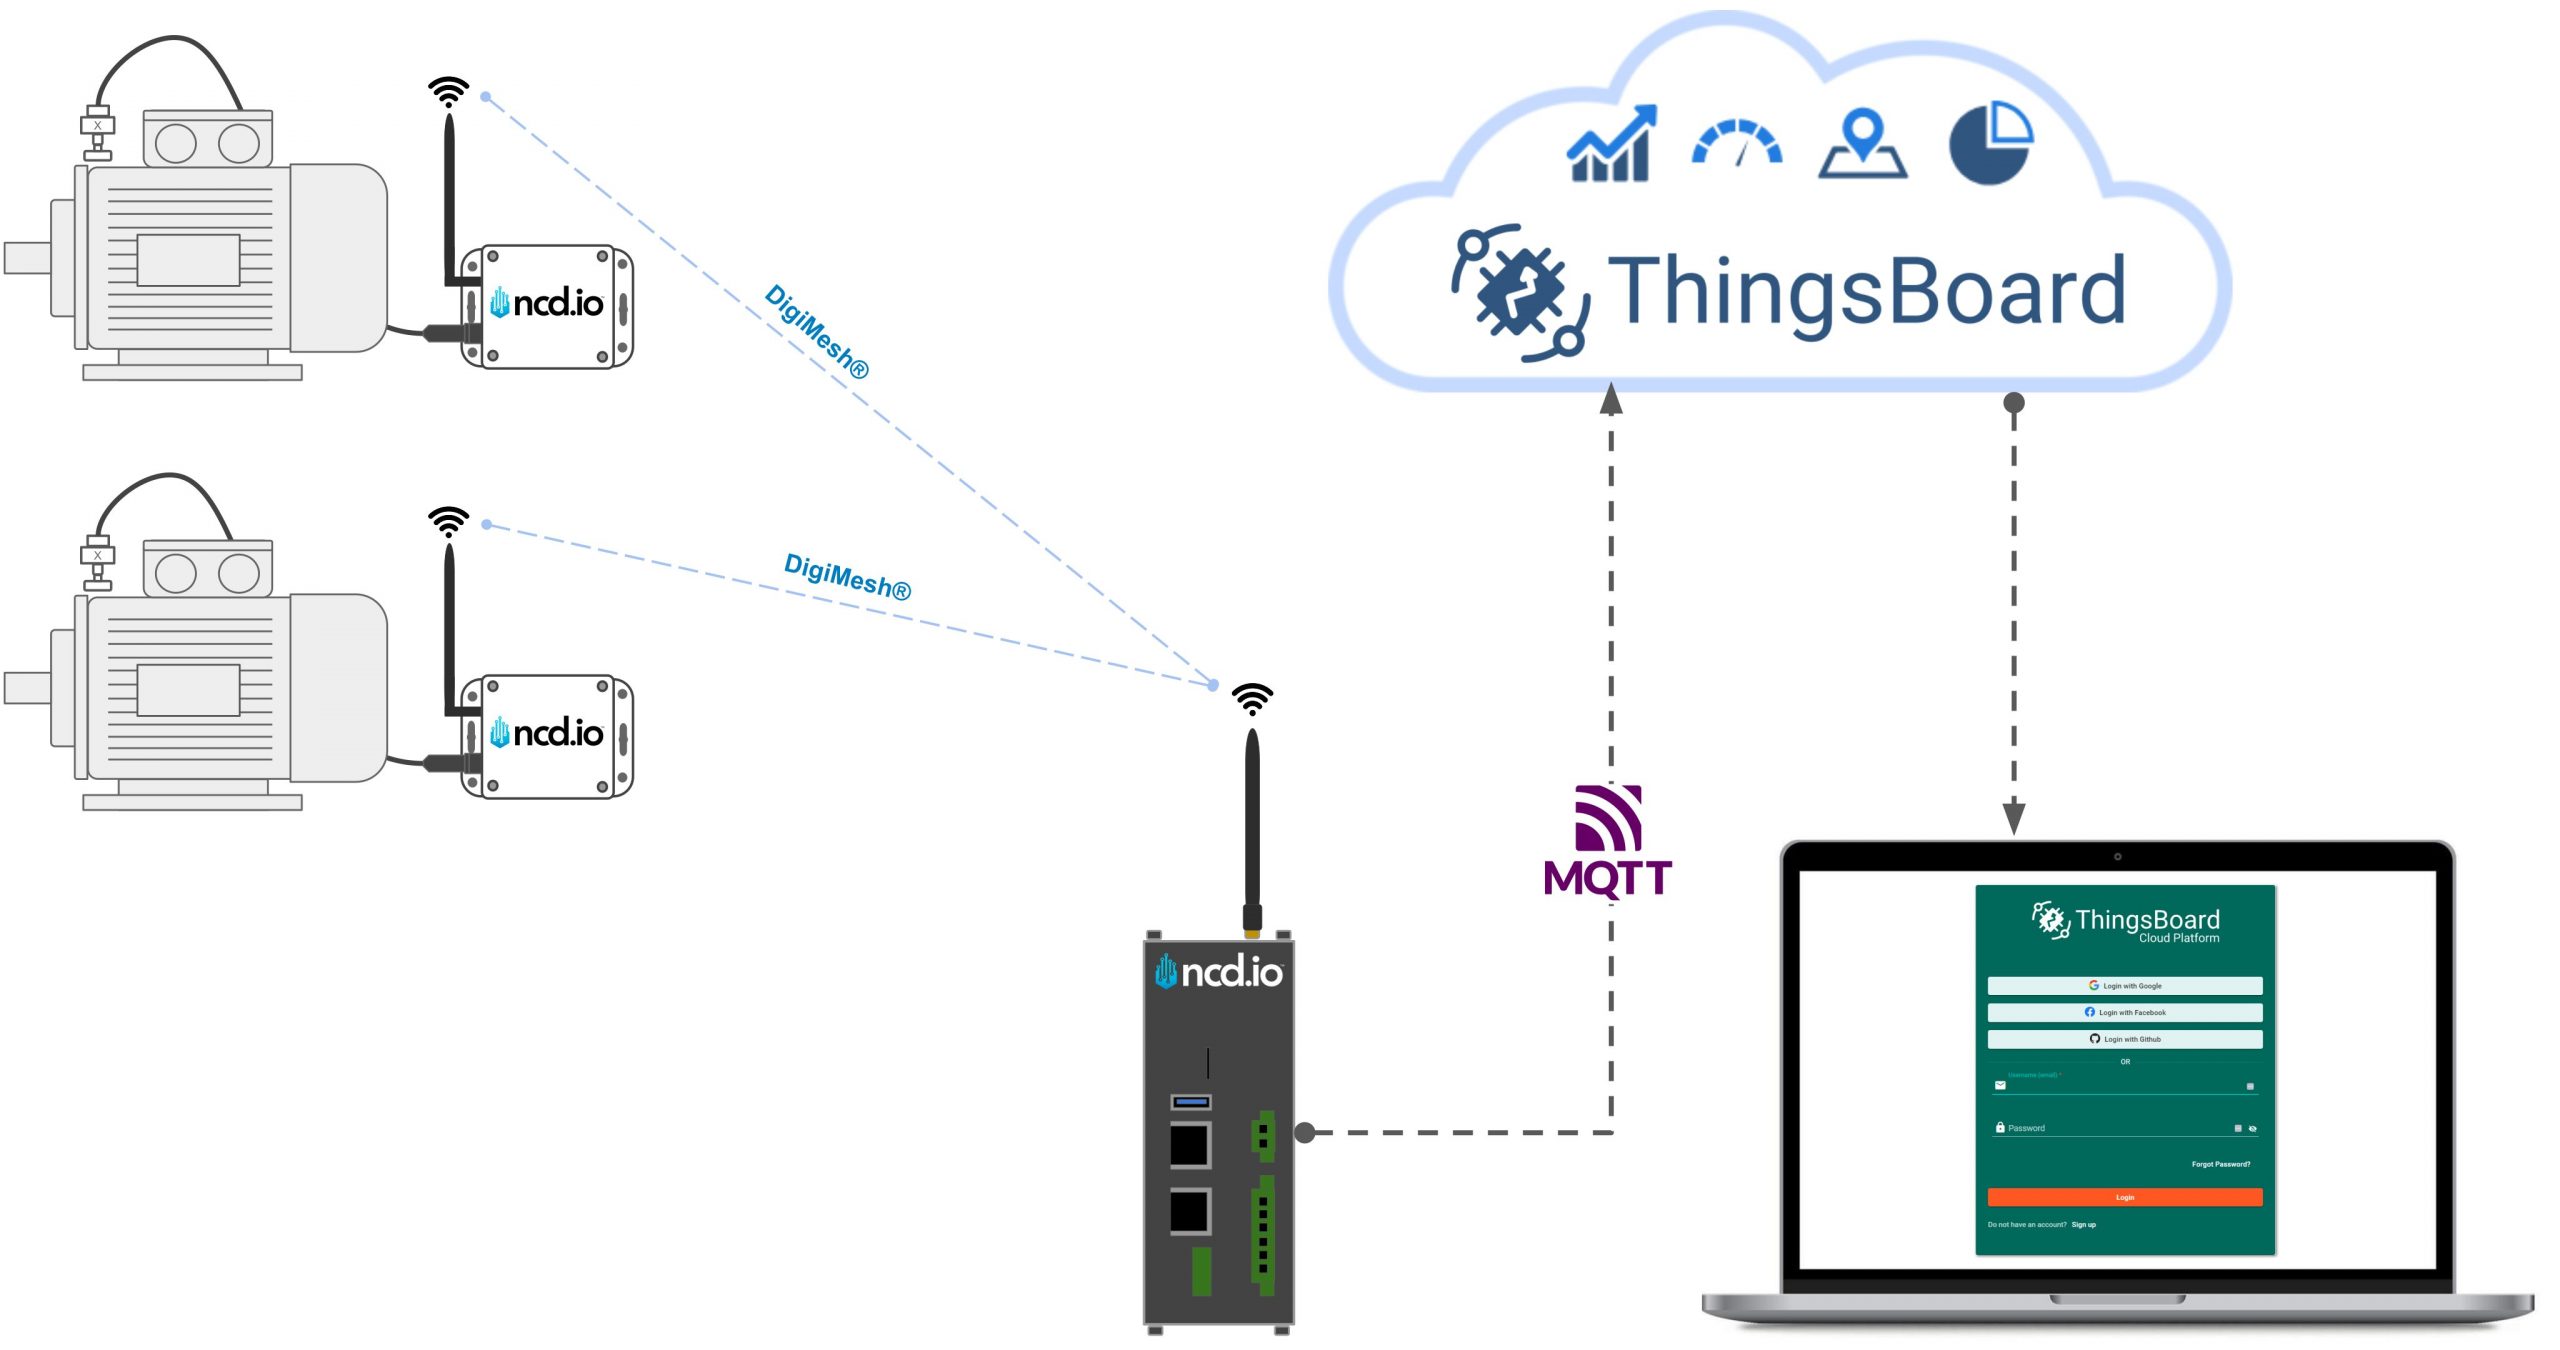
The Enterprise IIoT Gateway gets, processes, decodes, and transmits data from the NCD Industrial IoT sensor to various cloud services or Industrial protocols. You can think of it as a Wi-Fi router, but it uses a specialized wireless protocol called DigiMesh®. Both the NCD sensor and the Enterprise IIoT Gateway communicate using this protocol, which is specifically designed and tested for industrial applications.
The Industrial IoT Wireless Vibration and Temperature Sensor captures critical field parameters, including temperature and vibration data. Utilizing the robust DigiMesh® industrial protocol, the sensor transmits this data to the Enterprise IIoT Gateway. The gateway, equipped with the NCD Node-RED library, receives, decodes, and filters the data for further processing. Once prepared, the data is transmitted to the ThingsBoard platform via the MQTT protocol. Within ThingsBoard, the data can be queried, analyzed, and visualized in real-time through custom dashboards, providing actionable insights for monitoring and decision-making.
Requirements
To transmit data from NCD Industrial IoT sensors to ThingsBoard, certain prerequisites must be met.
NoteWhile the ThingsBoard Cloud is used in this example, ThingsBoard on-premise deployment can also be used.
NoteThis tutorial can be replicated with any other NCD Industrial Sensor.
With these components, you can connect the NCD sensor to the Enterprise IIoT Gateway and leverage the built-in Node-RED instance to forward sensor data to ThingsBoard using the MQTT protocol.
This tutorial provides a comprehensive walkthrough of the essential configuration steps, including connecting NCD devices, registering them on the platform, setting up a ThingsBoard Cloud account, adding and linking a new gateway, and creating a dashboard to visualize real-time sensor data effectively.
Configuring the NCD Devices
We’ll start by setting up the Enterprise IIoT Gateway and the Vibration Sensor, followed by connecting them. This process is straightforward, and we have a detailed guide available for reference. Below is a brief overview, but for complete instructions, please refer to the following NCD documentation:
Unbox your NCD Enterprise IIoT Gateway, connect it, and power it on following the provided instructions. Then, connect the ETH0 port to your DHCP-enabled router (the Gateway will act as a DHCP client). It will automatically obtain an IP address. After giving the device some time to boot, you should be able to access the Node-RED instance running on it by using its local IP address or domain name, appending port 1880 (the default Node-RED port).
We recommend using the local domain name format: ncd-xxxx.local:1880, where ‘xxxx’ refers to the last four digits of the Enterprise IIoT Gateway’s MAC address (printed on the side of the device). For example, http://ncd-c398.local:1880
Connect the Sensor to the Gateway
Upon accessing the Node-RED instance, you will notice a pre-configured flow that includes a Wireless Gateway node and a Debug node. These nodes form part of the default configuration, enabling the system to receive and display messages from connected devices.
Click to Expand
This flow is preconfigured and ready to receive data from NCD sensors. When an NCD sensor connects to the wireless network and transmits data, the ‘Wireless Gateway‘ node automatically receives and processes the message. The processed message is then passed through its output terminal and sent to the ‘Debug’ node. This node displays the message in the Debug window, located on the right side of the Node-RED editor.
At this stage, everything is ready, and you can proceed to power on your NCD Vibration Sensor. NCD Industrial Sensors come pre-equipped with batteries and also support an external power supply option, which can be selected during the purchase process.
In this tutorial, we will focus on an example using a battery-powered sensor; however, the steps are equally applicable to sensors powered by an external supply. To activate the sensor, open its casing and toggle the power switch to the “Power by Internal Battery” position.
The power switch on this device has three positions:
Battery Power
Off
External Power
Click to Expand
The Battery Power position will use the onboard batteries to power the sensor and transmit data.
The Off position will power down all components of the sensor and no data will be transmitted
The External Power position will use the external power supply connected to the onboard barrel connector to power the sensor and transmit data.
NCD Vibration Sensor messages
Once the sensor is powered on, it begins transmitting data, and you will start seeing incoming messages. The ‘Wireless Gateway‘ node decodes the sensor data and forwards it through its output terminal to the ‘Debug’ node. These messages are displayed in the debug window of the Node-RED editor. After activating the NCD Vibration Sensor, the Debug window should display messages similar to the following:
Click to Expand
NCD sensors transmit a variety of messages that provide insight into the sensor’s current mode and operational status, along with the actual sensor data. In this tutorial, we will focus specifically on the RUNsensor_mode and sensor_data message.
RUN sensor_mode message
A RUN message signifies that the sensor, identified by the msg.payload.mac property, is powered on and successfully communicating with the Enterprise IIoT Gateway via the wireless network. This message contains critical details, including the sensor’s MAC Address, sensor type, node ID, mode, and timestamp.
Click to Expand
sensor_data message
The sensor_data message includes critical information such as the firmware version, battery percentage, sensor type, data values, sensor name, MAC address, and other essential details.
The sensor_data message can be identified by the msg.topic property. When the sensor transmits a data message, the msg.topic is set to sensor_data which makes it easier to filter or manage the sensor data. To view the sensor data in the debug window, simply click on the message. You should see something like this:
Click to Expand
In this tutorial, our primary focus will be on transmitting RUN sensor mode and sensor data messages to effectively monitor the sensor’s real-time status. We will explore these topics in greater detail later in the tutorial. For now, let’s move on to ThingsBoard to configure all the necessary components.
Configuring ThingsBoard Cloud
You can find the documentation to help you get started with ThingsBoard Professional Edition, as well as the MQTT Gateway API Reference, available here:
Once you sign in, you will be presented with important resources to help you get started, along with solution templates. Take a moment to explore these to familiarize yourself with the ThingsBoard environment.
Click to Expand
If you click on the ‘Close’ button, the home view will update and display a screen similar to this:
Click to Expand
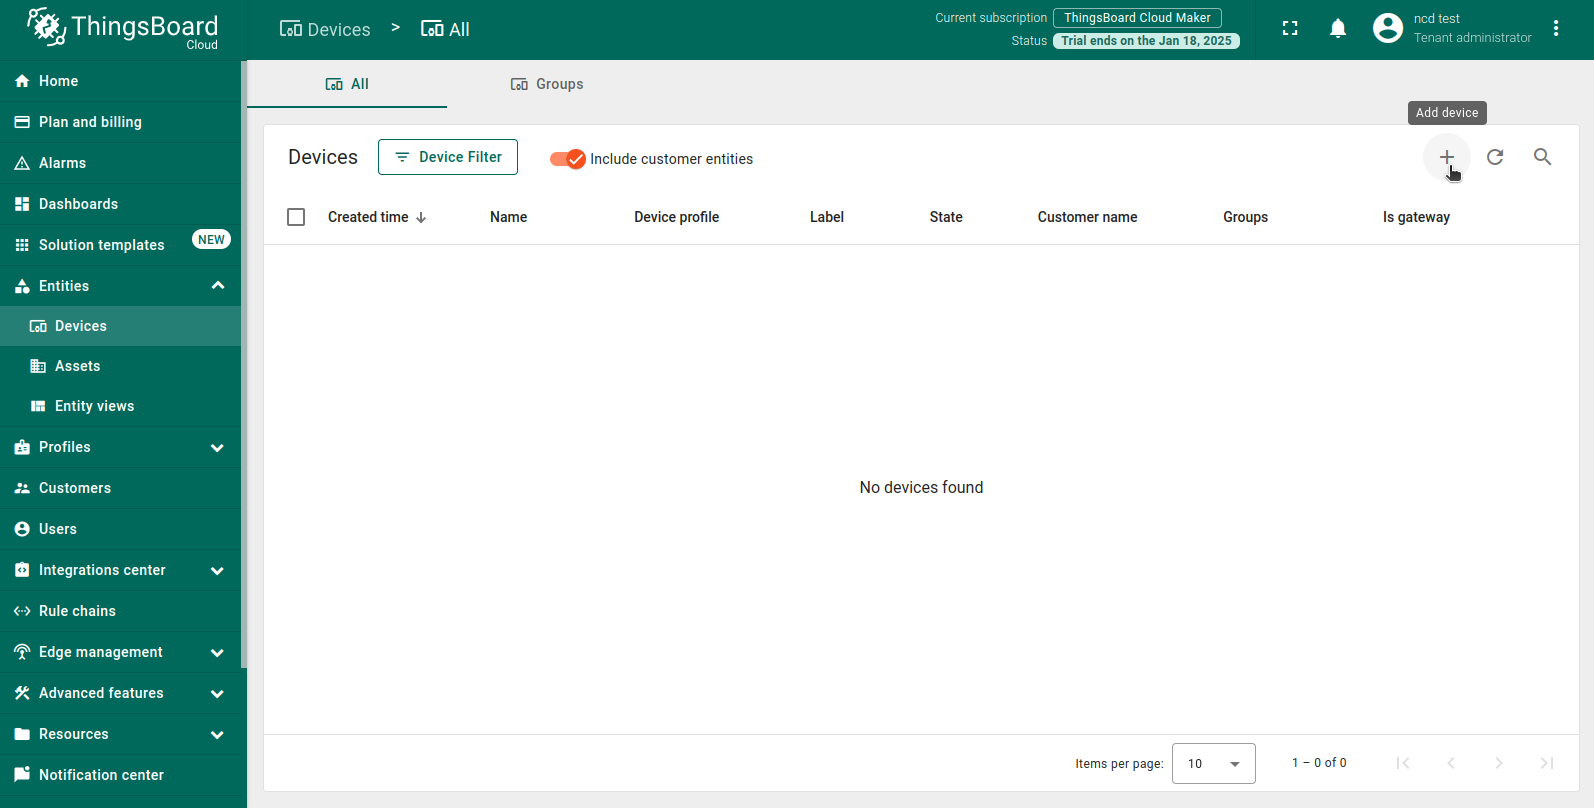
The first step is to add a new device to your ThingsBoard instance. To do this, navigate to ‘Entities’ and click on ‘Devices’.
click to Expand
You will see a list of all your devices in the following window. Since we don’t have any devices yet, we need to add one. By default, you’ll be in the ‘All’ device group. Click the ‘+‘ icon in the top-right corner of the table.
Click to Expand
Then, select ‘Add new device‘ from the drop-down menu.
Click to Expand
Once you do this, a new window will appear. You need to assign a name to your new device; in this case, we used ‘NCD Enterprise IIoT Gateway’. You can also assign a label, groups, description, and other options.
Click to Expand
You need to enable the ‘Is a Gateway‘ switch.
Click to Expand
Next, click on the ‘Next: Credentials‘ button.
Click to Expand
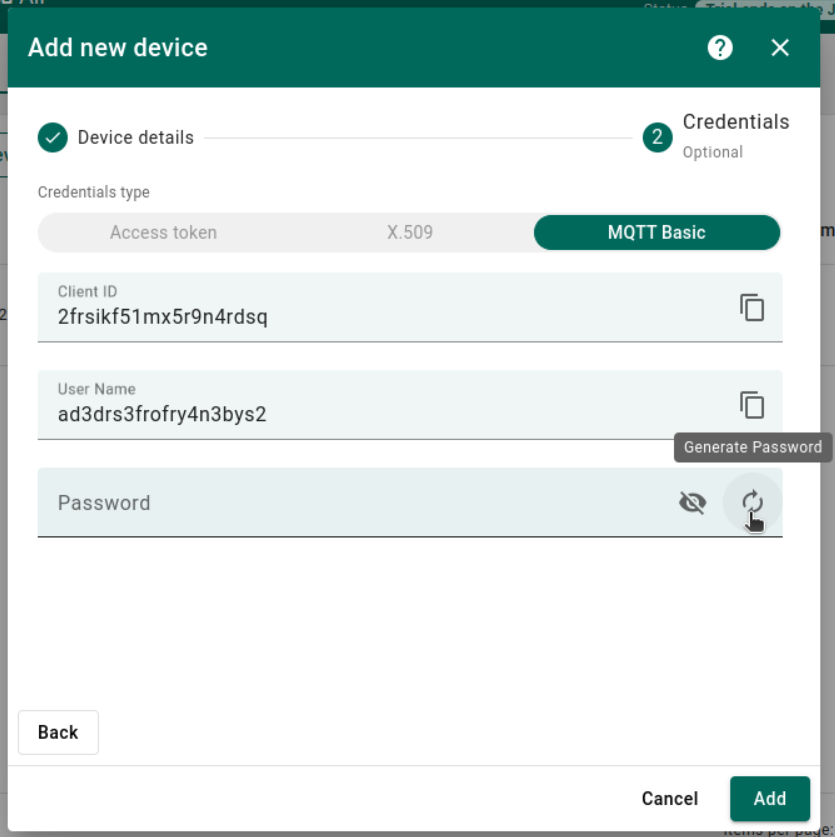
This will take you to the device credentials window. Select the ‘MQTT Basic‘ option (you can add additional MQTT security layers here if desired):
Click to Expand
Next, generate the Client ID, Username, and Password by clicking the ‘Generate’ button next to each option. These credentials are essential for configuring the Node-RED MQTT node to establish a connection with the Enterprise IIoT Gateway.
Click to Expand
Click to Expand
Once the credentials are generated, use the ‘Copy’ button to retrieve each value. We recommend saving these values in a temporary file, as we will use them in the Node-RED MQTT node later in this tutorial. Next, click the ‘Add’ button.
Click to Expand
Click to Expand
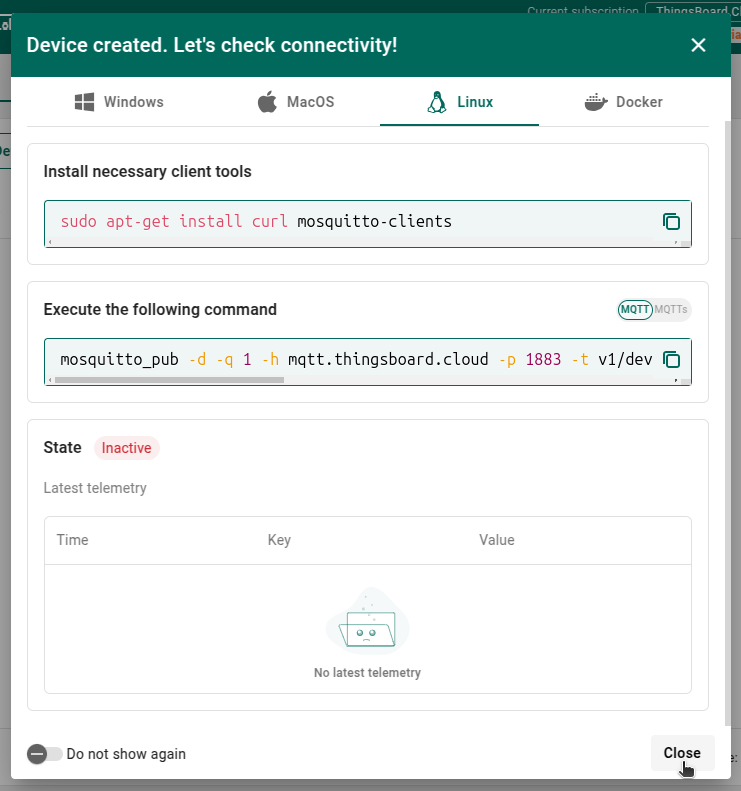
After this, a new window will appear, allowing you to test the connectivity. However, since we are using a Gateway, a different set of MQTT topics is required to properly integrate with the ThingsBoard gateway device. You can skip this step. For now, we will identify the MQTT server to use for the connection:
mqtt.thingsboard.cloud
You will need to click on ‘Close’ button:
Now that we’ve successfully added a new Gateway configured to use the MQTT protocol, the next step is to configure the MQTT credentials in the Enterprise IIoT Gateway to verify connectivity. You can see your new device created; is name, device profile, status, and it is a Gateway:
Click to Expand
Importing and Configuring Flow
The next step is to import and configure a pre-configured flow template. This flow will allow us to filter and format the vibration sensor data before connecting it to the ThingsBoard MQTT broker server and publishing the sensor data. The flow will also set the appropriate topics based on the ThingsBoard MQTT Gateway API reference.
To import the flow into your workspace, begin by navigating to the GitHub repository and copying or downloading the RAWncd-to-thingsboard-example.json JSON file.
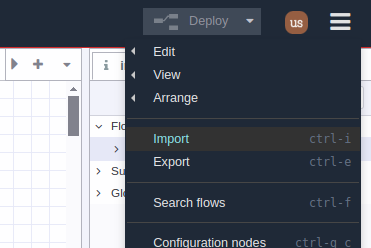
Next, in Node-RED, navigate to the main menu in the top right corner of the editor and click on the ‘Import’ option:
Click to Expand
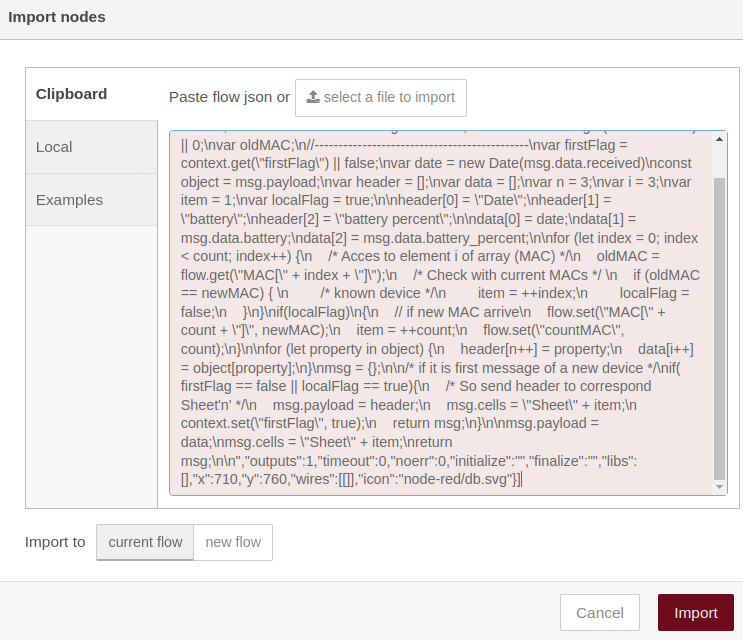
To import the ‘ncd-vibration-sensor-t80-to-thingsboard-mqtt.json’ file, simply open the window and either select the file using the ‘Select a file to import’ button or paste the copied JSON code into the pink text box. Once done, click the ‘Import’ button to proceed:
Click to Expand
A pop-up message will appear at the top of the Node-RED editor, indicating the nodes that have been successfully imported into your workspace:
Click to Expand
You can now position the flow within your Node-RED workspace. The next step is to connect the output of the ‘Wireless Gateway‘ node to the input of the ‘ncd-filter-mode‘ node, as demonstrated in the following image:
Click to Expand
Next, we will provide a general overview of the function of each node in this flow. We will not go into a deep explanation of each node’s function.
NoteIf you want to learn more about how these nodes work, you can select a node within the Node-RED editor and click on the 'Info' tab, where you can find documentation related to each node in Node-RED.
Click to Expand
ncd-filter-mode
This node evaluates the incoming messages from the ‘Wireless Gateway‘ node. It specifically filters and directs messages based on their topic. Output 1 is dedicated to messages of topic sensor_mode, which contain the operational modes of the sensor. For this tutorial, we will focus on RUN mode, which indicates that the sensor is connected to the Enterprise IIoT Gateway network and ready to transmit data. Output 2 is for sensor_data messages, which include critical information such as battery percentage, vibration, temperature, and other sensor readings.
Click to Expand
ncd-filter-by-run-mode
This node will evaluate whether the sensor is in RUNmode. If the sensor is not in RUN mode, the message will not flow through the node.
Click to Expand
ncd-set-device
This node allows us to extract the MAC address of the sensor (by specifying the last 8 alphanumeric characters: ‘xx:xx:xx:xx’) and assign it as the msg.payload.device value.
Click to Expand
NoteAn example of an NCD device MAC address is: 00:13:A2:00:42:53:64:33. After processing through this node, the msg.payload.device property will contain the shortened MAC address: 42:53:64:33.
ncd-set-mqtt-topic-connect
This node sets the MQTT topic for ThingsBoard, which serves to inform the platform that the device is successfully connected to the Gateway.
msg.topic = ‘v1/gateway/connect’.
Click to Expand
ncd-filter-by-type
NCD IoT manufactures a wide range of Industrial IoT Sensors, each identified by a sensor type. This node allows us to filter sensor messages based on the sensor type. In this case, it filters messages corresponding to the ‘One Channel Vibration Sensor‘, which is identified by sensor type ’80’.
Click to Expand
ncd-attributes
This is a function node that uses JavaScript code to ensure that a sensor_data message of type 80 is sent only once after a deployment. The node allows us to define various sensor attributes, such as the address, sensor name, firmware version, node ID, and sensor type. These attributes are then wrapped in the correct format according to the ThingsBoard MQTT Gateway API. Below is the JavaScript code:
					// Retrieve the 'flag' from the context or default to false
const flag = context.get("flag") || false;

if (!flag) {
   // Destructure properties from msg.payload
   const {
       addr,
       sensor_name: sensorName,
       firmware,
       nodeId,
       sensor_type: sensorType
   } = msg.payload;

   // Extract the device from the address
   const device = addr.substring(12);

   msg.payload = {
       [device]: {
           "Sensor Name": sensorName,
           "Firmware": firmware,
           "Node ID": nodeId,
           "Sensor Type": sensorType
       }
   };

   // Set the 'flag' in the context to avoid re-execution
   context.set("flag", true);
   return msg;
}
ncd-set-mqtt-topic-attributes
This node sets the MQTT topic for ThingsBoard. The topic is used to update the sensor attributes on ThingsBoard.
msg.topic = ‘v1/gateway/attributes’
Click to Expand
ncd-add-battery-to-sensor-data
This node allows us to add the property containing the vibration sensor’s battery percentage to the msg.payload.sensor_data message, which already includes temperature and vibration variables. This way, we can have all the relevant variables in a single message for this tutorial.
Click to Expand
ncd-telemetry
This is a function node. The JavaScript code extracts the Sensor MAC address and timestamp data from the msg.payload message. It then retrieves the sensor_data message (which includes battery percentage) and wraps it in the correct format for the ThingsBoard MQTT Gateway API. The JavaScript code is as follows:
					// Destructure relevant properties from msg.payload
const { addr, received: timestamp } = msg.payload;

// Extract the device ID from the address
const device = addr.substring(12);

// Extract the data from the message
const sensor_data = msg.payload.sensor_data;

// Construct the payload in a clean and structured way
msg.payload = {
   [device]: [
       {
           ts: timestamp,
           values: sensor_data
       }
   ]
};

return msg;
ncd-set-mqtt-topic-telemetry
This node Set the MQTT ThingsBoard telemetry topic, this topic serves to set the sensor data values on telemetry ThingsBoard.
msg.topic = ‘v1/gateway/telemetry’
Click to Expand
ncd-to-thingsboard
This MQTT output node establishes a connection to the MQTT Broker using the required credentials to connect to ThingsBoard, allowing the data generated by the vibration sensor to be published to the ThingsBoard cloud.
Click to Expand
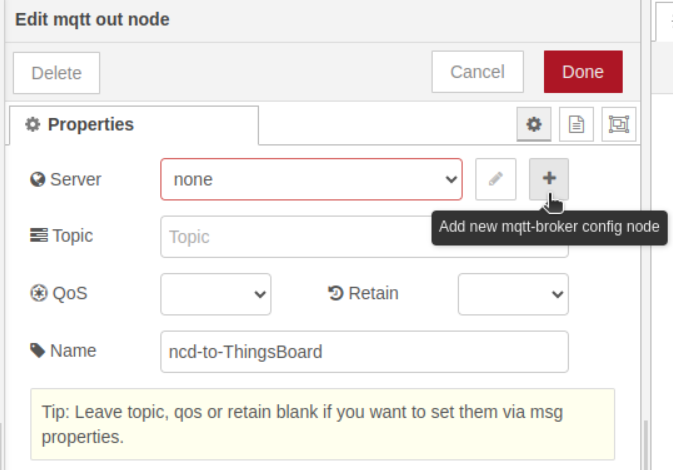
Once we’ve reviewed the general functions of each Node-RED node in the flow, the next step is to configure the MQTT out node with the credentials generated in ThingsBoard. To access the properties of this node, double-click on the ‘ncd-to-ThingsBoard‘ node. Once you’ve opened the properties, the first step is to configure the ‘mqtt-broker config node‘. To do this, click the ‘Add new mqtt-broker config node‘ button.
Click to Expand
The next step is to set the Server property with the ThingsBoard MQTT Broker server address: ‘mqtt.thingsboard.cloud’. For this example, we’ll use the default port, 1883. Lastly, you need to configure the Client ID property, which is generated in ThingsBoard.
Click to Expand
The next step is to navigate to the security tab and enter the Username and Password credentials generated in ThingsBoard.
Click to Expand
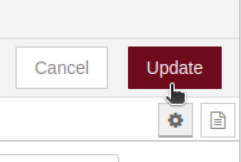
Finally, to save the configurations made within the node, click the ‘Update’ button.
Click to Expand
Once this is completed, the MQTT server configuration is finalized. The Topic property should be left empty because it will dynamically receive its value from the msg properties configured in the preceding nodes. These nodes have already defined the appropriate topics for each type of MQTT message.
Click to Expand
To save the changes made within the MQTT out node, click on the ‘Done’ icon.
Click to Expand
Once the MQTT credentials are configured, the next time a message is transmitted by the NCD vibration sensor, it will be published to ThingsBoard via MQTT on the corresponding MQTT topic. To save and apply the changes made in your Node-RED application, click the Deploy button located at the top-right corner of the Node-RED editor.
Click to Expand
Once you press the Deploy button, you will see the status ‘connecting’ displayed just below the MQTT out node. This indicates that the system is attempting to establish a connection with the MQTT server.
Click to Expand
Once the connection is successfully established, you should see the status change to ‘connected’, indicating that the Node-RED instance is now communicating with the MQTT server.
Click to Expand
To test communication, you can manually trigger a data transmission from the NCD Vibration Sensor by pressing the RESET button inside the sensor. To access the button, remove the four screws from the white casing. Once inside, locate the RESET button and press it once.
Click to Expand
NoteIt is also possible to wait for the next transmission from the sensor to perform the test, without the need to press the RESET button, as the sensor sends data periodically at user-defined intervals.
Once a new message is transmitted by the sensor, you should be able to see some messages into the debug window that comes from the ‘debug thingsboard’ node, you can identify this messages by the msg.topic property:
v1/gateway/connect
v1/gateway/attributes
v1/gateway/telemetry
Click to Expand
When you press the RESET button on the sensor, it first attempts to establish wireless network communication. Once the sensor successfully connects to the Enterprise IIoT Gateway network, it transmits a RUN message. Afterward, the sensor sends a sensor_data message.
The flow then uses the information from the RUN and sensor_data messages to build the connect, attributes, and telemetry messages. Let’s break down each of these messages in detail:
Connect Message
This first message is generated when the Industrial IoT Wireless Vibration Temperature Sensor successfully establishes a connection with the Enterprise IIoT Gateway. The Wireless Gateway node receives the sensor_mode message, which contains the connection status of the sensor. The flow then uses a switch node to check if the message is a RUN message, indicating the sensor is successfully connected and operational.
If the message is a RUN message, the flow extracts the MAC address of the sensor and formats the message according to the ThingsBoard API. This message is crucial as it informs ThingsBoard that the device is successfully connected to the Gateway, allowing the platform to recognize the sensor and begin receiving telemetry and attribute data for further analysis and visualization.
To build this message, the flow uses the sensor_data message, which contains essential sensor data. It extracts key pieces of information such as the sensor name, firmware version, node ID, and sensor type. This data is then formatted according to the ThingsBoard attributes API, which requires the data to be in key-value pair format. The flow sends this message only once to ThingsBoard.
In ThingsBoard, device attributes are key-value pairs that are associated with a device. These attributes are used to store important information, such as configuration settings, metadata, and operational details, providing context for the device. By including the sensor’s attributes, ThingsBoard can store relevant information like the sensor’s name, its version, and other characteristics, which are crucial for monitoring and managing the device efficiently within the platform.
This message contains the real-time sensor data, which includes key readings such as temperature, vibration, and battery percentage. The flow formats this data and publishes it to ThingsBoard as telemetry data. Telemetry data in ThingsBoard is used for real-time monitoring and visualization, enabling users to track the sensor’s status and performance over time.
By sending this telemetry message, the sensor’s data is continuously updated on the ThingsBoard platform, where it can be displayed on dashboards for analysis, triggering alerts, or taking other actions based on the sensor’s readings. This allows for effective monitoring and management of sensor networks in industrial IoT applications.
Now, return to the ThingsBoard platform. You will notice that a new device has been automatically added, identified by its MAC address. Both the Enterprise IIoT Gateway and the Sensor device will show an Active state. The system will automatically update the device status based on the sensor’s communication, and you should see something like this:
Click to Expand
You can click on the newly added device to explore its details, Attributes, Latest Telemetry, Alarms, Events, Relations, Audit Logs, among others. By reviewing these sections, you can gain deeper insights into the device’s status and performance within the ThingsBoard platform.
Click to Expand
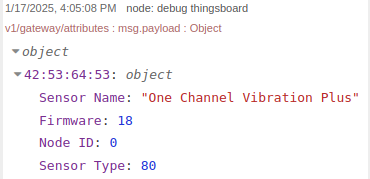
You can click on the Attributes tab to view the newly added sensor attributes. These attributes are typically updated once and do not change every time the sensor transmits data. They represent static or infrequent details about the sensor, such as:
Sensor Name: The name assigned to the sensor for easy identification.
Firmware Version: The version of the firmware currently installed on the sensor.
Node ID: A unique identifier for the sensor within the network.
Sensor Type: The type of sensor.
You should see something similar to the following format in the Attributes tab:
Click to Expand
You can also view the latest sensor telemetry under the ‘Latest Telemetry‘ tab. This section displays the sensor’s real-time data, such as temperature, vibration, and battery percentage. These values are updated every time the sensor transmits data to the ThingsBoard platform. This telemetry data is of primary interest for monitoring the sensor’s performance and status. You can use this data to create alarms or build dashboards that visually represent the sensor’s real-time measurements. You should see something similar to this, displaying the updated values each time the sensor sends data.
Click to Expand
Create a ThingsBoard Dashboard
The next step is to create a ThingsBoard dashboard. A dashboard in ThingsBoard allows users to visualize and monitor data collected from IoT devices. Let’s create a dashboard and add some widgets to display a list of entities and their latest NCD Sensor values. To create a new, empty dashboard, follow these steps.
Navigate to the “Dashboards” page from the main menu on the left side of the screen. By default, you’ll be directed to the “All” dashboard group.
Click to Expand
Click the “+” icon in the upper-right corner of the screen and select “Create new dashboard” from the drop-down menu.
Click to Expand
Click to Expand
In the dialog that opens, enter a title for the dashboard (description is optional). For this tutorial, use “NCD Vibration Sensor Dashboard.” After that, click the “Add” button.
Click to Expand
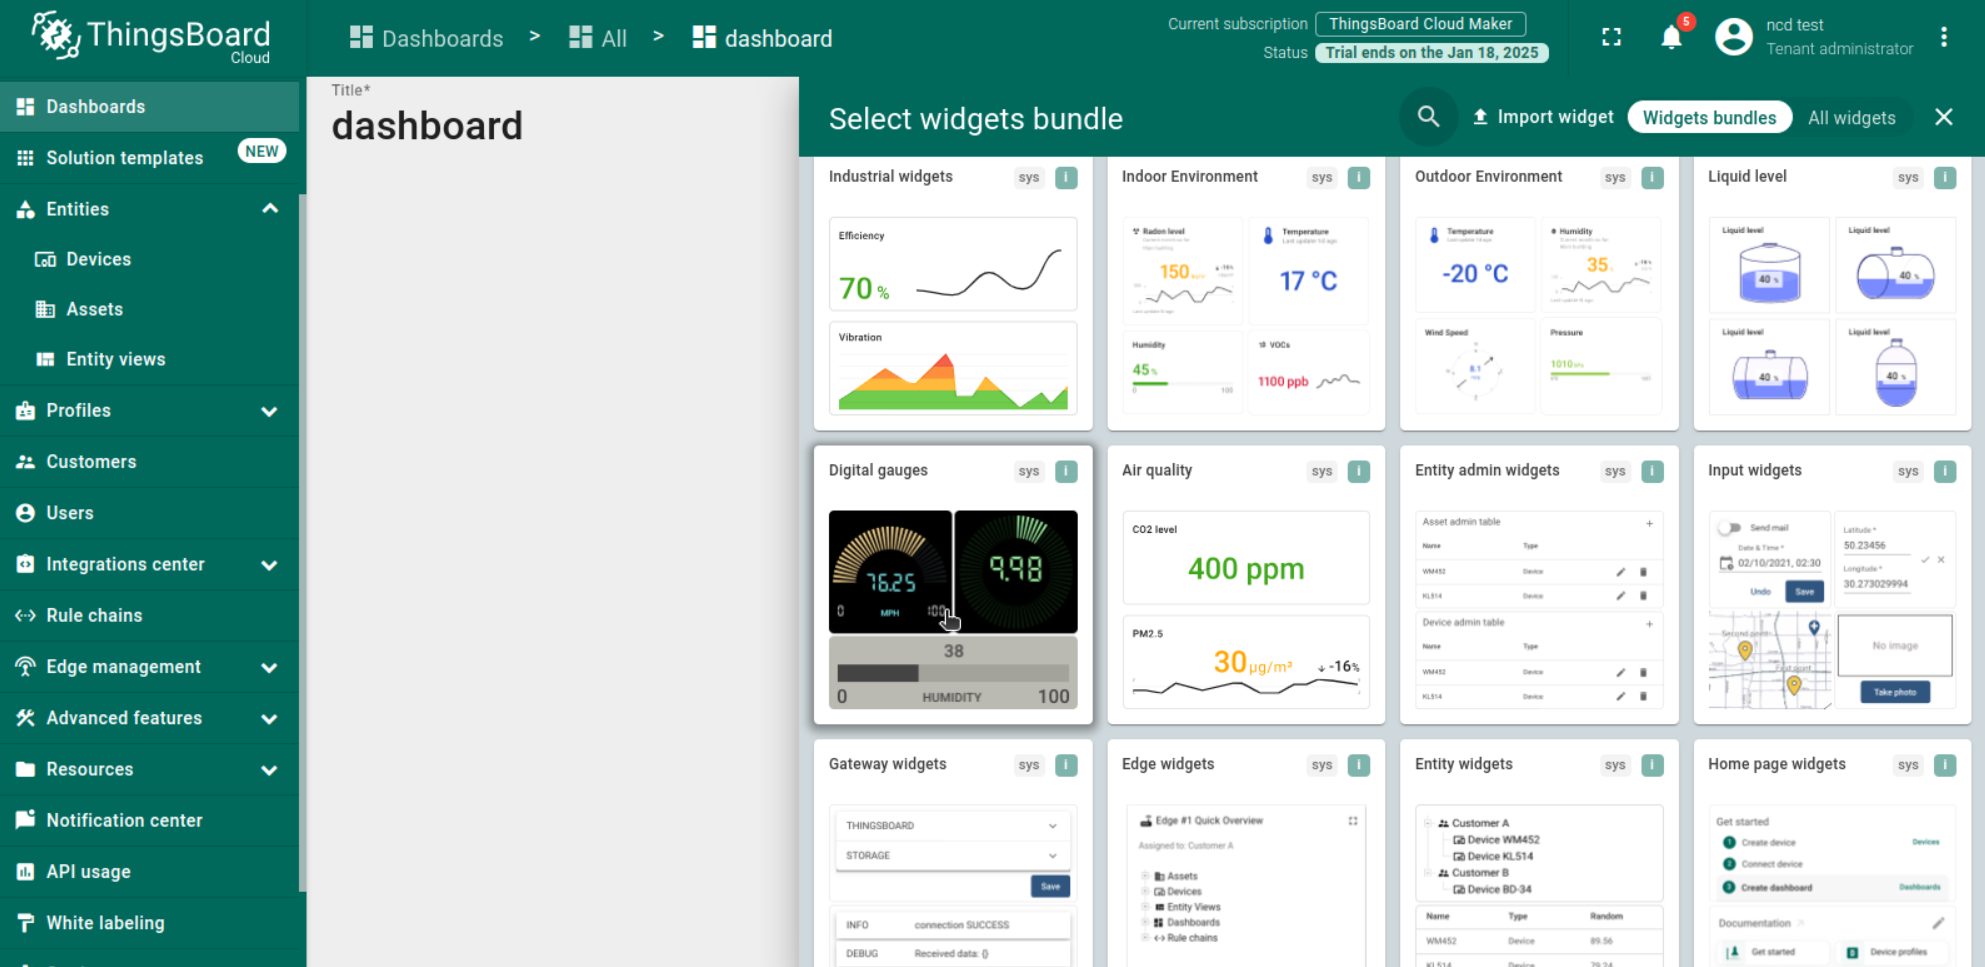
Now you have created an empty dashboard. From here, you can add new widgets for each variable emitted by the vibration sensor. To add the first widget, click the “Add new widget” button.
Click to Expand
We will add the first widget, which will display the temperature value. ThingsBoard natively offers a wide range of widgets within its library, including graphs, gauges, tables, buttons, alarms, and even SCADA-style visual elements for building dashboards. These widgets are grouped and allow you to explore and select the one that best fits your application. It’s worth noting that each widget is customizable, either in a basic way or more advanced if you want to add additional functionalities.
Each widget has a data source, which defines what data the widget will display.
Click to Expand
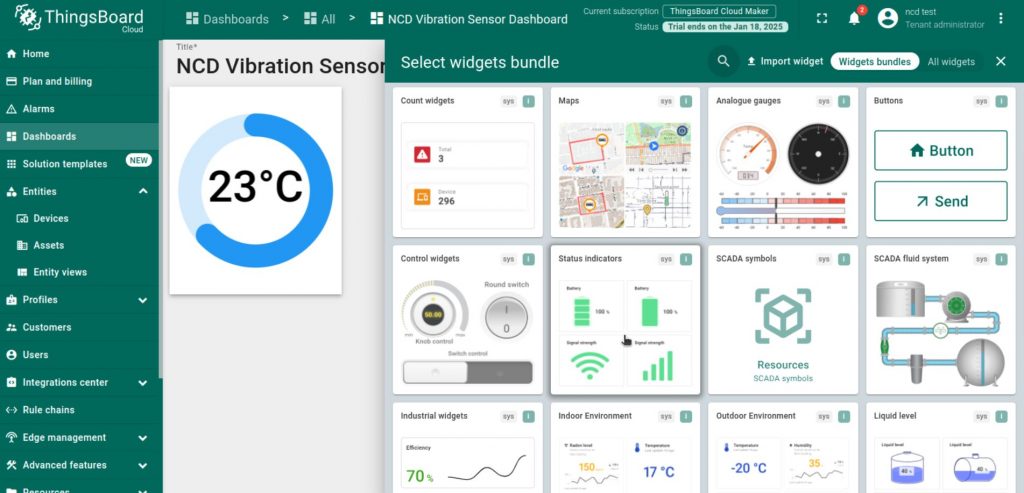
To visualize the real-time temperature value from the vibration sensor, we will use a gauge widget, which can be found in the ‘Digital gauges’ group.
Click to Expand
We will select the ‘Mini gauge’ option.
Click to Expand
The “Add Widget” window will appear. You will need to specify the device this widget will be linked to. In the “Device” property, select the device we have created.
Click to Expand
In the “Data Key” property, clicking “+Add” will display a list of variables emitted by the sensor. In this case, select the “Temperature” option.
Click to Expand
Within the properties, you can customize the unit of measurement, operationrange, number of decimal places to be displayed, style, and many other settings.
Click to Expand
To add the widget to your dashboard, click the ‘Add’ icon.
Click to Expand
Once this is done, you should see the gauge widget added to your dashboard, displaying the most recent value sent by the sensor, in this case, 23 degrees Celsius.
Click to Expand
In ‘Edit’mode, you can reposition or resize the widgets by using the cursor. In this case, we will increase its size by simply clicking on the widget and dragging with the mouse.
When you hover over the widget in ‘Edit’ mode, you will see buttons in the top-right corner of the widget. These buttons allow you to edit, download, or delete the widget, as well as adjust its position or size.
Click to Expand
To add more widgets to the dashboard, simply click the ‘Add widget’ button again.
Click to Expand
Next, you’ll need to access the available widget library. In this case, we’ll add a second widget to display the battery percentage of the sensor.
Go to the ‘Status Indicators’ group and select the ‘Battery Level’ widget.
Click to Expand
You will need to set the ‘Device’ property again with the NCD device that we previously added.
Click to Expand
The next step is to set the ‘Data Key’ property. Click on the Data Key field, and this will display the list of variables emitted by the NCD vibration sensor. From the list, select the property defined as ‘battery_percent’.
Click to Expand
We will adjust the layout by selecting the ‘Horizontal Divided’ option under the ‘Appearance’ properties. ThingsBoard allows real-time visualization of available layout types for this widget, which is a very useful tool for fine-tuning this property.
Click to Expand
Finally, click the ‘Add’ button at the bottom.
Click to Expand
Once again, you can use the mouse to adjust the size and layout of each widget within the ThingsBoard dashboard, allowing you to customize the display to your preferences.
Click to Expand
To save any changes made to your ThingsBoard dashboard, you should click the ‘Save’ button located in the upper right corner.
Click to Expand
This way, you can add as many widgets as you need to your dashboard. The steps for doing so are the same as shown earlier. Each widget can be customized and adjusted, including style, color, unit of measurement, icon, elements, distribution, size, and many other options. You can also link each widget to the variables emitted by the vibration sensor.
We have added several other widgets to our dashboard and linked each one to the vibration variables emitted by the sensor in the same way. The final layout of our dashboard looks as follows:
Click to Expand
You can save the changes made by pressing the ‘Save’ button:
Click to Expand
Inside the dashboard, you can view it in full screen by using the ‘Expand to fullscreen’ button located at the top right.
Click to Expand
Finally, our dashboard is displayed as follows:
Click to Expand
Summary
This tutorial explained the basic, step-by-step process of integrating the NCD Industrial IoT Wireless Vibration and Temperature Sensor with ThingsBoard Cloud, enabling you to manage and visualize the vibration and temperature variables sent by the NCD sensor.
After successfully connecting the NCD Industrial IoT Wireless Vibration and Temperature Sensor to the ThingsBoard platform, you can expand its functionality by setting up thresholds and alarms for sensor data, enabling notifications via email, SMS, or web when thresholds are exceeded. You can manage users by adding them with specific roles and permissions, allowing customized access to devices and dashboards.
Additionally, you can integrate ThingsBoard with external platforms like AWS, Azure, or Google Cloud, and external databases or message brokers for enhanced data flow. With advanced widgets, you can perform deeper data analysis, visualize trends, and configure alarms based on sensor conditions. You can create more dashboards tailored to different user needs and adjust layouts for optimal monitoring. The ThingsBoard platform also offers advanced features like real-time data processing, custom notifications, and automated actions through the Rule Engine. Finally, you can set up data exports for reporting or external analysis, further enhancing your IoT system’s capabilities.