The documentation on this page is intended to provide a general and concise overview of commonly used settings. The configurations themselves are handled using Robustel’s web interface interacting with their network handlers. Robustel provides in depth documentation and support for these network settings that extend far beyond the scope of this document and our support.

WiFi Settings
There are two main functions of WiFi on the Robustel Devices. These are using WiFi to act as an Access Point to allow other devices/clients to connect to it and using WiFi to act as a Client which allows the Enterprise Gateway to connect to an existing WiFI network. These two functions are mutually exclusive and only one can be used at a time. The default state will be to have the WiFi act as an Access point.
This section will cover common settings for each of these functionalities as well as how to enable or disable them if not necessary.
WiFi Access Point
Having the Enterprise Gateway act as an Access Point has three primary uses:
- Easy connection and configuration
- Granting cellular connectivity to WiFi based devices
- Granting Ethernet network connectivity to WiFi based devices
By default the IIoT Gateway will create a WiFi network that any WiFI enabled PC can connect to. The SSID of this network will be: NCD_Edge_[last_four_of_mac] where [last_four_of_mac] is the last 4 characters in the mac address printed on the side of the IIoT Gateway without the colon. i.e. NCD_Edge_C398.
The default password will be ncdGateway
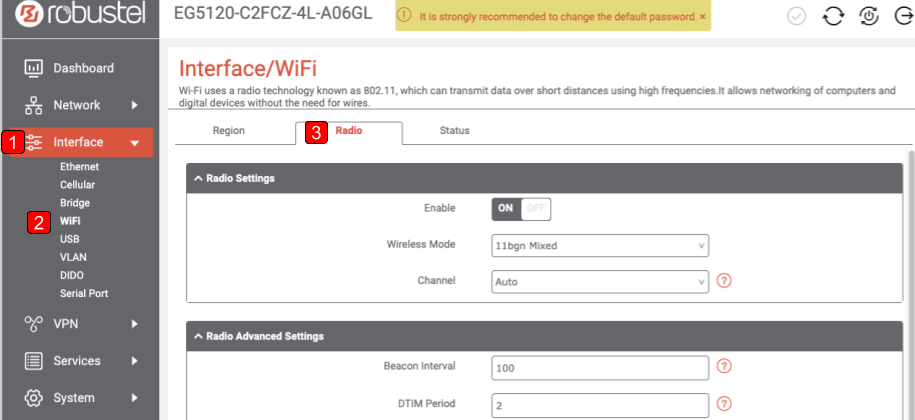
You can find the settings to customize, enable, or disable the access point from Interface > WiFi > Radio as shown in this image.
Scroll down until you see the “Radio VAP Settings” as shown below and click on the edit icon outlined in blue in the below image.

This will open a modal window where you can access the settings for the Enterprise Gateway’s access point.
Settings Overview
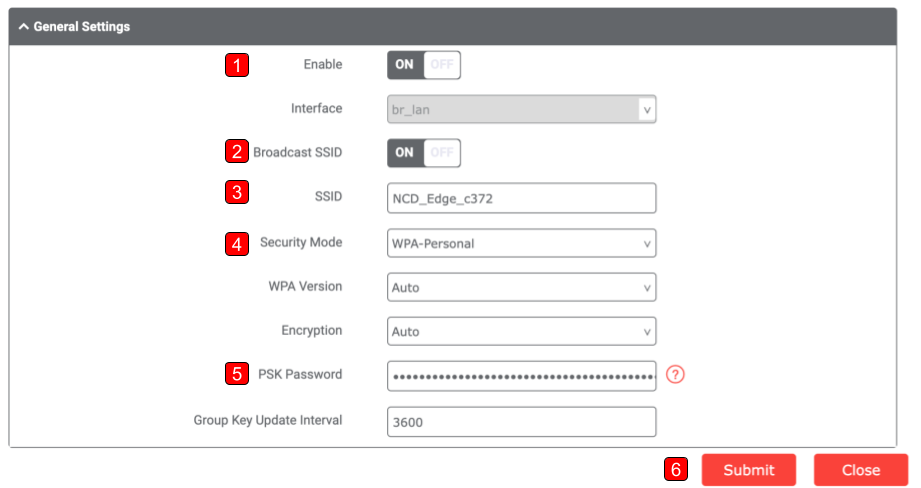
- The enable setting can be used to enable or disable the WiFi access point functionality of the Edge Gateway. In the screenshot above the access point is enabled
- Broadcast SSID can be used to hide the network so that you must know the SSID before you can attempt to connect to it. In the screenshot above the SSID is being broadcast
- The SSID setting is used to name the wifi network/SSID. This is what you will see in the list of WiFi networks from a PC.
- Security Mode can be used to switch between WPA-Personal and WPA-Enterprise. You will need to reference Robustel’s documentation for more information on the WPA-Enterprise option.
- PSK Password is the password used to authenticate into the network. This is the password your PC will ask for when you attempt to connect to the network.
- Submit must be used to save any change made to these fields.
WiFi Client
Having the Enterprise Gateway act as a Client to an existing WiFi network simply allows wireless access to a network much like a normal PC or Server.
By default the Enterprise Edge Computer will not have WiFi as a Client enabled.
Enabling WiFi Client
The Enterprise IIoT Gateway can only act as either an Access point to allow direct connection to it over WiFi OR act as a client to connect to an existing WiFi gateway, but not both simultaneously.
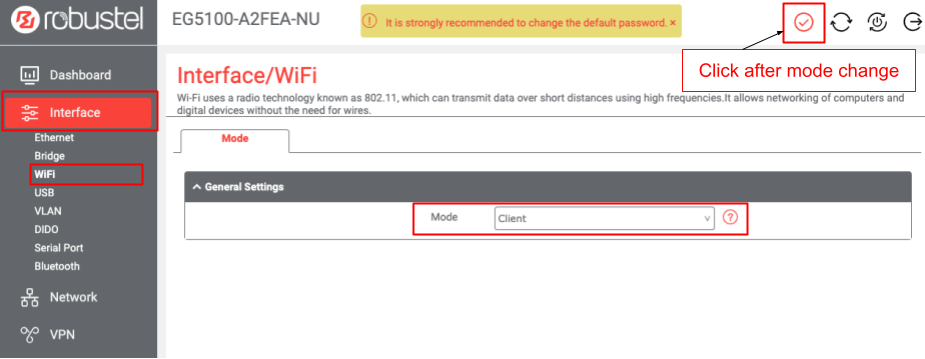
To enable the ability to connect to a wifi network you will need to either connect to an existing LAN network via ETH0 or directly connect the gateway to your PC using ETH1. Once connected through means other than the WiFi Network you will go to Interface > WiFi > General Settings and change Mode from “AP” to “Client” as shown in the image below.
You will need to Submit and and Apply these changes for WiFi to show up as an option when following the instructions in the next section.
Adding/Editing a WiFi Client WAN
To add a new WiFi WAN you will need to click on the + icon as shown in the image below. This will open a modal windows where you can configure the WAN interface.

To edit a WiFi WAN interface you can select the edit icon next to your existing WiFi WAN. The edit icon will look like the below image.
![]()
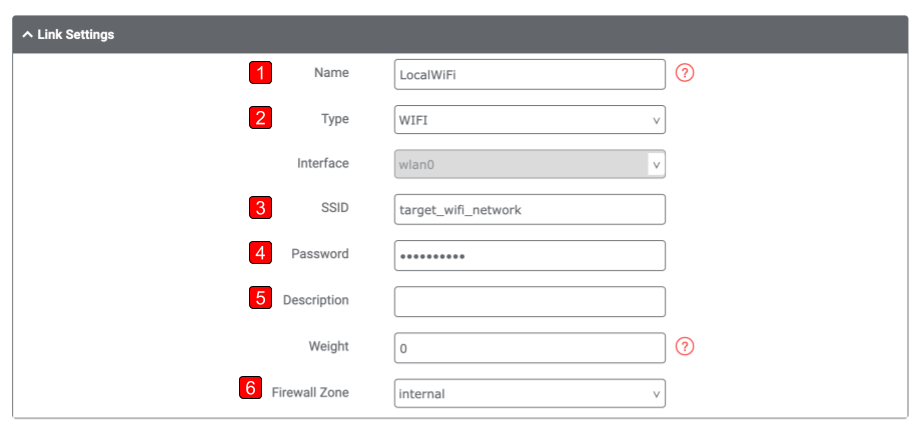
- Name – This field acts as a label for the WAN interface for the Web interface. This is not the name of the network you are connecting to.
- Type – You will need to set this to “WIFI” for a WiFi WAN
- SSID – This will need to be set to the SSID of the network you’re trying to connect to. This field is case sensitive.
- Password – This is the password for the WiFi network you are trying to connect to. This field is case sensitive.
- Description – This field is only used to store additional information on the network for the Web Management UI.
- Firewall Zone – If you want to be able to access and manage node-red or the Web Management UI from the network you’re attaching to set this to internal. If you want to restrict access from this network set this to external.
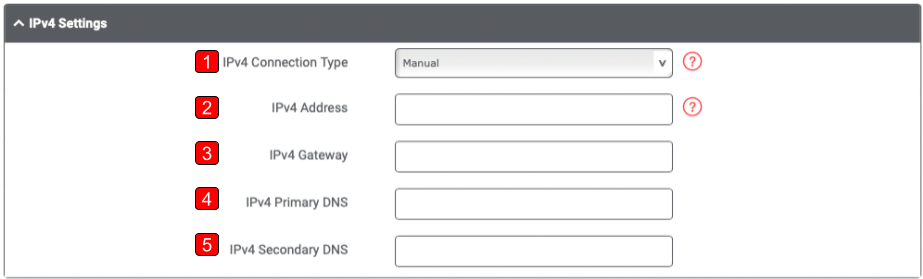
- IPv4 Connection Type – To allow the nework’s router to assign an IP Address dynamically set this to DHCP. To assign an IP address manually set this to Manual.
- If DHCP is chosen you will not see fields 2-5.
- IPv4 Address – Enter the IP address you want to assign this Enterprise Gateway on the network.
- IPv4 Gateway – Enter the IP address of the router on the network you’re connecting to.
- IPv4 Primary DNS – Enter the IP address of the Primary DNS server you would like the gateway to use on this WAN interface
- IPv4 Secondary DNS – Enter the IP address of the Secondary DNS server you would like the gateway to use on this WAN interface
Ethernet Settings
There are two main functions of Ethernet on the Robustel Devices. These are using Ethernet to act as a Client which allows the Enterprise Gateway to connect to an existing Ethernet network and using an Ethernet cable to act as a Network Host to allow other devices/clients to connect to it.
By default ETH0 on the Enterprise Gateway will be configured to act as a Client so you can directly connect it to an existing network out of the box.
By default ETH1 will be configured to act as a Network Host to enable direct connection of a PC for easier access in more restricted network environments.
This section will cover common settings for each of these functionalities as well as how to enable or disable them if not necessary.
Ethernet as a Client
Using one or multiple of the Ethernet ports as a Client on the Enterprise Gateway allows the Enterprise Gateway to connect to an existing Ethernet network for Internet or just local network access.
By Default ETH0 will act as an Ethernet Client.
You can find the settings to enable, disable, and configure the WiFi network the Enterprise Gateway will use from Network > WAN > Link as shown in this image.
This page will show all configured WAN networks and their options.
Adding/Editing an Ethernet Client WAN
To add a new Ethernet WAN you will need to click on the + icon as shown in the image below. This will open a modal windows where you can configure the WAN interface.
To edit an Ethernet WAN interface you can select the edit icon next to your existing Ethernet WAN. The edit icon will look like the below image.
![]()
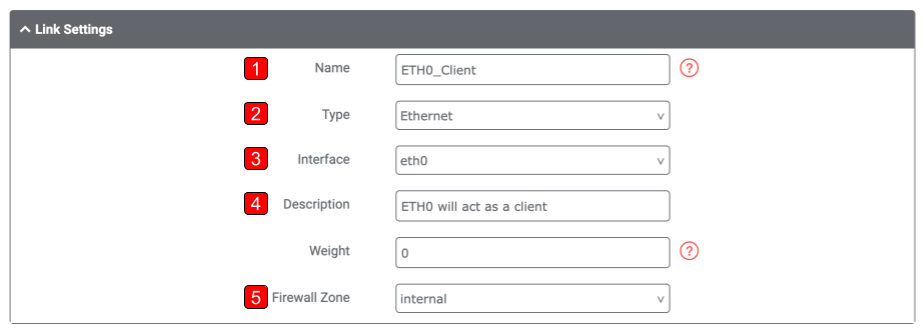
- Name – This field acts as a label for the WAN interface for the Web interface. This is not the name of the network you are connecting to.
- Type – You will need to set this to “Ethernet” for an Ethernet WAN
- Interface – This changes the Ethernet port of the Enterprise Gateway used for the WAN Interface
- Firewall Zone – If you want to be able to access and manage node-red or the Web Management UI from the network you’re attaching to set this to internal. If you want to restrict access from this network set this to external.
Ethernet as a Network Host
Using one or multiple of the Ethernet ports as a Network Host on the Enterprise Gateway allows one or more devices to connect to the Enterprise Gateway for internet or external network access.
By Default ETH1 will act as a Network Host.
Any Ethernet port not configured as a Client/WAN interface will automatically act as a Network Host.
Cellular Settings
Using a cellular internet connection allows internet access in remote areas or as a backup in facilities if the network goes down. Additionally if you are installing this in a Client’s facility it allows you to bypass the need of accessing the client’s network.
You can find the settings to configure the cellular network on the Enterprise Gateway from Interface > Cellular > Cellular as shown in this image.
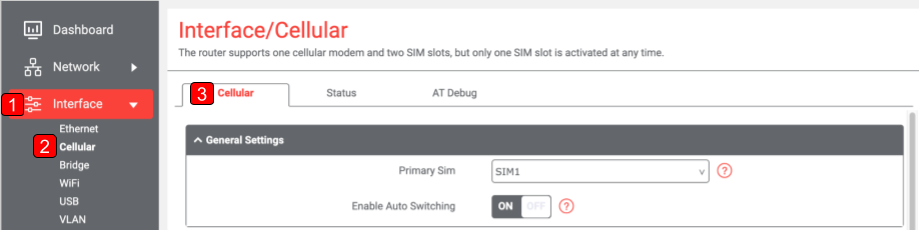
Cellular is not NCD’s area of expertise and at this time it is recommended to contact Robustel directly with any questions on this communication method.