Those of you with one of our AWS Gateways may find this article very interesting. One of the most powerful thing about using AWS as your IoT Cloud provider is not just AWS IoT itself but how it integrates with all of AWS’s other services. Today we’ll investigate using AWS’s SNS service in conjunction with AWS IoT.
SNS stands for Simple Notification Service. It is essentially a pub sub service where messages can be published to a topic almost just like MQTT itself. We will create an SNS topic add an SMS subscriber to it, then we will publish to that SNS topic from AWS IoT using it’s rules interface(Displayed as Act on the IoT interface).
First it will be important to ensure your AWS IoT Gateway is running version 1.0.2 or higher. To check this put your gateway into setup mode by pressing and holding the CFG button until the LED flashes blue. Connect to it through WiFi, then open its web interface by entering 172.217.28.1 into your web browser. Look at the version code at the bottom of the page, if it is not 1.0.2 or higher click Advanced, then danger zone, and check for a firmware update there.
The directive of this article is not to assist in setting up your AWS Gateway, that has already been covered in the WiFi Micro Gateway Setup for Amazon AWS, so if you have not already done that please do so before proceeding through this article. The remainder of the article assumes you have your AWS Gateway connected to AWS IoT, have at least one sensor reporting through it, and your AWS account is in good health.
AWS SNS Topic Setup
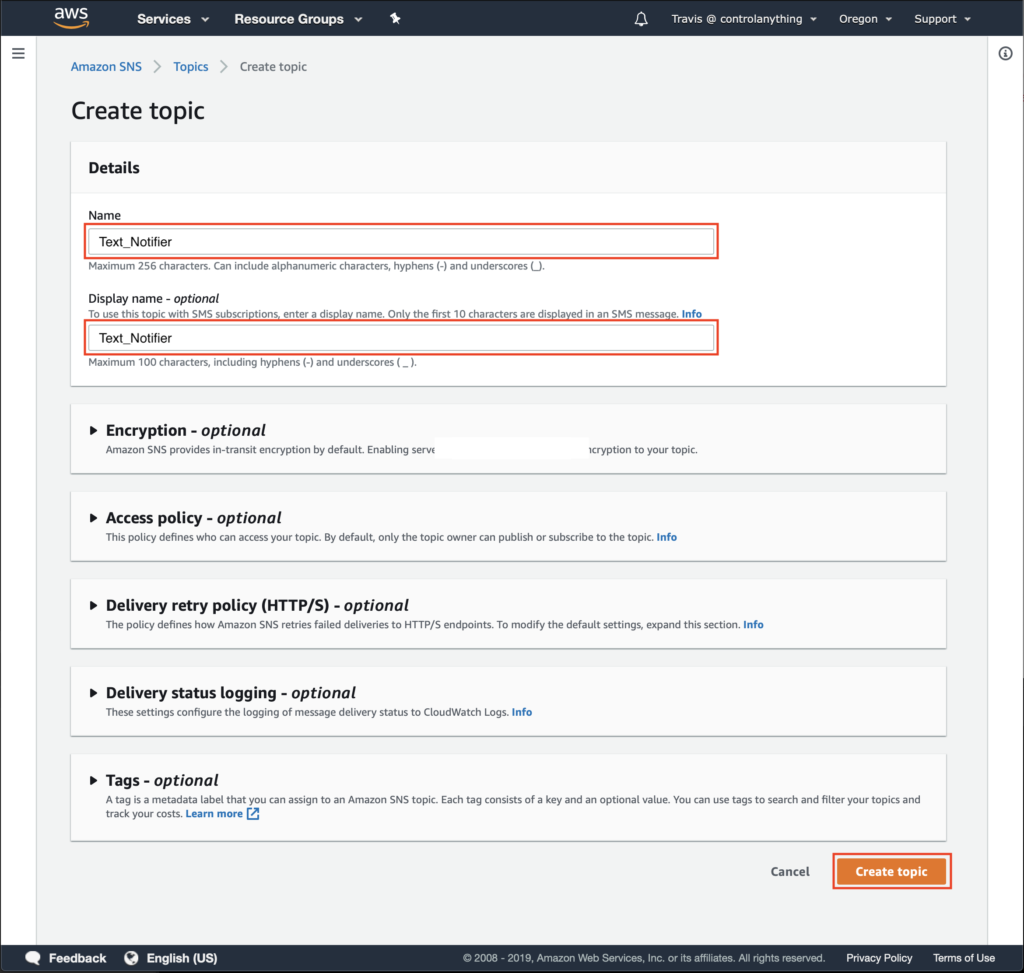
Go to https://aws.amazon.com and sign into your AWS Account console. Under services search for Simple Notification Service and then open it. You’ll be greeted with the Amazon SNS dashboard. Look for “Topics” and select it. The first thing we need to do is create a Topic so click Create Topic. Enter a name (anything you like, I’ll call mine “Text Notifier”), and a display name (if you like), then click Create Topic. You will be redirected to a page displaying information about this AWS Topic. There you should see an Amazon Resource Name, copy this down, you will need it later.
Add a Subscription to that Topic
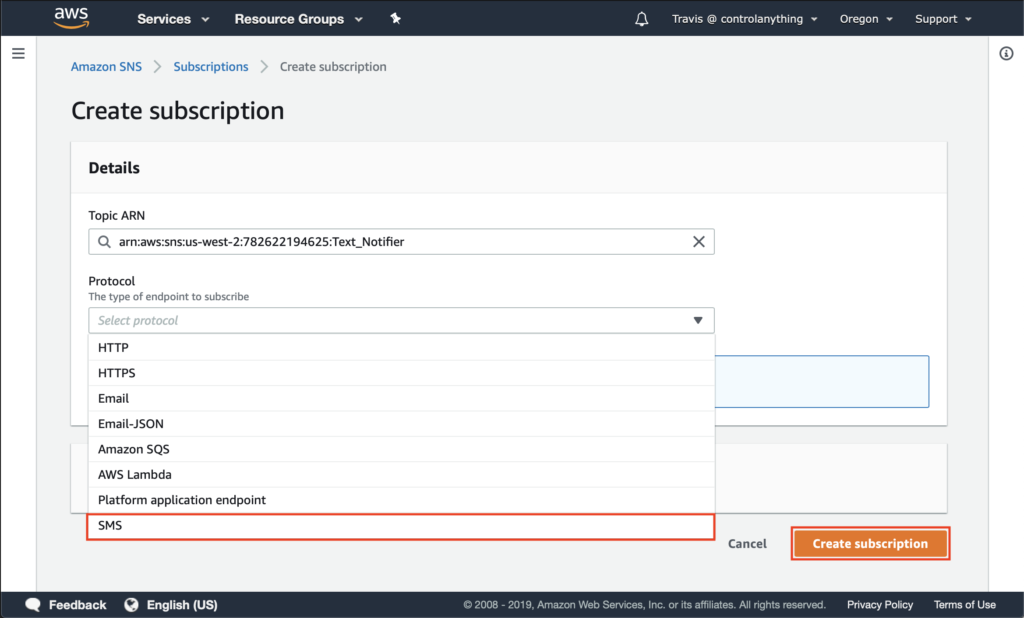
On topic page you will see a Create subscription button, go ahead and click that. We’re going to add a subscriber to this topic. You’ll notice the Topic ARN here again. This ARN is the endpoint for this topic, it’s very important. We are going to add a subscriber which is tied to the ARN and are going to publish a message to the ARN from AWS IoT a little later.
Click the Protocol drop down and select SMS. An Endpoint text box will appear. Enter your mobile phone number here (Make sure to enter 1 first if you are in the US or the Code for the country you reside in).
Click Create subscription.
This is the extent of the setup for the SNS topic and subscription. Remember to copy the ARN, you’re about to need it.
AWS IoT Rule Setup
Search AWS Services for IoT Core and select it to head to the AWS IoT Console. We’re going to create a rule but before we do this we need to determine the shadow topic we’re going to act on. So locate Manage, then under manage select Things, then select your AWS Gateway (It will probably be a Mac address).
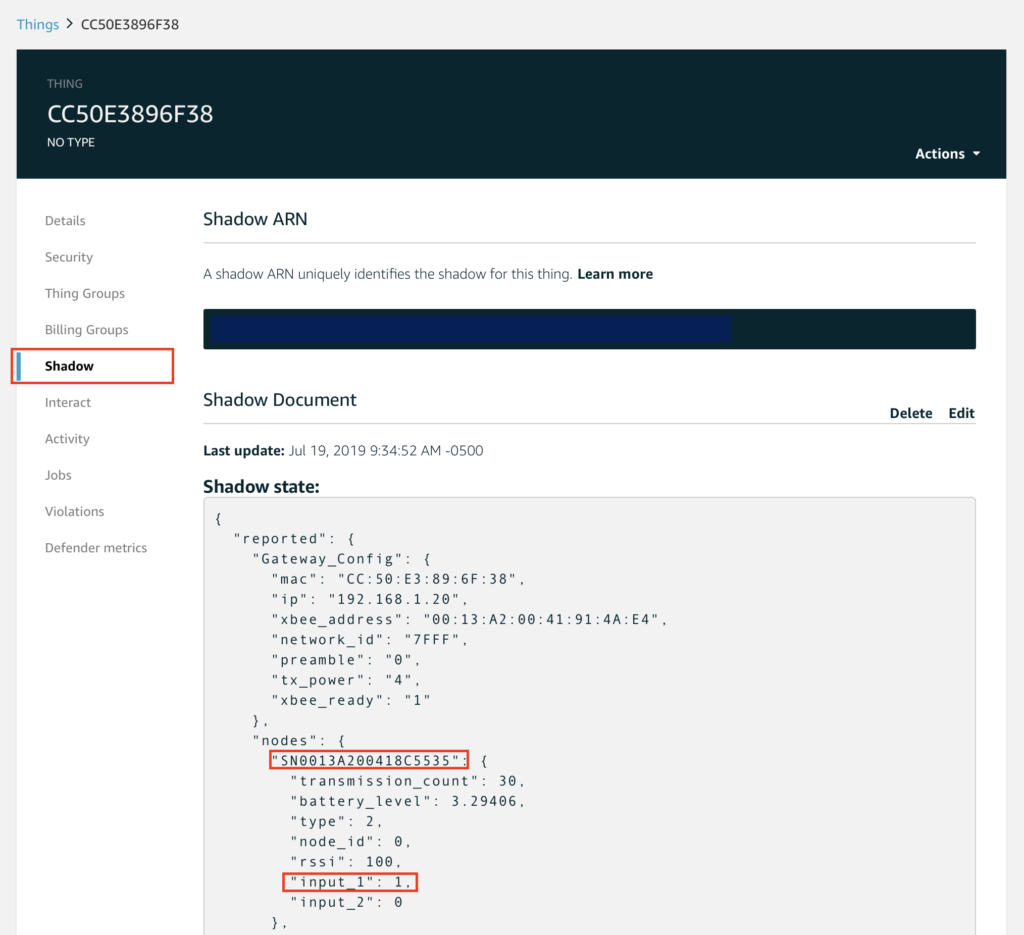
You should now be viewing the Thing Interface for your AWS Gateway (Make note of the Thing Name here as you will need it later, the name of mine is “CC50E3896F38”). Look for Shadow and select it. This is where the Gateway publishes information about itself as well as telemetry messages from wireless sensors in its area. You can set your rule to react to any of this information.
I happen to have a 2-channel push notification sensor connected to my gateway so I’ll be reacting to “input_1“. Take a look at the shadow for my device and you’ll be able to decipher what I am doing. I can determine from the documentation of the 2-channel push notification sensor that it’s “input_1″ value is going to be a “0” or a “1“. This is important to know when setting up the rule. Also from the shadow I can determine that the address of this sensor is “SN0013A200418C5535″. This is important to know as it will determine the hierarchy of the topic (more on this later). Make note of your sensor value id (Input_1) and the XBee address of the sensor you are monitoring.
Return to the main AWS IoT dashboard and click “Act“.
I don’t really know why that link says “Act” when we are clicking it to create a Rule so that may change to “Rules” in the future.
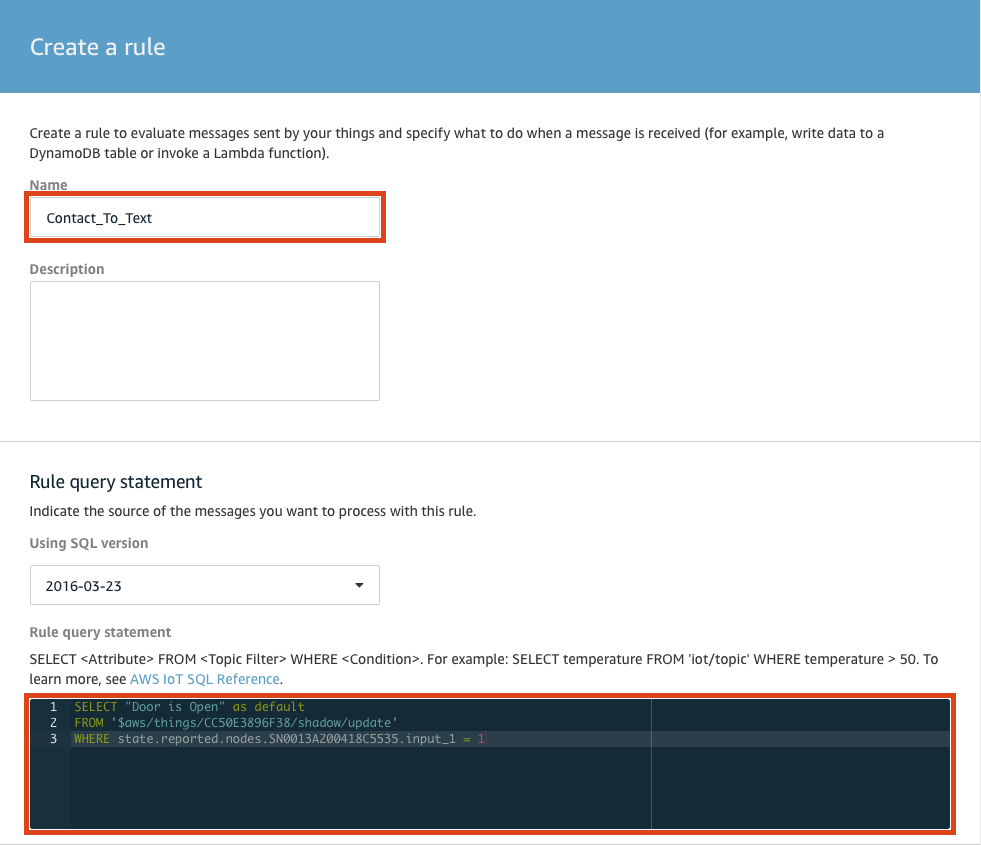
Click the Create button here to create a new Rule. Give it a name that will help you recognize it. I’ll be sending an email when a contact happens so “Contact_To_Text” sounds good to me. You can also enter a description if you’d like.
This rule uses a SQL Query to evaluate updates from our device as to whether or not it should run so we’ll need to write an SQL Query for the rule. This is fairly straight forward so don’t get nervous, we’ll walk through it step by step.
We use an “SQL SELECT” to set the message that will be sent via Text message (SMS). We use a “SQL FROM” to select the MQTT Topic we are listening to, and we can use “WHERE” to evaluate the message received on the MQTT Topic. When this rule executes I want to send a text message to say “the door is open” (SELECT). The topic I am monitoring is the thing shadow for “Thing CC50E3896F38” (FROM). I want this rule to execute when “input_1 = 1” (WHERE). Here is what the SQL query for that would look like:
SELECT “Door is Open” as default FROM ‘$aws/things/CC50E3896F38/shadow/update’ WHERE state.reported.nodes.SN0013A200418C5535.input_1 = 1
You will, of course, need to change “CC50E3896F38” to the name of your AWS Gateway Thing, and possibly the Where statement if you are not using a 2-channel push notification board or are evaluating the other input. You may also want to send a different message so you can change that as well.
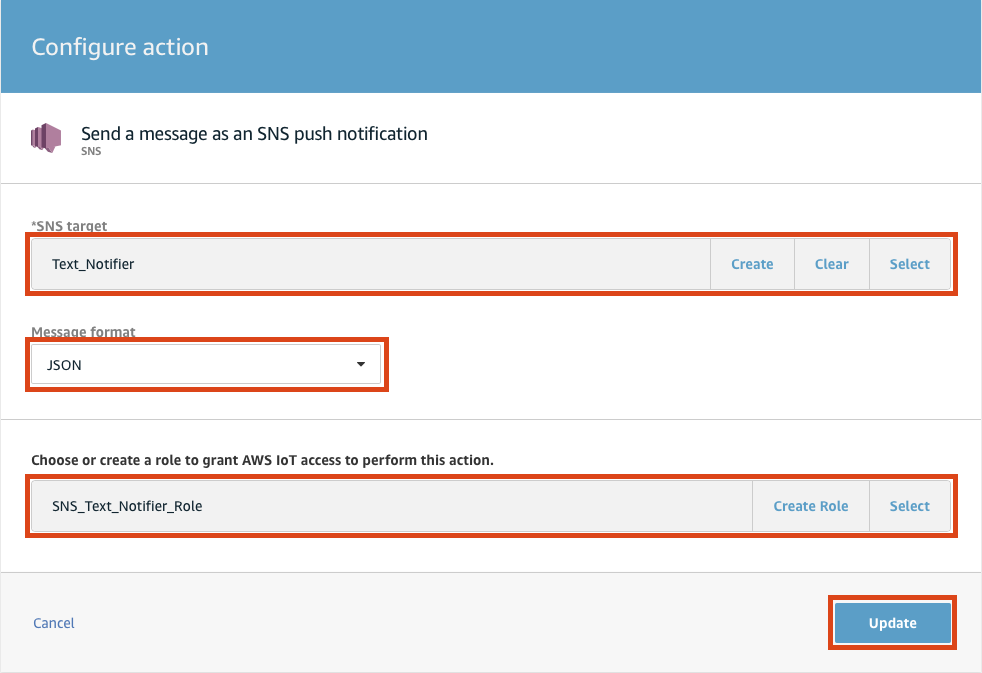
The next step is to tell the Rule what we want to happen when it executes. In our case we want to trigger AWS SNS which will send a Text Message(SMS) to us. So click the Add action button. From the List select Send message as an SNS push notification(SNS), then click the Configure action button at the bottom of the page.
On SNS target click Select, then select the SNS Topic you created previously.
For Message format select JSON.
Then click Create Role and give the new Role a name. This creates a permission role so this AWS Rule can publish to the SNS Topic we created earlier.
Finally, click Add action.
After clicking the Add action button you will be taken to an overview of the rule.
Click Create rule, and you will be returned to a view of your current rules. You are now ready to test it.
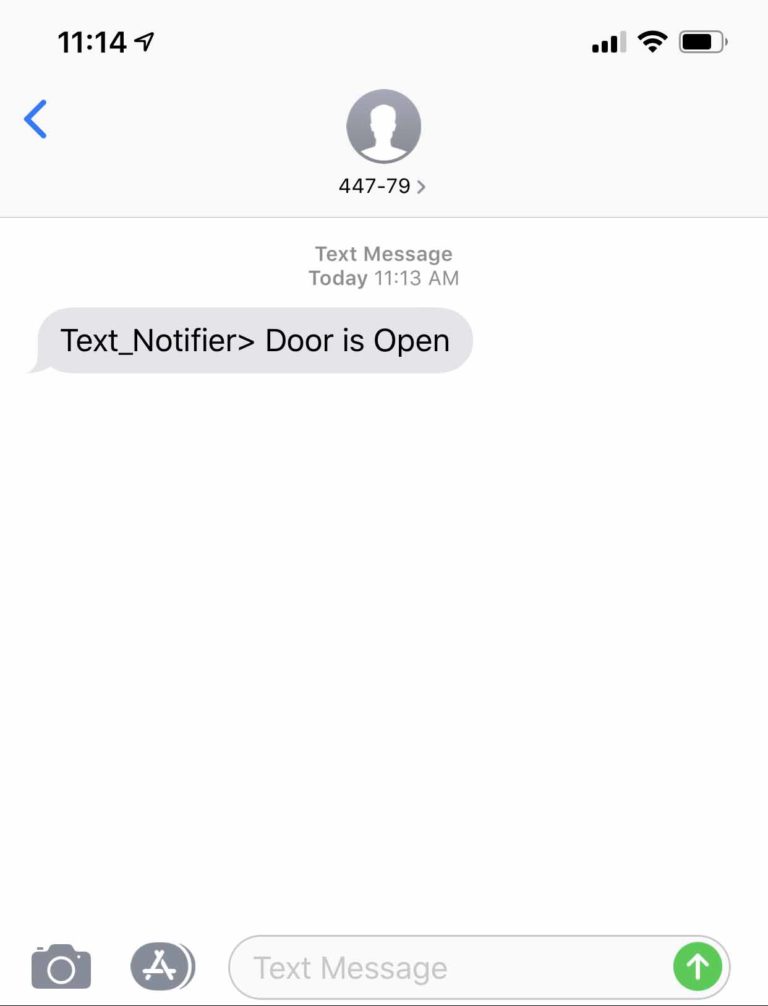
For my setup I’ll just trigger the input with a contact closure and I should receive a Text Message. So asI push the button the text you see here is what I receive.