Base Station
Base Station Software is our reference tool for designing and testing all currently manufactured NCD Devices. Base Station will assist you in learning how any NCD device functions and will provide valuable diagnostic tools to help determine if your controller is functioning as designed. Base Station software exercises every supported feature of every supported device. It is the ultimate reference tool for learning, diagnosing, and testing NCD devices.
Base Station software works by communicating with your controller to identify the model and provides the appropriate graphical user interface for controlling and testing the identified device.
Things You Will Need:
- A computer running Windows XP, Windows Vista, or Windows 7
- Just about any NCD Device
- Power Supply (Computer Grade 12v DC Regulated power supply suggested)
- Base Station Software (ncd.io/start)
Supported Interface Technologies:
- USB
- Bluetooth
- RS-232
- Fiber Optic
- WiFi (Roving Networks Interface)
- Ethernet (Connect ME using RealPort—Recommended) (discontinued)
- Ethernet (Connect ME using TCP/IP) (discontinued)
- Ethernet Lantronix XPort
- Ethernet (Web-I Web Interface or TCP/IP)
- Ethernet -NET Series (discontinued)
- 802.15.4 Manufactured by Digi.com
- 900HP (S3B) Manufactured by Digi.com
- ZigBee Manufactured by Digi.com
- XSC Manufactured by Digi.com
Supported Communication Protocols:
- COM Serial Ports and Virtual COM Ports
- TCP/IP Network Communications
Device Compatibility:
Base Station Software is compatible with all currently manufactured NCD Devices including:
- All Low-Cost Series Controllers
- All R1x/R2x Series Controllers
- All R4x/R8xPro Series Controllers
- All ProXR Series Controllers
- All Reactor Series Controllers including KeyFob
- All Taralist Series (Generation 1 and 2)
- All MXNET/MXNET Series Controllers
- All PWM8x Series Controllers
- All Pulsar Series AC/DC Light Dimmers
- All Fusion Series Controllers
- All ProXR Generation 4 Series Controllers
Base Station software is not compatible with:
- Ultra Series (Limited Production)
- Hybrid Series (Limited Production)
- 1-Way Wireless devices (End of Life)
- All other End of Life products
Getting Started
- Connect your device to the computer. The method in which it is connected will depend on the interface. Connect power supply to the device.
- Download and install Base Station software: ncd.io/start
- Base Station software is used to identify and configure a variety of devices. In order to access your device, you will need to do one of two things:
- Find the COM port to which your device is attached, if connecting to your computer with a USB cable or USB to Serial adapter.
- Discover the IP address of the device, if your device is connected with an Ethernet cable or through a wireless connection.
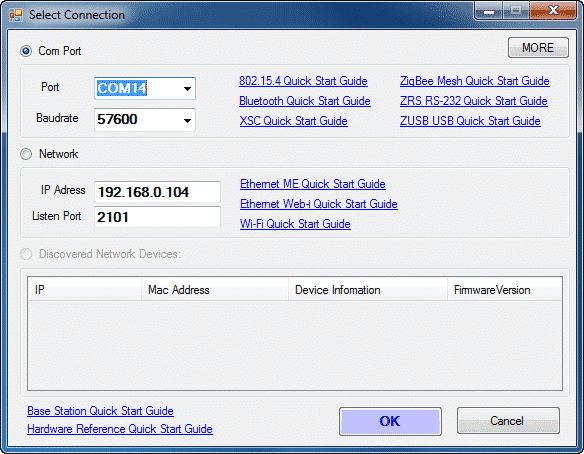
- If you are unsure what type of communication your device is capable of, please reference the appropriate Quick Start Guide. A link for each available interface is provided in the Select Connection window shown below.
- When you have established the COM port or the IP address for your device, open and run Base Station Software.
- A window will open labeled “Connection Settings,” which
allows the user to select the communication method of the device. Select either “COM Port” or “Network.” - If you select “COM Port,” be sure to change the “Port” field to the COM port to which your device is attached and change the baud rate to the default baud rate of your device.
- If you select “Network,” enter the IP Address of your device in the “IP Address” field. You can also change the listening port, but 2101 is suggested.
- Select “OK”.
- A window will open labeled “Connection Settings,” which
- You will be confronted with a simple control panel that allows you to identify the device you are using, configure the device, and use all command sets that are available.
NOTE: Base Station Software is updated frequently; it is not unusual for Base Station to be updated several times per month. If you experience any compatibility issues, please try downloading the most recent version from our web site. Windows shown in this guide may be out of date from the current version of Base Station software. Portions of Base Station software will require Internet access.
Useful Features
There are some useful features to look for when using Base Station Software to control, test, or configure your device:
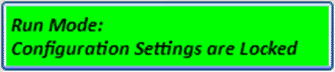
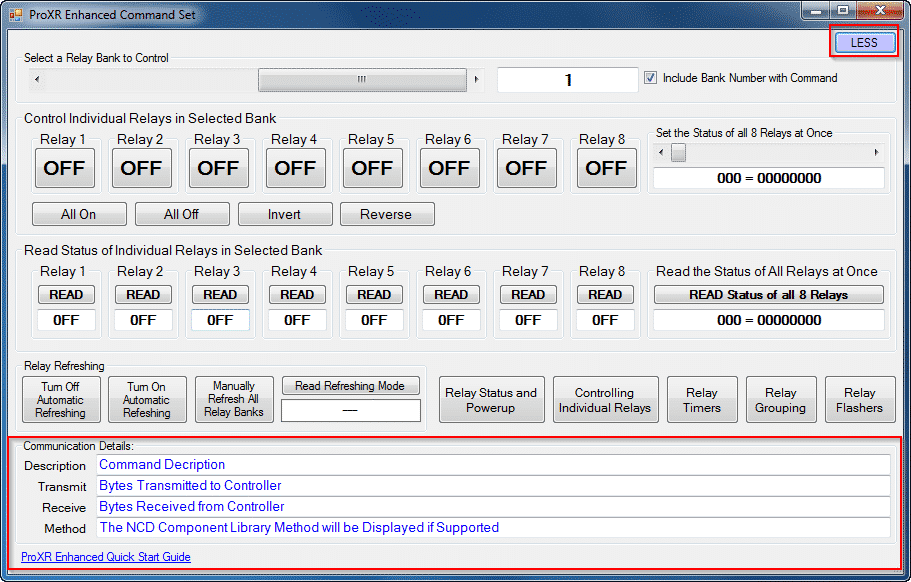
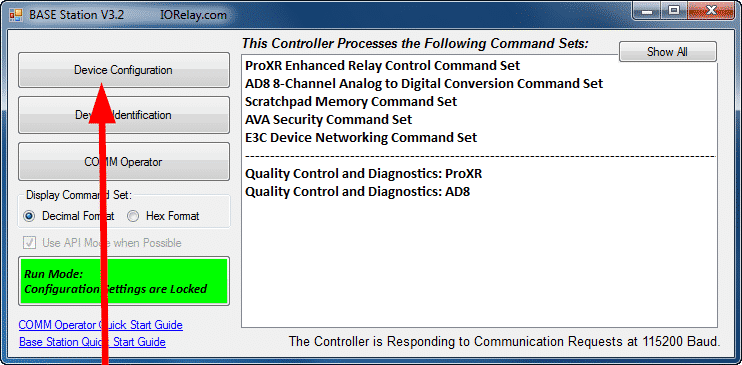
- At the bottom left corner of each window there is a link to relevant documentation for your device (Top: Relevant documentation circled in red).
- In the Control Command Set Window, and many others, there is a MORE or LESS option at the top right corner. Selecting MORE allows you to view specific communication details (Bottom: diagram shows the window labeled ProXR Enhanced Command Set, this will differ depending on your device. MORE or LESS button and communication details are circled in red).
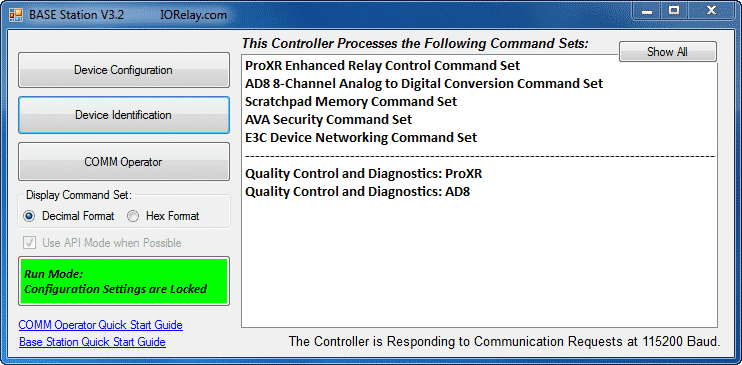
Device Command Sets

Base Station software asks the controller which command sets are supported. The supported command sets are listed when you run the Base Station software application. Some controllers may show more command sets while other controllers may show fewer command sets. The Base Station program will decide which command sets apply to your particular controller. This allows our software to scale with the product line.
NOTE: This illustration is just for demonstration purposes and does not represent all devices.
You may click one time on any item in the list to see a graphical user interface that was created as the controller was developed. Each command set represents a module that is installed in the firmware of your device.
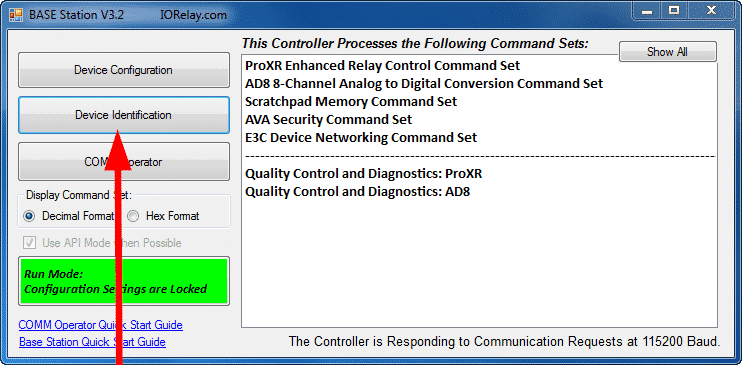

NOTE: Not all devices support Device Identification. All devices released in 2012 and later support Device Identification.
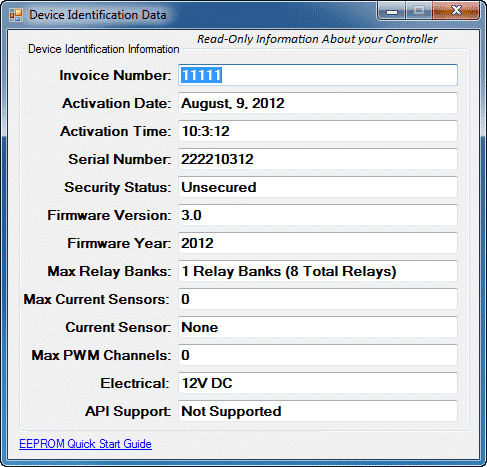
A window will open labeled “Device Identification Data.” This window contains important “Read-Only” information about your device. Note the “Documentation Related to this Controller” field. This is a compilation of all articles relevant to your device. Click on an item in the list to view. You will need an Internet connection to access this information.
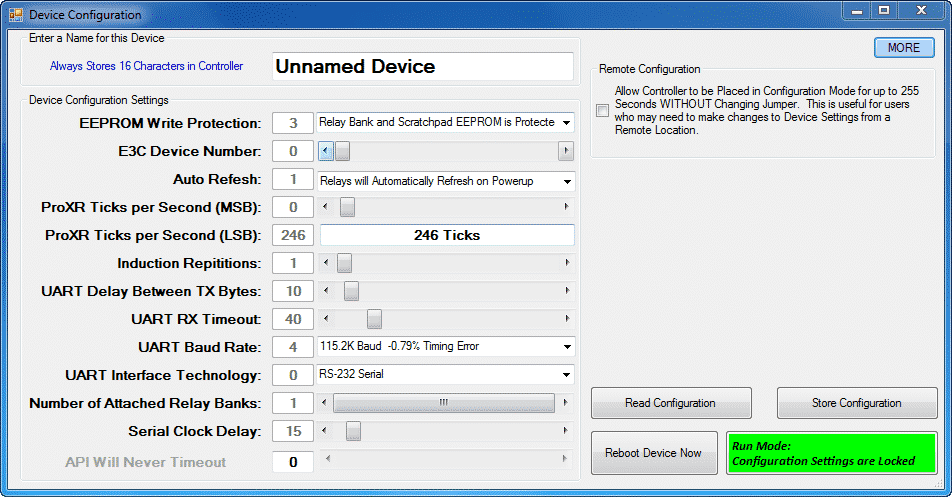
Device Configuration
All devices are configured prior to shipping. The Configuration page is for experienced users who wish to customize
NOTE: Not all devices support Device Configuration. All Devices released in 2012 and later support Device Configuration. Some configuration settings will affect device communication timing, which can render a device too fast for the chosen interface. If you ever lose communications with your controller, power down the controller, set the Program/Run jumper to the Program Position and power up the device. Attempt Communication at 57.6K or 115.2K Baud. If problems persist, install a ZUSB communications module to recover device settings.
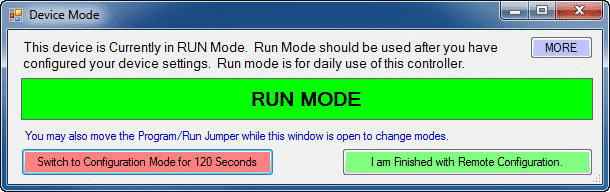
NOTE: NCD Devices must be in Configuration mode to make changes. Use the green button shown above to change to Configuration mode. You may also use the Program/Run-jumper to change modes. NEVER leave the jumper in Program mode. Program mode is for configuration changes only. Use RUN mode for daily operation.
Configuration settings may be changed using sliders and drop-down boxes. These settings may be used to increase the performance of the device or to adjust timing parameters so that you can maximize compatibility and speed. When using this software, you can hover over each parameter and an explanation of the parameter will appear in the text box shown at the bottom left of the screen shot above.
Note the green button located at the bottom right corner of the “Device Configuration” screen shot. This is critical to making changes to your device. We will cover this in the next portion of the guide.
Configuration and Run Modes
All NCD controllers have two modes of operation: Configuration mode and Run mode. Normally, the controller should always be in RUN mode. Use Configuration mode if you want to make changes to the settings of the controller. Configuration mode is a temporary mode. Configuration mode allows you to write parameters to the controllers for changing device settings. Run mode does not allow accidental changes to configuration parameters. On-board memory is protected from write operations in Run mode.
Traditionally, you needed to move a jumper to change device modes. You can still do this, but 2012 and later controllers allow you to put the device in Configuration mode for a short period of time without moving the jumper. This is very convenient when you need to setup the device in a remote location.
So far, the concept of Configuration and Run mode is pretty simple. But there are special rules about the use of these modes that must be followed to prevent loss of communications. Most notably, changing the baud rate or any of the UART settings can cause a loss of communications. This is where the hardware Configuration/Run jumper comes into play. When the jumper is set to Configuration mode and the controller is powered up, the controller will always load safe communication settings so you can recover communications with the device.
If at any time your settings cause a loss of communications, follow these steps:
- Power Down the Controller
- Set the Configuration/Run Jumper to Configuration
- Power Up the Controller
- The device will boot up running at 57.6K or 115.2K Baud using very conservative communication parameters that are compatible with all communication technologies.
- Note that if you have set a fixed IP address into a Web-i or –NET controller, this will force the communications module into DHCP Mode so that you may change your IP address settings. Without this feature, you could permanently lose communications with these Ethernet controllers. Moving the jumper while the controller is already powered up will NOT force DHCP mode. DHCP mode is ONLY forced when the Program/Run jumper is in Program Mode AND the Device is Powered Up with the jumper in the Program position. Note that a Fixed IP address is only applied when the controller powers up with the jumper in the RUN position.
Software Configuration Mode
Software Configuration Mode allows you to send a command to put the controller in Configuration mode for up to 255 seconds. This is extremely useful if you need to make changes to the controller from a remote location. If you change the baud rate settings, our Base software will attempt to Re-Sync to the device. This is effective most of the time, but occasionally, you may need to exit and re-run our Base software.
If you make changes to any parameters while in software configuration mode, the controller will not respond to these changes until the Reboot command is issued. Our software automatically issues the Reboot command at the appropriate times, allowing you to make changes without ever touching the device. However, configuration settings can lead to a loss of communications, so if you intend to make changes to communication parameters, make sure the Configuration/Run jumper is accessible in case you need to boot up the controller in “Safe” mode of 57.6K or 115.2K Baud.
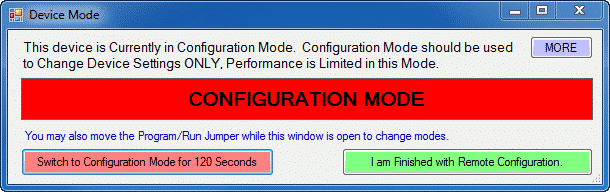
The Green button shown below is extremely important when using Base Station software. You will see this button throughout the program for all devices released in 2012 and later. Sometimes it will be green, sometimes it will be red. This depends on the mode of operation. When the button is green, your controller is running using the configuration settings you have chosen. When this button is red, you are allowed to make changes to the configuration settings of the controller.
To issue software configuration mode without moving the jumper, click the button that says “I am Working Remotely…I Need Configuration Mode for 120 Seconds.” To cancel out of Configuration mode, use the “I am Finished with Remote Configuration” button. Note the controller will NOT reboot when using any of these buttons. The Configuration page allows you to manually reboot the device. Storing settings into the controller also causes the device to reboot with your new settings provided the Jumper is in Run mode during boot up. Many configuration settings are over-ridden to “Safe” settings if the controller powers or reboots with the jumper in Configuration mode.
Remember, you can always recover any loss of communications by booting the controller with the Configuration/Run jumper set to the Configuration setting. Performance will be limited to 57.6K or 115.2K Baud and device timing will be relatively slow to maintain compatibility with all communications modules, programs, and older computers.