Node-RED Thermocouple Alert
Thermocouples are widely used in many industries due to their affordability and their ability to measure over a very wide range of temperatures. Our Wireless Enterprise Thermocouple quickly and easily adds a type K thermocouple to your Wireless Sensor Network, allowing you to read temperatures between -200°C (-328°F) and 260°C (500°F) with the included probe. Combine that with the power of Node-RED and your next IIoT project is just a few clicks away.
One of the most requested pieces of functionality we’ve had for our thermocouple products is simply the ability to be notified via email when a sensor detects that the temperature has fallen outside an acceptable range. For example, in the food service industry the FDA sets strict guidelines governing at what temperatures food may be stored, so knowing that your walk-in cooler is approaching the limit so you can service it before it enters the danger zone can save you a great deal of money in food cost.
In this article we’ll set up a Node-RED dashboard to view the temperature reported by this Wireless Enterprise Thermocouple, and optionally send an email when it drifts outside of a configurable range.
I will be using Fahrenheit for this tutorial, if you’d like to use Celsius feel free, there is only 1 node that will need to be left out which I’ll point out in Step 3.

The Setup
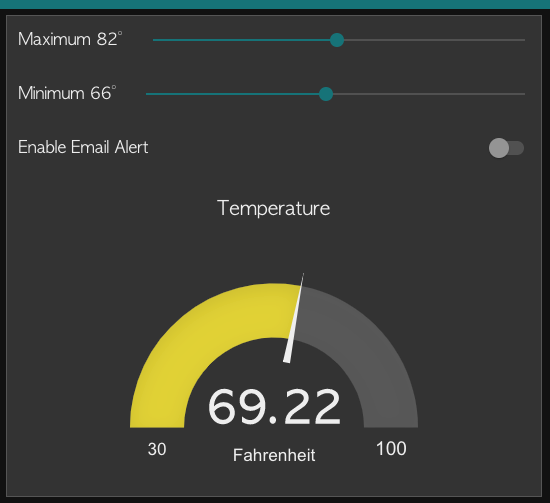
If this is your first time using Node-RED with our Wireless Enterprise Line, please check out our setup post, it’s relatively short and you should only need to do it once, as the steps become self explanatory after the first use. As you can see in the graphic above, I wasn’t monitoring a walk-in cooler for this tutorial, the steps will remain the same, and the user controls allow you to build out this example on your desk and easily move it into the application of your choice by simply altering the thresholds.
Prerequisites
Outside of the typical packages we would use for one of these tutorials (ncd-red-wireless and node-red-dashboard), we will be using a subflow I built to augment Node-RED while we wait for persistent settings to be added to the core. To use the subflow copy it from the block to the right, and import into Node-RED using the Import From > Clipboard (Ctrl-I) menu option. Once you’ve done this, we can get into the nitty gritty! This is our most complicated tutorial to date, and with any luck you’ll leave with a much deeper understanding of how Node-RED functions than you started with.
Persistent Settings Subflow
[{"id":"4b8dcadd.1afa44","type":"subflow","name":"Settings","info":"Persist settings in a flat file.\n\nIf msg.clearAll is set to true, the settings are truncated.\n\nSending a topic of \"get\" will return the property you've named in the payload.\n\nAny other topic will be treated as a property and the payload will be saved to the settings file.","in":[{"x":40,"y":220,"wires":[{"id":"fd773621.54f638"}]}],"out":[{"x":380,"y":160,"wires":[{"id":"fd773621.54f638","port":0}]}]},{"id":"da4b9b0.096e468","type":"file in","z":"4b8dcadd.1afa44","name":"","filename":"persist/settings.json","format":"utf8","chunk":false,"sendError":true,"x":360,"y":60,"wires":[["3dbc537d.eabbac"]]},{"id":"3dbc537d.eabbac","type":"switch","z":"4b8dcadd.1afa44","name":"","property":"error","propertyType":"msg","rules":[{"t":"nnull"},{"t":"else"}],"checkall":"true","repair":false,"outputs":2,"x":570,"y":60,"wires":[["c6fa089c.c66448"],["a70ce91e.334e88"]]},{"id":"9b5416a4.2e6ba8","type":"file","z":"4b8dcadd.1afa44","name":"","filename":"persist/settings.json","appendNewline":false,"createDir":true,"overwriteFile":"false","x":1080,"y":40,"wires":[]},{"id":"e8d03084.ecada","type":"json","z":"4b8dcadd.1afa44","name":"","property":"payload","action":"str","pretty":false,"x":390,"y":260,"wires":[["b8af204c.779fd"]]},{"id":"9eecb642.afe988","type":"inject","z":"4b8dcadd.1afa44","name":"","topic":"","payload":"","payloadType":"str","repeat":"","crontab":"","once":true,"onceDelay":0.1,"x":90,"y":60,"wires":[["da4b9b0.096e468"]]},{"id":"f144822b.17fe7","type":"change","z":"4b8dcadd.1afa44","name":"","rules":[{"t":"set","p":"persistant_settings","pt":"flow","to":"payload","tot":"msg"}],"action":"","property":"","from":"","to":"","reg":false,"x":1120,"y":100,"wires":[[]]},{"id":"a70ce91e.334e88","type":"json","z":"4b8dcadd.1afa44","name":"","property":"payload","action":"","pretty":false,"x":930,"y":100,"wires":[["f144822b.17fe7"]]},{"id":"fd773621.54f638","type":"function","z":"4b8dcadd.1afa44","name":"","func":"if(msg.clearAll === true){\n flow.set('persistant_settings', {});\n return [msg, {payload: {}}];\n}\n\nvar settings = flow.get('persistant_settings') || {};\n\nif(msg.topic == 'get'){\n msg.payload = settings[msg.payload] || null;\n return [msg, null]\n}else{\n settings[msg.topic] = msg.payload;\n flow.set('persistant_settings', settings);\n return [msg, {payload: settings}];\n}","outputs":2,"noerr":0,"x":210,"y":220,"wires":[[],["e8d03084.ecada"]]},{"id":"b8af204c.779fd","type":"file","z":"4b8dcadd.1afa44","name":"","filename":"persist/settings.json","appendNewline":false,"createDir":true,"overwriteFile":"true","x":620,"y":260,"wires":[]},{"id":"c6fa089c.c66448","type":"change","z":"4b8dcadd.1afa44","name":"","rules":[{"t":"set","p":"payload","pt":"msg","to":"{}","tot":"str"}],"action":"","property":"","from":"","to":"","reg":false,"x":780,"y":20,"wires":[["9b5416a4.2e6ba8","a70ce91e.334e88"]]}] 
The Flow
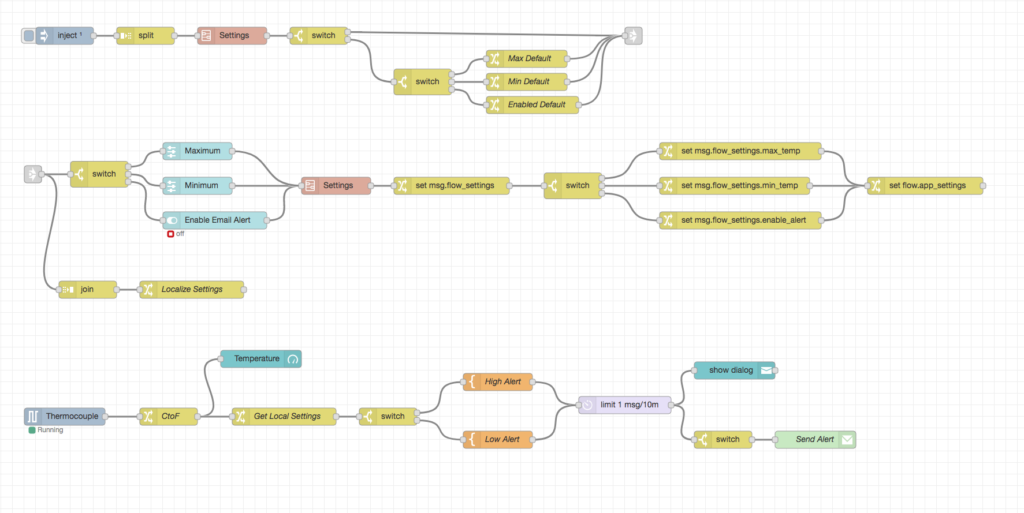
Now that you have all the pieces, it’s time to put them together. As I mentioned before, this flow is fairly complex, so we’ll break it into some constituent pieces to make it easier to digest. The main parts of the flow are:
Step 1. Initializing / Retrieving the Settings
Step 2. User Input and Updating the Settings
Step 3. Reporting and Notifications
Please note that I am using a large monitor, if you can’t fit all of your nodes next to each other, or at least don’t want to use the scroll bar, the important thing is that the wires are connected to the appropriate places, the layout of the nodes themselves has no impact on the functionality of a flow.
We’ll be going into some depth here, so if you are familiar with Node-RED enough to feel like you can accomplish most of this on your own, feel free to skim, or even skip ahead using the links above. If you just want the prize without the work, I’ve included the complete flow at the bottom of this post for import.
Step 1: Initializing / Retrieving the Settings
In order to set up these alerts to be configurable, we need to allow for user defined thresholds. One of the current limitations of Node-RED is a lack of persistent storage, meaning that when you restart Node-RED, or deploy new changes to a flow, anything you’ve saved using the available “context” object is lost. To prevent this, we’ll be using a combination of flow context and a flat file storage mechanism to retain them between deployments. In addition to the subflow I had you import, the other nodes we’ll be using for this section are the inject, split, switch, change, and link nodes. I’m not going to go into the location of the nodes in the palette, if you’re unsure of where one is, just type its name into the search box at the top of the palette.

Kicking off the Flow
In order for a flow to start, it needs some point of input. In the case of this section we need to retrieve data when Node-RED starts up, and set some defaults if no data is available. We’ll be using an inject node for that. The inject node allows you to manually start a flow using the button it provides, and/or trigger a flow when Node-RED starts automatically after a pre-defined period of time.
Go ahead and grab an inject node from your palette, drag it onto your workspace, and double click on it. You’ll notice the options are fairly limited, you can set a payload and topic, and define if it automatically sends them, and how frequently if you choose to repeat it. What we need this node to do is send a list of setting names out that we can grab from our persistent settings
In the payload section, enter max_temp,min_temp,enable_alert make sure there are no spaces. Set the Topic to “get”, and check the box that says “Inject once after”, you can leave it at 1 second, that gives the persistent settings subflow enough time to get started before we request data from it.

Fetching the settings
Now that we’ve sent a payload with the setting names we need, we need to split the payload into multiple messages, the subflow expects a message with a payload of {setting_name} and a topic of “get” in order to retrieve a specific setting.
To do this we’ll grab a split node, drag it to the right of the inject node, and double click. Change the “String/Buffer -> Split using” setting to a comma (,) and click done.
Next, grab the “Settings” subflow node from the palette and drag it to the right of the split node. There are no settings for this, just wire the three nodes together.
When the flow kicks off we will be getting 3 messages from the Settings node, one for each setting. If a setting has not been saved, the payload that is sent out will be “null”.
Bring a switch node onto the workspace to the right of the settings node and edit it. We need 2 conditions, leave the property at msg.payloadand set the first condition to “is not null”, click the add button down at the bottom and set the new condition to “otherwise”. Click done and wire up the last node.
The first output of the switch will send settings that have been retrieved from a previous session, the second will be for settings that have not previously been set, this allows us to define defaults if no value exists, or immediately localize the settings if the values have already been saved.
Adding the Default Settings
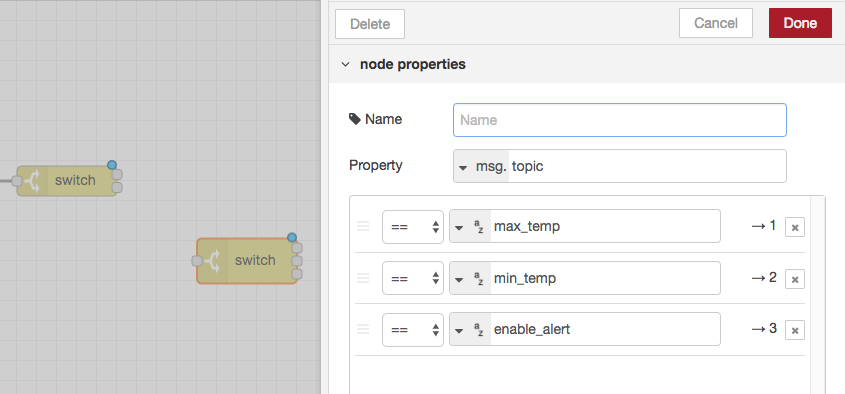
To set the default settings we’ll be using change nodes, but we’ll need another switch to define which change node is for which setting.
Bring the switch down to the bottom right of the last switch and edit it, change the property to msg.topic, we’ll need 3 rules, one for each setting. The condition field can be left at ==, and the value next to it should be set to a single property name for each condition, max_temp ,min_temp , and enable_alert, respectively. Click done and wire up the node.
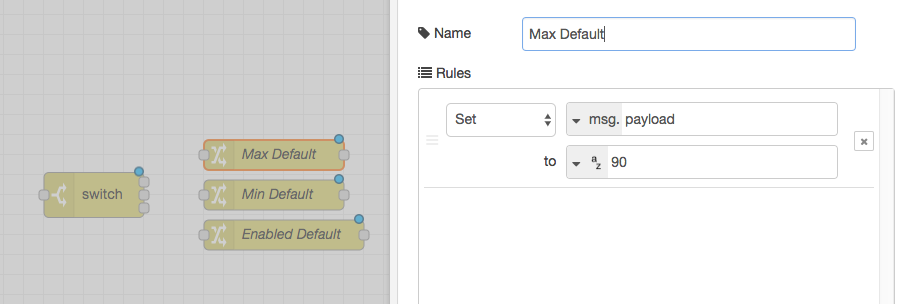
Next we need 3 change nodes to correspond with those outputs. Each of these will set the payload of the setting it controls to the default you want it at, I like giving these nodes names based on the properties they are handling, then you’ll need a rule in each that uses the Set operator on the msg.payloadproperty.
For the first 2 (max_temp, min temp) this should be the value in degrees you want your thresholds set at, I went with 90 for the max and 60 for the min since I’m bench testing all of this on my office desk. For the third one (enable_alert) it should be a true or false value, so change the drop down on the second line of the rule to bool and select false(we’ll turn it on in a moment and then it will be saved).
Lastly, grab a link node from the “output” group, and add it to the right. If you’ve arranged your nodes correctly wiring them up should be pretty straight forward, you can check the screenshot above to ensure you’ve got it set up properly.
This default setting section may seem trivial when you think about the fact that as soon as you touch the controls the settings will be saved, but I like to think of it as covering my bases, I can copy this flow out to another machine if I need to, or easily tweak it to handle multiple sensors, and this avoids errors being thrown.

Step 2: User Input and Updating the Settings
Now that we have a way to grab previously set or default values, we need to set up a user interface and adjust the elements accordingly. We also need the user interface to be responsible for saving the settings once they have been changed so that when telemetry data comes in we can determine if we need to send out a notification. A couple of these nodes are more complicated that the last section so we’ll go a bit more in depth. In addition to a few of the nodes we used in the last section, we’ll be using the join node, along with the dashboard switch and slider nodes.
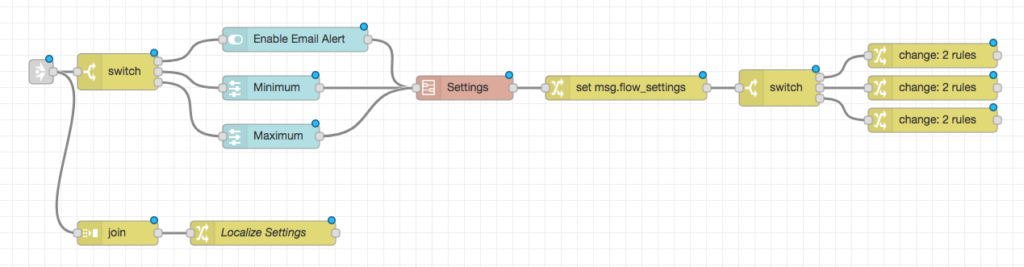
Localizing the Settings
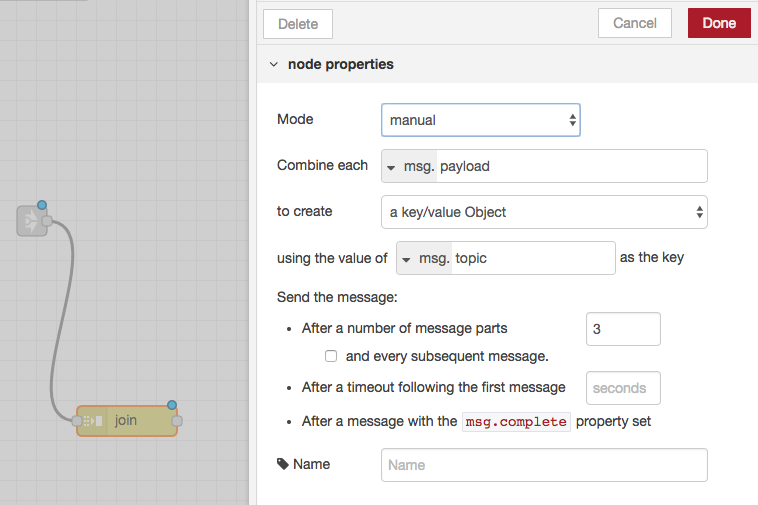
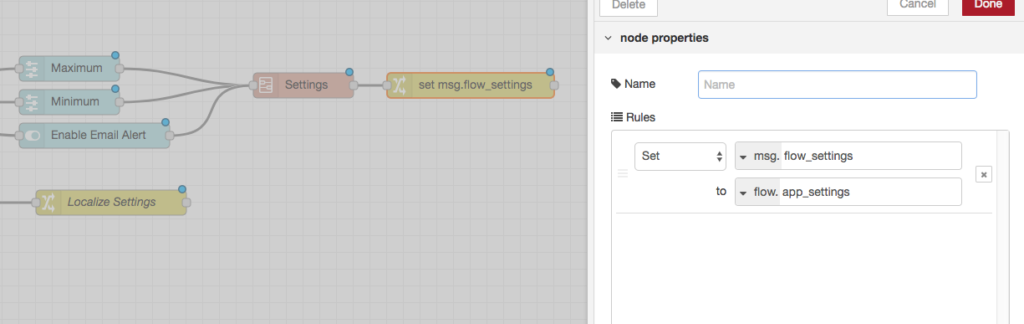
The last thing we did in the previous step was add an output link node, this wasn’t strictly necessary as we are building these sections into a single flow, but without it we would have needed 8 wires the ran from the end of the last section to the beginning of this one. Bring an input link node onto the workspace and double click it, you’ll see list with 1 option, check it and it will create a “hidden” wire between the two nodes.
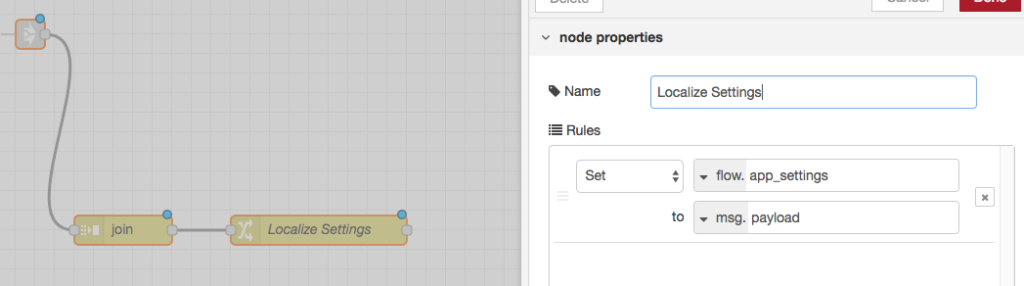
Next bring over a join node and drop it to the lower right of the link, this node will rejoin the settings into a single object we can save to the flow for later use. Double click on it, and set the Mode to “manual”, this will bring up several more options, we want to Combine each msg.payload to create a key/value Object using the value of msg.topic as the key, we want to do this after 3 message parts. Once you’ve added those settings you can click done.
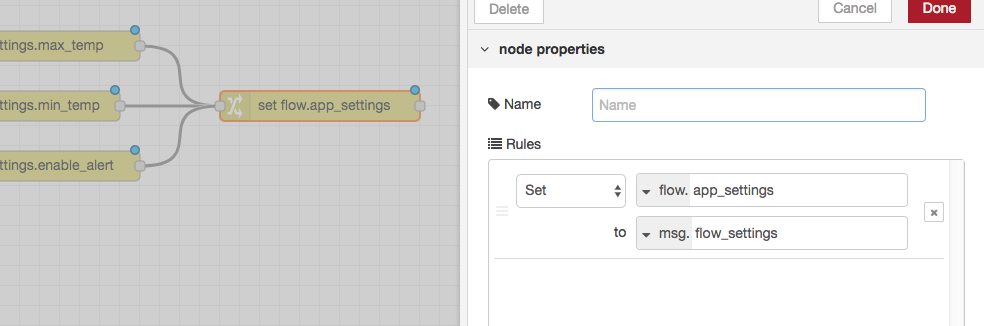
Finally bring a change node over to the right of the join node, This only needs 1 rule.
Set flow.app_settings to msg.payload
This will take the object just created from our settings and save it to the local flow context. The context object is accessible from any node in the flow, which makes it ideal for settings like these where we need to be able to use them for filtering at another point in the flow.
Building the UI
Next up are the UI elements, the link node we added is outputting a message for each setting, the UI elements can take those values and adjust the dashboard element to reflect it, so we’ll need another switch node.
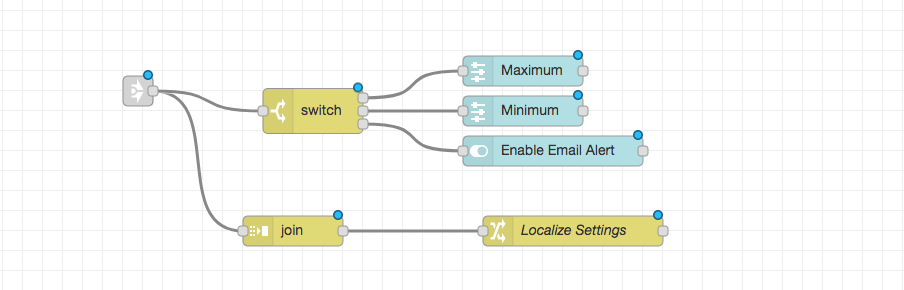
One of my favorite things about Node-RED is the quick and easy use of familiar shortcuts. Click on the switch node you made in the last section that outputs 3 wires to the default settings change nodes, click cmd+c (ctrl+c on windows) and then cmd+v (ctrl+v on windows), this creates an exact copy of that node, move it above the join node you added a moment ago.
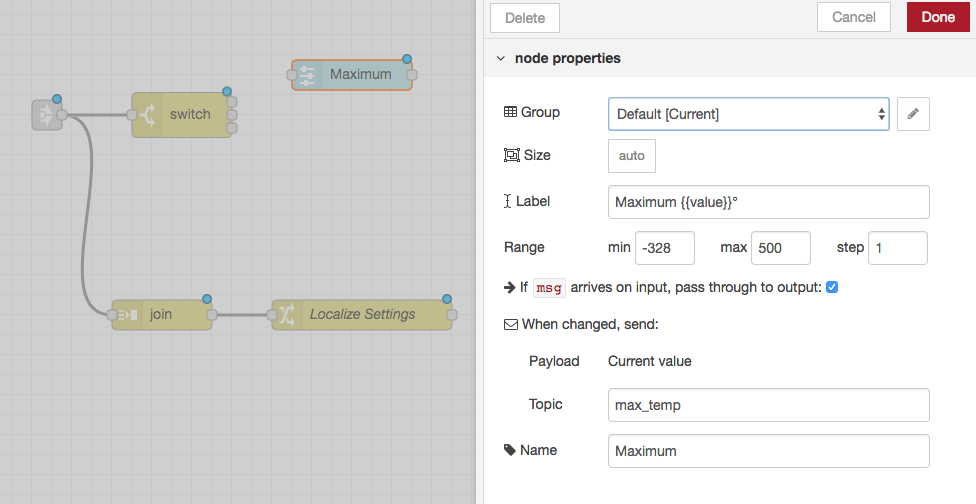
Now we’ll be adding the actual dashboard elements, grab a slider node from the palette and bring it over to the top right of the switch node, this will be our maximum threshold, double click on it to configure.
These sliders by default don’t display the actual numeric value, but fortunately they’ve given us a way around that. In the Label field type Maximum {{value}}°, the curly braces indicate that part should be replaced with the “value” variable on the front end. You can configure the range of this slider, for the purpose of this tutorial I set my range to the thresholds of the actual sensor, -328 to 500 (f). Check the checkbox so that anymsgwill be passed through to output, and set the Topic to max_temp so it knows which variable to update.
Now copy and paste that node to a spot directly below it, go in and replace Maximum with Minimum and max_temp with min_temp, and you have finished your sliders!
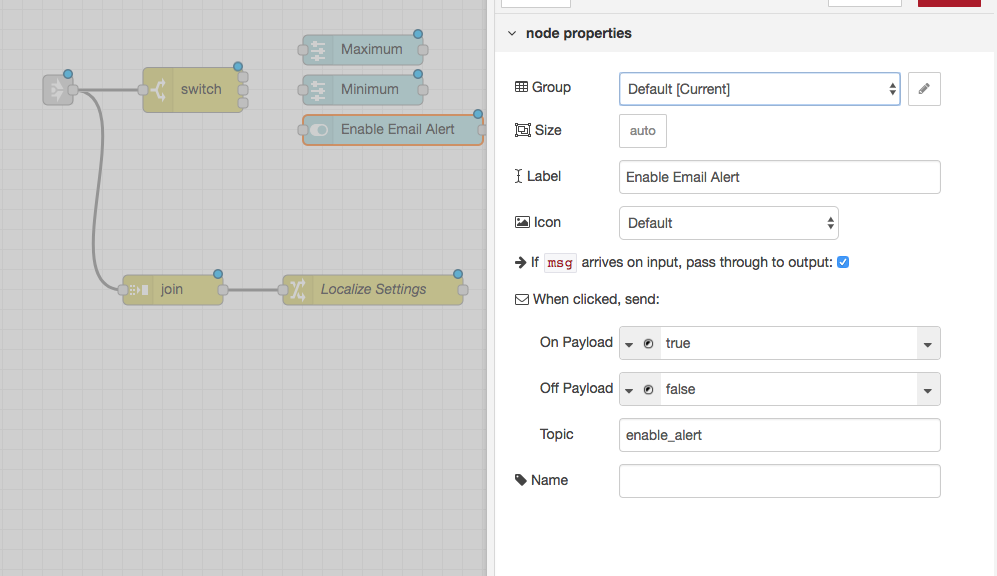
Lastly, grab a switch node from the dashboard section and drag it below the second slider, edit it and make the Label “Enable Email Alert”, then set the Topic to enable_alert. That’s all there is, wire these nodes up as shown in the screenshot and you have successfully added dashboard elements to your flow.
Saving the UI Settings
The last thing we need this section to do is save the settings coming from the UI elements, so we’ll need to grab another node for the Settings subflow and position it to the right of the UI elements that we just added, this will set any values coming out of the UI nodes permanently.
Next we need a change node to send it into, this part is a little confusing so I’ll try to explain it thoroughly. Earlier when we “Localized” the settings, we assigned the stored values to the flow context object, now we need to update that object, but only 1 value at a time depending on which UI element was adjusted. In order to access the children of the main object, we need it to be part of the msg object, a limitation of the change node is that we can’t access descendants of the flow context (or anything other than the msg object) more than 1 level deep. If you don’t understand how JSON works, this is a question of object structure. Imagine a bicycle shop that has 3 bicycles (it’s a small place), we need to know how tall bike number 2 is, in javascript that could be accessed something like this: shop.bike_2.height, in this case, bike_2 is a first level descendant, when we access properties on the msg object with the change node, we can access as deep as we need to, so we could make sure the rule is set to access msg. and just type bike_1.height and it would work. This same doesn’t hold true for the flow and global context objects, so we’ll move the top level property over to the msg object so we can work with its children.
Clear as mud? Good, let’s move on… (if you need help understanding this principle or anything else, feel free to post on the Community). If you haven’t already, add a change node to the right of the Settings node, and:
Set msg.flow_settings
to flow.app_settings
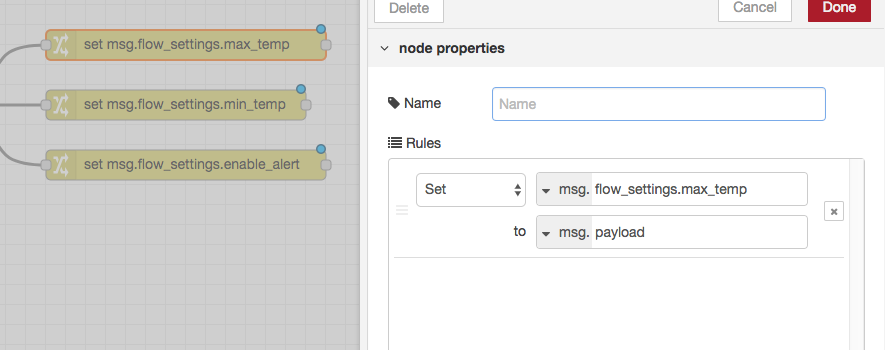
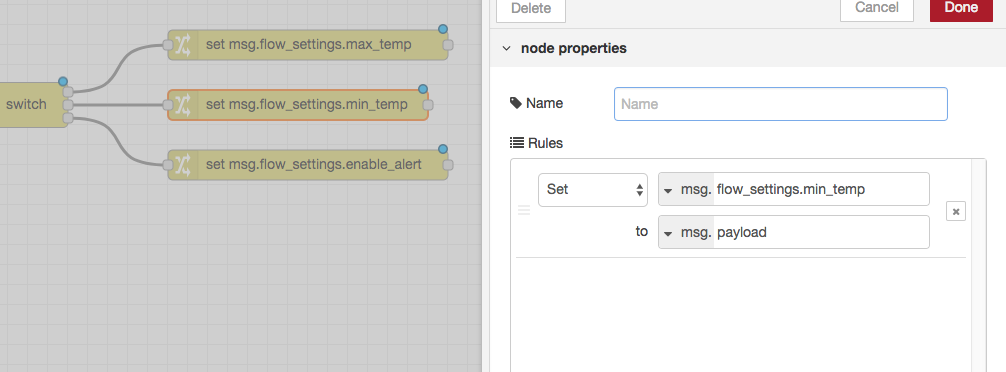
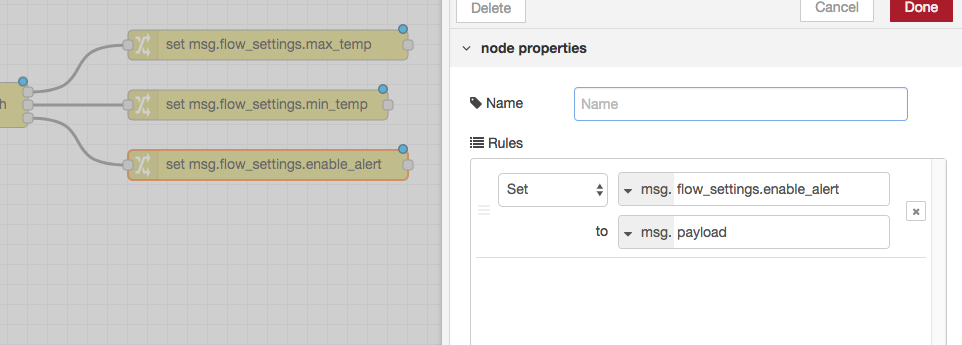
Then, just like earlier, copy and paste your switch node with the 3 outputs to the right of this change node.
Now we need to set the properties of the object we just pulled into the msg, so we’ll need 3 change nodes, they’ll go in the same order as our other settings nodes, from top to bottom they control max_temp, min_temp and enable_alert. The single rule for each of these nodes will be to assign the appropriate property based on the payload it received. So the top node should be:
Set msg.flow_settings.max_temp
to msg.payload
The other two should be the same, replacing “max_temp” with their respective property names. Finally we need a final change node to update the `flow.app_settings` object so the rule should be:
Set flow.app_settings
to msg.flow_settings
Make sure you’ve wired everything properly as in the screenshot, and move on to Step 3!
Step 3: Reporting and Notifications
Alright! Now we have a mechanism to retrieve settings, allow users to alter them with pretty visual elements, and save those changed settings for later use. The last things we need to get this system running is the actual thermocouple display and notification system! This section will have us using Wireless Device, Gauge, template, delay, email, and notification nodes in addition to those you are already familiar with.

Getting the Current Telemetry
If you haven’t already as part of the setup, grab a Wireless Device node from the palette and drag it to the workspace, double click and configure the serial device and set the type to Thermocouple.
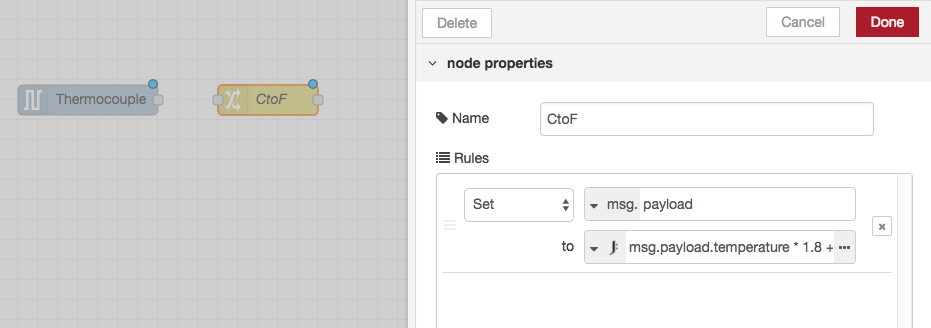
If you are going to be using Fahrenheit as I have in this tutorial, we’ll need to convert the temperature reading with a change node, (if you are using Celsius you can skip this node), the Set value should be msg.payload, we’re going to use a JSONata expression for this one, so select the stylized J: expression from the list next to “to”, this is a great tool for javascript to simplify some common tasks, in this case a simple math expression. The sensor will output a payload with a “temperature” property, so our expression will be:
msg.payload.temperature * 1.8 + 32
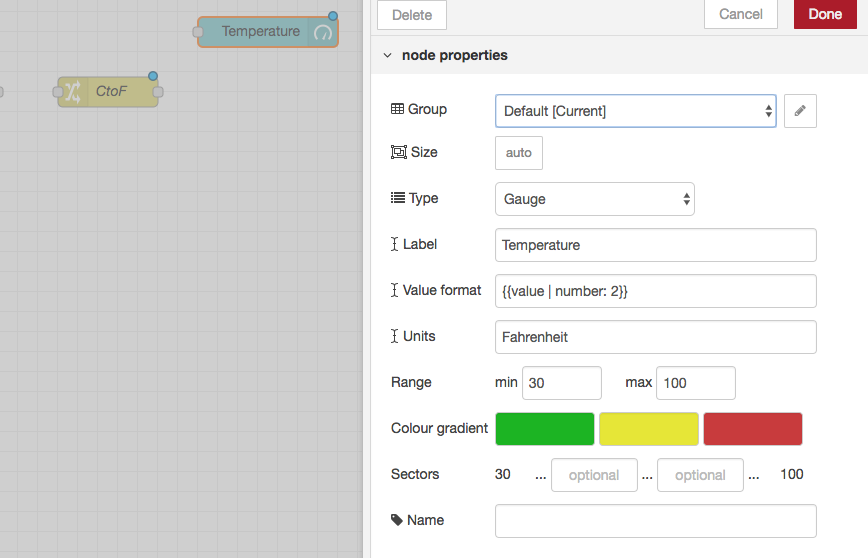
Next we’ll add the gauge that allows us to see the temperature, grab one from the palette and add it above and to the right of the change node. Just make the Label “Termperature”, the Value format allows us to truncate some of the digits after the decimal point using an AngularJS filter, so we’ll round to 2 digits by entering this formula:
{{value | number: 2}}
Set the Units to the scale you are using (Celsius or Fahrenheit), and the range to whatever you want, probably the outside limits you can expect your application to achieve, I went with 30-100, then click done. Finally wire the nodes together.
Viewing the Dashboard
At this point you can click deploy and visit http://localhost:1880/ui. You should see the dashboard, it should look something like previous picture. You can also get to the dashboard from the link in the Dashboard tab in the sidebar.
Your dashboard probably looks a lot more white and blue than mine at this point, if you are so inclined you can adjust the theme by clicking on the Dashboard tab in the sidebar, followed by Theme in the secondary tab list there. You can also rearrange your form elements from the Layout tab if you want.
If you plan to build UIs after this one, I strongly suggest playing with some of the layout settings… adding tabs and groups, rearranging the elements, redeploying, and checking how it affects the UI. The process is elegant and pretty easy to understand, but you can build much more functional dashboards with a little understanding of how the package organizes everything.
If you are having trouble getting a temperature reading, remember that by default these sensors only check in every 10 minutes, simply clicking reset on your sensor will force a check in and you should see the gauge come alive, if it doesn’t you can always wire up a debug node to the Thermocouple node, and possibly the Celsius to Fahrenheit node to make sure the message is coming through.
Getting the Settings
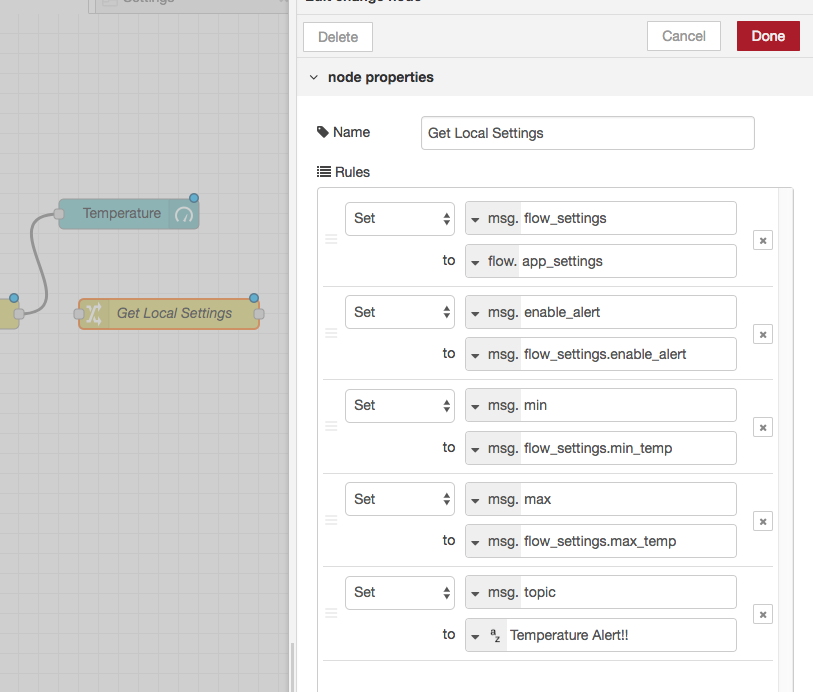
The last thing to do is test the incoming value against the user defined thresholds and send out notifications, the first node we need is a change node, we need to grab the settings from the flow context and add them to the message for the switch node we’ll use next. This is pretty much the reverse of the process we used earlier to save the settings after a UI element was updated, the 4 rules to handle this are:
Set msg.flow_settings
to flow.app_settings
Set msg.enable_alert
to msg.flow_settings.enable_alert
Set msg.min
to msg.flow_settings.min_temp
Set msg.max
to msg.flow_settings.max_temp
Those will get all of our properties to a place we can compare them, the last rule I’ve added will set the topic of the notification, and the subject of the email:
Set msg.topic
to azTemperature Alert!
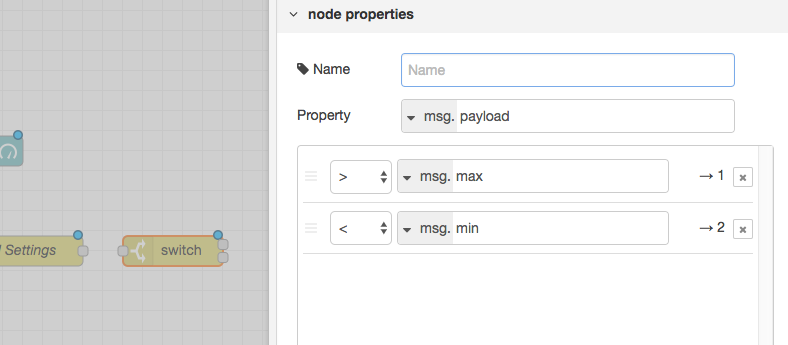
The Logic
In order to determine if the temperature is in an acceptable range we need to use a switch node, we’ll only be testing for above or below the thresholds, so it’s pretty straight forward:
> msg.max -> 1
< msg.min -> 2
This will give us 2 outputs that we can handle differently depending on whether the temperature is above or below the defined range.
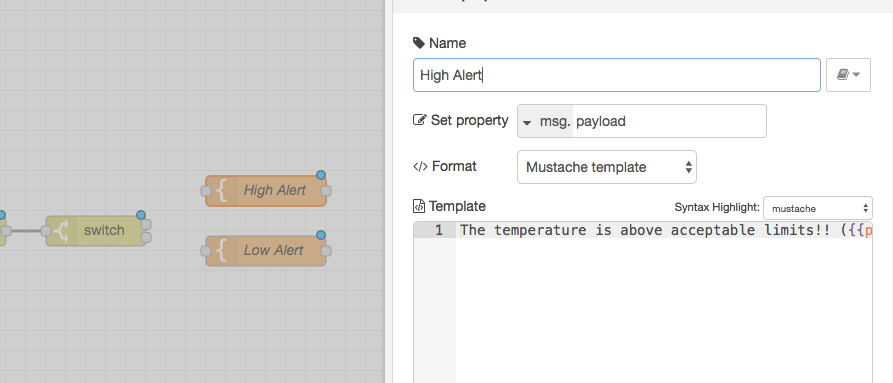
Now we need to build a message for the notification, grab a Template node from the function category (not the dashboard template node) and bring it to the upper right of the switch. This will be our “High Alert” message, we can use a mustache template which allows us to pull in the payload without needing to write any code. The settings are all correct by default, just add this into your Template:
The temperature is above acceptable limits!! ({{payload}})
Next copy and paste that node to a position below it, and change the word “above” to “below” in the new node.
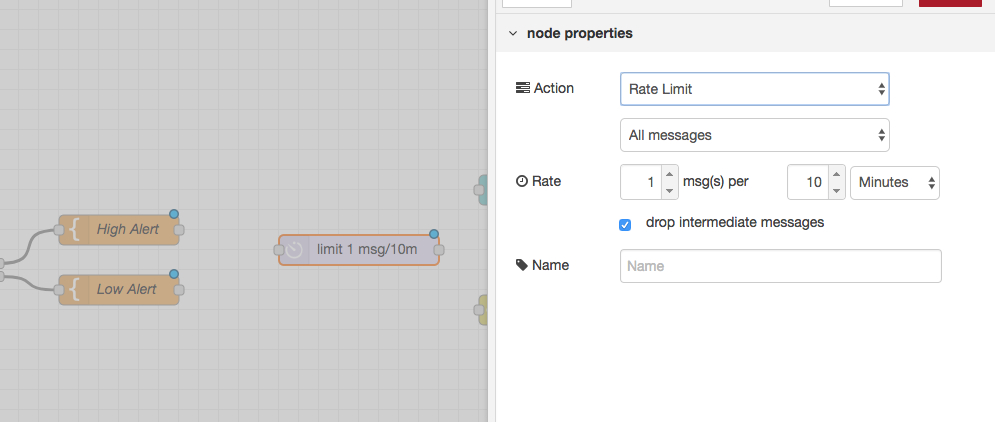
If the temperature drifts out of range at this point a message will be sent every time the sensor checks in, you can limit the frequency of messages using a Delay node, grab one now and bring it to the right of the templates you just built.
Change the “Action” to “Rate Limit”, and set a reasonable rate. My sensor checks in every 10 seconds, so I have my rate limit set to 10 minutes. Lastly check the box next to “drop intermediate messages”. After the first message comes through all other messages will be ignored until 10 minutes has passed.
Make sure you have all the nodes wired together and take a breath… you’re almost done!
The Alerts
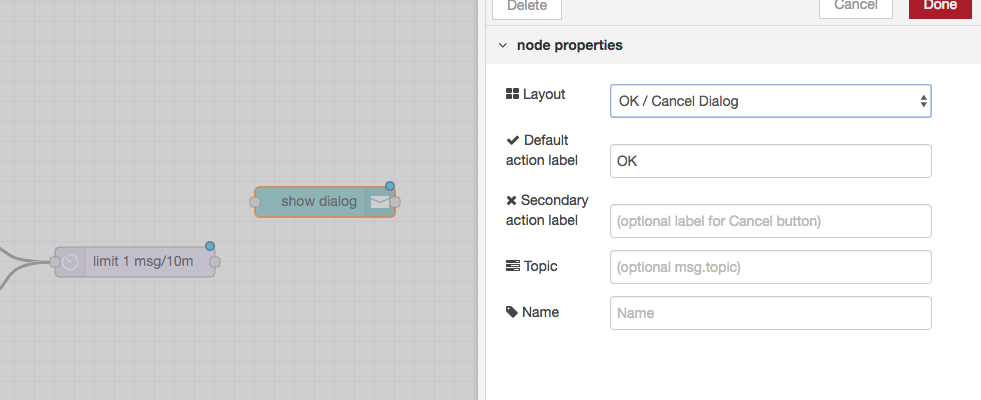
The last thing we need to add are the nodes that tell us when we have a problem, we’ll add the notification node first, this will pop up a message on our dashboard with our notification message. Bring it onto your workspace to the upper right of the delay node, I like the “OK / Cancel Dialog” because the message won’t go away without human interaction, but if you are already sending out an email, that may not be necessary. You can choose the notification style that suits you.
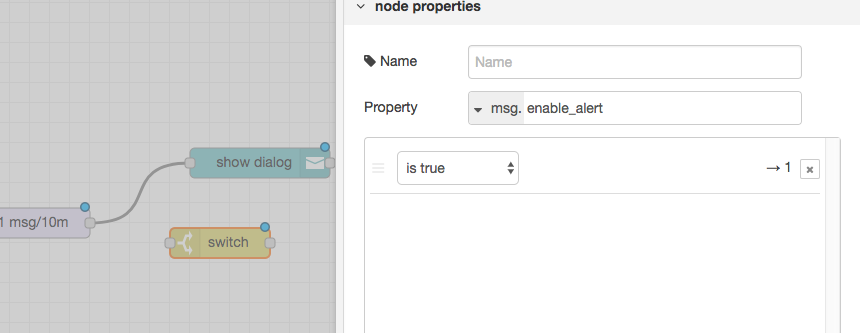
Next we’ll grab a switch node, in this flow I’m sending every out of bounds reading to the UI, but I want to limit my emails based on the switch we added to the UI, so we’ll check that here. Set the Property of the switch to msg.enable_alert, and select “is true” for the rule.
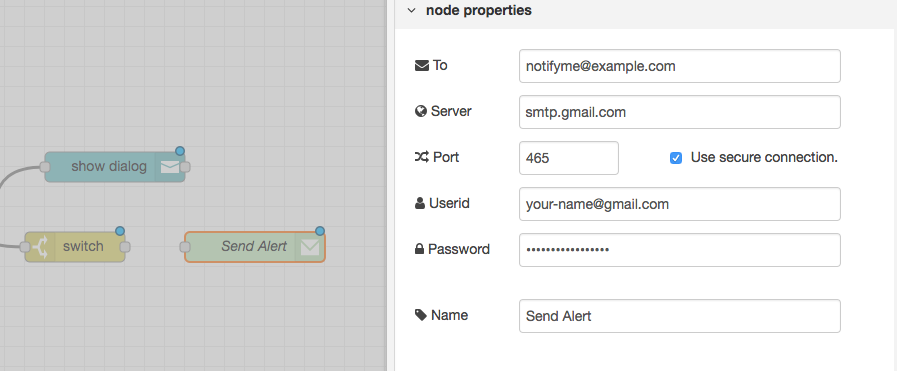
Finally we need the Email node. I’ve set up mine to use my gmail work account, it’s pretty straight forward, and uses SMTP so will work with most mail servers as long as you know the settings. For Gmail the server should be ‘smtp.gmail.com’, and the port should be 465. Your username is your email address (this varies on different mail servers).
Once you have all this set up you can wire these last few nodes together and… drumroll please… deploy your finished solution! If all goes well you can adjust your threshold, turn on the notifications with the switch, and trigger a temperature alert.
As I mentioned earlier, this is the most complicated flow we’ve done so far. Depending on your needs it could certainly be simplified, if you don’t need the UI elements to set thresholds you could cut out step 1 & 2 and alter the values of the switch nodes in step 3 directly, but who doesn’t love a nice UI. The practical upshot of completing a tutorial with this complexity is that you have now set up over a dozen different node types, which should give you a much deeper understanding of Node-RED. Make sure to play with your flow to see how you can change it. If you break it, you can import it directly from below!
The Flow
[{"id":"4b8dcadd.1afa44","type":"subflow","name":"Settings","info":"Persist settings in a flat file.\n\nIf msg.clearAll is set to true, the settings are truncated.\n\nSending a topic of \"get\" will return the property you've named in the payload.\n\nAny other topic will be treated as a property and the payload will be saved to the settings file.","in":[{"x":60,"y":280,"wires":[{"id":"fd773621.54f638"}]}],"out":[{"x":400,"y":220,"wires":[{"id":"fd773621.54f638","port":0}]}]},{"id":"da4b9b0.096e468","type":"file in","z":"4b8dcadd.1afa44","name":"Load File","filename":"persist/settings.json","format":"utf8","chunk":false,"sendError":true,"x":260,"y":100,"wires":[["3dbc537d.eabbac"]]},{"id":"3dbc537d.eabbac","type":"switch","z":"4b8dcadd.1afa44","name":"","property":"error","propertyType":"msg","rules":[{"t":"nnull"},{"t":"else"}],"checkall":"true","repair":false,"outputs":2,"x":470,"y":120,"wires":[["c6fa089c.c66448"],["a70ce91e.334e88"]]},{"id":"9b5416a4.2e6ba8","type":"file","z":"4b8dcadd.1afa44","name":"Create File","filename":"persist/settings.json","appendNewline":false,"createDir":true,"overwriteFile":"false","x":930,"y":80,"wires":[]},{"id":"e8d03084.ecada","type":"json","z":"4b8dcadd.1afa44","name":"JSON Encode","property":"payload","action":"str","pretty":false,"x":480,"y":320,"wires":[["b8af204c.779fd"]]},{"id":"9eecb642.afe988","type":"inject","z":"4b8dcadd.1afa44","name":"","topic":"","payload":"","payloadType":"str","repeat":"","crontab":"","once":true,"onceDelay":0.1,"x":110,"y":100,"wires":[["da4b9b0.096e468"]]},{"id":"f144822b.17fe7","type":"change","z":"4b8dcadd.1afa44","name":"","rules":[{"t":"set","p":"persistant_settings","pt":"flow","to":"payload","tot":"msg"}],"action":"","property":"","from":"","to":"","reg":false,"x":920,"y":180,"wires":[[]]},{"id":"a70ce91e.334e88","type":"json","z":"4b8dcadd.1afa44","name":"JSON Decode","property":"payload","action":"","pretty":false,"x":680,"y":180,"wires":[["f144822b.17fe7"]]},{"id":"fd773621.54f638","type":"function","z":"4b8dcadd.1afa44","name":"","func":"if(msg.clearAll === true){\n flow.set('persistant_settings', {});\n return [msg, {payload: {}}];\n}\n\nvar settings = flow.get('persistant_settings') || {};\n\nif(msg.topic == 'get'){\n msg.topic = msg.payload;\n msg.payload = typeof settings[msg.payload] == 'undefined' ? null : settings[msg.payload];\n return [msg, null]\n}else{\n settings[msg.topic] = msg.payload;\n flow.set('persistant_settings', settings);\n return [msg, {payload: settings}];\n}","outputs":2,"noerr":0,"x":210,"y":280,"wires":[[],["e8d03084.ecada"]]},{"id":"b8af204c.779fd","type":"file","z":"4b8dcadd.1afa44","name":"Update File","filename":"persist/settings.json","appendNewline":false,"createDir":true,"overwriteFile":"true","x":730,"y":320,"wires":[]},{"id":"c6fa089c.c66448","type":"change","z":"4b8dcadd.1afa44","name":"Initialize Settings Object","rules":[{"t":"set","p":"payload","pt":"msg","to":"{}","tot":"str"}],"action":"","property":"","from":"","to":"","reg":false,"x":690,"y":80,"wires":[["9b5416a4.2e6ba8","a70ce91e.334e88"]]},{"id":"3aa1774f.0b8f78","type":"ncd-wireless-node","z":"13754c0b.dca3a4","name":"","connection":"","config_comm":"","addr":"","sensor_type":"4","auto_config":false,"node_id":0,"delay":300,"destination":"0000FFFF","power":4,"retries":10,"pan_id":"7FFF","change_enabled":"","change_pr":"0","change_interval":"0","cm_calibration":"60.6","bp_altitude":"0","bp_pressure":"0","bp_temp_prec":"0","bp_press_prec":"0","amgt_accel":"0","amgt_mag":"0","amgt_gyro":"0","x":130,"y":800,"wires":[["c36b8709.42b588"]]},{"id":"c36b8709.42b588","type":"change","z":"13754c0b.dca3a4","name":"CtoF","rules":[{"t":"set","p":"payload","pt":"msg","to":"msg.payload.temperature * 1.8 + 32","tot":"jsonata"}],"action":"","property":"","from":"","to":"","reg":false,"x":310,"y":800,"wires":[["f4301179.b3749","4743b003.50949"]]},{"id":"1e3cb8da.d978b7","type":"template","z":"13754c0b.dca3a4","name":"High Alert","field":"payload","fieldType":"msg","format":"handlebars","syntax":"mustache","template":"The temperature is above acceptible limits!! ({{payload}})","output":"str","x":880,"y":740,"wires":[["6e19d3a3.7fd6ec"]]},{"id":"f4301179.b3749","type":"ui_gauge","z":"13754c0b.dca3a4","name":"","group":"d79de0e4.bda58","order":4,"width":0,"height":0,"gtype":"gage","title":"Temperature","label":"Fahrenheit","format":"{{value | number: 2}}","min":"30","max":"100","colors":["#00b500","#e6e600","#ca3838"],"seg1":"","seg2":"","x":470,"y":700,"wires":[]},{"id":"6e19d3a3.7fd6ec","type":"delay","z":"13754c0b.dca3a4","name":"","pauseType":"rate","timeout":"5","timeoutUnits":"seconds","rate":"1","nbRateUnits":"10","rateUnits":"minute","randomFirst":"1","randomLast":"5","randomUnits":"seconds","drop":true,"x":1100,"y":780,"wires":[["dcd8c2a7.5e1ee","e6fad855.8bca48"]]},{"id":"7f1c793c.f64db8","type":"switch","z":"13754c0b.dca3a4","name":"","property":"payload","propertyType":"msg","rules":[{"t":"gt","v":"max","vt":"msg"},{"t":"lt","v":"min","vt":"msg"}],"checkall":"false","repair":false,"outputs":2,"x":690,"y":800,"wires":[["1e3cb8da.d978b7"],["8be01994.9e31a8"]]},{"id":"c31ca6c2.56b778","type":"ui_switch","z":"13754c0b.dca3a4","name":"","label":"Enable Email Alert","group":"d79de0e4.bda58","order":3,"width":0,"height":0,"passthru":true,"decouple":"false","topic":"enable_alert","style":"","onvalue":"true","onvalueType":"bool","onicon":"","oncolor":"","offvalue":"false","offvalueType":"bool","officon":"","offcolor":"","x":390,"y":460,"wires":[["1316e502.c5009b"]]},{"id":"e6fad855.8bca48","type":"switch","z":"13754c0b.dca3a4","name":"","property":"enable_alert","propertyType":"msg","rules":[{"t":"true"}],"checkall":"true","repair":false,"outputs":1,"x":1270,"y":840,"wires":[["72a8579b.24ae08"]]},{"id":"c95f6f35.2f81e","type":"inject","z":"13754c0b.dca3a4","name":"","topic":"get","payload":"max_temp,min_temp,enable_alert","payloadType":"str","repeat":"","crontab":"","once":true,"onceDelay":"1","x":130,"y":140,"wires":[["6b4de751.cd6098"]]},{"id":"6b4de751.cd6098","type":"split","z":"13754c0b.dca3a4","name":"","splt":",","spltType":"str","arraySplt":1,"arraySpltType":"len","stream":false,"addname":"","x":270,"y":140,"wires":[["a4bed1af.3e478"]]},{"id":"a4bed1af.3e478","type":"subflow:4b8dcadd.1afa44","z":"13754c0b.dca3a4","name":"","x":420,"y":140,"wires":[["d4767a8b.514698"]]},{"id":"7f4cbec.1df774","type":"link out","z":"13754c0b.dca3a4","name":"Init Settings","links":["1e641942.56c377","3bbe6408.dbd6cc"],"x":1115,"y":140,"wires":[]},{"id":"77445e71.7c45e","type":"ui_slider","z":"13754c0b.dca3a4","name":"Minimum","label":"Minimum {{value}}°","group":"d79de0e4.bda58","order":2,"width":0,"height":0,"passthru":true,"topic":"min_temp","min":"-328","max":"500","step":1,"x":360,"y":400,"wires":[["1316e502.c5009b"]]},{"id":"2b70cf9a.8400f","type":"ui_slider","z":"13754c0b.dca3a4","name":"Maximum","label":"Maximum {{value}}°","group":"d79de0e4.bda58","order":1,"width":0,"height":0,"passthru":true,"topic":"max_temp","min":"-328","max":"500","step":1,"x":360,"y":340,"wires":[["1316e502.c5009b"]]},{"id":"1e641942.56c377","type":"link in","z":"13754c0b.dca3a4","name":"Set Values","links":["7f4cbec.1df774"],"x":75,"y":380,"wires":[["f606ddb8.01b35","c2204153.a4aa8"]]},{"id":"1316e502.c5009b","type":"subflow:4b8dcadd.1afa44","z":"13754c0b.dca3a4","name":"","x":600,"y":400,"wires":[["58e6d761.d91f98"]]},{"id":"f606ddb8.01b35","type":"join","z":"13754c0b.dca3a4","name":"","mode":"custom","build":"object","property":"payload","propertyType":"msg","key":"topic","joiner":"\\n","joinerType":"str","accumulate":false,"timeout":"","count":"3","reduceRight":false,"reduceExp":"","reduceInit":"","reduceInitType":"","reduceFixup":"","x":170,"y":580,"wires":[["616174c.6b65b8c"]]},{"id":"616174c.6b65b8c","type":"change","z":"13754c0b.dca3a4","name":"Localize Settings","rules":[{"t":"set","p":"app_settings","pt":"flow","to":"payload","tot":"msg"}],"action":"","property":"","from":"","to":"","reg":false,"x":350,"y":580,"wires":[[]]},{"id":"d4767a8b.514698","type":"switch","z":"13754c0b.dca3a4","name":"","property":"payload","propertyType":"msg","rules":[{"t":"nnull"},{"t":"else"}],"checkall":"true","repair":false,"outputs":2,"x":570,"y":140,"wires":[["7f4cbec.1df774"],["abb53ea6.8f9a8"]]},{"id":"abb53ea6.8f9a8","type":"switch","z":"13754c0b.dca3a4","name":"","property":"topic","propertyType":"msg","rules":[{"t":"eq","v":"max_temp","vt":"str"},{"t":"eq","v":"min_temp","vt":"str"},{"t":"eq","v":"enable_alert","vt":"str"}],"checkall":"true","repair":false,"outputs":3,"x":750,"y":220,"wires":[["8996f11b.63003"],["95afbc55.c988e"],["15ff5bc.e89f6a4"]]},{"id":"8996f11b.63003","type":"change","z":"13754c0b.dca3a4","name":"Max Default","rules":[{"t":"set","p":"payload","pt":"msg","to":"90","tot":"str"}],"action":"","property":"","from":"","to":"","reg":false,"x":930,"y":180,"wires":[["7f4cbec.1df774"]]},{"id":"95afbc55.c988e","type":"change","z":"13754c0b.dca3a4","name":"Min Default","rules":[{"t":"set","p":"payload","pt":"msg","to":"60","tot":"str"}],"action":"","property":"","from":"","to":"","reg":false,"x":930,"y":220,"wires":[["7f4cbec.1df774"]]},{"id":"15ff5bc.e89f6a4","type":"change","z":"13754c0b.dca3a4","name":"Enabled Default","rules":[{"t":"set","p":"payload","pt":"msg","to":"true","tot":"bool"}],"action":"","property":"","from":"","to":"","reg":false,"x":940,"y":260,"wires":[["7f4cbec.1df774"]]},{"id":"4743b003.50949","type":"change","z":"13754c0b.dca3a4","name":"Get Local Settings","rules":[{"t":"set","p":"flow_settings","pt":"msg","to":"app_settings","tot":"flow"},{"t":"set","p":"enable_alert","pt":"msg","to":"flow_settings.enable_alert","tot":"msg"},{"t":"set","p":"min","pt":"msg","to":"flow_settings.min_temp","tot":"msg"},{"t":"set","p":"max","pt":"msg","to":"flow_settings.max_temp","tot":"msg"},{"t":"set","p":"topic","pt":"msg","to":"Temperature Alert!!","tot":"str"}],"action":"","property":"","from":"","to":"","reg":false,"x":510,"y":800,"wires":[["7f1c793c.f64db8"]]},{"id":"8be01994.9e31a8","type":"template","z":"13754c0b.dca3a4","name":"Low Alert","field":"payload","fieldType":"msg","format":"handlebars","syntax":"mustache","template":"The temperature is below acceptible limits!! ({{payload}})","output":"str","x":880,"y":840,"wires":[["6e19d3a3.7fd6ec"]]},{"id":"58e6d761.d91f98","type":"change","z":"13754c0b.dca3a4","name":"","rules":[{"t":"set","p":"flow_settings","pt":"msg","to":"app_settings","tot":"flow"}],"action":"","property":"","from":"","to":"","reg":false,"x":800,"y":400,"wires":[["950467f7.68efe8"]]},{"id":"dcd8c2a7.5e1ee","type":"ui_toast","z":"13754c0b.dca3a4","position":"dialog","displayTime":"3","highlight":"red","outputs":1,"ok":"OK","cancel":"","topic":"","name":"","x":1290,"y":720,"wires":[[]]},{"id":"c2204153.a4aa8","type":"switch","z":"13754c0b.dca3a4","name":"","property":"topic","propertyType":"msg","rules":[{"t":"eq","v":"max_temp","vt":"str"},{"t":"eq","v":"min_temp","vt":"str"},{"t":"eq","v":"enable_alert","vt":"str"}],"checkall":"true","repair":false,"outputs":3,"x":190,"y":380,"wires":[["2b70cf9a.8400f"],["77445e71.7c45e"],["c31ca6c2.56b778"]]},{"id":"950467f7.68efe8","type":"switch","z":"13754c0b.dca3a4","name":"","property":"topic","propertyType":"msg","rules":[{"t":"eq","v":"max_temp","vt":"str"},{"t":"eq","v":"min_temp","vt":"str"},{"t":"eq","v":"enable_alert","vt":"str"}],"checkall":"true","repair":false,"outputs":3,"x":1010,"y":400,"wires":[["f8563bb.64318c8"],["740ec877.965548"],["bdb15ddf.ffa23"]]},{"id":"bdb15ddf.ffa23","type":"change","z":"13754c0b.dca3a4","name":"","rules":[{"t":"set","p":"flow_settings.enable_alert","pt":"msg","to":"payload","tot":"msg"}],"action":"","property":"","from":"","to":"","reg":false,"x":1300,"y":460,"wires":[["ef1a2193.4766d"]]},{"id":"740ec877.965548","type":"change","z":"13754c0b.dca3a4","name":"","rules":[{"t":"set","p":"flow_settings.min_temp","pt":"msg","to":"payload","tot":"msg"}],"action":"","property":"","from":"","to":"","reg":false,"x":1290,"y":400,"wires":[["ef1a2193.4766d"]]},{"id":"f8563bb.64318c8","type":"change","z":"13754c0b.dca3a4","name":"","rules":[{"t":"set","p":"flow_settings.max_temp","pt":"msg","to":"payload","tot":"msg"}],"action":"","property":"","from":"","to":"","reg":false,"x":1300,"y":340,"wires":[["ef1a2193.4766d"]]},{"id":"ef1a2193.4766d","type":"change","z":"13754c0b.dca3a4","name":"","rules":[{"t":"set","p":"app_settings","pt":"flow","to":"flow_settings","tot":"msg"}],"action":"","property":"","from":"","to":"","reg":false,"x":1620,"y":400,"wires":[[]]},{"id":"72a8579b.24ae08","type":"e-mail","z":"13754c0b.dca3a4","server":"smtp.gmail.com","port":"465","secure":true,"name":"","dname":"","x":1500,"y":840,"wires":[]},{"id":"d79de0e4.bda58","type":"ui_group","z":"","name":"Default","tab":"104ce52d.cc60bb","disp":false,"width":"10","collapse":false},{"id":"104ce52d.cc60bb","type":"ui_tab","z":"","name":"Current","icon":"dashboard"}]